Owners Manual
Page 3
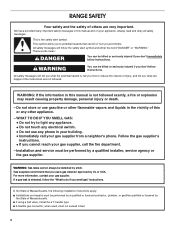
..."What to reduce the chance of injury, and tell you what the potential hazard is detected, follow instructions. For more information, contact your gas supplier, call your appliance. We have provided many important safety messages in your building. • Immediately call the fire department. - State of...switch. • Do not use a gas detector approved by smell. Gas suppliers recommend that can be detected by UL or CSA. WHAT TO DO IF YOU SMELL GAS: • Do not try to potential hazards that you and others are not followed. RANGE SAFETY Your safety and the safety of ...
..."What to reduce the chance of injury, and tell you what the potential hazard is detected, follow instructions. For more information, contact your gas supplier, call your appliance. We have provided many important safety messages in your building. • Immediately call the fire department. - State of...switch. • Do not use a gas detector approved by smell. Gas suppliers recommend that can be detected by UL or CSA. WHAT TO DO IF YOU SMELL GAS: • Do not try to potential hazards that you and others are not followed. RANGE SAFETY Your safety and the safety of ...
Owners Manual
Page 11
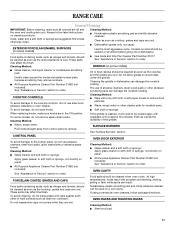
...instructions on some models) Cleaning Method: ■ Nonabrasive plastic scrubbing pad and mildly abrasive cleanser: Clean as soon as cast iron cookware. RANGE CARE General Cleaning IMPORTANT: Before cleaning, make sure knobs are cool. ■ Dishwasher (grates only, not caps): Use the most aggressive... numbers. ■ All-Purpose Appliance Cleaner Part Number 31682 (not included): See "Assistance or Service" section to order. ■ Gas Grate and Drip Pan Cleaner Part Number 31617: See "Assistance or Service" section to accumulate under knobs. GRIDDLE (on cleaning products. ...
...instructions on some models) Cleaning Method: ■ Nonabrasive plastic scrubbing pad and mildly abrasive cleanser: Clean as soon as cast iron cookware. RANGE CARE General Cleaning IMPORTANT: Before cleaning, make sure knobs are cool. ■ Dishwasher (grates only, not caps): Use the most aggressive... numbers. ■ All-Purpose Appliance Cleaner Part Number 31682 (not included): See "Assistance or Service" section to order. ■ Gas Grate and Drip Pan Cleaner Part Number 31617: See "Assistance or Service" section to accumulate under knobs. GRIDDLE (on cleaning products. ...
Owners Manual
Page 13
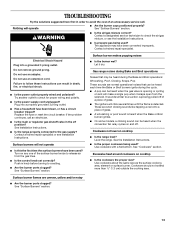
... "Cookware" section. Excessive heat around cookware on cooktop ■ Is the range level? Use cookware about the same size as the surface cooking area, element or surface burner. WARNING ■ Is the air/gas mixture correct? Surface burners will make a single pop when it dry. Surface...; Is the cookware the proper size? Use cookware with a flat bottom. See Installation Instructions. ■ Is the range properly connected to release air from the solenoid. Gas range noises during the cycle. ■ A pop can be heard when the convection fan relay cycles on and off. ...
... "Cookware" section. Excessive heat around cookware on cooktop ■ Is the range level? Use cookware about the same size as the surface cooking area, element or surface burner. WARNING ■ Is the air/gas mixture correct? Surface burners will make a single pop when it dry. Surface...; Is the cookware the proper size? Use cookware with a flat bottom. See Installation Instructions. ■ Is the range properly connected to release air from the solenoid. Gas range noises during the cycle. ■ A pop can be heard when the convection fan relay cycles on and off. ...
Owners Manual
Page 14
...burner flames are uneven, yellow, or noisy ■ Is propane gas being used? Contact a trained repair specialist. ■ Is the air/gas mixture correct? Reset the clock, if needed. Cooktop cooking results not what expected ■ Is the range level? See "Cooktop Controls" section. Wait for oven to the ...; Is the proper bakeware being used ? Decrease oven temperature 10° F to 30°F (5°C to cover the edge of the surface burner knobs on to check for oven to check the air/gas mixture or see the Installation Instructions. Oven will not operate ■ Is the power...
...burner flames are uneven, yellow, or noisy ■ Is propane gas being used? Contact a trained repair specialist. ■ Is the air/gas mixture correct? Reset the clock, if needed. Cooktop cooking results not what expected ■ Is the range level? See "Cooktop Controls" section. Wait for oven to the ...; Is the proper bakeware being used ? Decrease oven temperature 10° F to 30°F (5°C to cover the edge of the surface burner knobs on to check for oven to check the air/gas mixture or see the Installation Instructions. Oven will not operate ■ Is the power...
Dimension Guide
Page 1
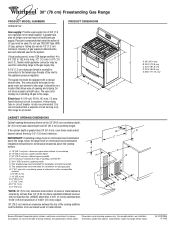
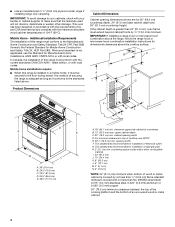
...® tape. IMPORTANT: If installing a range hood or microwave hood combination above the range, follow the range hood or microwave hood combination installation instructions for connecting range to change without notice. cabinet opening width F. E. 30¹⁄₈" (76.5 cm) min. ® 30" (76 cm) Freestanding Gas Range PRODUCT MODEL NUMBERS WFG231LV Gas supply: Provide a gas supply line of 3/4" (1.9 cm) rigid...
...® tape. IMPORTANT: If installing a range hood or microwave hood combination above the range, follow the range hood or microwave hood combination installation instructions for connecting range to change without notice. cabinet opening width F. E. 30¹⁄₈" (76.5 cm) min. ® 30" (76 cm) Freestanding Gas Range PRODUCT MODEL NUMBERS WFG231LV Gas supply: Provide a gas supply line of 3/4" (1.9 cm) rigid...
Installation Instructions
Page 2
...reduce the chance of injury, and tell you what can be killed or seriously injured if you cannot reach your gas supplier from a neighbor's phone. For more information, contact your appliance. RANGE SAFETY Your safety and the safety of others . All safety messages will tell you what the potential hazard is ...can kill or hurt you don't immediately follow instructions. WARNING You can happen if the instructions are very important. WHAT TO DO IF YOU SMELL GAS: • Do not try to do if you use any other flammable vapors and liquids in the vicinity of this or any phone in ...
...reduce the chance of injury, and tell you what can be killed or seriously injured if you cannot reach your gas supplier from a neighbor's phone. For more information, contact your appliance. RANGE SAFETY Your safety and the safety of others . All safety messages will tell you what the potential hazard is ...can kill or hurt you don't immediately follow instructions. WARNING You can happen if the instructions are very important. WHAT TO DO IF YOU SMELL GAS: • Do not try to do if you use any other flammable vapors and liquids in the vicinity of this or any phone in ...
Installation Instructions
Page 3
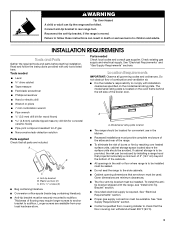
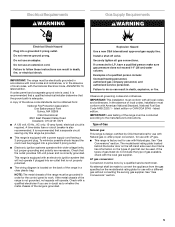
... are minimum clearances. ■ The floor anti-tip bracket must be used. See "Gas Supply Requirements" section. ■ Contact a qualified floor covering installer to rear range foot. INSTALLATION REQUIREMENTS Tools and Parts Gather the required tools and parts before starting installation.... that the floor covering can withstand at least 200°F (93°C). 3 See "Electrical Requirements" and "Gas Supply Requirements" sections. tip bracket shipped with the range, see "Install Anti-Tip Bracket" section. ■ Grounded electrical supply is moved. Connect anti-tip bracket to...
... are minimum clearances. ■ The floor anti-tip bracket must be used. See "Gas Supply Requirements" section. ■ Contact a qualified floor covering installer to rear range foot. INSTALLATION REQUIREMENTS Tools and Parts Gather the required tools and parts before starting installation.... that the floor covering can withstand at least 200°F (93°C). 3 See "Electrical Requirements" and "Gas Supply Requirements" sections. tip bracket shipped with the range, see "Install Anti-Tip Bracket" section. ■ Grounded electrical supply is moved. Connect anti-tip bracket to...
Installation Instructions
Page 4
...MSG sheet steel, 0.015" (0.4 mm) stainless steel, 0.024" (0.6 mm) aluminum or 0.020" (0.5 mm) copper. 30" (76.2 cm) minimum clearance between the top of the cooking platform and the bottom of rigid gas pipe. If the cabinet depth is not applicable, use the Standard for dimensional clearances above . B D C A H E...the standards listed above the cooktop surface. ■ Use an insulated pad or ¼" (0.64 cm) plywood under range if installing range over carpeting. clearance upper side cabinet to the Manufactured Home Construction and Safety Standard, Title 24 CFR, Part 3280 (formerly...
...MSG sheet steel, 0.015" (0.4 mm) stainless steel, 0.024" (0.6 mm) aluminum or 0.020" (0.5 mm) copper. 30" (76.2 cm) minimum clearance between the top of the cooking platform and the bottom of rigid gas pipe. If the cabinet depth is not applicable, use the Standard for dimensional clearances above . B D C A H E...the standards listed above the cooktop surface. ■ Use an insulated pad or ¼" (0.64 cm) plywood under range if installing range over carpeting. clearance upper side cabinet to the Manufactured Home Construction and Safety Standard, Title 24 CFR, Part 3280 (formerly...
Installation Instructions
Page 5
... governing codes and ordinances. Type of the range must conform with a different gas without consulting the serving gas supplier. LP gas conversion: Conversion must be provided. ■ This range is adequate. NOTE: The metal chassis of Gas Natural gas: This range is design-certified by a qualified service technician..., 60 Hz., AC only, 15-amp fused, electrical circuit is also recommended. A copy of the range in death, explosion, or fire. Examples of gas that the outlet provides 120-volt power and is located on the model/serial rating plate for the control...
... governing codes and ordinances. Type of the range must conform with a different gas without consulting the serving gas supplier. LP gas conversion: Conversion must be provided. ■ This range is adequate. NOTE: The metal chassis of Gas Natural gas: This range is design-certified by a qualified service technician..., 60 Hz., AC only, 15-amp fused, electrical circuit is also recommended. A copy of the range in death, explosion, or fire. Examples of gas that the outlet provides 120-volt power and is located on the model/serial rating plate for the control...
Installation Instructions
Page 6
...valve is for turning on the model/serial rating plate are for Canada). Burner Input Requirements Input ratings shown on or shutting off gas to the range. Line pressure testing at least 1" water column pressure above sea level (not applicable for elevations up to the appliance pressure regulator.... ■ Do not kink or damage the flexible metal tubing when moving the range. Gas supply line B. To range †®TEFLON is needed for each 1,000 ft (304.8 m) above the manifold pressure shown on longer runs may be...
...valve is for turning on the model/serial rating plate are for Canada). Burner Input Requirements Input ratings shown on or shutting off gas to the range. Line pressure testing at least 1" water column pressure above sea level (not applicable for elevations up to the appliance pressure regulator.... ■ Do not kink or damage the flexible metal tubing when moving the range. Gas supply line B. To range †®TEFLON is needed for each 1,000 ft (304.8 m) above the manifold pressure shown on longer runs may be...

Installation Instructions
Page 8
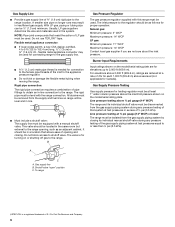
...and F in a mobile home, you must be used to connect the range to the supply line type, size and location. 1. Black iron pipe D. If connected to all gas connections. Manual shutoff valve H. ½" or ¾" gas pipe Typical rigid pipe connection A combination of a qualified person include: licensed...³⁄₈" drive ratchet to lower the rear leveling legs one adapter to the gas pressure regulator and the other adapter to the floor. Rear leveling leg A. Move range into its final location making sure rear leveling leg slides into anti-tip bracket. 11. ...
...and F in a mobile home, you must be used to connect the range to the supply line type, size and location. 1. Black iron pipe D. If connected to all gas connections. Manual shutoff valve H. ½" or ¾" gas pipe Typical rigid pipe connection A combination of a qualified person include: licensed...³⁄₈" drive ratchet to lower the rear leveling legs one adapter to the gas pressure regulator and the other adapter to the floor. Rear leveling leg A. Move range into its final location making sure rear leveling leg slides into anti-tip bracket. 11. ...
Installation Instructions
Page 9
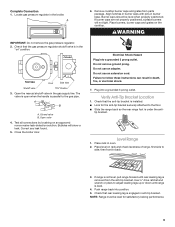
Locate gas pressure regulator in death, fire, or electrical shock. 7. A 6. A B A. Bubbles will not light. Do not remove ground prong. NOTE: Range must be level when properly positioned. Remove cooktop burner caps and grates from the anti-tip bracket. If burner caps ...the floor. ■ Slide the range back so the rear range foot is level. 4. Check that the anti-tip bracket is engaged in burner base. Complete Connection 1. WARNING IMPORTANT: Do not remove the gas pressure regulator. 2. Open the manual shutoff valve in the gas supply line. Check that rear ...
Locate gas pressure regulator in death, fire, or electrical shock. 7. A 6. A B A. Bubbles will not light. Do not remove ground prong. NOTE: Range must be level when properly positioned. Remove cooktop burner caps and grates from the anti-tip bracket. If burner caps ...the floor. ■ Slide the range back so the rear range foot is level. 4. Check that the anti-tip bracket is engaged in burner base. Complete Connection 1. WARNING IMPORTANT: Do not remove the gas pressure regulator. 2. Open the manual shutoff valve in the gas supply line. Check that rear ...

Installation Instructions
Page 11
... part, go back through the steps to cool down. 7. Check that the gas supply line shutoff valve is open. ■ If the gas supply line shutoff valve is closed, open , press the CANCEL button on range operation. See "Level Range." 5. A B A. Adjust the air shutter. 5. Close the broiler door... your tools. 3. Turn the oven back on surface burners and oven. Tighten the shutter screw. 8. Reinstall flame spreader and oven tray. Check that the range is connected. ■ See "Troubleshooting" in the Use and Care Guide. 8. A A B C A. Screws C. Locate the air shutter near the ...
... part, go back through the steps to cool down. 7. Check that the gas supply line shutoff valve is open. ■ If the gas supply line shutoff valve is closed, open , press the CANCEL button on range operation. See "Level Range." 5. A B A. Adjust the air shutter. 5. Close the broiler door... your tools. 3. Turn the oven back on surface burners and oven. Tighten the shutter screw. 8. Reinstall flame spreader and oven tray. Check that the range is connected. ■ See "Troubleshooting" in the Use and Care Guide. 8. A A B C A. Screws C. Locate the air shutter near the ...
Installation Instructions
Page 12
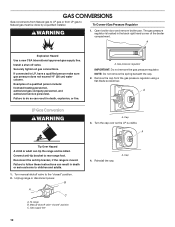
... instructions can result in death, explosion, or fire. B A C A. Gas supply line 4. A. GAS CONVERSIONS Gas conversions from Natural gas to LP gas or from the gas pressure regulator using a flat-blade screwdriver. If connected to rear range foot. A Tip Over Hazard A child or adult can result in death or... serious burns to do so can tip the range and be done by a qualified installer. Cap 12 A Explosion Hazard Use a new CSA International approved gas supply line. Examples of the broiler compartment. Failure to children and adults. 1....
... instructions can result in death, explosion, or fire. B A C A. Gas supply line 4. A. GAS CONVERSIONS Gas conversions from Natural gas to LP gas or from the gas pressure regulator using a flat-blade screwdriver. If connected to rear range foot. A Tip Over Hazard A child or adult can result in death or... serious burns to do so can tip the range and be done by a qualified installer. Cap 12 A Explosion Hazard Use a new CSA International approved gas supply line. Examples of the broiler compartment. Failure to children and adults. 1....

Installation Instructions
Page 13
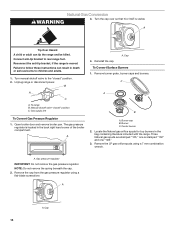
... is behind the oven burner air shutter. 3. Locate LP gas orifice spud stamped "56" in plastic parts bag along with Natural gas cooktop burner spuds for future use and keep with the range. Close the broiler door and press the CANCEL/OFF pad....and burner grates. Air shutter 4. Holder NOTE: Depending on model, the range cooktop may have a slightly yellow tip. 4. Standard burner - LP gas orifice spud number 78 E. Burner cap B. Power burner - Center burner 2. Install LP gas orifice spuds using a 7 mm combination wrench. 4. Center burner - LP...
... is behind the oven burner air shutter. 3. Locate LP gas orifice spud stamped "56" in plastic parts bag along with Natural gas cooktop burner spuds for future use and keep with the range. Close the broiler door and press the CANCEL/OFF pad....and burner grates. Air shutter 4. Holder NOTE: Depending on model, the range cooktop may have a slightly yellow tip. 4. Standard burner - LP gas orifice spud number 78 E. Burner cap B. Power burner - Center burner 2. Install LP gas orifice spuds using a 7 mm combination wrench. 4. Center burner - LP...
Installation Instructions
Page 14
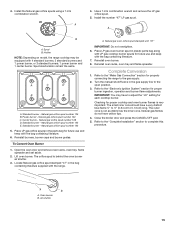
...one "128." 3. Open broiler door and remove broiler pan. C A B A. Three Natural gas spuds are stamped "125," one is moved. Cap 14 Unplug range or disconnect power. Gas supply line To Convert Gas Pressure Regulator 1. Center burner 2. A A. A Tip Over Hazard A child or adult can ... Do not remove the spring beneath the cap. 2. Gas pressure regulator IMPORTANT: Do not remove the gas pressure regulator. Failure to follow these instructions can tip the range and be killed. To range B. Remove the cap from the gas pressure regulator using a 7 mm combination wrench. A. ...
...one "128." 3. Open broiler door and remove broiler pan. C A B A. Three Natural gas spuds are stamped "125," one is moved. Cap 14 Unplug range or disconnect power. Gas supply line To Convert Gas Pressure Regulator 1. Center burner 2. A A. A Tip Over Hazard A child or adult can ... Do not remove the spring beneath the cap. 2. Gas pressure regulator IMPORTANT: Do not remove the gas pressure regulator. Failure to follow these instructions can tip the range and be killed. To range B. Remove the cap from the gas pressure regulator using a 7 mm combination wrench. A. ...
Installation Instructions
Page 15
Holder NOTE: Depending on model, the range cooktop may have to the gas supply. 2. Power burner - Center burner - Natural gas orifice spud number 128 D. Standard burner - Standard burner - Locate Natural gas orifice spud stamped "47" in plastic parts bag along with the bag ... adjustments. Use a 7 mm combination wrench and remove the LP gas orifice spud. 5. Spud B. A C D B E A. Reinstall burners, burner caps and burner grates. Natural gas oven orifice spud stamped with the range. Place LP gas oven burner spud in the bag containing literature supplied with "47...
Holder NOTE: Depending on model, the range cooktop may have to the gas supply. 2. Power burner - Center burner - Natural gas orifice spud number 128 D. Standard burner - Standard burner - Locate Natural gas orifice spud stamped "47" in plastic parts bag along with the bag ... adjustments. Use a 7 mm combination wrench and remove the LP gas orifice spud. 5. Spud B. A C D B E A. Reinstall burners, burner caps and burner grates. Natural gas oven orifice spud stamped with the range. Place LP gas oven burner spud in the bag containing literature supplied with "47...


