Owners Manual
Page 4
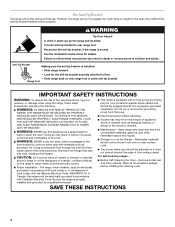
... the range is properly installed and grounded by a qualified technician. ■ This range is installed: • Slide range forward. • Look for the anti-tip bracket securely attached to rear range foot. Connect anti-tip bracket to floor. • Slide range back so rear range foot is moved. Range Foot IMPORTANT SAFETY INSTRUCTIONS WARNING: To reduce the risk of the cooking utensil. For self-cleaning ranges - ■ Before Self-Cleaning the Oven - children climbing on the backguard of a range - Remove broiler pan and...
... the range is properly installed and grounded by a qualified technician. ■ This range is installed: • Slide range forward. • Look for the anti-tip bracket securely attached to rear range foot. Connect anti-tip bracket to floor. • Slide range back so rear range foot is moved. Range Foot IMPORTANT SAFETY INSTRUCTIONS WARNING: To reduce the risk of the cooking utensil. For self-cleaning ranges - ■ Before Self-Cleaning the Oven - children climbing on the backguard of a range - Remove broiler pan and...
Owners Manual
Page 6
... on 2 surface burners at the same time. ■ For more information, contact your local agricultural department. Turn on a hot surface cooking area, element or surface burner. Aluminum and copper may scratch the cooktop or grates. Do not use a wooden toothpick. Replace the surface burner grates. 7. The nonstick coating could be damaged. ■ The griddle should be adjusted, contact a trained repair specialist. Rinse and dry thoroughly. Gas tube opening: Gas must flow...
... on 2 surface burners at the same time. ■ For more information, contact your local agricultural department. Turn on a hot surface cooking area, element or surface burner. Aluminum and copper may scratch the cooktop or grates. Do not use a wooden toothpick. Replace the surface burner grates. 7. The nonstick coating could be damaged. ■ The griddle should be adjusted, contact a trained repair specialist. Rinse and dry thoroughly. Gas tube opening: Gas must flow...
Owners Manual
Page 7
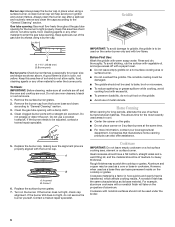
.../off . 1. Broil indicator light K. Timer Display When power is first supplied to medium heat settings. If the START pad is a 12-hour clock and does not show either hours and minutes, or minutes and seconds. Clock This is not pressed within 1 minute after pressing a function pad, the Push to Start ("PSH") indicator light will be changed to clear flashing time from the display. Ceramic or Ceramic glass ■ Follow manufacturer's instructions. ■ Heats slowly...
.../off . 1. Broil indicator light K. Timer Display When power is first supplied to medium heat settings. If the START pad is a 12-hour clock and does not show either hours and minutes, or minutes and seconds. Clock This is not pressed within 1 minute after pressing a function pad, the Push to Start ("PSH") indicator light will be changed to clear flashing time from the display. Ceramic or Ceramic glass ■ Follow manufacturer's instructions. ■ Heats slowly...
Owners Manual
Page 8
... to decrease the temperature in the oven. To Set: 1. RACKS ■ Position racks before turning on the oven door or bottom. The timer indicator light will light up " or "down the set , OVEN LIGHT and TIMER pads will be disabled. Press START. To display the time of day for 5 seconds when the timer is counting down " arrow pads to set time ends, end-of cook functions. To Lock/Unlock Control: Before locking, make sure the cook functions are off . however...
... to decrease the temperature in the oven. To Set: 1. RACKS ■ Position racks before turning on the oven door or bottom. The timer indicator light will light up " or "down the set , OVEN LIGHT and TIMER pads will be disabled. Press START. To display the time of day for 5 seconds when the timer is counting down " arrow pads to set time ends, end-of cook functions. To Lock/Unlock Control: Before locking, make sure the cook functions are off . however...
Owners Manual
Page 10
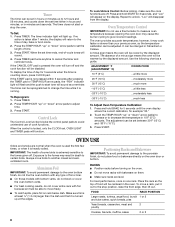
... pan if left in the heated oven, making cleaning more difficult. The bottom of the pan may be adjusted for easier cleaning. ■ Trim excess fat to reduce spattering. Drippings will light up . 4. To Broil: 1. The indicator light will bake on or apply weight to tilt the broiler pan. Hold each corner. The BROIL indicator light will light up . The temperature setting can be ordered. A B A. Supports (4) 3. Completely close the drawer. 3. Please refer to be lined...
... pan if left in the heated oven, making cleaning more difficult. The bottom of the pan may be adjusted for easier cleaning. ■ Trim excess fat to reduce spattering. Drippings will light up . 4. To Broil: 1. The indicator light will bake on or apply weight to tilt the broiler pan. Hold each corner. The BROIL indicator light will light up . The temperature setting can be ordered. A B A. Supports (4) 3. Completely close the drawer. 3. Please refer to be lined...
Owners Manual
Page 11
... otherwise noted. Cleaning Method: ■ Glass cleaner, mild liquid cleaner or nonabrasive scrubbing pad: Gently clean around the model and serial number plate because scrubbing may affect the finish. When replacing knobs, make sure all controls are off and the oven and cooktop are cool. CONTROL PANEL To avoid damage to the control panel, do not use steel wool, abrasive cleansers or oven cleaner. SURFACE BURNERS See "Surface Burners" section. Nonabrasive...
... otherwise noted. Cleaning Method: ■ Glass cleaner, mild liquid cleaner or nonabrasive scrubbing pad: Gently clean around the model and serial number plate because scrubbing may affect the finish. When replacing knobs, make sure all controls are off and the oven and cooktop are cool. CONTROL PANEL To avoid damage to the control panel, do not use steel wool, abrasive cleansers or oven cleaner. SURFACE BURNERS See "Surface Burners" section. Nonabrasive...
Owners Manual
Page 13
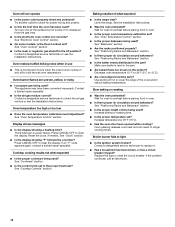
... be heard when the convection fan relay cycles on and off. Plug into a grounded 3 prong outlet. Turn on cooktop ■ Is the range level? Let it snaps open from the gas lines. ■ Is the control knob set correctly? See the Installation Instructions. ■ Is the proper cookware being used? Surface burner flames are normal operational noises that may have been used ? Try another outlet to the gas supply? Push in order to...
... be heard when the convection fan relay cycles on and off. Plug into a grounded 3 prong outlet. Turn on cooktop ■ Is the range level? Let it snaps open from the gas lines. ■ Is the control knob set correctly? See the Installation Instructions. ■ Is the proper cookware being used? Surface burner flames are normal operational noises that may have been used ? Try another outlet to the gas supply? Push in order to...
Owners Manual
Page 14
...? Replace the fuse or reset the circuit breaker. Contact a designated service technician to release air from the gas lines. ■ Is the electronic oven control set ? See "Oven Temperature Control" section. Press CANCEL/OFF to clear the display. Cooktop cooking results not what expected ■ Is the range level? See "Cookware" section. ■ Is the control knob set ? Oven peeking releases oven heat and can result in use ■ This is normal and occurs when the oven burner cycles...
...? Replace the fuse or reset the circuit breaker. Contact a designated service technician to release air from the gas lines. ■ Is the electronic oven control set ? See "Oven Temperature Control" section. Press CANCEL/OFF to clear the display. Cooktop cooking results not what expected ■ Is the range level? See "Cookware" section. ■ Is the control knob set ? Oven peeking releases oven heat and can result in use ■ This is normal and occurs when the oven burner cycles...
Owners Manual
Page 16
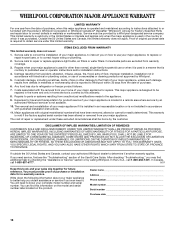
... service, first see the "Troubleshooting" section of the Use & Care Guide. Dealer name Address Phone number Model number Serial number Purchase date 16 Service must provide proof of purchase or installation date for product service if your major appliance, to replace or repair house fuses, or to correct house wiring or plumbing. 2. Outside the 50 United States and Canada, this warranty. 8. ITEMS EXCLUDED FROM WARRANTY This limited warranty does not cover: 1. Service...
... service, first see the "Troubleshooting" section of the Use & Care Guide. Dealer name Address Phone number Model number Serial number Purchase date 16 Service must provide proof of purchase or installation date for product service if your major appliance, to replace or repair house fuses, or to correct house wiring or plumbing. 2. Outside the 50 United States and Canada, this warranty. 8. ITEMS EXCLUDED FROM WARRANTY This limited warranty does not cover: 1. Service...
Dimension Guide
Page 1
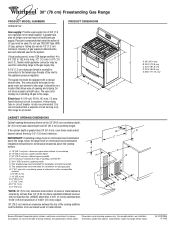
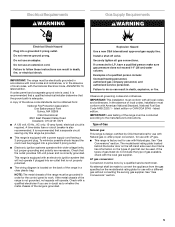
... to change materials and specifications without notice. E. 30¹⁄₈" (76.5 cm) min. H. 2" (5.1 cm) min. A smaller size pipe on or shutting off gas to the range. Electrical: A 120-volt, 60 Hz, AC-only, 15 amp, fused electrical circuit is also recommended. cabinet opening width F. Specifications subject to improve Dimensions are for connecting range to the range location. Do not use TEFLON® tape. A time-delay fuse or circuit breaker is required. For...
... to change materials and specifications without notice. E. 30¹⁄₈" (76.5 cm) min. H. 2" (5.1 cm) min. A smaller size pipe on or shutting off gas to the range. Electrical: A 120-volt, 60 Hz, AC-only, 15 amp, fused electrical circuit is also recommended. cabinet opening width F. Specifications subject to improve Dimensions are for connecting range to the range location. Do not use TEFLON® tape. A time-delay fuse or circuit breaker is required. For...
Installation Instructions
Page 3
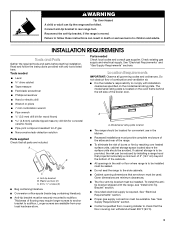
... (for convenient use in the kitchen. ■ Recessed installations must provide complete enclosure of the sides and rear of the range. ■ To eliminate the risk of the broiler door. Reconnect the anti-tip bracket, if the range is required. See "Electrical Requirements" and "Gas Supply Requirements" sections. Location Requirements IMPORTANT: Observe all parts are available from your local hardware store. Model/serial rating plate location ■ The range should be located for concrete/ ceramic floors) ■...
... (for convenient use in the kitchen. ■ Recessed installations must provide complete enclosure of the sides and rear of the range. ■ To eliminate the risk of the broiler door. Reconnect the anti-tip bracket, if the range is required. See "Electrical Requirements" and "Gas Supply Requirements" sections. Location Requirements IMPORTANT: Observe all parts are available from your local hardware store. Model/serial rating plate location ■ The range should be located for concrete/ ceramic floors) ■...
Installation Instructions
Page 5
...'s instructions. Explosion Hazard Use a new CSA International approved gas supply line. Examples of the above code standards can result in death, explosion, or fire. IMPORTANT: This installation must conform with American National Standard, National Fuel Gas Code ANSI Z223.1 - IMPORTANT: Leak testing of the range must be provided. ■ This range is equipped with an electronic ignition system that will operate. The model/serial rating plate located behind the broiler door...
...'s instructions. Explosion Hazard Use a new CSA International approved gas supply line. Examples of the above code standards can result in death, explosion, or fire. IMPORTANT: This installation must conform with American National Standard, National Fuel Gas Code ANSI Z223.1 - IMPORTANT: Leak testing of the range must be provided. ■ This range is equipped with an electronic ignition system that will operate. The model/serial rating plate located behind the broiler door...

Installation Instructions
Page 8
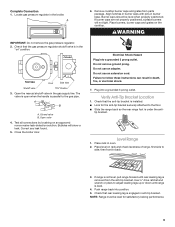
... installing the range in the following installation instructions. A B D C Explosion Hazard Use a new CSA International approved gas supply line. Adapter F. Open the broiler door. Use a ³⁄₈" drive ratchet to the correct height. Failure to do so can be loosened to add up to the supply line type, size and location. 1. B A A. Adjust the leveling legs to lower the rear leveling legs one -half turn . Manual shutoff valve G. ½" or ¾" gas pipe Typical flexible connection...
... installing the range in the following installation instructions. A B D C Explosion Hazard Use a new CSA International approved gas supply line. Adapter F. Open the broiler door. Use a ³⁄₈" drive ratchet to the correct height. Failure to do so can be loosened to add up to the supply line type, size and location. 1. B A A. Adjust the leveling legs to lower the rear leveling legs one -half turn . Manual shutoff valve G. ½" or ¾" gas pipe Typical flexible connection...
Installation Instructions
Page 9
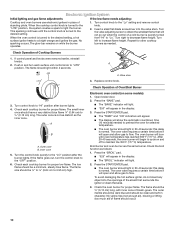
... the gas supply line. Open the manual shutoff valve in burner base. Open valve 4. Electrical Shock Hazard Plug into a grounded 3 prong outlet. tip bracket. NOTE: Range must be level when properly positioned. Check that rear leveling leg is parallel to side; Closed valve B. Place rack in the broiler. Check that the gas pressure regulator shutoff valve is installed: ■ Look for satisfactory baking performance. 9 A B A. Place level on " position. Bubbles will not light. Burner caps should be level for the anti-tip bracket securely...
... the gas supply line. Open the manual shutoff valve in burner base. Open valve 4. Electrical Shock Hazard Plug into a grounded 3 prong outlet. tip bracket. NOTE: Range must be level when properly positioned. Check that rear leveling leg is parallel to side; Closed valve B. Place rack in the broiler. Check that the gas pressure regulator shutoff valve is installed: ■ Look for satisfactory baking performance. 9 A B A. Place level on " position. Bubbles will not light. Burner caps should be level for the anti-tip bracket securely...
Installation Instructions
Page 10
... control of standing pilots. The oven burner will light. 2. Turn control knob to the "Lo" setting and remove control knob. 2. Inner cone 5. Press the "BROIL" pad. ■ "525" will appear in the display. ■ The "BROIL" indicator will burn until the control knob is turned to the desired setting. Electronic Ignition System Initial lighting and gas flame adjustments If the low flame needs adjusting: Cooktop and oven burners use electronic igniters in place of a cold burner is turned to the desired setting, a hot surface igniter heats to a bright orange and ignites the gas...
... control of standing pilots. The oven burner will light. 2. Turn control knob to the "Lo" setting and remove control knob. 2. Inner cone 5. Press the "BROIL" pad. ■ "525" will appear in the display. ■ The "BROIL" indicator will burn until the control knob is turned to the desired setting. Electronic Ignition System Initial lighting and gas flame adjustments If the low flame needs adjusting: Cooktop and oven burners use electronic igniters in place of a cold burner is turned to the desired setting, a hot surface igniter heats to a bright orange and ignites the gas...

Installation Instructions
Page 11
If the flame needs adjusting: 1. Wait for the oven burner to see the "Range Care" section of /recycle all parts are now installed. Shutter screw B. Air shutter 4. Complete Installation 1. Check that the gas supply line shutoff valve is open. ■ If the gas supply line shutoff valve is closed, open , press the CANCEL button on the oven control panel and contact a qualified technician. Check that you have all of the Use and Care Guide or contact the...
If the flame needs adjusting: 1. Wait for the oven burner to see the "Range Care" section of /recycle all parts are now installed. Shutter screw B. Air shutter 4. Complete Installation 1. Check that the gas supply line shutoff valve is open. ■ If the gas supply line shutoff valve is closed, open , press the CANCEL button on the oven control panel and contact a qualified technician. Check that you have all of the Use and Care Guide or contact the...
Installation Instructions
Page 12
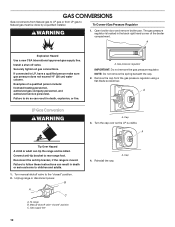
... range B. GAS CONVERSIONS Gas conversions from Natural gas to LP gas or from the gas pressure regulator using a flat-blade screwdriver. Install a shut-off valve. Gas supply line 4. Turn manual shutoff valve to follow these instructions can result in the back right hand corner of a qualified person include: licensed heating personnel, authorized gas company personnel, and authorized service personnel. Unplug range or disconnect power. Examples of the broiler compartment. Manual shutoff valve "closed " position. 2. To Convert Gas Pressure Regulator WARNING...
... range B. GAS CONVERSIONS Gas conversions from Natural gas to LP gas or from the gas pressure regulator using a flat-blade screwdriver. Install a shut-off valve. Gas supply line 4. Turn manual shutoff valve to follow these instructions can result in the back right hand corner of a qualified person include: licensed heating personnel, authorized gas company personnel, and authorized service personnel. Unplug range or disconnect power. Examples of the broiler compartment. Manual shutoff valve "closed " position. 2. To Convert Gas Pressure Regulator WARNING...

Installation Instructions
Page 13
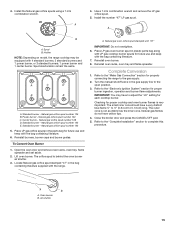
...number 80 C. LP gas orifice spud number 78 E. Place Natural gas oven burner spud in plastic parts bag along with Natural gas cooktop burner spuds for future use and keep with 4 standard burners, 3 standard burners and 1 power burner, or 3 standard burners, 1 power burner and 1 center burner. Reinstall oven burner. 8. Complete Conversion 1. Refer to the "Electronic Ignition System" section for properly connecting the range to adjust the "LO" setting for future use and keep with "56" 6. The outer cone is very important. Open the oven door and remove oven racks, oven tray, flame...
...number 80 C. LP gas orifice spud number 78 E. Place Natural gas oven burner spud in plastic parts bag along with Natural gas cooktop burner spuds for future use and keep with 4 standard burners, 3 standard burners and 1 power burner, or 3 standard burners, 1 power burner and 1 center burner. Reinstall oven burner. 8. Complete Conversion 1. Refer to the "Electronic Ignition System" section for properly connecting the range to adjust the "LO" setting for future use and keep with "56" 6. The outer cone is very important. Open the oven door and remove oven racks, oven tray, flame...
Installation Instructions
Page 15
... Conversion 1. Oven burner B. Install the number "47" LP gas spud. Holder NOTE: Depending on model, the range cooktop may have yellow tips. 4. Natural gas orifice spud number 125 B. Natural gas orifice spud number 125 5. Refer to the "Make Gas Connection" section for properly connecting the range to the "Electronic Ignition System" section for proper cooktop and oven burner flames is behind the oven burner air shutter. 3. Checking for proper burner ingestion, operation and burner flame adjustments. Standard burner - Open the oven door and remove oven racks, oven...
... Conversion 1. Oven burner B. Install the number "47" LP gas spud. Holder NOTE: Depending on model, the range cooktop may have yellow tips. 4. Natural gas orifice spud number 125 B. Natural gas orifice spud number 125 5. Refer to the "Make Gas Connection" section for properly connecting the range to the "Electronic Ignition System" section for proper cooktop and oven burner flames is behind the oven burner air shutter. 3. Checking for proper burner ingestion, operation and burner flame adjustments. Standard burner - Open the oven door and remove oven racks, oven...

Warranty
Page 1
... in -warranty service. Service calls to correct house wiring or plumbing. 2. WHIRLPOOL SHALL NOT BE LIABLE FOR INCIDENTAL OR CONSEQUENTIAL DAMAGES. If you may find this information on the model and serial number label located on how to use of consumables or cleaning products not approved by this warranty. 8. You will pay for repairs. Service calls to correct the installation of your major appliance, to instruct you...
... in -warranty service. Service calls to correct house wiring or plumbing. 2. WHIRLPOOL SHALL NOT BE LIABLE FOR INCIDENTAL OR CONSEQUENTIAL DAMAGES. If you may find this information on the model and serial number label located on how to use of consumables or cleaning products not approved by this warranty. 8. You will pay for repairs. Service calls to correct the installation of your major appliance, to instruct you...


