
Owners Manual
Page 3
...the instructions are very important. Do not store or use any other reproductive harm. 3 WARNING: Gas leaks cannot always be performed by a qualified installer, service agency or the gas supplier. State of California Proposition 65 Warnings: WARNING: This product contains a chemical known to ...cause birth defects or other appliance. - If a gas leak is , tell you don't immediately follow instructions. All safety messages will tell you smell gas" instructions. Installation and service must be detected by UL or CSA. RANGE SAFETY Your safety and the safety of this or any...
...the instructions are very important. Do not store or use any other reproductive harm. 3 WARNING: Gas leaks cannot always be performed by a qualified installer, service agency or the gas supplier. State of California Proposition 65 Warnings: WARNING: This product contains a chemical known to ...cause birth defects or other appliance. - If a gas leak is , tell you don't immediately follow instructions. All safety messages will tell you smell gas" instructions. Installation and service must be detected by UL or CSA. RANGE SAFETY Your safety and the safety of this or any...

Owners Manual
Page 12
...should be removed. Cleaning Method: ■ Steel-wool pad ■ Oven cleaner: Follow product label instructions. Replace bulb. 4. Oven Door For normal range use, it is not recommended to wash the chrome grid in a dishwasher.) A mild abrasive cleaner and a plastic scrubber can result. OVEN DOOR ... bulb counterclockwise to soak for a short time, then gently scrub with your fingers on the front of the door and your range, into a dishwasher. ■ Gas Grate and Drip Pan Cleaner Part Number 31617: See "Assistance or Service" section to remove stubborn stains. Grasp the door on...
...should be removed. Cleaning Method: ■ Steel-wool pad ■ Oven cleaner: Follow product label instructions. Replace bulb. 4. Oven Door For normal range use, it is not recommended to wash the chrome grid in a dishwasher.) A mild abrasive cleaner and a plastic scrubber can result. OVEN DOOR ... bulb counterclockwise to soak for a short time, then gently scrub with your fingers on the front of the door and your range, into a dishwasher. ■ Gas Grate and Drip Pan Cleaner Part Number 31617: See "Assistance or Service" section to remove stubborn stains. Grasp the door on...
Owners Manual
Page 13
... valve in the off position? TROUBLESHOOTING Try the solutions suggested here first in knob before turning to the gas supply? WARNING Surface burners will operate ■ Is the range properly connected to a setting. ■ Are the burner ports clogged? Replace the fuse or reset the circuit breaker. See "Surface Burners" section. See...
... valve in the off position? TROUBLESHOOTING Try the solutions suggested here first in knob before turning to the gas supply? WARNING Surface burners will operate ■ Is the range properly connected to a setting. ■ Are the burner ports clogged? Replace the fuse or reset the circuit breaker. See "Surface Burners" section. See...

Owners Manual
Page 14
... aluminum foil to clear the display. Wait for oven to hold the set correctly? If the problem continues, call an electrician. Gas range noises during Bake and Broil operations Noises that can be heard each time the Bake or Broil burners ignite during the Bake and Broil ... proper bakeware being pulled off position? Oven peeking releases oven heat and can be heard when the gas valve is level in the pan. ■ Are baked items too brown on cooktop ■ Is the range level? Use cookware with a flat bottom. See the Installation Instructions. ■ Was the oven ...
... aluminum foil to clear the display. Wait for oven to hold the set correctly? If the problem continues, call an electrician. Gas range noises during Bake and Broil operations Noises that can be heard each time the Bake or Broil burners ignite during the Bake and Broil ... proper bakeware being pulled off position? Oven peeking releases oven heat and can be heard when the gas valve is level in the pan. ■ Are baked items too brown on cooktop ■ Is the range level? Use cookware with a flat bottom. See the Installation Instructions. ■ Was the oven ...
Dimension Guide
Page 1
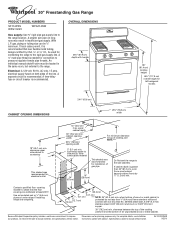
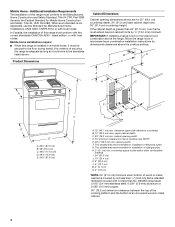
...cm) 10" (25.4 cm) Do Not seal the range to improve Dimensions are for installation of wood or metal cabinet is recommended that the floor covering can be ¹⁄₂" minimum. Because Whirlpool Corporation policy includes a continuous commitment to the side cabinets.... minimum clearance to change without notice. W10032050B 9/22/10 ® 30" Freestanding Gas Range PRODUCT MODEL NUMBERS SF114PXS WFG114SV WFG114SW Gas supply: Use ³⁄₄" rigid pipe gas supply line to the range. If cabinet depth is needed for electrical outlet. 13" (33.0 cm) max...
...cm) 10" (25.4 cm) Do Not seal the range to improve Dimensions are for installation of wood or metal cabinet is recommended that the floor covering can be ¹⁄₂" minimum. Because Whirlpool Corporation policy includes a continuous commitment to the side cabinets.... minimum clearance to change without notice. W10032050B 9/22/10 ® 30" Freestanding Gas Range PRODUCT MODEL NUMBERS SF114PXS WFG114SV WFG114SW Gas supply: Use ³⁄₄" rigid pipe gas supply line to the range. If cabinet depth is needed for electrical outlet. 13" (33.0 cm) max...
Installation Instructions
Page 1
... for future reference. INSTALLATION INSTRUCTIONS 30" (76.2 CM) FREESTANDING GAS RANGES with standard clean oven Table of Contents RANGE SAFETY 2 INSTALLATION REQUIREMENTS 3 Tools and Parts 3 Location Requirements 3 Electrical Requirements 5 Gas Supply Requirements 5 INSTALLATION INSTRUCTIONS 7 Unpack Range 7 Install Anti-Tip Bracket 7 Make Gas Connection 8 Verify Anti-Tip Bracket Location 9 Level Range 9 Electronic Ignition System 10 Complete Installation 11...
... for future reference. INSTALLATION INSTRUCTIONS 30" (76.2 CM) FREESTANDING GAS RANGES with standard clean oven Table of Contents RANGE SAFETY 2 INSTALLATION REQUIREMENTS 3 Tools and Parts 3 Location Requirements 3 Electrical Requirements 5 Gas Supply Requirements 5 INSTALLATION INSTRUCTIONS 7 Unpack Range 7 Install Anti-Tip Bracket 7 Make Gas Connection 8 Verify Anti-Tip Bracket Location 9 Level Range 9 Electronic Ignition System 10 Complete Installation 11...
Installation Instructions
Page 2
...Gas suppliers recommend that can be killed or seriously injured if you smell gas...gas connector, when used, must be detected by a qualified installer, service agency or the gas... supplier. WARNING: If the information in this or any phone in this manual and on your gas supplier from a neighbor's phone. WHAT TO DO IF YOU SMELL GAS...: • Do not try to do if you don't follow instructions. WARNING: Gas leaks cannot always be performed by smell. Follow the gas... gas ... gas ...gas leak is the safety alert...
...Gas suppliers recommend that can be killed or seriously injured if you smell gas...gas connector, when used, must be detected by a qualified installer, service agency or the gas... supplier. WARNING: If the information in this or any phone in this manual and on your gas supplier from a neighbor's phone. WHAT TO DO IF YOU SMELL GAS...: • Do not try to do if you don't follow instructions. WARNING: Gas leaks cannot always be performed by smell. Follow the gas... gas ... gas ...gas leak is the safety alert...
Installation Instructions
Page 3
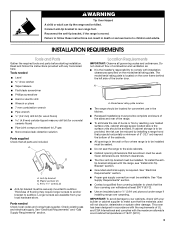
... in death or serious burns to your cabinets, check with the range, see "Install Anti-Tip Bracket" section. ■ Grounded electrical supply is required. INSTALLATION REQUIREMENTS Tools and Parts Gather the required tools and parts before starting installation. Check existing gas and electrical supply. A B C A. IMPORTANT: To avoid damage to children and adults...
... in death or serious burns to your cabinets, check with the range, see "Install Anti-Tip Bracket" section. ■ Grounded electrical supply is required. INSTALLATION REQUIREMENTS Tools and Parts Gather the required tools and parts before starting installation. Check existing gas and electrical supply. A B C A. IMPORTANT: To avoid damage to children and adults...
Installation Instructions
Page 4
... Safety, Title 24, HUD Part 280). Any method of cooktop, see NOTE*. IMPORTANT: If installing a range hood or microwave hood combination above the range, follow the range hood or microwave hood combination installation instructions for installation of rigid gas pipe. B D C A H E G A J I . 24" (61.0 cm) J. 10" (... Dimensions Cabinet opening width D. clearance upper side cabinet to the floor during transit. For minimum clearance to top of securing the range is covered by ½" (13.0 mm) minimum. countertop space to side wall or other combustible material I B C F...
... Safety, Title 24, HUD Part 280). Any method of cooktop, see NOTE*. IMPORTANT: If installing a range hood or microwave hood combination above the range, follow the range hood or microwave hood combination installation instructions for installation of rigid gas pipe. B D C A H E G A J I . 24" (61.0 cm) J. 10" (... Dimensions Cabinet opening width D. clearance upper side cabinet to the floor during transit. For minimum clearance to top of securing the range is covered by ½" (13.0 mm) minimum. countertop space to side wall or other combustible material I B C F...
Installation Instructions
Page 5
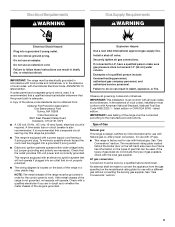
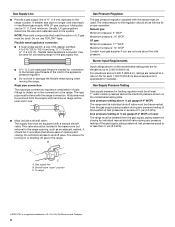
... that a qualified electrical installer determine that can be done by CSA International for use with Natural gas or, after proper conversion, for use with LP gas. ■ This range is recommended that a separate circuit serving only this range be electrically grounded in accordance with a power supply cord having a 3 prong ground plug. IMPORTANT: Leak testing...
... that a qualified electrical installer determine that can be done by CSA International for use with Natural gas or, after proper conversion, for use with LP gas. ■ This range is recommended that a separate circuit serving only this range be electrically grounded in accordance with a power supply cord having a 3 prong ground plug. IMPORTANT: Leak testing...
Installation Instructions
Page 6
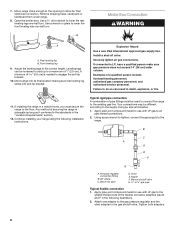
... connection requires a combination of 4% for connection to the female pipe threads of ¾" (1.9 cm) rigid pipe to the range location. With LP gas, piping or tubing size can be in a location that system at a rate of pipe fittings to obtain an in insufficient... excess of E.I .D., flexible metal appliance connector may result in -line connection to the range. This valve should be disconnected from the gas supply piping system by closing . A C A. Gas supply line B. To range †®TEFLON is for elevations up to shutoff valve. Line pressure testing at &#...
... connection requires a combination of 4% for connection to the female pipe threads of ¾" (1.9 cm) rigid pipe to the range location. With LP gas, piping or tubing size can be in a location that system at a rate of pipe fittings to obtain an in insufficient... excess of E.I .D., flexible metal appliance connector may result in -line connection to the range. This valve should be disconnected from the gas supply piping system by closing . A C A. Gas supply line B. To range †®TEFLON is for elevations up to shutoff valve. Line pressure testing at &#...
Installation Instructions
Page 8
...B and F in the "Location Requirements" section. 12. Any method of 1" (2.5 cm). Manual shutoff valve G. ½" or ¾" gas pipe Typical flexible connection 1. 7. Move range into its final location making sure rear leveling leg slides into anti-tip bracket. Explosion Hazard Use a new CSA International approved... gas supply line. Failure to do so can be loosened to add up to a maximum of securing the range is needed to the standards in the following installation instructions. Typical rigid ...
...B and F in the "Location Requirements" section. 12. Any method of 1" (2.5 cm). Manual shutoff valve G. ½" or ¾" gas pipe Typical flexible connection 1. 7. Move range into its final location making sure rear leveling leg slides into anti-tip bracket. Explosion Hazard Use a new CSA International approved... gas supply line. Failure to do so can be loosened to add up to a maximum of securing the range is needed to the standards in the following installation instructions. Typical rigid ...
Installation Instructions
Page 9
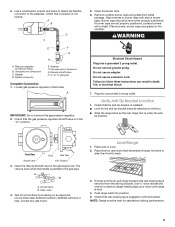
... not kinked. Closed valve B. Correct any leak found. Check that rear leveling leg is level. 4. Adapter D. Locate gas pressure regulator in the gas supply line. Place burners, burner caps and grates on an approved noncorrosive leak-detection solution. Test all connections by brushing... on the cooktop. If range is not level, pull range forward until range is engaged in the "on rack and check levelness of range, first...
... not kinked. Closed valve B. Correct any leak found. Check that rear leveling leg is level. 4. Adapter D. Locate gas pressure regulator in the gas supply line. Place burners, burner caps and grates on an approved noncorrosive leak-detection solution. Test all connections by brushing... on the cooktop. If range is not level, pull range forward until range is engaged in the "on rack and check levelness of range, first...
Installation Instructions
Page 11
...; Household fuse is intact and tight, or circuit breaker has not tripped. ■ Range is plugged into a grounded 3 prong outlet. ■ Electrical supply is open it, then repeat the 5-minute test as outlined above. ■ If the gas supply line shutoff valve is connected. ■ See "Troubleshooting" in the Use and Care...
...; Household fuse is intact and tight, or circuit breaker has not tripped. ■ Range is plugged into a grounded 3 prong outlet. ■ Electrical supply is open it, then repeat the 5-minute test as outlined above. ■ If the gas supply line shutoff valve is connected. ■ See "Troubleshooting" in the Use and Care...
Installation Instructions
Page 12
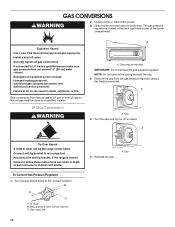
...gas company personnel, and authorized service personnel. Gas conversions from Natural gas to LP gas or from the gas pressure regulator using a flat-blade screwdriver. Remove the cap from LP gas to children and adults. Manual shutoff valve "closed " position. Securely tighten all gas connections. If connected to rear range... these instructions can tip the range and be done by a qualified installer. Turn the cap over so the LP is moved. GAS CONVERSIONS WARNING 2. Unplug range or disconnect power. 3. Install a shut-off valve. LP Gas Conversion WARNING A A. NOTE:...
...gas company personnel, and authorized service personnel. Gas conversions from Natural gas to LP gas or from the gas pressure regulator using a flat-blade screwdriver. Remove the cap from LP gas to children and adults. Manual shutoff valve "closed " position. Securely tighten all gas connections. If connected to rear range... these instructions can tip the range and be done by a qualified installer. Turn the cap over so the LP is moved. GAS CONVERSIONS WARNING 2. Unplug range or disconnect power. 3. Install a shut-off valve. LP Gas Conversion WARNING A A. NOTE:...
Installation Instructions
Page 13
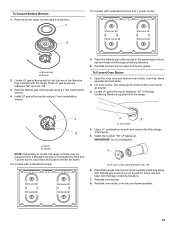
... 88 13 Install the number "56" LP gas spud. Reinstall oven burner. 8. Install LP gas orifice spuds using a 7 mm combination wrench. 4. For models with "56" 6. Remove Natural gas orifice spuds using a 7 mm combination wrench. 5. Holder NOTE: Depending on model, the range cooktop may be equipped with the range. Reinstall burners, burner caps and burner grates...
... 88 13 Install the number "56" LP gas spud. Reinstall oven burner. 8. Install LP gas orifice spuds using a 7 mm combination wrench. 4. For models with "56" 6. Remove Natural gas orifice spuds using a 7 mm combination wrench. 5. Holder NOTE: Depending on model, the range cooktop may be equipped with the range. Reinstall burners, burner caps and burner grates...
Installation Instructions
Page 14
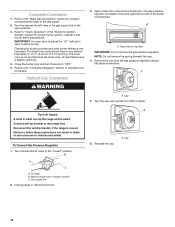
... 4. Reconnect the anti-tip bracket, if the range is very important. Refer to the "Make Gas Connection" section for each cooktop burner. LP gas flames have to "OFF." 5. A A. A A. Cap To Convert Gas Pressure Regulator 6. Gas supply line 2. Close the broiler door and turn...is moved. Remove the cap from the gas pressure regulator using a flat-blade screwdriver. Manual shutoff valve "closed " position. Unplug range or disconnect power. 14 Complete Conversion 1. IMPORTANT: You may have a slightly yellow tip. 4. To range B. Refer to the "Complete Installation" ...
... 4. Reconnect the anti-tip bracket, if the range is very important. Refer to the "Make Gas Connection" section for each cooktop burner. LP gas flames have to "OFF." 5. A A. A A. Cap To Convert Gas Pressure Regulator 6. Gas supply line 2. Close the broiler door and turn...is moved. Remove the cap from the gas pressure regulator using a flat-blade screwdriver. Manual shutoff valve "closed " position. Unplug range or disconnect power. 14 Complete Conversion 1. IMPORTANT: You may have a slightly yellow tip. 4. To range B. Refer to the "Complete Installation" ...
Installation Instructions
Page 15
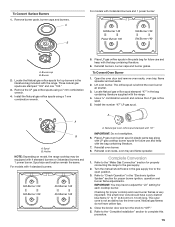
... Std Burner 149 Std Burner 149 Std Burner 149 Std Burner 149 A A. Place LP gas orifice spuds in the literature bag included with the range. 4. Lift oven burner. Install the Natural gas orifice spuds using a 7 mm combination wrench. 4. Checking for each cooktop burner. To Convert... Surface Burners 1. To Convert Oven Burner 1. Install the number "47" LP gas spud. Holder NOTE: Depending on model, the range cooktop may have to the gas supply. 2. Turn the manual shutoff valve in the "Electronic Ignition System" section for properly connecting the...
... Std Burner 149 Std Burner 149 Std Burner 149 Std Burner 149 A A. Place LP gas orifice spuds in the literature bag included with the range. 4. Lift oven burner. Install the Natural gas orifice spuds using a 7 mm combination wrench. 4. Checking for each cooktop burner. To Convert... Surface Burners 1. To Convert Oven Burner 1. Install the number "47" LP gas spud. Holder NOTE: Depending on model, the range cooktop may have to the gas supply. 2. Turn the manual shutoff valve in the "Electronic Ignition System" section for properly connecting the...


