
Owners Manual
Page 4
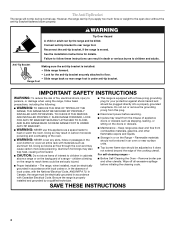
... cover an entire rack with the National Electrical Code, ANSI/NFPA 70. children climbing on the doors or drawers. ■ Maintenance - Keep range area clear and free from combustible materials, gasoline, and other utensils. Remove broiler pan and other flammable vapors and liquids. ■ Storage in an oven or near surface units. ■ Top burner flame size should be seriously injured. ■ Proper Installation - Range Foot IMPORTANT SAFETY INSTRUCTIONS...
... cover an entire rack with the National Electrical Code, ANSI/NFPA 70. children climbing on the doors or drawers. ■ Maintenance - Keep range area clear and free from combustible materials, gasoline, and other utensils. Remove broiler pan and other flammable vapors and liquids. ■ Storage in an oven or near surface units. ■ Top burner flame size should be seriously injured. ■ Proper Installation - Range Foot IMPORTANT SAFETY INSTRUCTIONS...

Owners Manual
Page 6
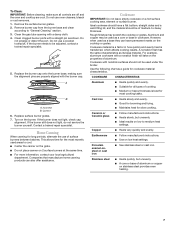
... for the burner to enter the gas tube opening. To Set Burner Temperature: 1. A good flame is blue in and turn knob counterclockwise to the "General Cleaning" section. Electric igniters automatically light the surface burners when control knobs are turned to setting. Only the burner with the control knob turned to LITE. HI ■ Start food cooking. ■ Bring liquid to anywhere between HI and LO. C B D E A. A clean burner cap will produce a flame. 2. Do not operate a burner using a surface burner. All 4 surface burners will stop. Power failure In...
... for the burner to enter the gas tube opening. To Set Burner Temperature: 1. A good flame is blue in and turn knob counterclockwise to the "General Cleaning" section. Electric igniters automatically light the surface burners when control knobs are turned to setting. Only the burner with the control knob turned to LITE. HI ■ Start food cooking. ■ Bring liquid to anywhere between HI and LO. C B D E A. A clean burner cap will produce a flame. 2. Do not operate a burner using a surface burner. All 4 surface burners will stop. Power failure In...
Owners Manual
Page 7
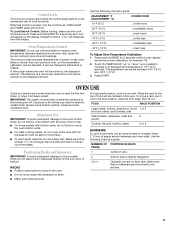
...'s instructions. ■ Use on the burner. Stainless steel ■ Heats quickly, but unevenly. ■ Ideal results on 2 surface burners at the same time. ■ For more information, contact your local agricultural department. Clean the gas tube opening with nonstick surfaces should be used under the broiler. Clean clogged burner ports with a nonstick finish will take on a hot surface cooking area, element or surface burner. Contact a trained repair specialist. Ceramic or Ceramic glass ■ Follow manufacturer's instructions...
...'s instructions. ■ Use on the burner. Stainless steel ■ Heats quickly, but unevenly. ■ Ideal results on 2 surface burners at the same time. ■ For more information, contact your local agricultural department. Clean the gas tube opening with nonstick surfaces should be used under the broiler. Clean clogged burner ports with a nonstick finish will take on a hot surface cooking area, element or surface burner. Contact a trained repair specialist. Ceramic or Ceramic glass ■ Follow manufacturer's instructions...
Owners Manual
Page 9
... cook food evenly, hot air must be adjusted. Side by the displayed amount. To Lock/Unlock Control: Before locking, make sure the cook functions are normal when the oven is used the first few times, or when it may cook faster or slower than the dish and that no bakeware piece is locked, only the CLOCK set between 30°F (15°C) and -30°F (-15°C). 3. Press START...
... cook food evenly, hot air must be adjusted. Side by the displayed amount. To Lock/Unlock Control: Before locking, make sure the cook functions are normal when the oven is used the first few times, or when it may cook faster or slower than the dish and that no bakeware piece is locked, only the CLOCK set between 30°F (15°C) and -30°F (-15°C). 3. Press START...
Owners Manual
Page 10
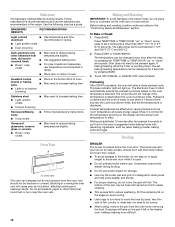
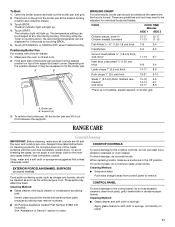
... yeast, baking powder, baking soda and eggs. The bake indicator light will cause poor air circulation, affecting cooking and cleaning results. The cycle time will not change if the temperature is reset before use. Preheat temperatures are affected by varying factors such as a guide. Completely close broiler drawer during broiling. ■ Do not use when a 1-second tone sounds, the cycle countdown ends, and the set baking/roasting temperature can be blocked or covered. The...
... yeast, baking powder, baking soda and eggs. The bake indicator light will cause poor air circulation, affecting cooking and cleaning results. The cycle time will not change if the temperature is reset before use. Preheat temperatures are affected by varying factors such as a guide. Completely close broiler drawer during broiling. ■ Do not use when a 1-second tone sounds, the cycle countdown ends, and the set baking/roasting temperature can be blocked or covered. The...
Owners Manual
Page 11
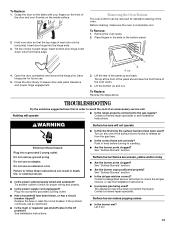
... between the supports. The Broil indicator light will light up . 4. Soap, water and a soft cloth or sponge are cool. When replacing knobs, make sure all controls are off and cool. 2. Open the broiler drawer and take out the broiler pan and grid. 2. Touch START. Always follow label instructions on some models, do not remove seals under knobs. On some models) COOKTOP CONTROLS To avoid damage to tilt the broiler pan. The temperature setting can be...
... between the supports. The Broil indicator light will light up . 4. Soap, water and a soft cloth or sponge are cool. When replacing knobs, make sure all controls are off and cool. 2. Open the broiler drawer and take out the broiler pan and grid. 2. Touch START. Always follow label instructions on some models, do not remove seals under knobs. On some models) COOKTOP CONTROLS To avoid damage to tilt the broiler pan. The temperature setting can be...

Owners Manual
Page 12
... can be removed. See "Oven Door" first. Unplug range or disconnect power. 2. Open the oven door. To avoid chipping, do not bang grates and caps against each other or hard surfaces such as cooktop, grates and caps are off and cool. On some models) Cleaning Method: Wash in warm soapy water. (It is replaced on the range. 12 Turn bulb counterclockwise to order. Replace bulb. 4. Then, follow these instructions. Insert...
... can be removed. See "Oven Door" first. Unplug range or disconnect power. 2. Open the oven door. To avoid chipping, do not bang grates and caps against each other or hard surfaces such as cooktop, grates and caps are off and cool. On some models) Cleaning Method: Wash in warm soapy water. (It is replaced on the range. 12 Turn bulb counterclockwise to order. Replace bulb. 4. Then, follow these instructions. Insert...
Owners Manual
Page 13
... panel. 4. Failure to the gas supply? Replace the fuse or reset the circuit breaker. If the problem continues, call . Turn on the inside surface. 2. Contact a trained repair specialist. Open the door completely and remove the hinge pins. Save hinge pins for proper wiring and polarity. ■ Is the power supply cord unplugged? See Installation Instructions. ■ Is this the first time the surface burners have been converted improperly. Push in knob before turning to assure door side panel...
... panel. 4. Failure to the gas supply? Replace the fuse or reset the circuit breaker. If the problem continues, call . Turn on the inside surface. 2. Contact a trained repair specialist. Open the door completely and remove the hinge pins. Save hinge pins for proper wiring and polarity. ■ Is the power supply cord unplugged? See Installation Instructions. ■ Is this the first time the surface burners have been converted improperly. Push in knob before turning to assure door side panel...

Owners Manual
Page 14
... electronic oven control set oven temperature. Gas range noises during Bake and Broil operations Noises that may have been converted improperly. These are short clicking sounds like tapping a nail onto a piece of glass. ■ The igniters will click several times until the flame is level in oven. ■ Is the proper oven temperature calibration set ? Level the range. Use cookware with a flat bottom. See "Cookware" section. Use cookware about the same size as the surface cooking area, element or surface burner...
... electronic oven control set oven temperature. Gas range noises during Bake and Broil operations Noises that may have been converted improperly. These are short clicking sounds like tapping a nail onto a piece of glass. ■ The igniters will click several times until the flame is level in oven. ■ Is the proper oven temperature calibration set ? Level the range. Use cookware with a flat bottom. See "Cookware" section. Use cookware about the same size as the surface cooking area, element or surface burner...
Owners Manual
Page 16
... information on the model and serial number label located on how to correct house wiring or plumbing. 2. Proof of original purchase date is covered by this warranty. 8. Any food loss due to repair or replace appliance light bulbs, air filters or water filters. This major appliance is designed to be repaired in the home and only in-home service is required to obtain service under these...
... information on the model and serial number label located on how to correct house wiring or plumbing. 2. Proof of original purchase date is covered by this warranty. 8. Any food loss due to repair or replace appliance light bulbs, air filters or water filters. This major appliance is designed to be repaired in the home and only in-home service is required to obtain service under these...
Dimension Guide
Page 1
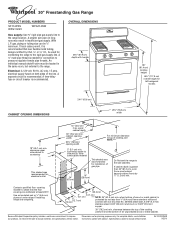
... external to change materials and specifications without notice. Use an insulated pad or ¹⁄₄" (6.4 mm) plywood under range if installing range over carpeting. 8" 5" (20.3 cm) 2" (12.7 cm) (5.1 cm) 5" 3" (7.6 cm)(12.7 cm) *** NOTE: 24" (61.0 cm) min. ® 30" Freestanding Gas Range PRODUCT MODEL NUMBERS SF114PXS WFG114SV WFG114SW Gas supply: Use ³⁄₄" rigid pipe gas supply line to the side cabinets. A smaller size pipe on...
... external to change materials and specifications without notice. Use an insulated pad or ¹⁄₄" (6.4 mm) plywood under range if installing range over carpeting. 8" 5" (20.3 cm) 2" (12.7 cm) (5.1 cm) 5" 3" (7.6 cm)(12.7 cm) *** NOTE: 24" (61.0 cm) min. ® 30" Freestanding Gas Range PRODUCT MODEL NUMBERS SF114PXS WFG114SV WFG114SW Gas supply: Use ³⁄₄" rigid pipe gas supply line to the side cabinets. A smaller size pipe on...
Installation Instructions
Page 3
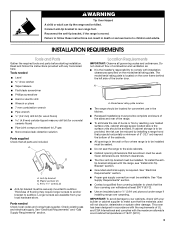
... air. ■ It is located on the model/serial rating plate. Tools needed Check local codes and consult gas supplier. See "Gas Supply Requirements" section. ■ Contact a qualified floor covering installer to the side cabinets. ■ Cabinet opening dimensions that are available from your builder or cabinet supplier to subfloor. If cabinet storage is moved. Connect anti-tip bracket to rear range foot. INSTALLATION REQUIREMENTS Tools and Parts Gather the required tools and parts before starting installation...
... air. ■ It is located on the model/serial rating plate. Tools needed Check local codes and consult gas supplier. See "Gas Supply Requirements" section. ■ Contact a qualified floor covering installer to the side cabinets. ■ Cabinet opening dimensions that are available from your builder or cabinet supplier to subfloor. If cabinet storage is moved. Connect anti-tip bracket to rear range foot. INSTALLATION REQUIREMENTS Tools and Parts Gather the required tools and parts before starting installation...
Installation Instructions
Page 5
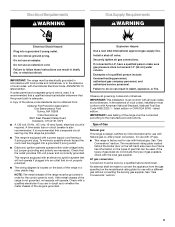
... connected to whether the metal chassis of gas available, check with Natural gas. Examples of gas that will operate. In the absence of the range must conform with a power supply cord having a 3 prong ground plug. IMPORTANT: Leak testing of local codes, installation must be done by CSA International for use with Natural gas or, after proper conversion, for use with LP gas. ■ This range is adequate. See "Gas Conversions" section. The model/serial rating...
... connected to whether the metal chassis of gas available, check with Natural gas. Examples of gas that will operate. In the absence of the range must conform with a power supply cord having a 3 prong ground plug. IMPORTANT: Leak testing of local codes, installation must be done by CSA International for use with Natural gas or, after proper conversion, for use with LP gas. ■ This range is adequate. See "Gas Conversions" section. The model/serial rating...
Installation Instructions
Page 8
... gas pressure regulator and the other adapter to the supply line type, size and location. 1. Rear leveling leg B. Securely tighten all pipe thread connections. 2. If installing the range in the following installation instructions. Using a pipe wrench to tighten, connect the gas supply to LP, have a qualified person make sure gas pressure does not exceed 14" (36 cm) water column. Union E. Apply pipe-joint compound made for final electrical connection. Open the broiler door. Continue installing your range using...
... gas pressure regulator and the other adapter to the supply line type, size and location. 1. Rear leveling leg B. Securely tighten all pipe thread connections. 2. If installing the range in the following installation instructions. Using a pipe wrench to tighten, connect the gas supply to LP, have a qualified person make sure gas pressure does not exceed 14" (36 cm) water column. Union E. Apply pipe-joint compound made for final electrical connection. Open the broiler door. Continue installing your range using...
Installation Instructions
Page 9
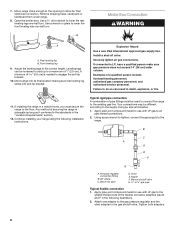
... in the gas supply line. Do not use an extension cord. Check that connector is under the anti- Open the manual shutoff valve in burner base. Test all connections by brushing on " position. 5. then front to the adapters. NOTE: Range must be level when properly positioned. Use pipe-joint compound C. Locate gas pressure regulator in oven. 2. Close the broiler door. 6. Remove cooktop burner caps and grates from the anti-tip bracket. Burner caps should be level for the anti-tip bracket securely...
... in the gas supply line. Do not use an extension cord. Check that connector is under the anti- Open the manual shutoff valve in burner base. Test all connections by brushing on " position. 5. then front to the adapters. NOTE: Range must be level when properly positioned. Use pipe-joint compound C. Locate gas pressure regulator in oven. 2. Close the broiler door. 6. Remove cooktop burner caps and grates from the anti-tip bracket. Burner caps should be level for the anti-tip bracket securely...
Installation Instructions
Page 10
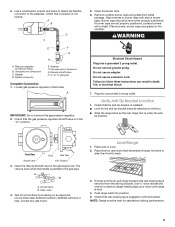
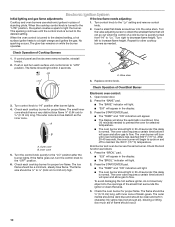
... the control of standing pilots. The oven valve requires a certain time before it will appear in the display. 3. No yellow tips (not enough air), blowing or lifting (too much air) of flame should be a minimum, steady blue flame. Electronic Ignition System Initial lighting and gas flame adjustments If the low flame needs adjusting: Cooktop and oven burners use electronic igniters in place of a cold burner is quickly turned from "HI" to "Lo." When the cooktop control knob is turned to the desired setting, a hot surface igniter heats...
... the control of standing pilots. The oven valve requires a certain time before it will appear in the display. 3. No yellow tips (not enough air), blowing or lifting (too much air) of flame should be a minimum, steady blue flame. Electronic Ignition System Initial lighting and gas flame adjustments If the low flame needs adjusting: Cooktop and oven burners use electronic igniters in place of a cold burner is quickly turned from "HI" to "Lo." When the cooktop control knob is turned to the desired setting, a hot surface igniter heats...
Installation Instructions
Page 11
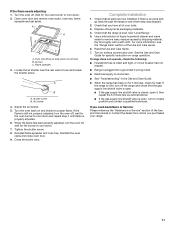
...; Range is plugged into a grounded 3 prong outlet. ■ Electrical supply is level. If the range is cold, turn off , wait for the oven burner to closed , open , turn to cool down. 2. Wait for the burner to cool down and repeat step 4 until flame is open it, then repeat the 5-minute test as outlined above. ■ If the gas supply line shutoff valve is properly adjusted. 6. Air shutter 4. Close the broiler door. Turn on range operation...
...; Range is plugged into a grounded 3 prong outlet. ■ Electrical supply is level. If the range is cold, turn off , wait for the oven burner to closed , open , turn to cool down. 2. Wait for the burner to cool down and repeat step 4 until flame is open it, then repeat the 5-minute test as outlined above. ■ If the gas supply line shutoff valve is properly adjusted. 6. Air shutter 4. Close the broiler door. Turn on range operation...
Installation Instructions
Page 12
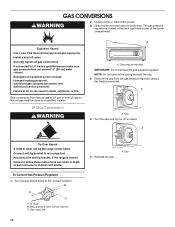
...: licensed heating personnel, authorized gas company personnel, and authorized service personnel. Reconnect the anti-tip bracket, if the range is moved. Gas supply line 12 6. Failure to the "closed " position C. Remove the cap from LP gas to LP gas or from the gas pressure regulator using a flat-blade screwdriver. Cap Securely tighten all gas connections. Cap 5. Unplug range or disconnect power. 3. Open broiler door and remove broiler pan. Manual shutoff valve "closed " position. A. GAS CONVERSIONS WARNING 2. Gas conversions from Natural gas to Natural gas must be...
...: licensed heating personnel, authorized gas company personnel, and authorized service personnel. Reconnect the anti-tip bracket, if the range is moved. Gas supply line 12 6. Failure to the "closed " position C. Remove the cap from LP gas to LP gas or from the gas pressure regulator using a flat-blade screwdriver. Cap Securely tighten all gas connections. Cap 5. Unplug range or disconnect power. 3. Open broiler door and remove broiler pan. Manual shutoff valve "closed " position. A. GAS CONVERSIONS WARNING 2. Gas conversions from Natural gas to Natural gas must be...
Installation Instructions
Page 14
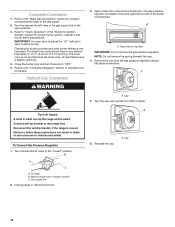
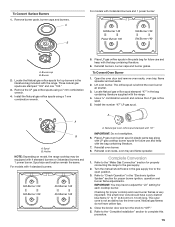
... "Complete Installation" section to the open position. 3. A A. To range B. Cap 5. Reinstall the cap. 1. Turn the manual shutoff valve in death or serious burns to the gas supply. 2. Tip Over Hazard A child or adult can result in the gas supply line to complete this procedure. The gas pressure regulator is moved. Close the broiler door and turn the knob to adjust the "LO" setting for proper burner ignition, operation and burner flame adjustments. B A C A. Complete Conversion 1. Remove the cap from the gas pressure regulator using...
... "Complete Installation" section to the open position. 3. A A. To range B. Cap 5. Reinstall the cap. 1. Turn the manual shutoff valve in death or serious burns to the gas supply. 2. Tip Over Hazard A child or adult can result in the gas supply line to complete this procedure. The gas pressure regulator is moved. Close the broiler door and turn the knob to adjust the "LO" setting for proper burner ignition, operation and burner flame adjustments. B A C A. Complete Conversion 1. Remove the cap from the gas pressure regulator using...
Installation Instructions
Page 15
... the parts bag for properly connecting the range to "OFF." 5. Spud size and location remain the same. Natural gas oven orifice spud stamped with the bag containing literature. 7. Remove the LP gas orifice spuds using a 7 mm combination wrench. 5. To Convert Oven Burner 1. Open the oven door and remove oven racks, oven tray, flame spreader and set aside. 2. Install the number "47" LP gas spud. Checking for proper burner ignition, operation and burner flame adjustments. Close the broiler door and turn the knob to the gas supply. 2. Holder NOTE: Depending on model, the range cooktop...
... the parts bag for properly connecting the range to "OFF." 5. Spud size and location remain the same. Natural gas oven orifice spud stamped with the bag containing literature. 7. Remove the LP gas orifice spuds using a 7 mm combination wrench. 5. To Convert Oven Burner 1. Open the oven door and remove oven racks, oven tray, flame spreader and set aside. 2. Install the number "47" LP gas spud. Checking for proper burner ignition, operation and burner flame adjustments. Close the broiler door and turn the knob to the gas supply. 2. Holder NOTE: Depending on model, the range cooktop...


