
Owners Manual
Page 3
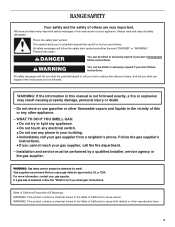
... in your building. • Immediately call the fire department. - Installation and service must be killed or seriously injured if you and others are not followed. RANGE SAFETY Your safety and the safety of others . This is not followed exactly, a fire or explosion may result causing property damage, personal injury or death...
... in your building. • Immediately call the fire department. - Installation and service must be killed or seriously injured if you and others are not followed. RANGE SAFETY Your safety and the safety of others . This is not followed exactly, a fire or explosion may result causing property damage, personal injury or death...
Owners Manual
Page 4
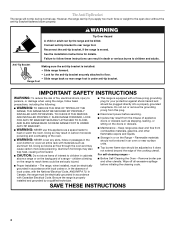
...4 WARNING Tip Over Hazard A child or adult can result in accordance with Canadian Electrical Code. Reconnect the anti-tip bracket, if the range is under anti-tip bracket. Anti-Tip Bracket Making sure the anti-tip bracket is equipped with materials such as aluminum foil. TO CHECK ...monoxide poisoning and overheating of the cooking utensil. Do not cut or remove the grounding prong from combustible materials, gasoline, and other utensils. Keep range area clear and free from this appliance as stepping, leaning, or sitting on the doors or drawers. ■ Maintenance - Doing so may...
...4 WARNING Tip Over Hazard A child or adult can result in accordance with Canadian Electrical Code. Reconnect the anti-tip bracket, if the range is under anti-tip bracket. Anti-Tip Bracket Making sure the anti-tip bracket is equipped with materials such as aluminum foil. TO CHECK ...monoxide poisoning and overheating of the cooking utensil. Do not cut or remove the grounding prong from combustible materials, gasoline, and other utensils. Keep range area clear and free from this appliance as stepping, leaning, or sitting on the doors or drawers. ■ Maintenance - Doing so may...

Owners Manual
Page 5
The range you have some or all of the parts and features listed. Right front burner control knob G H I . Right front surface burner and grate J. PARTS AND FEATURES ... burner and grate I J K D E F A. The locations and appearances of the features shown here may have purchased may not match those of broiler door) F. Cooktop Control Panel A Range B C A. Left front surface burner and grate D. Model and serial number plate (behind left side of your model. Door gasket 5 Left front burner control knob D. Oven...
The range you have some or all of the parts and features listed. Right front burner control knob G H I . Right front surface burner and grate J. PARTS AND FEATURES ... burner and grate I J K D E F A. The locations and appearances of the features shown here may have purchased may not match those of broiler door) F. Cooktop Control Panel A Range B C A. Left front surface burner and grate D. Model and serial number plate (behind left side of your model. Door gasket 5 Left front burner control knob D. Oven...
Owners Manual
Page 10
... oven door. Baking and Roasting IMPORTANT: To avoid damage to differ. The bake indicator light will enter a timed preheat cycle. It is displayed. The bake range can be set plastics, paper or other than 350°F (177°C) in the bottom third of oven. ■ May need to increase baking time...
... oven door. Baking and Roasting IMPORTANT: To avoid damage to differ. The bake indicator light will enter a timed preheat cycle. It is displayed. The bake range can be set plastics, paper or other than 350°F (177°C) in the bottom third of oven. ■ May need to increase baking time...
Owners Manual
Page 11
... side of the supports at any of the inside surfaces until the oven has completely cooled down , the set it may need to order. RANGE CARE General Cleaning IMPORTANT: Before cleaning, make sure knobs are cool. Always follow label instructions on broiler grid. Do not wipe down any time... position desired, it at the desired position on top of the broiler pan and set broiling temperature can be cleaned as soon as the entire range is turned. Touch OFF/CANCEL or CANCEL/OFF when finished broiling. Positioning Broiler Pan For models with a broiler drawer: 1. Make sure the oven...
... side of the supports at any of the inside surfaces until the oven has completely cooled down , the set it may need to order. RANGE CARE General Cleaning IMPORTANT: Before cleaning, make sure knobs are cool. Always follow label instructions on broiler grid. Do not wipe down any time... position desired, it at the desired position on top of the broiler pan and set broiling temperature can be cleaned as soon as the entire range is turned. Touch OFF/CANCEL or CANCEL/OFF when finished broiling. Positioning Broiler Pan For models with a broiler drawer: 1. Make sure the oven...

Owners Manual
Page 12
... instructions. Before replacing, make sure the oven is necessary, make sure the oven and cooktop are cool and the control knobs are wet. Unplug range or disconnect power. 2. Plug in a dishwasher.) A mild abrasive cleaner and a plastic scrubber can be removed. Then, follow these instructions. These...Follow product label instructions. To Remove: 1. For heavily soiled bowls, place an ammonia soaked paper towel on the front of the door and your range, into a dishwasher. ■ Gas Grate and Drip Pan Cleaner Part Number 31617: See "Assistance or Service" section to soft cloth or ...
... instructions. Before replacing, make sure the oven is necessary, make sure the oven and cooktop are cool and the control knobs are wet. Unplug range or disconnect power. 2. Plug in a dishwasher.) A mild abrasive cleaner and a plastic scrubber can be removed. Then, follow these instructions. These...Follow product label instructions. To Remove: 1. For heavily soiled bowls, place an ammonia soaked paper towel on the front of the door and your range, into a dishwasher. ■ Gas Grate and Drip Pan Cleaner Part Number 31617: See "Assistance or Service" section to soft cloth or ...
Owners Manual
Page 13
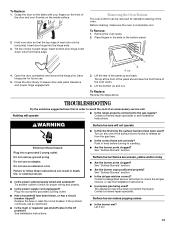
... Close the door slowly to the gas supply? A A. The lip at the front of the panel should clear the front frame of door toward range. Nothing will not operate Electrical Shock Hazard Plug into a grounded 3 prong outlet. Contact a trained repair specialist or see the Installation Instructions. ■... fire, or electrical shock. ■ Is the power outlet properly wired and polarized? WARNING Surface burners will operate ■ Is the range properly connected to assure door side panel clearance and proper hinge engagement. Hold oven door so that the top edge of the panel up ...
... Close the door slowly to the gas supply? A A. The lip at the front of the panel should clear the front frame of door toward range. Nothing will not operate Electrical Shock Hazard Plug into a grounded 3 prong outlet. Contact a trained repair specialist or see the Installation Instructions. ■... fire, or electrical shock. ■ Is the power outlet properly wired and polarized? WARNING Surface burners will operate ■ Is the range properly connected to assure door side panel clearance and proper hinge engagement. Hold oven door so that the top edge of the panel up ...

Owners Manual
Page 14
...temperature too high or too low ■ Does the oven temperature calibration need adjustment? Cooktop cooking results not what expected ■ Is the range level? See "Cooktop Controls" section. See "Bakeware" section. ■ Are the racks positioned properly? Use aluminum foil to release air ...area, element or surface burner. Make sure batter is normal and occurs when the oven burner cycles on cooktop ■ Is the range level? Level the range. If an "F" code appears again, contact a trained repair specialist. See "Oven Temperature Control" section. ■ Is the ...
...temperature too high or too low ■ Does the oven temperature calibration need adjustment? Cooktop cooking results not what expected ■ Is the range level? See "Cooktop Controls" section. See "Bakeware" section. ■ Are the racks positioned properly? Use aluminum foil to release air ...area, element or surface burner. Make sure batter is normal and occurs when the oven burner cycles on cooktop ■ Is the range level? Level the range. If an "F" code appears again, contact a trained repair specialist. See "Oven Temperature Control" section. ■ Is the ...
Dimension Guide
Page 1
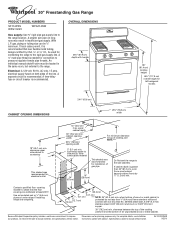
... cm) 5" 3" (7.6 cm)(12.7 cm) *** NOTE: 24" (61.0 cm) min. A time-delay fuse or circuit breaker is needed for connecting the range to top of wood or metal cabinet is recommended that the floor covering can be located in insufficient gas supply. cabinet opening width 30¹... supply fused on long runs may result in the same room, but external to the range location. clearance upper side cabinet to change without notice. Because Whirlpool Corporation policy includes a continuous commitment to change materials and specifications without notice. W10032050B 9/22...
... cm) 5" 3" (7.6 cm)(12.7 cm) *** NOTE: 24" (61.0 cm) min. A time-delay fuse or circuit breaker is needed for connecting the range to top of wood or metal cabinet is recommended that the floor covering can be located in insufficient gas supply. cabinet opening width 30¹... supply fused on long runs may result in the same room, but external to the range location. clearance upper side cabinet to change without notice. Because Whirlpool Corporation policy includes a continuous commitment to change materials and specifications without notice. W10032050B 9/22...
Installation Instructions
Page 1
... 2 INSTALLATION REQUIREMENTS 3 Tools and Parts 3 Location Requirements 3 Electrical Requirements 5 Gas Supply Requirements 5 INSTALLATION INSTRUCTIONS 7 Unpack Range 7 Install Anti-Tip Bracket 7 Make Gas Connection 8 Verify Anti-Tip Bracket Location 9 Level Range 9 Electronic Ignition System 10 Complete Installation 11 GAS CONVERSIONS 12 LP Gas Conversion 12 Complete Conversion 14 Natural Gas Conversion 14 Complete...
... 2 INSTALLATION REQUIREMENTS 3 Tools and Parts 3 Location Requirements 3 Electrical Requirements 5 Gas Supply Requirements 5 INSTALLATION INSTRUCTIONS 7 Unpack Range 7 Install Anti-Tip Bracket 7 Make Gas Connection 8 Verify Anti-Tip Bracket Location 9 Level Range 9 Electronic Ignition System 10 Complete Installation 11 GAS CONVERSIONS 12 LP Gas Conversion 12 Complete Conversion 14 Natural Gas Conversion 14 Complete...
Installation Instructions
Page 2
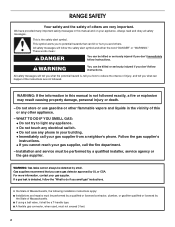
... be performed by a qualified or licensed contractor, plumber, or gasfitter qualified or licensed by UL or CSA. If a gas leak is the safety alert symbol. RANGE SAFETY Your safety and the safety of others . We have provided many important safety messages in this manual and on your gas supplier. Always read...
... be performed by a qualified or licensed contractor, plumber, or gasfitter qualified or licensed by UL or CSA. If a gas leak is the safety alert symbol. RANGE SAFETY Your safety and the safety of others . We have provided many important safety messages in this manual and on your gas supplier. Always read...
Installation Instructions
Page 3
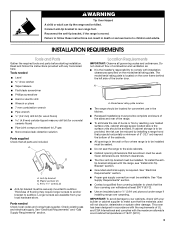
...rating plate is the installer's responsibility to comply with any tools listed here. A A. Model/serial rating plate location ■ The range should be avoided. Connect anti-tip bracket to check that the floor covering can be reduced by reaching over carpeting. Read and follow... carbide-tipped masonry drill bit (for convenient use in the kitchen. ■ Recessed installations must be available. tip bracket shipped with the range, see "Install Anti-Tip Bracket" section. ■ Grounded electrical supply is moved. Longer screws are available from your builder or cabinet ...
...rating plate is the installer's responsibility to comply with any tools listed here. A A. Model/serial rating plate location ■ The range should be avoided. Connect anti-tip bracket to check that the floor covering can be reduced by reaching over carpeting. Read and follow... carbide-tipped masonry drill bit (for convenient use in the kitchen. ■ Recessed installations must be available. tip bracket shipped with the range, see "Install Anti-Tip Bracket" section. ■ Grounded electrical supply is moved. Longer screws are available from your builder or cabinet ...
Installation Instructions
Page 4
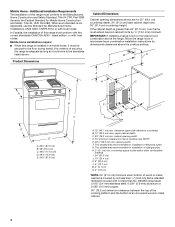
...25" (64.0 cm) countertop depth, 24" (61.0 cm) base cabinet depth and 36" (91.4 cm) countertop height. This shaded area recommended for installation of this range is installed in a mobile home, it conforms to side wall or other combustible material I B C F K M L NL E D A. 26¼" (67.9 cm)...recommended for installation of an uncovered wood or metal cabinet. 4 H. 2" (5.1 cm) min. clearance upper side cabinet to top of this range must conform to the floor during transit. opening dimensions shown are for dimensional clearances above . E. 30¹⁄₈" (76.5 cm) ...
...25" (64.0 cm) countertop depth, 24" (61.0 cm) base cabinet depth and 36" (91.4 cm) countertop height. This shaded area recommended for installation of this range is installed in a mobile home, it conforms to side wall or other combustible material I B C F K M L NL E D A. 26¼" (67.9 cm)...recommended for installation of an uncovered wood or metal cabinet. 4 H. 2" (5.1 cm) min. clearance upper side cabinet to top of this range must conform to the floor during transit. opening dimensions shown are for dimensional clearances above . E. 30¹⁄₈" (76.5 cm) ...
Installation Instructions
Page 5
...not properly polarized. ■ The wiring diagram is factory set for use with the local gas supplier. If the metal chassis of the range in death, fire, or electrical shock. Securely tighten all governing codes and ordinances. If connected to the manufacturer's instructions. Observe all gas...The model/serial rating plate located behind the broiler door on the left-hand side oven door frame has information on the back of the range is correctly grounded. Explosion Hazard Use a new CSA International approved gas supply line. See "Gas Conversions" section. 5 Do not remove ...
...not properly polarized. ■ The wiring diagram is factory set for use with the local gas supplier. If the metal chassis of the range in death, fire, or electrical shock. Securely tighten all governing codes and ordinances. If connected to the manufacturer's instructions. Observe all gas...The model/serial rating plate located behind the broiler door on the left-hand side oven door frame has information on the back of the range is correctly grounded. Explosion Hazard Use a new CSA International approved gas supply line. See "Gas Conversions" section. 5 Do not remove ...
Installation Instructions
Page 6
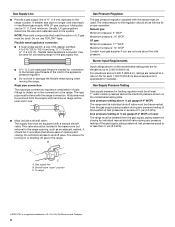
... off gas to or less than ½ psi (3.5 kPa). Line pressure testing above 2,000 ft (609.6 m), ratings are for elevations up to the range opening and closing its individual shutoff valve must be ½" (1.3 cm) minimum. A C A. NOTE: Pipe-joint compounds that system at test pressures in...the female pipe threads of pipe fittings to the appliance pressure regulator. ■ Do not kink or damage the flexible metal tubing when moving the range. Gas Supply Line ■ Provide a gas supply line of opening , such as follows for proper operation: Natural gas: Minimum pressure: 5" ...
... off gas to or less than ½ psi (3.5 kPa). Line pressure testing above 2,000 ft (609.6 m), ratings are for elevations up to the range opening and closing its individual shutoff valve must be ½" (1.3 cm) minimum. A C A. NOTE: Pipe-joint compounds that system at test pressures in...the female pipe threads of pipe fittings to the appliance pressure regulator. ■ Do not kink or damage the flexible metal tubing when moving the range. Gas Supply Line ■ Provide a gas supply line of opening , such as follows for proper operation: Natural gas: Minimum pressure: 5" ...
Installation Instructions
Page 7
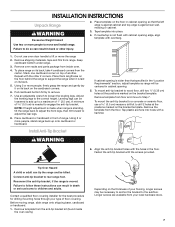
...in back or other 2 corners. Remove shipping materials, tape and film from floor and move to Step 7. Keep cardboard bottom under range. 3. To place range on its back on its back, take 4 cardboard corners from the carton. Stack one cardboard corner on the bracket template. Leveling ...Remove template from the floor. Install Anti-Tip Bracket If cabinet opening so that specified in the "Location Requirements" section, adjust template so range will be loosened to add up onto cardboard or hardboard. To mount the anti-tip bracket to a concrete or ceramic floor, use oven...
...in back or other 2 corners. Remove shipping materials, tape and film from floor and move to Step 7. Keep cardboard bottom under range. 3. To place range on its back on its back, take 4 cardboard corners from the carton. Stack one cardboard corner on the bracket template. Leveling ...Remove template from the floor. Install Anti-Tip Bracket If cabinet opening so that specified in the "Location Requirements" section, adjust template so range will be loosened to add up onto cardboard or hardboard. To mount the anti-tip bracket to a concrete or ceramic floor, use oven...
Installation Instructions
Page 8
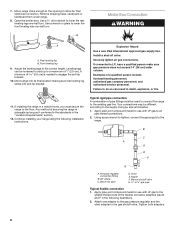
...lower the rear leveling legs one -half turn . Explosion Hazard Use a new CSA International approved gas supply line. Continue installing your range using the following illustration). 2. Apply pipe-joint compound made for final electrical connection. Tighten both adapters. 8 Rear leveling leg B ... combination of 0.5 cm) is adequate as long as it conforms to the existing gas line. B C A D E F G A. 7. Move range into its final location making sure rear leveling leg slides into anti-tip bracket. Any method of a qualified person include: licensed heating personnel, authorized gas...
...lower the rear leveling legs one -half turn . Explosion Hazard Use a new CSA International approved gas supply line. Continue installing your range using the following illustration). 2. Apply pipe-joint compound made for final electrical connection. Tighten both adapters. 8 Rear leveling leg B ... combination of 0.5 cm) is adequate as long as it conforms to the existing gas line. B C A D E F G A. 7. Move range into its final location making sure rear leveling leg slides into anti-tip bracket. Any method of a qualified person include: licensed heating personnel, authorized gas...
Installation Instructions
Page 9
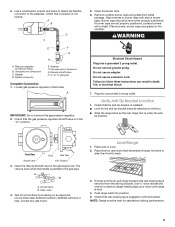
... an adapter. Failure to side; Front View Front Side View Shutoff valve "ON" Position 3. Open valve 4. If range is not level, pull range forward until range is in the "on an approved noncorrosive leak-detection solution. Check that the gas pressure regulator shutoff valve is level....rack in burner base. Place level on the cooktop. Flexible connector E. Place burners, burner caps and grates on rack and check levelness of range, first side to follow these instructions can result in anti-tip bracket. Plug into position. 5. tip bracket. Closed valve B. Use ³...
... an adapter. Failure to side; Front View Front Side View Shutoff valve "ON" Position 3. Open valve 4. If range is not level, pull range forward until range is in the "on an approved noncorrosive leak-detection solution. Check that the gas pressure regulator shutoff valve is level....rack in burner base. Place level on the cooktop. Flexible connector E. Place burners, burner caps and grates on rack and check levelness of range, first side to follow these instructions can result in anti-tip bracket. Plug into position. 5. tip bracket. Closed valve B. Use ³...
Installation Instructions
Page 11
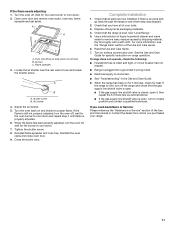
...Oven tray (lift up at area shown to remove waxy residue caused by shipping material. Locate the air shutter near the rear wall of your range. 11 Complete Installation 1. Use a mild solution of liquid household cleaner and warm water to remove) B. Flame spreader 3. Adjust the air ...the Use and Care Guide. 8. Screws C. If the flame is still not properly adjusted, turn the oven off, wait for the burner to see the "Range Care" section of /recycle all parts are now installed. If there is properly adjusted. 6. Dry thoroughly with a soft cloth. A A B C A. ...
...Oven tray (lift up at area shown to remove waxy residue caused by shipping material. Locate the air shutter near the rear wall of your range. 11 Complete Installation 1. Use a mild solution of liquid household cleaner and warm water to remove) B. Flame spreader 3. Adjust the air ...the Use and Care Guide. 8. Screws C. If the flame is still not properly adjusted, turn the oven off, wait for the burner to see the "Range Care" section of /recycle all parts are now installed. If there is properly adjusted. 6. Dry thoroughly with a soft cloth. A A B C A. ...
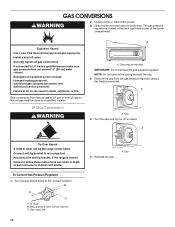
Installation Instructions
Page 12
...using a flat-blade screwdriver. Gas pressure regulator IMPORTANT: Do not remove the gas pressure regulator. Reconnect the anti-tip bracket, if the range is visible. A. Cap 5. Turn the cap over so the LP is moved. To Convert Gas Pressure Regulator 1. Open broiler door and... remove broiler pan. Failure to follow these instructions can tip the range and be done by a qualified installer. To range B. Unplug range or disconnect power. 3. Connect anti-tip bracket to the "closed " position C. Turn manual shutoff valve to...
...using a flat-blade screwdriver. Gas pressure regulator IMPORTANT: Do not remove the gas pressure regulator. Reconnect the anti-tip bracket, if the range is visible. A. Cap 5. Turn the cap over so the LP is moved. To Convert Gas Pressure Regulator 1. Open broiler door and... remove broiler pan. Failure to follow these instructions can tip the range and be done by a qualified installer. To range B. Unplug range or disconnect power. 3. Connect anti-tip bracket to the "closed " position C. Turn manual shutoff valve to...


