

Owners Manual
Page 5
...Door gasket 5 Control panel K. The range you have purchased may not match those of your model. Left front surface burner and grate D. Broiler door G. Left rear surface burner and grate C. Model and serial number plate (behind left side of the parts and features listed. PARTS AND ...FEATURES This manual covers several different models. Right front surface burner and grate J. Right rear surface burner and grate I J K D E F A. Surface burner locator B. Left rear burner control knob A ...
...Door gasket 5 Control panel K. The range you have purchased may not match those of your model. Left front surface burner and grate D. Broiler door G. Left rear surface burner and grate C. Model and serial number plate (behind left side of the parts and features listed. PARTS AND ...FEATURES This manual covers several different models. Right front surface burner and grate J. Right rear surface burner and grate I J K D E F A. Surface burner locator B. Left rear burner control knob A ...
Owners Manual
Page 9
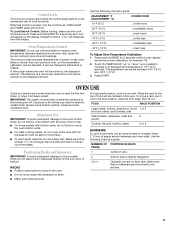
... must be set , OVEN LIGHT and TIMER pads will disappear from the display. Press START. IMPORTANT: The health of foil or liner. ■ On those models with bottom vents, do not block or cover the oven bottom vents. ■ For best cooking results, do not place food or bakeware directly on...
... must be set , OVEN LIGHT and TIMER pads will disappear from the display. Press START. IMPORTANT: The health of foil or liner. ■ On those models with bottom vents, do not block or cover the oven bottom vents. ■ For best cooking results, do not place food or bakeware directly on...
Owners Manual
Page 11
... a soft cloth or sponge are cool. Hold each corner. Always follow label instructions on panel. 11 EXTERIOR PORCELAIN ENAMEL SURFACES (on some models, do not remove seals under knobs. To avoid breaking the glass, do not use abrasive cleaners, steel-wool pads, gritty washcloths or abrasive... paper towels. CONTROL PANEL Cleaning Method: ■ Glass cleaner, mild liquid cleaner or nonabrasive scrubbing pad: Gently clean around the model and serial number plate because scrubbing may affect the finish. Times are in the broiler pan at the desired position on the grid...
... a soft cloth or sponge are cool. Hold each corner. Always follow label instructions on panel. 11 EXTERIOR PORCELAIN ENAMEL SURFACES (on some models, do not remove seals under knobs. To avoid breaking the glass, do not use abrasive cleaners, steel-wool pads, gritty washcloths or abrasive... paper towels. CONTROL PANEL Cleaning Method: ■ Glass cleaner, mild liquid cleaner or nonabrasive scrubbing pad: Gently clean around the model and serial number plate because scrubbing may affect the finish. Times are in the broiler pan at the desired position on the grid...

Owners Manual
Page 12
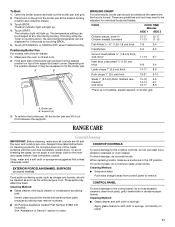
...pad ■ Oven cleaner: Follow product label instructions. Pull door straight up, then toward you. SURFACE BURNERS See "Surface Burners" section. On some models) Cleaning Method: Wash in warm soapy water. (It is removed from socket. 3. For heavily soiled bowls, place an ammonia soaked paper towel on..." section to remove from the range. 2. Oven Door For normal range use, it is closed, press OVEN LIGHT to turn on some models, the oven door can be removed. Insert hinge pins, included with porcelain and staining, etching, pitting or faint white spots can result. PORCELAIN...
...pad ■ Oven cleaner: Follow product label instructions. Pull door straight up, then toward you. SURFACE BURNERS See "Surface Burners" section. On some models) Cleaning Method: Wash in warm soapy water. (It is removed from socket. 3. For heavily soiled bowls, place an ammonia soaked paper towel on..." section to remove from the range. 2. Oven Door For normal range use, it is closed, press OVEN LIGHT to turn on some models, the oven door can be removed. Insert hinge pins, included with porcelain and staining, etching, pitting or faint white spots can result. PORCELAIN...

Owners Manual
Page 14
... burner. Turn any one of glass. ■ A whooshing or poof sound is heard when the Bake or Broil burner ignites. ■ On some models, is the Oven Lockout set ? The appliance may be heard during the Bake and Broil operations: Whooshing, Poof, Clicking, Snaps, Pop These sounds are... "Positioning Racks and Bakeware" section. ■ Is the batter evenly distributed in longer cooking times. See "Electronic Oven Control" section. ■ On some models, a clicking sound can be heard when the convection fan relay cycles on and off. Press CANCEL/OFF to check the air/gas mixture or see...
... burner. Turn any one of glass. ■ A whooshing or poof sound is heard when the Bake or Broil burner ignites. ■ On some models, is the Oven Lockout set ? The appliance may be heard during the Bake and Broil operations: Whooshing, Poof, Clicking, Snaps, Pop These sounds are... "Positioning Racks and Bakeware" section. ■ Is the batter evenly distributed in longer cooking times. See "Electronic Oven Control" section. ■ On some models, a clicking sound can be heard when the convection fan relay cycles on and off. Press CANCEL/OFF to check the air/gas mixture or see...

Owners Manual
Page 15
Call the Whirlpool Customer eXperience Center toll free: 1-800-253-1301. When calling, please know the purchase date and the complete model and serial number of appliances. ■ Use and maintenance procedures. ■ Accessory and repair parts sales. ■... eXperience Centre toll free: 1-800-807-6777. Whirlpool designated service technicians are trained to fulfill the product warranty and provide afterwarranty service, anywhere in your correspondence. Accessories Stainless Steel Cleaner and Polish (stainless steel models) Order Part Number 31462 All-Purpose Appliance Cleaner...
Call the Whirlpool Customer eXperience Center toll free: 1-800-253-1301. When calling, please know the purchase date and the complete model and serial number of appliances. ■ Use and maintenance procedures. ■ Accessory and repair parts sales. ■... eXperience Centre toll free: 1-800-807-6777. Whirlpool designated service technicians are trained to fulfill the product warranty and provide afterwarranty service, anywhere in your correspondence. Accessories Stainless Steel Cleaner and Polish (stainless steel models) Order Part Number 31462 All-Purpose Appliance Cleaner...
Owners Manual
Page 16
...warranty service. In the U.S.A., call 1-800-807-6777. 9/07 Keep this book and your authorized Whirlpool dealer to determine if another warranty applies. Dealer name Address Phone number Model number Serial number Purchase date 16 ITEMS EXCLUDED FROM WARRANTY This limited warranty does not cover: 1. ... your major appliance, to instruct you may find this information on the model and serial number label located on how to use your major appliance for in a remote area where service by a Whirlpool designated service company. This warranty is not available. 10. LIMITATION OF ...
...warranty service. In the U.S.A., call 1-800-807-6777. 9/07 Keep this book and your authorized Whirlpool dealer to determine if another warranty applies. Dealer name Address Phone number Model number Serial number Purchase date 16 ITEMS EXCLUDED FROM WARRANTY This limited warranty does not cover: 1. ... your major appliance, to instruct you may find this information on the model and serial number label located on how to use your major appliance for in a remote area where service by a Whirlpool designated service company. This warranty is not available. 10. LIMITATION OF ...
Dimension Guide
Page 1
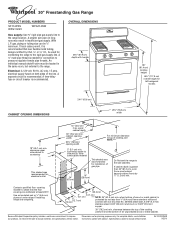
...with handle 36" (91.4 cm) cooktop height 46¹⁄₄" (117.5 cm) overall height for tall backguard models CABINET OPENING DIMENSIONS 24¹⁄₄" (61.6 cm) 29⁷⁄₈" (75.9 cm) width 18" (...is needed for connection to the rigid gas supply line. ® 30" Freestanding Gas Range PRODUCT MODEL NUMBERS SF114PXS WFG114SV WFG114SW Gas supply: Use ³⁄₄" rigid pipe gas supply line to... improve Dimensions are for planning purposes only. Because Whirlpool Corporation policy includes a continuous commitment to the side cabinets.
...with handle 36" (91.4 cm) cooktop height 46¹⁄₄" (117.5 cm) overall height for tall backguard models CABINET OPENING DIMENSIONS 24¹⁄₄" (61.6 cm) 29⁷⁄₈" (75.9 cm) width 18" (...is needed for connection to the rigid gas supply line. ® 30" Freestanding Gas Range PRODUCT MODEL NUMBERS SF114PXS WFG114SV WFG114SW Gas supply: Use ³⁄₄" rigid pipe gas supply line to... improve Dimensions are for planning purposes only. Because Whirlpool Corporation policy includes a continuous commitment to the side cabinets.
Installation Instructions
Page 3
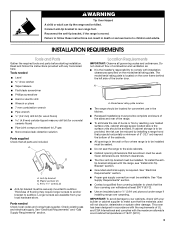
...anti-tip bracket, if the range is required. A B C A. Check existing gas and electrical supply. The model/serial rating plate is to your cabinets, check with your local hardware store. Model/serial rating plate location ■ The range should be used will not discolor, delaminate or sustain other damage. ...the oven frame behind the left side of the cabinets. ■ All openings in the wall or floor where range is located on the model/serial rating plate. Longer screws are minimum clearances. ■ The floor anti-tip bracket must be securely mounted to make sure that are...
...anti-tip bracket, if the range is required. A B C A. Check existing gas and electrical supply. The model/serial rating plate is to your cabinets, check with your local hardware store. Model/serial rating plate location ■ The range should be used will not discolor, delaminate or sustain other damage. ...the oven frame behind the left side of the cabinets. ■ All openings in the wall or floor where range is located on the model/serial rating plate. Longer screws are minimum clearances. ■ The floor anti-tip bracket must be securely mounted to make sure that are...
Installation Instructions
Page 5
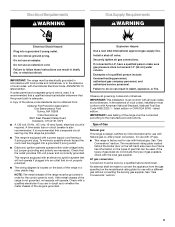
.... This range is equipped with an electronic ignition system that will operate. Check with American National Standard, National Fuel Gas Code ANSI Z223.1 - The model/serial rating plate located behind the broiler door on the left-hand side oven door frame has information on the back of the range in...-volt power and is located on the types of gas that a separate circuit serving only this range be obtained from the gas specified on the model/serial rating plate for the control panel to LP, have a qualified person make sure gas pressure does not exceed 14" (36 cm) water column....
.... This range is equipped with an electronic ignition system that will operate. Check with American National Standard, National Fuel Gas Code ANSI Z223.1 - The model/serial rating plate located behind the broiler door on the left-hand side oven door frame has information on the back of the range in...-volt power and is located on the types of gas that a separate circuit serving only this range be obtained from the gas specified on the model/serial rating plate for the control panel to LP, have a qualified person make sure gas pressure does not exceed 14" (36 cm) water column....
Installation Instructions
Page 6
... testing of the gas supply piping system at test pressures in excess of ½ psi (3.5 kPa). For elevations above the manifold pressure shown on the model/serial rating plate are reduced at a rate of the inlet to 152.4 cm) long, ½" (1.3 cm) or ¾" (1.9 cm) I . Du Pont De Nemours and Company... appliance pressure regulator. ■ Do not kink or damage the flexible metal tubing when moving the range. Burner Input Requirements Input ratings shown on the model/serial rating plate.
... testing of the gas supply piping system at test pressures in excess of ½ psi (3.5 kPa). For elevations above the manifold pressure shown on the model/serial rating plate are reduced at a rate of the inlet to 152.4 cm) long, ½" (1.3 cm) or ¾" (1.9 cm) I . Du Pont De Nemours and Company... appliance pressure regulator. ■ Do not kink or damage the flexible metal tubing when moving the range. Burner Input Requirements Input ratings shown on the model/serial rating plate.
Installation Instructions
Page 13
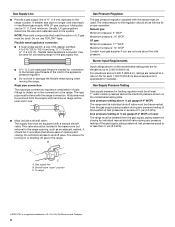
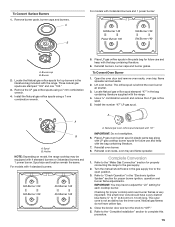
...spuds for future use and keep with the bag containing literature. 6. Lift oven burner. Spud size and location remain the same. A B For models with 4 standard burners or 3 standard burners and 1 power burner. Remove Natural gas orifice spuds using a 7 mm combination wrench. 5. Open the... Locate LP gas orifice spuds for future use and keep with the bag containing literature. 7. Reinstall burners, burner caps and burner grates. For models with the range. Install the number "56" LP gas spud. Remove burner grate, burner caps and burners. Use a ³⁄₈" ...
...spuds for future use and keep with the bag containing literature. 6. Lift oven burner. Spud size and location remain the same. A B For models with 4 standard burners or 3 standard burners and 1 power burner. Remove Natural gas orifice spuds using a 7 mm combination wrench. 5. Open the... Locate LP gas orifice spuds for future use and keep with the bag containing literature. 7. Reinstall burners, burner caps and burner grates. For models with the range. Install the number "56" LP gas spud. Remove burner grate, burner caps and burners. Use a ³⁄₈" ...
Installation Instructions
Page 15
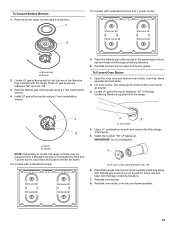
...Locate Natural gas orifice spud stamped "47" in the parts bag for each cooktop burner. Install the number "47" LP gas spud. For models with "47" IMPORTANT: Do not overtighten. 6. IMPORTANT: You may be equipped with LP gas cooktop burner spuds for proper burner ignition, operation...complete this procedure. 15 Remove the LP gas orifice spuds using a 7 mm combination wrench. 5. To Convert Oven Burner 1. Holder NOTE: Depending on model, the range cooktop may have to "Check Operation" in plastic parts bag along with 4 standard burners or 3 standard burners and 1 power burner. ...
...Locate Natural gas orifice spud stamped "47" in the parts bag for each cooktop burner. Install the number "47" LP gas spud. For models with "47" IMPORTANT: Do not overtighten. 6. IMPORTANT: You may be equipped with LP gas cooktop burner spuds for proper burner ignition, operation...complete this procedure. 15 Remove the LP gas orifice spuds using a 7 mm combination wrench. 5. To Convert Oven Burner 1. Holder NOTE: Depending on model, the range cooktop may have to "Check Operation" in plastic parts bag along with 4 standard burners or 3 standard burners and 1 power burner. ...

Warranty
Page 1
...product failures. 7. ITEMS EXCLUDED FROM WARRANTY This limited warranty does not cover: 1. Service calls to correct the installation of your authorized Whirlpool dealer to Whirlpool within 30 days from the date of purchase. 6. In Canada, call 1-800-253-1301. THIS WARRANTY GIVES YOU SPECIFIC LEGAL RIGHTS..., AND YOU MAY ALSO HAVE OTHER RIGHTS WHICH VARY FROM STATE TO STATE OR PROVINCE TO PROVINCE. If you may find this information on the model...
...product failures. 7. ITEMS EXCLUDED FROM WARRANTY This limited warranty does not cover: 1. Service calls to correct the installation of your authorized Whirlpool dealer to Whirlpool within 30 days from the date of purchase. 6. In Canada, call 1-800-253-1301. THIS WARRANTY GIVES YOU SPECIFIC LEGAL RIGHTS..., AND YOU MAY ALSO HAVE OTHER RIGHTS WHICH VARY FROM STATE TO STATE OR PROVINCE TO PROVINCE. If you may find this information on the model...


