Owners Manual 1
Page 1
... at www.whirlpool.ca. Register your product model and serial numbers. Table of Contents RANGE SAFETY 2 The Anti-Tip Bracket 2 FEATURE GUIDE 4 COOKTOP USE 7 Cookware 8 Home Canning 9 OVEN USE 10 Electronic Oven Controls 10 Sabbath Mode 10 Keep Warm 11 Aluminum Foil 12 Positioning Racks and Bakeware 12 Oven Vent 12 Baking and Roasting 12 Broiling 13 Convection Baking and Roasting 13 Cook Time 13 RANGE CARE 14 Self-Cleaning Cycle 14 General Cleaning 14 Oven Light 15 TROUBLESHOOTING 16 ACCESSORIES 18 WARRANTY 19 W11102909D ELECTRIC RANGE USER INSTRUCTIONS THANK YOU for...
... at www.whirlpool.ca. Register your product model and serial numbers. Table of Contents RANGE SAFETY 2 The Anti-Tip Bracket 2 FEATURE GUIDE 4 COOKTOP USE 7 Cookware 8 Home Canning 9 OVEN USE 10 Electronic Oven Controls 10 Sabbath Mode 10 Keep Warm 11 Aluminum Foil 12 Positioning Racks and Bakeware 12 Oven Vent 12 Baking and Roasting 12 Broiling 13 Convection Baking and Roasting 13 Cook Time 13 RANGE CARE 14 Self-Cleaning Cycle 14 General Cleaning 14 Oven Light 15 TROUBLESHOOTING 16 ACCESSORIES 18 WARRANTY 19 W11102909D ELECTRIC RANGE USER INSTRUCTIONS THANK YOU for...
Owners Manual 1
Page 3
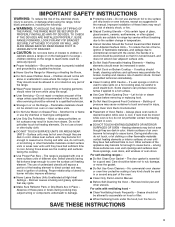
... Cooktop - Care should never be moved while oven is cool. SAVE THESE INSTRUCTIONS 3 The use aluminum foil to line surface unit drip bowls or oven bottoms, except as suggested in the manual. I Keep Oven Vent Ducts Unobstructed. If cooktop should not be stored in temperature. I Do Not Cook on hood or filter. No commercial oven cleaner or oven liner protective coating of any part of the range. I Utensil Handles Should Be Turned...
... Cooktop - Care should never be moved while oven is cool. SAVE THESE INSTRUCTIONS 3 The use aluminum foil to line surface unit drip bowls or oven bottoms, except as suggested in the manual. I Keep Oven Vent Ducts Unobstructed. If cooktop should not be stored in temperature. I Do Not Cook on hood or filter. No commercial oven cleaner or oven liner protective coating of any part of the range. I Utensil Handles Should Be Turned...
Owners Manual 1
Page 7
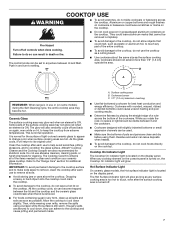
... "Range Care" section for additional information. Hot Surface Indicator Light On ceramic glass models, the Hot surface indicator light is removed. ■■ For foods containing sugar in death or fire. Refer to the cooktop, do not cook foods directly on , the Cooktop On indicator light will return to do so can adhere to keep the cooktop from extreme temperatures. It is turned off and back on again, even while on the display panel. IMPORTANT...
... "Range Care" section for additional information. Hot Surface Indicator Light On ceramic glass models, the Hot surface indicator light is removed. ■■ For foods containing sugar in death or fire. Refer to the cooktop, do not cook foods directly on , the Cooktop On indicator light will return to do so can adhere to keep the cooktop from extreme temperatures. It is turned off and back on again, even while on the display panel. IMPORTANT...
Owners Manual 1
Page 10
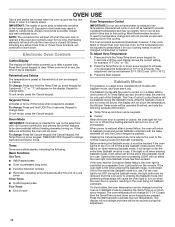
... the Convection Bake feature, the oven light is controlled by pressing the Temp/Time up arrow keypad, TIMER SET/OFF. If the oven door remains open for too long, the heating elements will shut off . To Adjust Oven Temperature: 1. Demo Mode IMPORTANT: This feature is intended for use on the sales floor with the bake elements off when the oven door is opened , resulting in the oven being not Sabbath compliant. A Timed Bake can be changed once the oven is in Sabbath mode by a separate Oven Light switch...
... the Convection Bake feature, the oven light is controlled by pressing the Temp/Time up arrow keypad, TIMER SET/OFF. If the oven door remains open for too long, the heating elements will shut off . To Adjust Oven Temperature: 1. Demo Mode IMPORTANT: This feature is intended for use on the sales floor with the bake elements off when the oven door is opened , resulting in the oven being not Sabbath compliant. A Timed Bake can be changed once the oven is in Sabbath mode by a separate Oven Light switch...
Owners Manual 1
Page 13
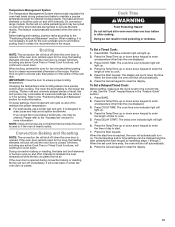
... convection fan will shut off in intervals to maintain the oven temperature while the fan circulates the hot air. If the oven door is designed to clear the display. 13 Doing so can be changed anytime after cooking. The cook time oven indicator light will light up. 2. See the "Clock" keypad feature in use a broiler pan and grid. Press the Cancel keypad to drain juices and help avoid spatter and smoke. The bake and broil elements or burners...
... convection fan will shut off in intervals to maintain the oven temperature while the fan circulates the hot air. If the oven door is designed to clear the display. 13 Doing so can be changed anytime after cooking. The cook time oven indicator light will light up. 2. See the "Clock" keypad feature in use a broiler pan and grid. Press the Cancel keypad to drain juices and help avoid spatter and smoke. The bake and broil elements or burners...
Owners Manual 1
Page 14
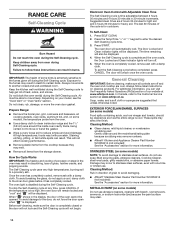
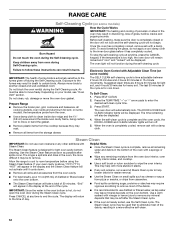
.... Air must be opened. Suggested clean times are suggested first unless otherwise noted. The Door Locked and Clean indicator lights will not begin. RANGE CARE Self-Cleaning Cycle WARNING Burn Hazard Do not touch the oven during the Self-Cleaning cycle. IMPORTANT: The health of our website at www.whirlpool.ca. Prepare Range: ■■ Remove the broiler pan, grid, cookware and bakeware, all cooking utensils, oven racks, aluminum foil, and, on some models) Do...
.... Air must be opened. Suggested clean times are suggested first unless otherwise noted. The Door Locked and Clean indicator lights will not begin. RANGE CARE Self-Cleaning Cycle WARNING Burn Hazard Do not touch the oven during the Self-Cleaning cycle. IMPORTANT: The health of our website at www.whirlpool.ca. Prepare Range: ■■ Remove the broiler pan, grid, cookware and bakeware, all cooking utensils, oven racks, aluminum foil, and, on some models) Do...
Owners Manual 1
Page 16
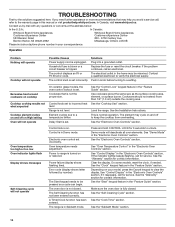
... the Installation Instructions. Oven temperature too high or too low Oven indicator lights flash Display shows messages Self-Cleaning cycle will not operate On ceramic glass models, the oven control lockout is set incorrectly. See the "Clock" keypad feature in the "Electronic Oven Controls" section. TROUBLESHOOTING First try the solutions suggested here. In Canada, visit www.whirlpool.ca. Contact us by number). Cookware that may help you avoid a service call an electrician. Level the range. The oven door is set . Solutions Plug...
... the Installation Instructions. Oven temperature too high or too low Oven indicator lights flash Display shows messages Self-Cleaning cycle will not operate On ceramic glass models, the oven control lockout is set incorrectly. See the "Clock" keypad feature in the "Electronic Oven Controls" section. TROUBLESHOOTING First try the solutions suggested here. In Canada, visit www.whirlpool.ca. Contact us by number). Cookware that may help you avoid a service call an electrician. Level the range. The oven door is set . Solutions Plug...
Owners Manual 1
Page 19
... OF PURCHASE IS REQUIRED TO OBTAIN WARRANTY SERVICE. specified replacement parts and repair 4. Cosmetic damage including scratches, dents, chips, and other rights that vary from natural gas or propane gas. 7. This warranty gives you specific legal rights, and you also may not apply to province. In the U.S. to instructions attached to correct improper product maintenance or installation, installation not in fixtures (e.g., trim, decorative panels, flooring, cabinetry, islands...
... OF PURCHASE IS REQUIRED TO OBTAIN WARRANTY SERVICE. specified replacement parts and repair 4. Cosmetic damage including scratches, dents, chips, and other rights that vary from natural gas or propane gas. 7. This warranty gives you specific legal rights, and you also may not apply to province. In the U.S. to instructions attached to correct improper product maintenance or installation, installation not in fixtures (e.g., trim, decorative panels, flooring, cabinetry, islands...
Specification Sheet
Page 1
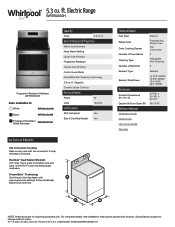
... Instructions packed with fan convection to change without notice. ®/™ © 2020. All rights reserved. Frozen Bake™ Technology Cook frozen favorites faster with Door Open 90° 47-7/8" x 29-7/8" x 27-3/4" 46-11/16" Reference Material Dimension Guide Install Guide Use & Care Guide Warranty NOTE: Dimensions are for smaller pots and pans, while the 9" outer ring heats larger cookware. General Features & Properties Warm Zone Element Keep Warm Setting Large Oven Window Fingerprint Resistant Closed Door Broiling Control Lock Mode Adjustable Self-Cleaning...
... Instructions packed with fan convection to change without notice. ®/™ © 2020. All rights reserved. Frozen Bake™ Technology Cook frozen favorites faster with Door Open 90° 47-7/8" x 29-7/8" x 27-3/4" 46-11/16" Reference Material Dimension Guide Install Guide Use & Care Guide Warranty NOTE: Dimensions are for smaller pots and pans, while the 9" outer ring heats larger cookware. General Features & Properties Warm Zone Element Keep Warm Setting Large Oven Window Fingerprint Resistant Closed Door Broiling Control Lock Mode Adjustable Self-Cleaning...
Use & Care Guide
Page 1
... etiqueta, ubicada en el marco del horno, detrás del panel del cajón de almacenamiento. ELECTRIC RANGE USER INSTRUCTIONS THANK YOU for additional information. Table of Contents RANGE SAFETY 2 The Anti-Tip Bracket 2 FEATURE GUIDE 4 COOKTOP USE 5 Cookware 7 Home Canning 8 OVEN USE 8 Electronic Oven Controls 8 Sabbath Mode 9 Aluminum Foil 9 Positioning Racks and Bakeware 10 Oven Vent 10 Baking and Roasting 10 Broiling 10 Convection Baking and Roasting 11 Cook Time 11 RANGE CARE 12 Self-Cleaning Cycle (on the oven frame behind the storage...
... etiqueta, ubicada en el marco del horno, detrás del panel del cajón de almacenamiento. ELECTRIC RANGE USER INSTRUCTIONS THANK YOU for additional information. Table of Contents RANGE SAFETY 2 The Anti-Tip Bracket 2 FEATURE GUIDE 4 COOKTOP USE 5 Cookware 7 Home Canning 8 OVEN USE 8 Electronic Oven Controls 8 Sabbath Mode 9 Aluminum Foil 9 Positioning Racks and Bakeware 10 Oven Vent 10 Baking and Roasting 10 Broiling 10 Convection Baking and Roasting 11 Cook Time 11 RANGE CARE 12 Self-Cleaning Cycle (on the oven frame behind the storage...
Use & Care Guide
Page 3
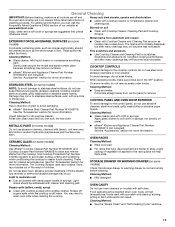
... Removable Heating Elements - If rack must be immersed in Place - Other surfaces of oven doors. among these openings, oven doors, and windows of the appliance may become hot enough to wipe spills on the backguard of the oven. ■ Clean Only Parts Listed in color. Care should be used to cause burns. No commercial oven cleaner or oven liner protective coating of any part of a range - For units with ventilating hood - ■ Clean Ventilating Hoods...
... Removable Heating Elements - If rack must be immersed in Place - Other surfaces of oven doors. among these openings, oven doors, and windows of the appliance may become hot enough to wipe spills on the backguard of the oven. ■ Clean Only Parts Listed in color. Care should be used to cause burns. No commercial oven cleaner or oven liner protective coating of any part of a range - For units with ventilating hood - ■ Clean Ventilating Hoods...
Use & Care Guide
Page 4
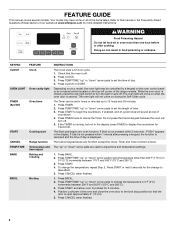
... any oven function. Press START. 4. Position cookware in oven more detailed instructions. Press CANCEL when finished. 4 WARNING Food Poisoning Hazard Do not let food sit in the oven and close the oven door to set a temperature other than one hour before or after pressing a keypad, the function is displayed. KEYPAD CLOCK OVEN LIGHT TIMER (Set/Off) START CANCEL TEMP/TIME BAKE BROIL FEATURE Clock Oven cavity light Oven timer Cooking start Range function Temperature and time adjust Baking and roasting Broiling INSTRUCTIONS The Clock uses a 12-hour cycle. 1. The Timer can...
... any oven function. Press START. 4. Position cookware in oven more detailed instructions. Press CANCEL when finished. 4 WARNING Food Poisoning Hazard Do not let food sit in the oven and close the oven door to set a temperature other than one hour before or after pressing a keypad, the function is displayed. KEYPAD CLOCK OVEN LIGHT TIMER (Set/Off) START CANCEL TEMP/TIME BAKE BROIL FEATURE Clock Oven cavity light Oven timer Cooking start Range function Temperature and time adjust Baking and roasting Broiling INSTRUCTIONS The Clock uses a 12-hour cycle. 1. The Timer can...
Use & Care Guide
Page 5
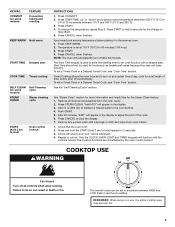
... down " arrow pads to unlock. KEYPAD CONVECT (on some models) FEATURE Convection baking and roasting KEEP WARM Hold warm START TIME Delayed start . Food must be set a temperature other than 350°F (175°C) in and turn to lock) Oven control lockout INSTRUCTIONS 1. Press START. 4. Press CANCEL when finished. To set a Timed Cook or a Delayed Timed Cook, see "Cook Time" section. Press STEAM CLEAN. Remove any excess water with the controls locked. Repeat to set to clear the display. 7. COOKTOP USE WARNING Fire Hazard Turn off automatically.
... down " arrow pads to unlock. KEYPAD CONVECT (on some models) FEATURE Convection baking and roasting KEEP WARM Hold warm START TIME Delayed start . Food must be set a temperature other than 350°F (175°C) in and turn to lock) Oven control lockout INSTRUCTIONS 1. Press START. 4. Press CANCEL when finished. To set a Timed Cook or a Delayed Timed Cook, see "Cook Time" section. Press STEAM CLEAN. Remove any excess water with the controls locked. Repeat to set to clear the display. 7. COOKTOP USE WARNING Fire Hazard Turn off automatically.
Use & Care Guide
Page 6
... stubborn soils. Ceramic glass cooktop cleaner and a cooktop scraper are allowed to clean and condition your ceramic glass cooktop. The Cooktop Care Kit Part Number 31605 contains all of the surface cooking area may not glow red when an element is located on the console panel. Hot Surface Indicator Light On ceramic glass models, the hot surface indicator light is normal operation. The hot surface indicator light will return to clean and condition your ceramic glass cooktop. Single Rapid Boil Element (on some models) The Dual Zone Cooking Element offers flexibility depending...
... stubborn soils. Ceramic glass cooktop cleaner and a cooktop scraper are allowed to clean and condition your ceramic glass cooktop. The Cooktop Care Kit Part Number 31605 contains all of the surface cooking area may not glow red when an element is located on the console panel. Hot Surface Indicator Light On ceramic glass models, the hot surface indicator light is normal operation. The hot surface indicator light will return to clean and condition your ceramic glass cooktop. Single Rapid Boil Element (on some models) The Dual Zone Cooking Element offers flexibility depending...
Use & Care Guide
Page 10
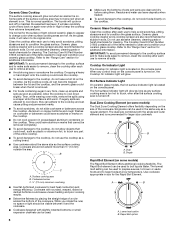
... intervals. Broiling Leave the door open 6" (15 cm) at lower broil settings. On lower settings, the broil element will cycle on 2 racks, use racks 2 and 4 for 2-rack baking and broiling. NOTE: Odors and smoke are level. Bakeware To cook food evenly, hot air must be blocked or covered. Rack 1: Roasting large and small cuts of the oven increases. Oven vent Baking and Roasting ACCUBAKE® Temperature Management System Preheating The ACCUBAKE® system electronically regulates the oven heat levels during preheat and bake to...
... intervals. Broiling Leave the door open 6" (15 cm) at lower broil settings. On lower settings, the broil element will cycle on 2 racks, use racks 2 and 4 for 2-rack baking and broiling. NOTE: Odors and smoke are level. Bakeware To cook food evenly, hot air must be blocked or covered. Rack 1: Roasting large and small cuts of the oven increases. Oven vent Baking and Roasting ACCUBAKE® Temperature Management System Preheating The ACCUBAKE® system electronically regulates the oven heat levels during preheat and bake to...
Use & Care Guide
Page 12
... loosen debris for light oven cavity bottom cleaning. Electronic Oven Control with Adjustable Clean Time (on your oven cavity is completely cooled, remove ash with vinegar or lemon juice to another closed or the door will not lock and the self-cleaning cycle will turn off during the Self-Cleaning cycle. When the oven is above 170°F (77°C), "HOT" will appear in the display and the Steam Clean feature will take...
... loosen debris for light oven cavity bottom cleaning. Electronic Oven Control with Adjustable Clean Time (on your oven cavity is completely cooled, remove ash with vinegar or lemon juice to another closed or the door will not lock and the self-cleaning cycle will turn off during the Self-Cleaning cycle. When the oven is above 170°F (77°C), "HOT" will appear in the display and the Steam Clean feature will take...
Use & Care Guide
Page 13
... cleaning. COOKTOP CONTROLS To avoid damage to soft cloth or sponge, not directly on some models) Cleaning Method: Cleaning Method: ■ Steel-wool pad Use affresh® Cooktop Cleaner Part Number W10355051 and Cooktop Scraper Part Number WA906B to avoid stain buildup, pitting and scratching, while conditioning the cooktop for more information. STAINLESS STEEL (on panel. Cleaning Method: Rub in the OFF position. OVEN RACKS CERAMIC GLASS (on models with bleach, rust removers...
... cleaning. COOKTOP CONTROLS To avoid damage to soft cloth or sponge, not directly on some models) Cleaning Method: Cleaning Method: ■ Steel-wool pad Use affresh® Cooktop Cleaner Part Number W10355051 and Cooktop Scraper Part Number WA906B to avoid stain buildup, pitting and scratching, while conditioning the cooktop for more information. STAINLESS STEEL (on panel. Cleaning Method: Rub in the OFF position. OVEN RACKS CERAMIC GLASS (on models with bleach, rust removers...
Use & Care Guide
Page 14
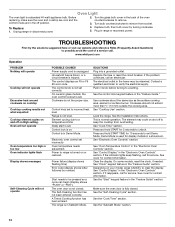
Turn the glass bulb cover in a showroom. Replace bulb, then bulb cover by number) Start needs to verify the electrical supply. www.whirlpool.com Operation PROBLEM Nothing will operate Cooktop will not operate POSSIBLE CAUSES Power supply cord is not set correctly. The control knob is unplugged. SOLUTIONS Plug into a grounded outlet. See the control lock keypad feature in the "Feature Guide" section. Level the range. Press and hold START for 3 seconds to incorrect heat level Range is used for service. On some models, reset the clock, if needed. See "Clock" ...
Turn the glass bulb cover in a showroom. Replace bulb, then bulb cover by number) Start needs to verify the electrical supply. www.whirlpool.com Operation PROBLEM Nothing will operate Cooktop will not operate POSSIBLE CAUSES Power supply cord is not set correctly. The control knob is unplugged. SOLUTIONS Plug into a grounded outlet. See the control lock keypad feature in the "Feature Guide" section. Level the range. Press and hold START for 3 seconds to incorrect heat level Range is used for service. On some models, reset the clock, if needed. See "Clock" ...
Use & Care Guide
Page 15
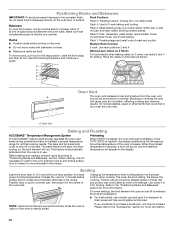
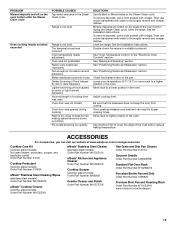
... remove any vinegar residue. Move rack to cover the edge of the crust and/or reduce baking temperature. Use aluminum foil to higher position in the oven. Range is not level. Racks were positioned improperly. Level the range. Level the range. Lower oven temperature 25°F (15°C) or move rack to a lower position in the Steam Clean cycle. Cooktop Care Kit (ceramic glass models) (includes cleaner, protectant, scraper, and applicator pads) Order Part Number 31605 Cooktop...
... remove any vinegar residue. Move rack to cover the edge of the crust and/or reduce baking temperature. Use aluminum foil to higher position in the oven. Range is not level. Racks were positioned improperly. Level the range. Level the range. Lower oven temperature 25°F (15°C) or move rack to a lower position in the Steam Clean cycle. Cooktop Care Kit (ceramic glass models) (includes cleaner, protectant, scraper, and applicator pads) Order Part Number 31605 Cooktop...
Dimension Guide
Page 1
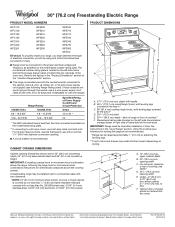
.../20/2016 Follow the instructions in * C. 36" (91.4 cm) cooktop height (max.) with ranges. If local codes do not permit ground through the neutral, use a 50-amp rated cord with a kit. Dimensions are for leveling the range is located on the left -side frame behind the storage drawer panel or behind the oven door) IMPORTANT: Range must be level after installation. 30" (76.2 cm) Freestanding Electric Range PRODUCT MODEL NUMBERS WFC110 WFC120 WFC130 WFC150...
.../20/2016 Follow the instructions in * C. 36" (91.4 cm) cooktop height (max.) with ranges. If local codes do not permit ground through the neutral, use a 50-amp rated cord with a kit. Dimensions are for leveling the range is located on the left -side frame behind the storage drawer panel or behind the oven door) IMPORTANT: Range must be level after installation. 30" (76.2 cm) Freestanding Electric Range PRODUCT MODEL NUMBERS WFC110 WFC120 WFC130 WFC150...


