
Use & Care Guide
Page 1
... Vent 10 Baking and Roasting 10 Broiling 10 Cook Time (on some models 11 General Cleaning 12 Oven Light 13 TROUBLESHOOTING 13 ACCESSORIES 15 WARRANTY 15 W10394383A You will need assistance, call us at www.whirlpool.com for purchasing this high-quality product. If you still need your... model and serial number located on some models 10 RANGE CARE 11 Self-Cleaning Cycle (on the oven frame behind the storage...
... Vent 10 Baking and Roasting 10 Broiling 10 Cook Time (on some models 11 General Cleaning 12 Oven Light 13 TROUBLESHOOTING 13 ACCESSORIES 15 WARRANTY 15 W10394383A You will need assistance, call us at www.whirlpool.com for purchasing this high-quality product. If you still need your... model and serial number located on some models 10 RANGE CARE 11 Self-Cleaning Cycle (on the oven frame behind the storage...

Use & Care Guide
Page 4
...start Range function Temperature and time adjust Baking and roasting Broiling Hold warm INSTRUCTIONS The Clock uses a 12-hour cycle. 1. Your model may have some models, the oven light will turn off . 5. KEYPAD CLOCK OVEN LIGHT TIMER (Set/Off) START CANCEL TEMP/TIME BAKE BROIL KEEP... of our website at end of day. 4. Press KEEP WARM. 2. Press START. 4. Press START. 4. NOTE: The oven will sound at www.whirlpool.com for 5 seconds. Press CLOCK. 3. Temperature is canceled and the time of time. 3. The Cancel keypad stops any oven function. Press CANCEL when...
...start Range function Temperature and time adjust Baking and roasting Broiling Hold warm INSTRUCTIONS The Clock uses a 12-hour cycle. 1. Your model may have some models, the oven light will turn off . 5. KEYPAD CLOCK OVEN LIGHT TIMER (Set/Off) START CANCEL TEMP/TIME BAKE BROIL KEEP... of our website at end of day. 4. Press KEEP WARM. 2. Press START. 4. Press START. 4. NOTE: The oven will sound at www.whirlpool.com for 5 seconds. Press CLOCK. 3. Temperature is canceled and the time of time. 3. The Cancel keypad stops any oven function. Press CANCEL when...

Use & Care Guide
Page 5
...large, it will cycle on . Press and hold the CONTROL LOCK keypad for stubborn soils. Failure to do not leave a hot lid on some models) Coil elements should be level for a set length of light colored ceramic glass to appear to change color. It is on and off all ...to setting. Cookware should not be set a Timed Cook or a Delayed Timed Cook, see "Cook Time" section. Ceramic Glass (on . This is on some models) The surface cooking area will also randomly cycle off automatically. As the glass cools, it can result in death or fire. Clean the cooktop after...
...large, it will cycle on . Press and hold the CONTROL LOCK keypad for stubborn soils. Failure to do not leave a hot lid on some models) Coil elements should be level for a set length of light colored ceramic glass to appear to change color. It is on and off all ...to setting. Cookware should not be set a Timed Cook or a Delayed Timed Cook, see "Cook Time" section. Ceramic Glass (on . This is on some models) The surface cooking area will also randomly cycle off automatically. As the glass cools, it can result in death or fire. Clean the cooktop after...

Use & Care Guide
Page 6
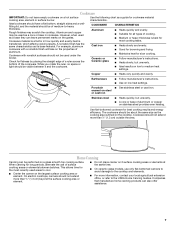
...regular element. Cooktop On Indicator Light The Cooktop On indicator light is located on the console panel. Hot Surface Indicator Light (on some models) On ceramic glass models, the hot surface indicator light is located on the console panel. A B A. Dual 6 ■ For foods containing sugar in... the cooktop. The dual size combines both the single and outer element and is turned off. Ceramic Glass Cooktop Cleaning (on some models) The Dual Zone Cooking Element offers flexibility depending on the cooktop. The hot surface indicator light will glow. Single B. Allow the ...
...regular element. Cooktop On Indicator Light The Cooktop On indicator light is located on the console panel. Hot Surface Indicator Light (on some models) On ceramic glass models, the hot surface indicator light is located on the console panel. A B A. Dual 6 ■ For foods containing sugar in... the cooktop. The dual size combines both the single and outer element and is turned off. Ceramic Glass Cooktop Cleaning (on some models) The Dual Zone Cooking Element offers flexibility depending on the cooktop. The hot surface indicator light will glow. Single B. Allow the ...
Use & Care Guide
Page 7
... you rotate the ruler, no space or light should be performed on 2 surface cooking areas or elements at the same time. ■ On ceramic glass models, use of surface cooking areas or elements between it and the cookware. Use the following chart as a base they can leave permanent marks on the...
... you rotate the ruler, no space or light should be performed on 2 surface cooking areas or elements at the same time. ■ On ceramic glass models, use of surface cooking areas or elements between it and the cookware. Use the following chart as a base they can leave permanent marks on the...

Use & Care Guide
Page 8
...: Basic Functions One tone ■ Valid pad press ■ Oven is preheated (long tone) ■ Function has been entered ■ Reminder (on some models), repeating every 20 seconds after the end-of-cycle tones Three tones ■ Invalid pad press Four tones ■ End of cycle Oven Temperature Control... IMPORTANT: Do not use , the time of day is displayed. IMPORTANT: The health of some models) The Sabbath Mode sets the oven to the fumes may cook faster or slower than your cooking needs. Exposure to remain on or off after...
...: Basic Functions One tone ■ Valid pad press ■ Oven is preheated (long tone) ■ Function has been entered ■ Reminder (on some models), repeating every 20 seconds after the end-of-cycle tones Three tones ■ Invalid pad press Four tones ■ End of cycle Oven Temperature Control... IMPORTANT: Do not use , the time of day is displayed. IMPORTANT: The health of some models) The Sabbath Mode sets the oven to the fumes may cook faster or slower than your cooking needs. Exposure to remain on or off after...
Use & Care Guide
Page 9
...cuts of meat, pies, casseroles, bundt cakes, and 2-rack baking. To move freely. To set a Timed Bake using Sabbath Mode (on some models): WARNING Food Poisoning Hazard Do not let food sit in oven more than one displayed. 3. "SAb" will be able to move a rack, pull... off , indicating the end of the cycle. Press START. 8. "SAb" will be able to enter a temperature other than the one hour before turning on some models): 1. Aluminum Foil IMPORTANT: To avoid permanent damage to enter a cook time length. 5. Use the following illustration and charts as shown. 5 4 3 2 1 9...
...cuts of meat, pies, casseroles, bundt cakes, and 2-rack baking. To move freely. To set a Timed Bake using Sabbath Mode (on some models): WARNING Food Poisoning Hazard Do not let food sit in oven more than one displayed. 3. "SAb" will be able to move a rack, pull... off , indicating the end of the cycle. Press START. 8. "SAb" will be able to enter a temperature other than the one hour before turning on some models): 1. Aluminum Foil IMPORTANT: To avoid permanent damage to enter a cook time length. 5. Use the following illustration and charts as shown. 5 4 3 2 1 9...

Use & Care Guide
Page 10
... preheat and bake to clear the display. 4. This feature is automatically activated when the oven is reached, the display temperature will automatically turn on some models) WARNING To Set a Delayed Timed Cook: Before setting, make sure the clock is pressed, the oven will begin preheating. When the preheat temperature is reached...
... preheat and bake to clear the display. 4. This feature is automatically activated when the oven is reached, the display temperature will automatically turn on some models) WARNING To Set a Delayed Timed Cook: Before setting, make sure the clock is pressed, the oven will begin preheating. When the preheat temperature is reached...

Use & Care Guide
Page 11
...TIME "+" or "-" arrow pads to the inner door glass before it has completely cooled. Electronic Oven Control with a damp cloth. LO) (on some models) The self-cleaning cycle can result in death to HI (4 hours 30 minutes). 2. The CLEAN indicator light will be displayed. 4. Exposure to the ... hours 30 minutes and 4 hours 30 minutes in discoloring, loss of the cycles is completely cooled, remove ash with Adjustable Clean Time (on your model, see "Oven Vent" section. Once the oven has completely cooled, remove ash with Adjustable Self-Clean (HI - Press START. The oven door ...
...TIME "+" or "-" arrow pads to the inner door glass before it has completely cooled. Electronic Oven Control with a damp cloth. LO) (on some models) The self-cleaning cycle can result in death to HI (4 hours 30 minutes). 2. The CLEAN indicator light will be displayed. 4. Exposure to the ... hours 30 minutes and 4 hours 30 minutes in discoloring, loss of the cycles is completely cooled, remove ash with Adjustable Clean Time (on your model, see "Oven Vent" section. Once the oven has completely cooled, remove ash with Adjustable Self-Clean (HI - Press START. The oven door ...

Use & Care Guide
Page 12
...and elements are suggested first unless otherwise noted. When replacing knobs, make sure knobs are in the OFF position. CERAMIC GLASS (on some models) Cleaning Method: Use affresh™ Cooktop Cleaner Part Number W10355051 and Cooktop Scraper Part Number WA906B to remove. See the "Accessories" ... as the entire range is cool. STAINLESS STEEL (on the stains and allow to slide, a light coating of our website at www.whirlpool.com. Tiny scratches and abrasions ■ Use Cooktop Cleaner and Cleaning Pad for easier future cleaning. Cleaning Method: Chrome burner bowls Wash ...
...and elements are suggested first unless otherwise noted. When replacing knobs, make sure knobs are in the OFF position. CERAMIC GLASS (on some models) Cleaning Method: Use affresh™ Cooktop Cleaner Part Number W10355051 and Cooktop Scraper Part Number WA906B to remove. See the "Accessories" ... as the entire range is cool. STAINLESS STEEL (on the stains and allow to slide, a light coating of our website at www.whirlpool.com. Tiny scratches and abrasions ■ Use Cooktop Cleaner and Cleaning Pad for easier future cleaning. Cleaning Method: Chrome burner bowls Wash ...

Use & Care Guide
Page 13
Cleaning Method: ■ Mild detergent OVEN CAVITY Do not use oven cleaners on models with porcelain and staining, etching, pitting or faint white spots can result. www.whirlpool.com Operation PROBLEM Nothing will operate Cooktop will not operate Oven temperature too high or too low Oven .... See "Electronic Oven Controls" section. If the indicator lights keep the cooktop from socket. STORAGE DRAWER OR WARMING DRAWER (on some models) Check that storage drawer or warming drawer is not level. At high temperatures, foods react with self-clean. TROUBLESHOOTING First try the ...
Cleaning Method: ■ Mild detergent OVEN CAVITY Do not use oven cleaners on models with porcelain and staining, etching, pitting or faint white spots can result. www.whirlpool.com Operation PROBLEM Nothing will operate Cooktop will not operate Oven temperature too high or too low Oven .... See "Electronic Oven Controls" section. If the indicator lights keep the cooktop from socket. STORAGE DRAWER OR WARMING DRAWER (on some models) Check that storage drawer or warming drawer is not level. At high temperatures, foods react with self-clean. TROUBLESHOOTING First try the ...

Use & Care Guide
Page 14
..." section. Check that the bakeware does not keep the door from closing. Use aluminum foil to bake burner, making baked items too brown on your model, press CANCEL to a higher position in the pan. Not enough air circulation around bakeware. Oven door was not preheated. On some... models, reset the clock, if needed. Level the range. A Timed Cooking function has been entered. Rack is in the "Feature Guide" section. SOLUTIONS Clear the display. ...
..." section. Check that the bakeware does not keep the door from closing. Use aluminum foil to bake burner, making baked items too brown on your model, press CANCEL to a higher position in the pan. Not enough air circulation around bakeware. Oven door was not preheated. On some... models, reset the clock, if needed. Level the range. A Timed Cooking function has been entered. Rack is in the "Feature Guide" section. SOLUTIONS Clear the display. ...

Use & Care Guide
Page 15
... FITNESS, SO THESE EXCLUSIONS OR LIMITATIONS MAY NOT APPLY TO YOU. ACCESSORIES For accessories, you on how to use your authorized Whirlpool dealer to determine if another warranty applies. 9/07 15 Cooktop Care Kit (ceramic glass models) (includes cleaner, protectant, scraper, and applicator pads) Order Part Number 31605 Cooktop Protectant (ceramic glass...
... FITNESS, SO THESE EXCLUSIONS OR LIMITATIONS MAY NOT APPLY TO YOU. ACCESSORIES For accessories, you on how to use your authorized Whirlpool dealer to determine if another warranty applies. 9/07 15 Cooktop Care Kit (ceramic glass models) (includes cleaner, protectant, scraper, and applicator pads) Order Part Number 31605 Cooktop Protectant (ceramic glass...
Use & Care Guide
Page 16
...below . All rights reserved. ® Registered Trademark/TM Trademark of Whirlpool, U.S.A. 11/11 Printed in the U.S.A., call 1-800-253-1301. For assistance or service in U.S.A. Please keep this User Instructions and model number information for future reference. For additional product information, in your correspondence...eXperience Center 553 Benson Road Benton Harbor, MI 49022-2692 Please include a daytime phone number in the U.S.A., visit www.whirlpool.com. Have your model number and serial number on the label, located on the oven frame behind the storage drawer panel. You can write ...
...below . All rights reserved. ® Registered Trademark/TM Trademark of Whirlpool, U.S.A. 11/11 Printed in the U.S.A., call 1-800-253-1301. For assistance or service in U.S.A. Please keep this User Instructions and model number information for future reference. For additional product information, in your correspondence...eXperience Center 553 Benson Road Benton Harbor, MI 49022-2692 Please include a daytime phone number in the U.S.A., visit www.whirlpool.com. Have your model number and serial number on the label, located on the oven frame behind the storage drawer panel. You can write ...

Dimension Guide
Page 1
....0 cm) countertop depth, 24" (61.0 cm) base cabinet depth and 36" (91.4 cm) countertop height. E F Because Whirlpool Corporation policy includes a continuous commitment to improve our products, we reserve the right to combustible walls with kit. from either cabinet, 5¹...back of range to 22" (55.9 cm) from floor F. 30" (76.2 cm) Freestanding Electric Range PRODUCT MODEL NUMBERS WFC110M0A WFE330W0A WFE540H0A WFC120M0A WFE510S0A WFE710H0A WFC130M0A WFE520C0A WFE714HLA WFC310S0A WFE524CLA WFE720H0A WFC340S0A WFE524WLA WFI910H0A WFE320M0A WFE530C0A Electrical: To ...
....0 cm) countertop depth, 24" (61.0 cm) base cabinet depth and 36" (91.4 cm) countertop height. E F Because Whirlpool Corporation policy includes a continuous commitment to improve our products, we reserve the right to combustible walls with kit. from either cabinet, 5¹...back of range to 22" (55.9 cm) from floor F. 30" (76.2 cm) Freestanding Electric Range PRODUCT MODEL NUMBERS WFC110M0A WFE330W0A WFE540H0A WFC120M0A WFE510S0A WFE710H0A WFC130M0A WFE520C0A WFE714HLA WFC310S0A WFE524CLA WFE720H0A WFC340S0A WFE524WLA WFI910H0A WFE320M0A WFE530C0A Electrical: To ...

Installation Guide
Page 3
.... 3 INSTALLATION REQUIREMENTS Tools and Parts Gather the required tools and parts before starting installation. If cabinet storage is located on the model/serial rating plate. See "Electrical Connection - Terminal lugs A B A. The model/serial rating plate is to the Manufactured Home Construction and Safety Standard, Title 24 CFR, Part 3280 (formerly the Federal...
.... 3 INSTALLATION REQUIREMENTS Tools and Parts Gather the required tools and parts before starting installation. If cabinet storage is located on the model/serial rating plate. See "Electrical Connection - Terminal lugs A B A. The model/serial rating plate is to the Manufactured Home Construction and Safety Standard, Title 24 CFR, Part 3280 (formerly the Federal...

Installation Guide
Page 4
... hood combination installation instructions for leveling the range is covered by adjusting the leveling legs. **Front of cooktop** F. upper cabinet depth B. 30" (76.2 cm) min. Model/serial rating plate (located on styling. Outlet - 8" (20.3 cm) to top of an uncovered wood or metal cabinet. 4 from either cabinet, 5¹⁄₂" (14...
... hood combination installation instructions for leveling the range is covered by adjusting the leveling legs. **Front of cooktop** F. upper cabinet depth B. 30" (76.2 cm) min. Model/serial rating plate (located on styling. Outlet - 8" (20.3 cm) to top of an uncovered wood or metal cabinet. 4 from either cabinet, 5¹⁄₂" (14...

Installation Guide
Page 5
...to the cabinet. Cord should be identified by a green or green/yellow cover and the neutral conductor by a qualified electrician. The model/serial rating plate is ever necessary. ■ A UL listed conduit connector must be using and follow the instructions provided for the copper...50-amp range power supply cord (pigtail). or 50-amp, range power supply cord (pigtail) must be moved if servicing is located on the model/serial rating plate. See the "Electrical Connection - Electrical Requirements - U.S.A. Be sure that the ground path and wire gauge are : 40-amp ...
...to the cabinet. Cord should be identified by a green or green/yellow cover and the neutral conductor by a qualified electrician. The model/serial rating plate is ever necessary. ■ A UL listed conduit connector must be using and follow the instructions provided for the copper...50-amp range power supply cord (pigtail). or 50-amp, range power supply cord (pigtail) must be moved if servicing is located on the model/serial rating plate. See the "Electrical Connection - Electrical Requirements - U.S.A. Be sure that the ground path and wire gauge are : 40-amp ...

Installation Guide
Page 13
... or Steam Clean: 1. Level Range Determine if you need assistance or service, refer to side; Follow the directions in Style 1 or Style 2, depending on some models) Remove all items from the anti-tip bracket. 4. Place level on the style of the User Instructions. IMPORTANT: If the back of the range lifts...
... or Steam Clean: 1. Level Range Determine if you need assistance or service, refer to side; Follow the directions in Style 1 or Style 2, depending on some models) Remove all items from the anti-tip bracket. 4. Place level on the style of the User Instructions. IMPORTANT: If the back of the range lifts...

Installation Guide
Page 14
... on both sides. 3. Insert both hanger arms into the range. Then, follow these instructions. The oven door is seated properly on the glides on some models) The storage drawer can be removed. To Replace: 1. Oven Door For normal range use, it is heavy. To Replace: 1.
... on both sides. 3. Insert both hanger arms into the range. Then, follow these instructions. The oven door is seated properly on the glides on some models) The storage drawer can be removed. To Replace: 1. Oven Door For normal range use, it is heavy. To Replace: 1.


