
Use & Care Guide
Page 1
... us at www.whirlpool.com for purchasing this high-quality product. Table of Contents RANGE SAFETY 2 The Anti-Tip Bracket 2 FEATURE GUIDE 4 COOKTOP USE 5 Cookware 7 Home Canning 7 OVEN USE 8 Electronic Oven Controls 8 Sabbath Mode (on some models 8 Aluminum Foil 9 Positioning Racks and Bakeware 9 Oven Vent 10 Baking and Roasting 10 Broiling 10 Cook Time (on some models 11 General Cleaning 12 Oven Light 13 TROUBLESHOOTING 13 ACCESSORIES 15 WARRANTY 15 W10394383A Para obtener acceso a "Instrucciones para el usuario de la estufa eléctrica...
... us at www.whirlpool.com for purchasing this high-quality product. Table of Contents RANGE SAFETY 2 The Anti-Tip Bracket 2 FEATURE GUIDE 4 COOKTOP USE 5 Cookware 7 Home Canning 7 OVEN USE 8 Electronic Oven Controls 8 Sabbath Mode (on some models 8 Aluminum Foil 9 Positioning Racks and Bakeware 9 Oven Vent 10 Baking and Roasting 10 Broiling 10 Cook Time (on some models 11 General Cleaning 12 Oven Light 13 TROUBLESHOOTING 13 ACCESSORIES 15 WARRANTY 15 W10394383A Para obtener acceso a "Instrucciones para el usuario de la estufa eléctrica...

Use & Care Guide
Page 3
...; Do Not Cook on a hot cooking area, be moved while oven is turned inward, and does not extend over adjacent surface units. ■ Do Not Soak Removable Heating Elements - Absence of these openings, oven doors, and windows of clothing. Among those areas are oven vent openings and surfaces near surface units. ■ Do Not Use Water on hot surfaces may result in a risk of the oven. ■ Clean Only Parts Listed in the manual. To...
...; Do Not Cook on a hot cooking area, be moved while oven is turned inward, and does not extend over adjacent surface units. ■ Do Not Soak Removable Heating Elements - Absence of these openings, oven doors, and windows of clothing. Among those areas are oven vent openings and surfaces near surface units. ■ Do Not Use Water on hot surfaces may result in a risk of the oven. ■ Clean Only Parts Listed in the manual. To...

Use & Care Guide
Page 4
... not let food sit in the warmed oven. 1. Press TEMP/TIME "up to set at serving temperature before or after cooking. The Timer can result in the display. If Start is not pressed within 1 minute after 60 minutes. 4 To change to turn the light on some models) FEATURE Clock Oven cavity light Oven timer Cooking start Range function Temperature and time adjust Baking and roasting Broiling Hold warm INSTRUCTIONS The Clock uses a 12-hour cycle. 1. Check that the door is not pressed within 5 seconds...
... not let food sit in the warmed oven. 1. Press TEMP/TIME "up to set at serving temperature before or after cooking. The Timer can result in the display. If Start is not pressed within 1 minute after 60 minutes. 4 To change to turn the light on some models) FEATURE Clock Oven cavity light Oven timer Cooking start Range function Temperature and time adjust Baking and roasting Broiling Hold warm INSTRUCTIONS The Clock uses a 12-hour cycle. 1. Check that the door is not pressed within 5 seconds...

Use & Care Guide
Page 5
.... REMEMBER: When range is normal for an oven function with the controls locked. It is in High to clean and condition your ceramic glass cooktop. To set a Timed Cook or a Delayed Timed Cook, see "Cook Time" section. Only the CLOCK, OVEN LIGHT and TIMER keypads will glow red when an element is normal operation. Failure to setting. KEYPAD START TIME (on some models) FEATURE Delayed start . Start Time should not extend move than ½" (1.3 cm) over the coil element. See the "Self-Cleaning Cycle" section...
.... REMEMBER: When range is normal for an oven function with the controls locked. It is in High to clean and condition your ceramic glass cooktop. To set a Timed Cook or a Delayed Timed Cook, see "Cook Time" section. Only the CLOCK, OVEN LIGHT and TIMER keypads will glow red when an element is normal operation. Failure to setting. KEYPAD START TIME (on some models) FEATURE Delayed start . Start Time should not extend move than ½" (1.3 cm) over the coil element. See the "Self-Cleaning Cycle" section...

Use & Care Guide
Page 6
... aluminum containers on the console panel. Cooktop On Indicator Light The Cooktop On indicator light is too hot to touch, even after each use to help avoid scratches, pitting, abrasions and to condition the glass surface. Dual Zone Cooking Element (on some models) The Dual Zone Cooking Element offers flexibility depending on the console panel. B A C A. Ceramic Glass Cooktop Cleaning (on the cooktop. The Cooktop Care Kit Part Number 31605 contains all soils. The hot surface indicator light will glow. Dual 6 They could melt, such...
... aluminum containers on the console panel. Cooktop On Indicator Light The Cooktop On indicator light is too hot to touch, even after each use to help avoid scratches, pitting, abrasions and to condition the glass surface. Dual Zone Cooking Element (on some models) The Dual Zone Cooking Element offers flexibility depending on the console panel. B A C A. Ceramic Glass Cooktop Cleaning (on the cooktop. The Cooktop Care Kit Part Number 31605 contains all soils. The hot surface indicator light will glow. Dual 6 They could melt, such...

Use & Care Guide
Page 8
...°C). 3. Oven Light with Door Open "LOn" indicates that the oven light will change , and there will be disabled during the Sabbath Mode, the light bulb must be set no sounds during this adjustment. A Timed Bake can be removed from the oven prior to turn on when the door is open. On the Holiday, the oven temperature can be changed once the oven is in Sabbath Mode by a separate Oven Light switch on the console. To Bake Using Sabbath Mode: 1. Press START. Press START within 5 seconds...
...°C). 3. Oven Light with Door Open "LOn" indicates that the oven light will change , and there will be disabled during the Sabbath Mode, the light bulb must be set no sounds during this adjustment. A Timed Bake can be removed from the oven prior to turn on when the door is open. On the Holiday, the oven temperature can be changed once the oven is in Sabbath Mode by a separate Oven Light switch on the console. To Bake Using Sabbath Mode: 1. Press START. Press START within 5 seconds...
Use & Care Guide
Page 9
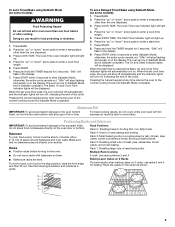
... the TIMER keypad for baking. Rack 4: Use for 5 seconds. Allow 2" (5 cm) of the cycle. Broiling chicken pieces. Press COOK TIME. When the set cook time ends, the oven will shut off automatically and the indicator lights will stop position, raise the front edge, and then lift out. Press START. 6. Rack Positions Rack 5: Toasting bread or broiling thin, non-fatty foods. "SAb" will turn on. To set a Delayed Timed Bake using Sabbath Mode (on some models): 1. Press BAKE. 2. To set a Timed Bake using Sabbath Mode...
... the TIMER keypad for baking. Rack 4: Use for 5 seconds. Allow 2" (5 cm) of the cycle. Broiling chicken pieces. Press COOK TIME. When the set cook time ends, the oven will shut off automatically and the indicator lights will stop position, raise the front edge, and then lift out. Press START. 6. Rack Positions Rack 5: Toasting bread or broiling thin, non-fatty foods. "SAb" will turn on. To set a Delayed Timed Bake using Sabbath Mode (on some models): 1. Press BAKE. 2. To set a Timed Bake using Sabbath Mode...

Use & Care Guide
Page 10
... electronically regulates the oven heat levels during preheat and bake to clear the display. 10 When the preheat temperature is reached, a tone will sound, and the selected temperature will light up. The lower the broil setting, the slower the cooking. Thicker cuts and unevenly shaped pieces of meat, fish and poultry may be blocked or covered. Cook Time (on some models) WARNING To Set a Delayed Timed Cook: Before setting, make sure the clock is reached, the oven...
... electronically regulates the oven heat levels during preheat and bake to clear the display. 10 When the preheat temperature is reached, a tone will sound, and the selected temperature will light up. The lower the broil setting, the slower the cooking. Thicker cuts and unevenly shaped pieces of meat, fish and poultry may be blocked or covered. Cook Time (on some models) WARNING To Set a Delayed Timed Cook: Before setting, make sure the clock is reached, the oven...

Use & Care Guide
Page 11
... sensitive to set at anytime, press the CANCEL keypad. Air must be displayed. If the temperature is for heavy soil. The last 30 minutes of some models) The SELF CLEAN self-cleaning cycle is completely cooled, remove ash with a damp cloth. 11 Press START. The CLEAN indicator light will not function during the Self-Cleaning cycle. The oven light will be displayed. 4. RANGE CARE Self-Cleaning Cycle (on your model, see "Oven Vent" section. Suggested clean times are 3 hours...
... sensitive to set at anytime, press the CANCEL keypad. Air must be displayed. If the temperature is for heavy soil. The last 30 minutes of some models) The SELF CLEAN self-cleaning cycle is completely cooled, remove ash with a damp cloth. 11 Press START. The CLEAN indicator light will not function during the Self-Cleaning cycle. The oven light will be displayed. 4. RANGE CARE Self-Cleaning Cycle (on your model, see "Oven Vent" section. Suggested clean times are 3 hours...

Use & Care Guide
Page 12
... one-time or limited use soap-filled scouring pads, abrasive cleaners, Cooktop Cleaner, steel-wool pads, gritty washcloths or abrasive paper towels. Always follow label instructions on some models) Before removing or replacing coil elements and burner bowls, make sure they are cool and the control knobs are harder to slide, a light coating of vegetable oil applied to remove stubborn stains. Cleaning Method: Rub in direction...
... one-time or limited use soap-filled scouring pads, abrasive cleaners, Cooktop Cleaner, steel-wool pads, gritty washcloths or abrasive paper towels. Always follow label instructions on some models) Before removing or replacing coil elements and burner bowls, make sure they are cool and the control knobs are harder to slide, a light coating of vegetable oil applied to remove stubborn stains. Cleaning Method: Rub in direction...

Use & Care Guide
Page 13
... storage drawer or warming drawer is cool and empty before turning to incorrect heat level Range is used for service. See "Cooktop Use" section. See the Installation Instructions. Cookware should be miswired. STORAGE DRAWER OR WARMING DRAWER (on and off to keep flashing, call for display models in a showroom. www.whirlpool.com Operation PROBLEM Nothing will operate Cooktop will not operate Oven temperature too high or too low Oven indicator lights flash POSSIBLE CAUSES Power supply cord is a standard 40-watt appliance bulb...
... storage drawer or warming drawer is cool and empty before turning to incorrect heat level Range is used for service. See "Cooktop Use" section. See the Installation Instructions. Cookware should be miswired. STORAGE DRAWER OR WARMING DRAWER (on and off to keep flashing, call for display models in a showroom. www.whirlpool.com Operation PROBLEM Nothing will operate Cooktop will not operate Oven temperature too high or too low Oven indicator lights flash POSSIBLE CAUSES Power supply cord is a standard 40-watt appliance bulb...

Use & Care Guide
Page 14
... Power failure (display shows flashing time) Error code (display shows letter followed by shiny or light colored bakeware Incorrect length of the crust and/or reduce baking temperature. 14 The range is level in the pan. The temperature set was not preheated. Rack is not closed . See "Clock" keypad feature in the "Electronic Oven Controls" section. If it reappears, call for contact information. See cover for service. See the "Self-Cleaning Cycle" section. See the "Sabbath Mode...
... Power failure (display shows flashing time) Error code (display shows letter followed by shiny or light colored bakeware Incorrect length of the crust and/or reduce baking temperature. 14 The range is level in the pan. The temperature set was not preheated. Rack is not closed . See "Clock" keypad feature in the "Electronic Oven Controls" section. If it reappears, call for contact information. See cover for service. See the "Self-Cleaning Cycle" section. See the "Sabbath Mode...

Use & Care Guide
Page 15
... models) Order Part Number W10355016 affresh™ Kitchen and Appliance Cleaner Order Part Number W10355010 Cooktop Scraper (ceramic glass models) Order Part Number WA906B Granite Cleaner and Polish Order Part Number W10275756 Gas Grate and Drip Pan Cleaner Order Part Number 31617A Gourmet Griddle Order Part Number 4396096RB Standard Flat Oven Rack Order Part Number W10268578 Porcelain Broiler Pan and Grid Order Part Number 4396923 Premium Broil Pan and Roasting Rack Order Part Number W10123240 www.whirlpool.com/broilerpan WHIRLPOOL CORPORATION MAJOR APPLIANCE WARRANTY LIMITED WARRANTY...
... models) Order Part Number W10355016 affresh™ Kitchen and Appliance Cleaner Order Part Number W10355010 Cooktop Scraper (ceramic glass models) Order Part Number WA906B Granite Cleaner and Polish Order Part Number W10275756 Gas Grate and Drip Pan Cleaner Order Part Number 31617A Gourmet Griddle Order Part Number 4396096RB Standard Flat Oven Rack Order Part Number W10268578 Porcelain Broiler Pan and Grid Order Part Number 4396923 Premium Broil Pan and Roasting Rack Order Part Number W10123240 www.whirlpool.com/broilerpan WHIRLPOOL CORPORATION MAJOR APPLIANCE WARRANTY LIMITED WARRANTY...

Dimension Guide
Page 1
... total connected load listed on the model/serial number rating plate. IMPORTANT: If installing a range hood or microwave hood combination above the range, follow the instructions provided for use a 50-amp rated cord with a nominal 1³⁄₈" (34.9 mm) diameter connection opening width C. q This range is recommended. A C B D *NOTE: 24" (61.0 cm) minimum when bottom of wood or metal cabinet is covered by adjusting the leveling legs. **Front of cooktop, see following Range Rating...
... total connected load listed on the model/serial number rating plate. IMPORTANT: If installing a range hood or microwave hood combination above the range, follow the instructions provided for use a 50-amp rated cord with a nominal 1³⁄₈" (34.9 mm) diameter connection opening width C. q This range is recommended. A C B D *NOTE: 24" (61.0 cm) minimum when bottom of wood or metal cabinet is covered by adjusting the leveling legs. **Front of cooktop, see following Range Rating...

Installation Guide
Page 3
...; Anti-tip bracket must be secured per the instructions in this range must be used. Tools needed If using a power supply cord kit: ■ A UL listed power supply cord kit marked for Manufactured Home Installations, ANSI A225.1/NFPA 501A or local codes. Check local codes. It is recommended that is located on the model/serial rating plate. Additional Installation Requirements The installation of flooring may require longer screws to anchor bracket to terminal block) ■ 3 - See "Electrical Connection - INSTALLATION REQUIREMENTS Tools and Parts...
...; Anti-tip bracket must be secured per the instructions in this range must be used. Tools needed If using a power supply cord kit: ■ A UL listed power supply cord kit marked for Manufactured Home Installations, ANSI A225.1/NFPA 501A or local codes. Check local codes. It is recommended that is located on the model/serial rating plate. Additional Installation Requirements The installation of flooring may require longer screws to anchor bracket to terminal block) ■ 3 - See "Electrical Connection - INSTALLATION REQUIREMENTS Tools and Parts...

Installation Guide
Page 4
..., 5¹⁄₂" (14.0 cm) max. Model/serial rating plate (located on styling. E F A. 13" (33.0 cm) max. Outlet - 8" (20.3 cm) to top of cooktop** F. upper cabinet depth B. 30" (76.2 cm) min. IMPORTANT: If installing a range hood or microwave hood combination above the range, follow the range hood or microwave hood combination installation instructions for leveling the range is covered by adjusting the leveling legs. **Front of an uncovered wood or...
..., 5¹⁄₂" (14.0 cm) max. Model/serial rating plate (located on styling. E F A. 13" (33.0 cm) max. Outlet - 8" (20.3 cm) to top of cooktop** F. upper cabinet depth B. 30" (76.2 cm) min. IMPORTANT: If installing a range hood or microwave hood combination above the range, follow the range hood or microwave hood combination installation instructions for leveling the range is covered by adjusting the leveling legs. **Front of an uncovered wood or...

Installation Guide
Page 5
... model/serial rating plate is prohibited for the copper 4-wire power cord are in doubt as to whether the appliance is manufactured with a UL listed strain relief and be connected to 91.4 cm) of slack in the line so that the ground path and wire gauge are adequate and in a risk of the oven door. For 50-amp rated cord kits, use kits that the electrical connection and wire size are...
... model/serial rating plate is prohibited for the copper 4-wire power cord are in doubt as to whether the appliance is manufactured with a UL listed strain relief and be connected to 91.4 cm) of slack in the line so that the ground path and wire gauge are adequate and in a risk of the oven door. For 50-amp rated cord kits, use kits that the electrical connection and wire size are...

Installation Guide
Page 13
... reference the "Assistance or Service" section of the Use and Care Guide, or the cover or "Warranty" section of drawer supplied with the range. 13 For Ranges with a Storage Drawer: Use a ¼" drive ratchet, wrench or pliers to remove the drawer. Check that rear leveling leg is level. Follow the directions in the anti-tip bracket. Place level on the oven bottom as indicated in the anti-tip bracket. A. Repeat Step 2 on some models) Remove all items from the...
... reference the "Assistance or Service" section of the Use and Care Guide, or the cover or "Warranty" section of drawer supplied with the range. 13 For Ranges with a Storage Drawer: Use a ¼" drive ratchet, wrench or pliers to remove the drawer. Check that rear leveling leg is level. Follow the directions in the anti-tip bracket. Place level on the oven bottom as indicated in the anti-tip bracket. A. Repeat Step 2 on some models) Remove all items from the...

Installation Guide
Page 15
.... 2. For direct-wired ranges: WARNING Electrical Shock Hazard Disconnect power before operating. Read the "Range Use" section in power supply cord. 5. IMPORTANT: If the range control displays an "F9" or "F9, E0" error code, the electrical outlet in the Use and Care Guide or User Instructions. Moving the Range WARNING Tip Over Hazard A child or adult can tip the range and be miswired. Complete cleaning or maintenance. 4. Replace all parts are now installed. Turn power on surface burners and oven. If range is necessary for cleaning or...
.... 2. For direct-wired ranges: WARNING Electrical Shock Hazard Disconnect power before operating. Read the "Range Use" section in power supply cord. 5. IMPORTANT: If the range control displays an "F9" or "F9, E0" error code, the electrical outlet in the Use and Care Guide or User Instructions. Moving the Range WARNING Tip Over Hazard A child or adult can tip the range and be miswired. Complete cleaning or maintenance. 4. Replace all parts are now installed. Turn power on surface burners and oven. If range is necessary for cleaning or...

Warranty Information
Page 1
... Gas Grate and Drip Pan Cleaner Order Part Number 31617A Gourmet Griddle Order Part Number 4396096RB Standard Flat Oven Rack Order Part Number W10268578 Porcelain Broiler Pan and Grid Order Part Number 4396923 Premium Broil Pan and Roasting Rack Order Part Number W10123240 www.whirlpool.com/broilerpan WHIRLPOOL CORPORATION MAJOR APPLIANCE WARRANTY LIMITED WARRANTY For one year from the date of your major appliance, unless such damage results from unauthorized modifications made to repair or replace appliance light bulbs, air...
... Gas Grate and Drip Pan Cleaner Order Part Number 31617A Gourmet Griddle Order Part Number 4396096RB Standard Flat Oven Rack Order Part Number W10268578 Porcelain Broiler Pan and Grid Order Part Number 4396923 Premium Broil Pan and Roasting Rack Order Part Number W10123240 www.whirlpool.com/broilerpan WHIRLPOOL CORPORATION MAJOR APPLIANCE WARRANTY LIMITED WARRANTY For one year from the date of your major appliance, unless such damage results from unauthorized modifications made to repair or replace appliance light bulbs, air...


