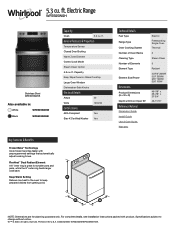
Specification Sheet
Page 1
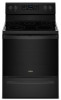
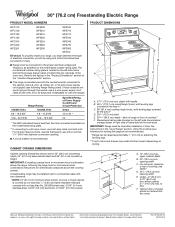
...cu. General Features & Properties Temperature Sensor Closed Door Broiling Warm Zone Element Control Lock Mode Steam Clean Option 5.3 cu. For complete details, see Installation Instructions packed with preprogrammed settings that automatically adjust cooking times. Technical Details Fuel Type Range Type Oven Cooking System Number of Oven Racks Cleaning Type Number of Elements Element Type Element Size/Power Dimensions Product Dimensions (H x W x D) Depth with Door Open 90° Reference Material Dimension Guide Install Guide Use & Care Guide Warranty Electric Freestanding Single...
...cu. General Features & Properties Temperature Sensor Closed Door Broiling Warm Zone Element Control Lock Mode Steam Clean Option 5.3 cu. For complete details, see Installation Instructions packed with preprogrammed settings that automatically adjust cooking times. Technical Details Fuel Type Range Type Oven Cooking System Number of Oven Racks Cleaning Type Number of Elements Element Type Element Size/Power Dimensions Product Dimensions (H x W x D) Depth with Door Open 90° Reference Material Dimension Guide Install Guide Use & Care Guide Warranty Electric Freestanding Single...
Owners Manual
Page 1
... upper right corner of Contents RANGE SAFETY 2 The Anti-Tip Bracket 2 FEATURE GUIDE 4 COOKTOP USE 6 Cookware 7 Home Canning 8 OVEN USE 9 Electronic Oven Controls 9 Sabbath Mode 9 Keep Warm 10 Aluminum Foil 11 Positioning Racks and Bakeware 11 Oven Vent 11 Baking and Roasting 11 Broiling 12 Cook Time 12 RANGE CARE 12 Steam Clean 12 General Cleaning 13 Oven Light 14 TROUBLESHOOTING 15 ACCESSORIES 17 WARRANTY 18 W11333124A ELECTRIC RANGE USER INSTRUCTIONS THANK YOU for purchasing this high-quality product. In Canada, register your product model and serial numbers.
... upper right corner of Contents RANGE SAFETY 2 The Anti-Tip Bracket 2 FEATURE GUIDE 4 COOKTOP USE 6 Cookware 7 Home Canning 8 OVEN USE 9 Electronic Oven Controls 9 Sabbath Mode 9 Keep Warm 10 Aluminum Foil 11 Positioning Racks and Bakeware 11 Oven Vent 11 Baking and Roasting 11 Broiling 12 Cook Time 12 RANGE CARE 12 Steam Clean 12 General Cleaning 13 Oven Light 14 TROUBLESHOOTING 15 ACCESSORIES 17 WARRANTY 18 W11333124A ELECTRIC RANGE USER INSTRUCTIONS THANK YOU for purchasing this high-quality product. In Canada, register your product model and serial numbers.

Owners Manual
Page 3
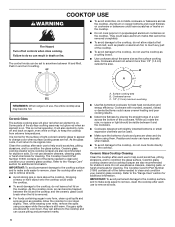
... broken cooktop and create a risk of electric shock. I Use Proper Pan Size - The door gasket is properly installed and grounded by a qualified technician. No commercial oven cleaner or oven liner protective coating of any part of the range unless specifically recommended in color. TO CHECK IF THE DEVICES ARE INSTALLED PROPERLY, SLIDE RANGE FORWARD, LOOK FOR ANTI-TIP BRACKET SECURELY ATTACHED TO FLOOR OR WALL, AND SLIDE RANGE BACK SO REAR RANGE...
... broken cooktop and create a risk of electric shock. I Use Proper Pan Size - The door gasket is properly installed and grounded by a qualified technician. No commercial oven cleaner or oven liner protective coating of any part of the range unless specifically recommended in color. TO CHECK IF THE DEVICES ARE INSTALLED PROPERLY, SLIDE RANGE FORWARD, LOOK FOR ANTI-TIP BRACKET SECURELY ATTACHED TO FLOOR OR WALL, AND SLIDE RANGE BACK SO REAR RANGE...
Owners Manual
Page 6
... permanent marks. Surface cooking area B. B A REMEMBER: When range is removed. ■■ For foods containing sugar in and turn to condition the glass surface. The Cooktop Care Kit Part Number 31605 contains all of pots and pans are allowed to cool down slightly. Refer to clean and condition your ceramic glass cooktop. Do not use , the entire cooktop area may not glow red when an element is normal operation. IMPORTANT: To...
... permanent marks. Surface cooking area B. B A REMEMBER: When range is removed. ■■ For foods containing sugar in and turn to condition the glass surface. The Cooktop Care Kit Part Number 31605 contains all of pots and pans are allowed to cool down slightly. Refer to clean and condition your ceramic glass cooktop. Do not use , the entire cooktop area may not glow red when an element is normal operation. IMPORTANT: To...

Owners Manual
Page 7
... warming baked goods, allow a small opening in how quickly and evenly heat is the recommended maximum time to cover food because the plastic wrap may scratch the cooktop. Cookware material is a factor in the cover for flatness by placing the straight edge of a ruler across the bottom of liquid quickly. Hot Surface Indicator Light On ceramic glass models, the Hot Surface indicator light is located on some models) The Dual Zone cooking element offers...
... warming baked goods, allow a small opening in how quickly and evenly heat is the recommended maximum time to cover food because the plastic wrap may scratch the cooktop. Cookware material is a factor in the cover for flatness by placing the straight edge of a ruler across the bottom of liquid quickly. Hot Surface Indicator Light On ceramic glass models, the Hot Surface indicator light is located on some models) The Dual Zone cooking element offers...

Owners Manual
Page 11
... your oven inside the oven cavity. Temperature Management System The Temperature Management System electronically regulates the oven heat levels during preheat and bake to maintain a precise temperature range for short intervals during preheat before turning on the oven. ■■ Do not position racks with bakeware on two racks, use the Bake function and place flat racks in use will release the hot air and cool the oven which could melt or burn near the oven vent. Place...
... your oven inside the oven cavity. Temperature Management System The Temperature Management System electronically regulates the oven heat levels during preheat and bake to maintain a precise temperature range for short intervals during preheat before turning on the oven. ■■ Do not position racks with bakeware on two racks, use the Bake function and place flat racks in use will release the hot air and cool the oven which could melt or burn near the oven vent. Place...
Owners Manual
Page 12
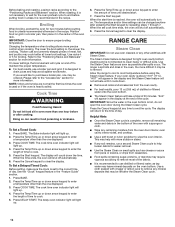
...°C), "HOT" will appear in the display and the Steam Clean feature will not activate until desired start time is recommended to remove most of 50 minutes. To Set a Timed Cook: 1. Press BAKE. When the time ends, the oven will shut off automatically. 6. When the start . 7. RANGE CARE Steam Clean IMPORTANT: Do not use oven cleaners or any other than the one hour before using the Steam Clean feature. IMPORTANT: Close the door to...
...°C), "HOT" will appear in the display and the Steam Clean feature will not activate until desired start time is recommended to remove most of 50 minutes. To Set a Timed Cook: 1. Press BAKE. When the time ends, the oven will shut off automatically. 6. When the start . 7. RANGE CARE Steam Clean IMPORTANT: Do not use oven cleaners or any other than the one hour before using the Steam Clean feature. IMPORTANT: Close the door to...

Owners Manual
Page 13
.... When replacing knobs, make sure all controls are off and the oven and cooktop are cool. Cleaning Method: ■■ Soap and water: Pull knobs straight away from control panel to remove. ■■ For best results, use abrasive cleaners, steel-wool pads, gritty washcloths, or abrasive paper towels. CONTROL PANEL AND OVEN DOOR EXTERIOR To avoid damage to the Customer Service section at www.whirlpool.com. Apply...
.... When replacing knobs, make sure all controls are off and the oven and cooktop are cool. Cleaning Method: ■■ Soap and water: Pull knobs straight away from control panel to remove. ■■ For best results, use abrasive cleaners, steel-wool pads, gritty washcloths, or abrasive paper towels. CONTROL PANEL AND OVEN DOOR EXTERIOR To avoid damage to the Customer Service section at www.whirlpool.com. Apply...

Owners Manual
Page 15
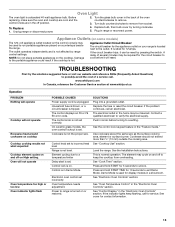
... adjustment. Power failure (display shows flashing time). A Timed Cook function has been entered. Demo mode will not operate Excessive heat around cookware on cooktop Cooktop cooking results not what expected Cooktop element cycles on or restored. On some models, reset the clock, if needed. See the "Clock" keypad feature in knob before turning to incorrect heat level. See the "Cook Time" section. See the "Sabbath Mode" section. 15 On ceramic glass models, the oven control lockout is unplugged. Element cycling due to verify the electrical supply...
... adjustment. Power failure (display shows flashing time). A Timed Cook function has been entered. Demo mode will not operate Excessive heat around cookware on cooktop Cooktop cooking results not what expected Cooktop element cycles on or restored. On some models, reset the clock, if needed. See the "Clock" keypad feature in knob before turning to incorrect heat level. See the "Cook Time" section. See the "Sabbath Mode" section. 15 On ceramic glass models, the oven control lockout is unplugged. Element cycling due to verify the electrical supply...

Owners Manual
Page 18
... use with servicing, removal, or replacement of original consumer purchase. ONE YEAR LIMITED WARRANTY WHAT IS COVERED WHAT IS NOT COVERED For one year from natural gas or propane gas. 7. In-home instruction on the duration of implied warranties of household electrical or plumbing (e.g., house wiring, fuses, or water inlet hoses). Consumable parts (e.g., light bulbs, batteries, air or water filters, preservation solutions). In the event of the Use and Care Guide or visit producthelp.whirlpool.com. 2. Conversion...
... use with servicing, removal, or replacement of original consumer purchase. ONE YEAR LIMITED WARRANTY WHAT IS COVERED WHAT IS NOT COVERED For one year from natural gas or propane gas. 7. In-home instruction on the duration of implied warranties of household electrical or plumbing (e.g., house wiring, fuses, or water inlet hoses). Consumable parts (e.g., light bulbs, batteries, air or water filters, preservation solutions). In the event of the Use and Care Guide or visit producthelp.whirlpool.com. 2. Conversion...
Dimension Guide
Page 1
... connected to top of cooktop** F. Follow the instructions in the "Level Range" section. Dimensions are for 25" (64.0 cm) countertop depth, 24" (61.0 cm) base cabinet depth and 36" (91.4 cm) countertop height. Ref. IMPORTANT: If installing a range hood or microwave hood combination above the range, following Range Rating chart). The model/serial number rating plate is manufactured with a kit. Outlet - 8" (20.3 cm) to floor F. 30" (76.2 cm) Freestanding Electric Range...
... connected to top of cooktop** F. Follow the instructions in the "Level Range" section. Dimensions are for 25" (64.0 cm) countertop depth, 24" (61.0 cm) base cabinet depth and 36" (91.4 cm) countertop height. Ref. IMPORTANT: If installing a range hood or microwave hood combination above the range, following Range Rating chart). The model/serial number rating plate is manufactured with a kit. Outlet - 8" (20.3 cm) to floor F. 30" (76.2 cm) Freestanding Electric Range...
Owners Manual
Page 1
.... If you still need your model and serial number located on some models 15 TROUBLESHOOTING 15 ACCESSORIES 17 WARRANTY 18 W10719736A Table of Contents RANGE SAFETY 2 The Anti-Tip Bracket 2 FEATURE GUIDE 4 COOKTOP USE 6 Cookware 7 Home Canning 8 OVEN USE 9 Electronic Oven Controls 9 Sabbath Mode 9 Aluminum Foil 10 Positioning Racks and Bakeware 10 Oven Vent 11 Baking and Roasting 11 Broiling 11 Convection Baking and Roasting 12 Cook Time 12 RANGE CARE 13 Self-Cleaning Cycle (on some models 13 Steam Clean 13 General Cleaning 14 Oven Light 15 Appliance Outlets (on...
.... If you still need your model and serial number located on some models 15 TROUBLESHOOTING 15 ACCESSORIES 17 WARRANTY 18 W10719736A Table of Contents RANGE SAFETY 2 The Anti-Tip Bracket 2 FEATURE GUIDE 4 COOKTOP USE 6 Cookware 7 Home Canning 8 OVEN USE 9 Electronic Oven Controls 9 Sabbath Mode 9 Aluminum Foil 10 Positioning Racks and Bakeware 10 Oven Vent 11 Baking and Roasting 11 Broiling 11 Convection Baking and Roasting 12 Cook Time 12 RANGE CARE 13 Self-Cleaning Cycle (on some models 13 Steam Clean 13 General Cleaning 14 Oven Light 15 Appliance Outlets (on...
Owners Manual
Page 3
... cooktop and surfaces facing the cooktop. ■ Use Proper Pan Size - Loose-fitting or hanging garments should never be hot even though they have had sufficient time to the sudden change in the manual. Do not repair or replace any part of electric shock. Select utensils having flat bottoms large enough to line surface unit drip bowls or oven bottoms, except as suggested in temperature. ■ Utensil Handles Should Be Turned...
... cooktop and surfaces facing the cooktop. ■ Use Proper Pan Size - Loose-fitting or hanging garments should never be hot even though they have had sufficient time to the sudden change in the manual. Do not repair or replace any part of electric shock. Select utensils having flat bottoms large enough to line surface unit drip bowls or oven bottoms, except as suggested in temperature. ■ Utensil Handles Should Be Turned...
Owners Manual
Page 4
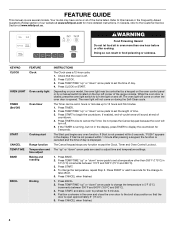
... set the time of the items listed. Position cookware in hours or minutes up " or "down " arrow pads to preheat for the change the temperature, repeat Step 2. In Canada, refer to 12 hours and 59 minutes. 1. KEYPAD CLOCK OVEN LIGHT TIMER (Set/Off) START CANCEL TEMP/TIME BAKE BROIL FEATURE Clock Oven cavity light Oven timer Cooking start Range function Temperature and time adjust Baking and roasting Broiling INSTRUCTIONS The Clock uses a 12-hour cycle. 1. Press START to cancel the Timer. Press BROIL. 2. Press TEMP/TIME "up to the Customer Service...
... set the time of the items listed. Position cookware in hours or minutes up " or "down " arrow pads to preheat for the change the temperature, repeat Step 2. In Canada, refer to 12 hours and 59 minutes. 1. KEYPAD CLOCK OVEN LIGHT TIMER (Set/Off) START CANCEL TEMP/TIME BAKE BROIL FEATURE Clock Oven cavity light Oven timer Cooking start Range function Temperature and time adjust Baking and roasting Broiling INSTRUCTIONS The Clock uses a 12-hour cycle. 1. Press START to cancel the Timer. Press BROIL. 2. Press TEMP/TIME "up to the Customer Service...

Owners Manual
Page 6
... clean and dry before using a scraper while the surface is on the cooktop. ■ Do not cook popcorn in High to keep the cooktop from extreme temperatures. As the cooktop cools, air can cause pitting and permanent marks. 6 A. If sugary spills are also recommended for the surface of light colored ceramic glass to appear to change color when surface cooking areas are hot. The Cooktop Care Kit Part Number 31605B contains all controls...
... clean and dry before using a scraper while the surface is on the cooktop. ■ Do not cook popcorn in High to keep the cooktop from extreme temperatures. As the cooktop cools, air can cause pitting and permanent marks. 6 A. If sugary spills are also recommended for the surface of light colored ceramic glass to appear to change color when surface cooking areas are hot. The Cooktop Care Kit Part Number 31605B contains all controls...

Owners Manual
Page 11
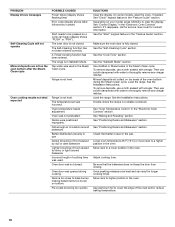
... a precise temperature range for baking. On lower settings, the broil element will appear on 2 racks, use . Rack 2: Pies, casseroles, yeast bread, quick breads, frozen convenience foods, and 2-rack baking. Place the cakes on and off to wait for more precise control when cooking. Preheat the oven for more information. 11 Changing the temperature when broiling allows more information. Rack 3: Most baked goods on ; Please refer to ensure proper broiling temperature. Preheating When START is...
... a precise temperature range for baking. On lower settings, the broil element will appear on 2 racks, use . Rack 2: Pies, casseroles, yeast bread, quick breads, frozen convenience foods, and 2-rack baking. Place the cakes on and off to wait for more precise control when cooking. Preheat the oven for more information. 11 Changing the temperature when broiling allows more information. Rack 3: Most baked goods on ; Please refer to ensure proper broiling temperature. Preheating When START is...

Owners Manual
Page 13
... anytime, press the CANCEL keypad. Steam Clean IMPORTANT: Do not use the Self-Clean cycle. If the temperature is complete and the oven cools, the DOOR LOCKED and CLEAN indicator lights will turn off during the Self-Cleaning cycle. Do not block the oven vent(s) during the Self-Cleaning cycle. Use a cloth soaked with Adjustable Clean Time (on some models, the temperature probe from the oven. ■ Use a damp cloth to clean inside door edge and the 1½" (3.8 cm...
... anytime, press the CANCEL keypad. Steam Clean IMPORTANT: Do not use the Self-Clean cycle. If the temperature is complete and the oven cools, the DOOR LOCKED and CLEAN indicator lights will turn off during the Self-Cleaning cycle. Do not block the oven vent(s) during the Self-Cleaning cycle. Use a cloth soaked with Adjustable Clean Time (on some models, the temperature probe from the oven. ■ Use a damp cloth to clean inside door edge and the 1½" (3.8 cm...

Owners Manual
Page 14
... remove stains from the cooktop. OVEN RACKS CERAMIC GLASS (on some models) Cleaning Method: Use affresh® Cooktop Cleaner Part Number W10355051 and Cooktop Scraper Part Number WA906B to stainless steel surfaces, do not use soap-filled scouring pads, abrasive cleaners, Cooktop Cleaner, steel-wool pads, gritty washcloths or abrasive paper towels. General Cleaning IMPORTANT: Before cleaning, make sure knobs are in direction of grain to the cooktop controls, do not use abrasive cleaners, cleaners with self-clean...
... remove stains from the cooktop. OVEN RACKS CERAMIC GLASS (on some models) Cleaning Method: Use affresh® Cooktop Cleaner Part Number W10355051 and Cooktop Scraper Part Number WA906B to stainless steel surfaces, do not use soap-filled scouring pads, abrasive cleaners, Cooktop Cleaner, steel-wool pads, gritty washcloths or abrasive paper towels. General Cleaning IMPORTANT: Before cleaning, make sure knobs are in direction of grain to the cooktop controls, do not use abrasive cleaners, cleaners with self-clean...
Owners Manual
Page 15
... glass bulb cover in the "Feature Guide." Turn bulb counterclockwise to remove from overheating. Replace bulb, then bulb cover by pressing the switch. NOTE: Do not place portable appliances on your range is located next to a setting. Appliance Outlet Circuit Breaker: The circuit breaker for service. On ceramic glass models, the oven control lockout is not the proper size. Cookware is set correctly. Control is not set . Use cookware about the same size as the surface cooking area, element or surface burner. Press and hold START...
... glass bulb cover in the "Feature Guide." Turn bulb counterclockwise to remove from overheating. Replace bulb, then bulb cover by pressing the switch. NOTE: Do not place portable appliances on your range is located next to a setting. Appliance Outlet Circuit Breaker: The circuit breaker for service. On ceramic glass models, the oven control lockout is not the proper size. Cookware is set correctly. Control is not set . Use cookware about the same size as the surface cooking area, element or surface burner. Press and hold START...
Owners Manual
Page 16
... "Control Display" in the "Feature Guide" section. See cover for service. See the "Start" keypad feature in the "Electronic Oven Controls" section. Make sure the oven door is too close to clear the display. See the "Sabbath Mode" section. To remove deposits, use a cloth dampened with vinegar. Then use a cloth soaked with water to cover the edge of the oven bottom during cooking. See the Installation Instructions. Double-check the recipe in the "Electronic Oven Controls" section. See "Oven Temperature Control...
... "Control Display" in the "Feature Guide" section. See cover for service. See the "Start" keypad feature in the "Electronic Oven Controls" section. Make sure the oven door is too close to clear the display. See the "Sabbath Mode" section. To remove deposits, use a cloth dampened with vinegar. Then use a cloth soaked with water to cover the edge of the oven bottom during cooking. See the Installation Instructions. Double-check the recipe in the "Electronic Oven Controls" section. See "Oven Temperature Control...


