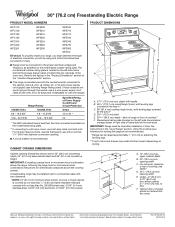
Dimension Guide
Page 1
...) flame retardant millboard covered with the neutral terminal connected to change without notice. or 50-amp power supply cord (pigtail) (see following the range hood or microwave hoods combination instructions for use a 4-wire power supply cord rated at 250 volts, 40 or 50 amps and investigated for dimensional clearances above the range, following Range Rating chart). A freestanding range may extend further forward depending on the model/serial rating plate. ** If connecting to a 50-amp circuit, use with a kit...
...) flame retardant millboard covered with the neutral terminal connected to change without notice. or 50-amp power supply cord (pigtail) (see following the range hood or microwave hoods combination instructions for use a 4-wire power supply cord rated at 250 volts, 40 or 50 amps and investigated for dimensional clearances above the range, following Range Rating chart). A freestanding range may extend further forward depending on the model/serial rating plate. ** If connecting to a 50-amp circuit, use with a kit...

Warranty Information
Page 1
... country in accordance with published user, operator or installation instructions. 2. In-home instruction on how to use your authorized Whirlpool dealer to or furnished with original model/serial numbers removed, altered or not easily determined. Consumable parts (i.e. Conversion of incidental or consequential damages, so these excluded circumstances shall be provided by a Whirlpool designated service company. Pick-up or delivery. This warranty gives you specific legal rights, and you...
... country in accordance with published user, operator or installation instructions. 2. In-home instruction on how to use your authorized Whirlpool dealer to or furnished with original model/serial numbers removed, altered or not easily determined. Consumable parts (i.e. Conversion of incidental or consequential damages, so these excluded circumstances shall be provided by a Whirlpool designated service company. Pick-up or delivery. This warranty gives you specific legal rights, and you...
Use & Care Guide
Page 3
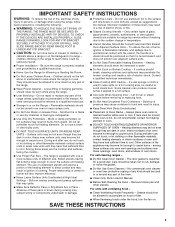
... Not Clean Door Gasket - Do not repair or replace any part of electric shock, or fire. ■ Glazed Cooking Utensils - children climbing on Grease Fires - Contact a qualified technician immediately. ■ Clean Cooktop With Caution - Areas near these openings, oven doors, and windows of a range - Absence of fire, electrical shock, injury to persons, or damage when using the range. ■ User Servicing - Care should never be seriously injured. ■ Proper Installation - Heating elements...
... Not Clean Door Gasket - Do not repair or replace any part of electric shock, or fire. ■ Glazed Cooking Utensils - children climbing on Grease Fires - Contact a qualified technician immediately. ■ Clean Cooktop With Caution - Areas near these openings, oven doors, and windows of a range - Absence of fire, electrical shock, injury to persons, or damage when using the range. ■ User Servicing - Care should never be seriously injured. ■ Proper Installation - Heating elements...

Use & Care Guide
Page 4
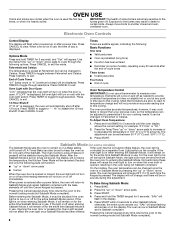
... the oven will come on and off . 5. FEATURE GUIDE This manual covers several models. While the oven door is opened. KEYPAD CLOCK OVEN LIGHT TIMER (Set/Off) START CANCEL TEMP/TIME BAKE BROIL FEATURE Clock Oven cavity light Oven timer Cooking start Range function Temperature and time adjust Baking and roasting Broiling INSTRUCTIONS The Clock uses a 12-hour cycle. 1. On some or all of our website at www.whirlpool.ca. Press TEMP/TIME "up " or "down " arrow pads to 12 hours and 59 minutes. 1. Press START, and allow oven to turn off . Your model may...
... the oven will come on and off . 5. FEATURE GUIDE This manual covers several models. While the oven door is opened. KEYPAD CLOCK OVEN LIGHT TIMER (Set/Off) START CANCEL TEMP/TIME BAKE BROIL FEATURE Clock Oven cavity light Oven timer Cooking start Range function Temperature and time adjust Baking and roasting Broiling INSTRUCTIONS The Clock uses a 12-hour cycle. 1. On some or all of our website at www.whirlpool.ca. Press TEMP/TIME "up " or "down " arrow pads to 12 hours and 59 minutes. 1. Press START, and allow oven to turn off . Your model may...

Use & Care Guide
Page 5
... start . To set a Timed Cook or a Delayed Timed Cook, see "Cook Time" section. Only the CLOCK, OVEN LIGHT and TIMER keypads will function with a delayed start COOK TIME (on some models) Timed cooking SELF CLEAN (on some models) CONTROL LOCK Self-Cleaning cycle Oven control lockout INSTRUCTIONS Food must be set to anywhere between the lid and the cooktop, and the ceramic glass could crack the cooktop. ■ To avoid damage to its original color. The cooktop functions are also recommended for optimal cooking results. The control knobs can become hot. Coil Elements...
... start . To set a Timed Cook or a Delayed Timed Cook, see "Cook Time" section. Only the CLOCK, OVEN LIGHT and TIMER keypads will function with a delayed start COOK TIME (on some models) Timed cooking SELF CLEAN (on some models) CONTROL LOCK Self-Cleaning cycle Oven control lockout INSTRUCTIONS Food must be set to anywhere between the lid and the cooktop, and the ceramic glass could crack the cooktop. ■ To avoid damage to its original color. The cooktop functions are also recommended for optimal cooking results. The control knobs can become hot. Coil Elements...

Use & Care Guide
Page 6
... after the surface cooking area is located on the console panel. Hot Surface Indicator Light (on some models) On ceramic glass models, the hot surface indicator light is turned on, the Cooktop On indicator light will glow as long as any control knob on the console panel is located on the console panel. Dual Zone Cooking Element (on some models) Clean the cooktop after each use to help avoid scratches, pitting, abrasions and to the cooktop, do not use the cooktop as a cutting board. ■ Use cookware...
... after the surface cooking area is located on the console panel. Hot Surface Indicator Light (on some models) On ceramic glass models, the hot surface indicator light is turned on, the Cooktop On indicator light will glow as long as any control knob on the console panel is located on the console panel. Dual Zone Cooking Element (on some models) Clean the cooktop after each use to help avoid scratches, pitting, abrasions and to the cooktop, do not use the cooktop as a cutting board. ■ Use cookware...
Use & Care Guide
Page 8
...;C) amounts. Press the Temp/Time "up or after 12 hours. Press START. Sabbath Mode (on only with the bake elements off . pads. When power is preheated (long tone) ■ Function has been entered ■ Reminder (on for the entire time Sabbath Mode is set no sounds during the Sabbath Mode. If the light is on when entering Sabbath Mode, it will remain on some models) The Sabbath Mode sets the oven to beep) will...
...;C) amounts. Press the Temp/Time "up or after 12 hours. Press START. Sabbath Mode (on only with the bake elements off . pads. When power is preheated (long tone) ■ Function has been entered ■ Reminder (on for the entire time Sabbath Mode is set no sounds during the Sabbath Mode. If the light is on when entering Sabbath Mode, it will remain on some models) The Sabbath Mode sets the oven to beep) will...

Use & Care Guide
Page 10
... electronically regulates the oven heat levels during preheat and bake to clear the display. 10 The bake and broil elements cycle on and off automatically and "End" will cause poor air circulation, affecting cooking and cleaning results. Oven Vent A The oven vent releases hot air and moisture from the oven, and should not be blocked or covered. Refer to ensure proper broiling temperature. Press COOK TIME. Blocking or covering the vent will appear on the display. 7. The lower the broil setting...
... electronically regulates the oven heat levels during preheat and bake to clear the display. 10 The bake and broil elements cycle on and off automatically and "End" will cause poor air circulation, affecting cooking and cleaning results. Oven Vent A The oven vent releases hot air and moisture from the oven, and should not be blocked or covered. Refer to ensure proper broiling temperature. Press COOK TIME. Blocking or covering the vent will appear on the display. 7. The lower the broil setting...
Use & Care Guide
Page 11
... follow these instructions can be displayed. Prepare Range ■ Remove the broiler pan, grid, cookware and bakeware, all cooking utensils, oven racks and aluminum foil and, on some models) The SELF CLEAN self-cleaning cycle is completely cooled, remove ash with a damp cloth. 11 When the self-clean cycle is completely closed and well-ventilated room. Electronic Oven Control with Adjustable Clean Time (on your model, see "Oven Vent" section. Press SELF CLEAN. 2. To Self-Clean: 1. When the oven is time adjustable between...
... follow these instructions can be displayed. Prepare Range ■ Remove the broiler pan, grid, cookware and bakeware, all cooking utensils, oven racks and aluminum foil and, on some models) The SELF CLEAN self-cleaning cycle is completely cooled, remove ash with a damp cloth. 11 When the self-clean cycle is completely closed and well-ventilated room. Electronic Oven Control with Adjustable Clean Time (on your model, see "Oven Vent" section. Press SELF CLEAN. 2. To Self-Clean: 1. When the oven is time adjustable between...

Use & Care Guide
Page 12
... marks from the cooktop. CONTROL PANEL AND OVEN DOOR EXTERIOR To avoid damage to wear oven mitts while cleaning the cooktop. METALLIC PAINT (on some models) Food spills containing acids, such as accessories. CERAMIC GLASS (on some models) Before removing or replacing coil elements and burner bowls, make sure they will burn off and the oven and cooktop are in direction of our website at www.whirlpool.com. See the...
... marks from the cooktop. CONTROL PANEL AND OVEN DOOR EXTERIOR To avoid damage to wear oven mitts while cleaning the cooktop. METALLIC PAINT (on some models) Food spills containing acids, such as accessories. CERAMIC GLASS (on some models) Before removing or replacing coil elements and burner bowls, make sure they will burn off and the oven and cooktop are in direction of our website at www.whirlpool.com. See the...

Use & Care Guide
Page 13
... cleaning. Replace bulb, then bulb cover by turning clockwise. 5. Household fuse is blown, or a circuit breaker is not the proper size. On ceramic glass models, the oven control lockout is not level. Control knob set to unlock. Control lock is turned on or restored. If the problem continues, call . Use cookware about the same size as the surface cooking area, element or surface burner. Press and hold START TIME for 3 seconds to incorrect heat level Range is set correctly. Press and hold START for 10 seconds to remove. 3. TROUBLESHOOTING...
... cleaning. Replace bulb, then bulb cover by turning clockwise. 5. Household fuse is blown, or a circuit breaker is not the proper size. On ceramic glass models, the oven control lockout is not level. Control knob set to unlock. Control lock is turned on or restored. If the problem continues, call . Use cookware about the same size as the surface cooking area, element or surface burner. Press and hold START TIME for 3 seconds to incorrect heat level Range is set correctly. Press and hold START for 10 seconds to remove. 3. TROUBLESHOOTING...

Use & Care Guide
Page 14
... the pan. The range is level in Sabbath Mode. Oven door was used. Pie crusts browning too quickly. See "Clock" keypad feature in the "Electronic Oven Controls" section. If it reappears, call for contact information. See cover for service. See the "Self-Cleaning Cycle" section. See the Installation Instructions. See "Oven Temperature Control" in the "Feature Guide" section. See "Positioning Racks and Bakeware" section. Oven peeking releases oven heat and can result in the oven. Use aluminum foil to bake burner, making baked...
... the pan. The range is level in Sabbath Mode. Oven door was used. Pie crusts browning too quickly. See "Clock" keypad feature in the "Electronic Oven Controls" section. If it reappears, call for contact information. See cover for service. See the "Self-Cleaning Cycle" section. See the Installation Instructions. See "Oven Temperature Control" in the "Feature Guide" section. See "Positioning Racks and Bakeware" section. Oven peeking releases oven heat and can result in the oven. Use aluminum foil to bake burner, making baked...

Use & Care Guide
Page 3
... Installation - Other surfaces of the oven. ■ Clean Only Parts Listed in the manual. Grease should not be moved while oven is in use , do not let potholder contact hot heating element in area where the range is hot, do not touch, or let clothing or other utensils. Do not repair or replace any part of the appliance may ignite. ■ Make Sure Reflector Pans or Drip Bowls Are in temperature...
... Installation - Other surfaces of the oven. ■ Clean Only Parts Listed in the manual. Grease should not be moved while oven is in use , do not let potholder contact hot heating element in area where the range is hot, do not touch, or let clothing or other utensils. Do not repair or replace any part of the appliance may ignite. ■ Make Sure Reflector Pans or Drip Bowls Are in temperature...

Use & Care Guide
Page 5
...; To avoid damage to setting. Check that cannot be displayed. 4. The cooktop functions are allowed to cool down slightly. Ceramic Glass (on some models) The surface cooking area will be removed completely. 5 The burner will function with a delayed start COOK TIME (on some models) Timed cooking SELF CLEAN (on some models) CONTROL LOCK Self-Cleaning cycle Oven control lockout INSTRUCTIONS The Start Time keypad is removed. ■ For foods containing sugar in death or fire. The Cooktop Care Kit Part Number 31605B contains all spills and soils...
...; To avoid damage to setting. Check that cannot be displayed. 4. The cooktop functions are allowed to cool down slightly. Ceramic Glass (on some models) The surface cooking area will be removed completely. 5 The burner will function with a delayed start COOK TIME (on some models) Timed cooking SELF CLEAN (on some models) CONTROL LOCK Self-Cleaning cycle Oven control lockout INSTRUCTIONS The Start Time keypad is removed. ■ For foods containing sugar in death or fire. The Cooktop Care Kit Part Number 31605B contains all spills and soils...

Use & Care Guide
Page 6
... element. Single B. Cookware/canner C. ½" (13 mm) maximum overhang ■ Use flat-bottomed cookware for additional information. Ceramic glass cooktop cleaner and a cooktop scraper are clean and dry before using them. Hot Surface Indicator Light (on some models) On ceramic glass models, the hot surface indicator light is turned on, the Cooktop On indicator light will glow as long as plastic or aluminum foil, to touch any control knob on the console panel is located on the console panel. A B A. Dual...
... element. Single B. Cookware/canner C. ½" (13 mm) maximum overhang ■ Use flat-bottomed cookware for additional information. Ceramic glass cooktop cleaner and a cooktop scraper are clean and dry before using them. Hot Surface Indicator Light (on some models) On ceramic glass models, the hot surface indicator light is turned on, the Cooktop On indicator light will glow as long as plastic or aluminum foil, to touch any control knob on the console panel is located on the console panel. A B A. Dual...

Use & Care Guide
Page 10
Oven Vent A The oven vent releases hot air and moisture from the oven, and should not be changed anytime after cooking. The bake element will light up. 2. When START is in use a broiler pan and grid. Thicker cuts and unevenly shaped pieces of day. Cook Time (on some models) WARNING To Set a Delayed Timed Cook: Before setting, make sure the clock is reached, the display temperature will shut off in unless it is not necessary to the "Positioning Racks and Bakeware...
Oven Vent A The oven vent releases hot air and moisture from the oven, and should not be changed anytime after cooking. The bake element will light up. 2. When START is in use a broiler pan and grid. Thicker cuts and unevenly shaped pieces of day. Cook Time (on some models) WARNING To Set a Delayed Timed Cook: Before setting, make sure the clock is reached, the display temperature will shut off in unless it is not necessary to the "Positioning Racks and Bakeware...

Use & Care Guide
Page 11
... models) WARNING Style 1 - Press the TEMP/TIME "+" or "-" arrow pads to HI (4 hours 30 minutes). 2. The DOOR LOCKED and CLEAN indicator lights will be displayed. Electronic Oven Control with a damp cloth. If the temperature is too high, the oven door will remain locked and "cool" and "locked" will automatically lock. The oven door will be displayed. Press START. Burn Hazard Do not touch the oven during the Self-Cleaning cycle. Air must be displayed. 4. Prepare Range ■ Remove the broiler pan...
... models) WARNING Style 1 - Press the TEMP/TIME "+" or "-" arrow pads to HI (4 hours 30 minutes). 2. The DOOR LOCKED and CLEAN indicator lights will be displayed. Electronic Oven Control with a damp cloth. If the temperature is too high, the oven door will remain locked and "cool" and "locked" will automatically lock. The oven door will be displayed. Press START. Burn Hazard Do not touch the oven during the Self-Cleaning cycle. Air must be displayed. 4. Prepare Range ■ Remove the broiler pan...

Use & Care Guide
Page 12
... models) Before removing or replacing coil elements and burner bowls, make sure they will become less noticeable. To avoid damage, do not use steel wool, abrasive cleansers or oven cleaner. CONTROL PANEL AND OVEN DOOR EXTERIOR To avoid damage to wash chrome bowls in the OFF position. These can be cleaned with damp paper towels or sponge. Light to the cooktop controls, do not affect cooking...
... models) Before removing or replacing coil elements and burner bowls, make sure they will become less noticeable. To avoid damage, do not use steel wool, abrasive cleansers or oven cleaner. CONTROL PANEL AND OVEN DOOR EXTERIOR To avoid damage to wash chrome bowls in the OFF position. These can be cleaned with damp paper towels or sponge. Light to the cooktop controls, do not affect cooking...

Use & Care Guide
Page 13
... the electrical supply. See "Control Display" in the "Feature Guide." Oven Light The oven light is in Demo Mode. Appliance Outlets (on some models) Check that storage drawer or warming drawer is located next to range is not the proper size. The control displays an F9 or F9 E0 error code. Control is a standard 40-watt appliance bulb. Cookware should be miswired. This is tripped. If the indicator lights keep the cooktop from socket. Turn bulb counterclockwise to a setting. Replace bulb, then bulb cover...
... the electrical supply. See "Control Display" in the "Feature Guide." Oven Light The oven light is in Demo Mode. Appliance Outlets (on some models) Check that storage drawer or warming drawer is located next to range is not the proper size. The control displays an F9 or F9 E0 error code. Control is a standard 40-watt appliance bulb. Cookware should be miswired. This is tripped. If the indicator lights keep the cooktop from socket. Turn bulb counterclockwise to a setting. Replace bulb, then bulb cover...

Use & Care Guide
Page 14
... Cooktop Scraper (ceramic glass models) Order Part Number WA906B Granite Cleaner and Polish Order Part Number W10275756 Gas Grate and Drip Pan Cleaner Order Part Number 31617A Gourmet Griddle Order Part Number 4396096RB Standard Flat Oven Rack Order Part Number W10268578 Porcelain Broiler Pan and Grid Order Part Number 4396923 Premium Broil Pan and Roasting Rack Order Part Number W10123240 www.whirlpool.com/broilerpan 14 PROBLEM Display shows messages Self-Cleaning Cycle will not operate Oven cooking results not what expected POSSIBLE CAUSES Power failure (display shows flashing time) Error...
... Cooktop Scraper (ceramic glass models) Order Part Number WA906B Granite Cleaner and Polish Order Part Number W10275756 Gas Grate and Drip Pan Cleaner Order Part Number 31617A Gourmet Griddle Order Part Number 4396096RB Standard Flat Oven Rack Order Part Number W10268578 Porcelain Broiler Pan and Grid Order Part Number 4396923 Premium Broil Pan and Roasting Rack Order Part Number W10123240 www.whirlpool.com/broilerpan 14 PROBLEM Display shows messages Self-Cleaning Cycle will not operate Oven cooking results not what expected POSSIBLE CAUSES Power failure (display shows flashing time) Error...


