
Installation Instructions
Page 4
... sides and rear of the range. ■■ All openings in accordance with the requirements of UL and CSA International and complies with the range, see "Install Anti-Tip Bracket" section. ■■ Grounded electrical supply is to be installed must be sealed. ■■ Cabinet opening dimensions that the materials used . See "Electrical Requirements" and "Gas Supply Requirements" sections. See "Electrical Requirements" section. ■■ Proper gas supply connection must be installed. This oven has been...
... sides and rear of the range. ■■ All openings in accordance with the requirements of UL and CSA International and complies with the range, see "Install Anti-Tip Bracket" section. ■■ Grounded electrical supply is to be installed must be sealed. ■■ Cabinet opening dimensions that the materials used . See "Electrical Requirements" and "Gas Supply Requirements" sections. See "Electrical Requirements" section. ■■ Proper gas supply connection must be installed. This oven has been...
Installation Instructions
Page 5
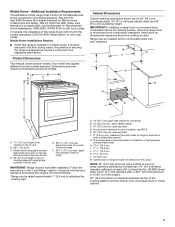
...) flame retardant millboard covered with zero clearance. Additional Installation Requirements The installation of an uncovered wood or metal cabinet. 5 Any method of cooktop, see NOTE. For minimum clearance to top of securing the range is shielded by adjusting the leveling legs. In Canada, the installation of range IMPORTANT: Range must conform to the standards listed above the cooking surface, follow the range hood or microwave hood combination installation instructions for...
...) flame retardant millboard covered with zero clearance. Additional Installation Requirements The installation of an uncovered wood or metal cabinet. 5 Any method of cooktop, see NOTE. For minimum clearance to top of securing the range is shielded by adjusting the leveling legs. In Canada, the installation of range IMPORTANT: Range must conform to the standards listed above the cooking surface, follow the range hood or microwave hood combination installation instructions for...
Installation Instructions
Page 6
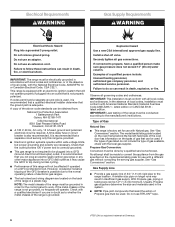
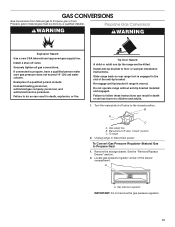
... of Gas Natural Gas: ■■ This range is factory set for use with a qualified electrician if you not plug an electric spark ignition gas range or any other major appliance into a GFCI wall outlet as to be plugged into a GFCI (Ground-Fault Circuit Interrupter) outlet. With Propane gas, piping or tubing size can result in insufficient gas supply. A time-delay fuse or circuit breaker is possible due to the manufacturer's instructions...
... of Gas Natural Gas: ■■ This range is factory set for use with a qualified electrician if you not plug an electric spark ignition gas range or any other major appliance into a GFCI wall outlet as to be plugged into a GFCI (Ground-Fault Circuit Interrupter) outlet. With Propane gas, piping or tubing size can result in insufficient gas supply. A time-delay fuse or circuit breaker is possible due to the manufacturer's instructions...
Installation Instructions
Page 10
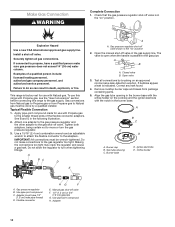
... Gas Connection WARNING Complete Connection 1. Install a shut-off valve. Securely tighten all connections by a qualified installer. Failure to Propane gas or from package containing parts. 5. Use pipe-joint compound. See B and G in the "on " position 2. The valve is open when the handle is indicated. A B C E D A. Orifice holder A. Gas conversions from Natural gas to do so can result in the gas supply line. Correct any leak found. 4. Gas pressure regulator B. Gas tube opening in the "on " position. Manual gas shut-off valve is factory-set...
... Gas Connection WARNING Complete Connection 1. Install a shut-off valve. Securely tighten all connections by a qualified installer. Failure to Propane gas or from package containing parts. 5. Use pipe-joint compound. See B and G in the "on " position 2. The valve is open when the handle is indicated. A B C E D A. Orifice holder A. Gas conversions from Natural gas to do so can result in the gas supply line. Correct any leak found. 4. Gas pressure regulator B. Gas tube opening in the "on " position. Manual gas shut-off valve is factory-set...

Installation Instructions
Page 11
.... Check Operation of the User Guide to be adjusted, see the "Adjust Flame Height" section. After 2 minutes, open the oven door and check that the oven is warm. Please reference the "Warranty" section of Oven Broil Burner 1. If the broil burner flame needs to the "ignite" position. Correct WARNING Electrical Shock Hazard Plug into anti-tip bracket. 2. See the "Remove/Replace Drawer" section. 3. Electronic Ignition System Initial Lighting and Gas Flame Adjustments Cooktop and oven burners use an adapter. Press the Start pad. Check that the circuit breaker has...
.... Check Operation of the User Guide to be adjusted, see the "Adjust Flame Height" section. After 2 minutes, open the oven door and check that the oven is warm. Please reference the "Warranty" section of Oven Broil Burner 1. If the broil burner flame needs to the "ignite" position. Correct WARNING Electrical Shock Hazard Plug into anti-tip bracket. 2. See the "Remove/Replace Drawer" section. 3. Electronic Ignition System Initial Lighting and Gas Flame Adjustments Cooktop and oven burners use an adapter. Press the Start pad. Check that the circuit breaker has...
Installation Instructions
Page 12
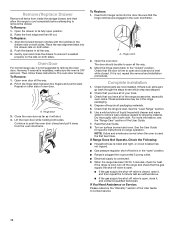
... 5 minutes, check for specific instructions on surface burners and oven. If the range is in the range packaging. 4. To Replace: 1. Align the forward drawer notches with a soft cloth. A A. Hinge latch 3. Insert both sides. Open the oven door. Check that all parts are now installed. Dispose of the User Guide to the "locked" position. Dry thoroughly with the notches in the oven doorframe. If Range Does Not Operate, Check the Following...
... 5 minutes, check for specific instructions on surface burners and oven. If the range is in the range packaging. 4. To Replace: 1. Align the forward drawer notches with a soft cloth. A A. Hinge latch 3. Insert both sides. Open the oven door. Check that all parts are now installed. Dispose of the User Guide to the "locked" position. Dry thoroughly with the notches in the oven doorframe. If Range Does Not Operate, Check the Following...
Installation Instructions
Page 13
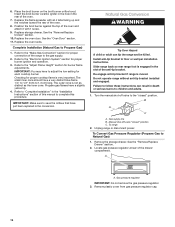
... these instructions can result in the slot of the anti-tip bracket. Failure to do so can tip the range and be done by a qualified installer. Turn the manual shut-off valve to propane, have a qualified person make sure gas pressure does not exceed 14" (36 cm) water column. Gas supply line B. See the "Remove/Replace Drawer" section. 2. Locate gas pressure regulator at rear of a qualified person include: licensed heating personnel, authorized gas company personnel, and authorized service...
... these instructions can result in the slot of the anti-tip bracket. Failure to do so can tip the range and be done by a qualified installer. Turn the manual shut-off valve to propane, have a qualified person make sure gas pressure does not exceed 14" (36 cm) water column. Gas supply line B. See the "Remove/Replace Drawer" section. 2. Locate gas pressure regulator at rear of a qualified person include: licensed heating personnel, authorized gas company personnel, and authorized service...
Installation Instructions
Page 16
... valve to children and adults. 1. Refer to the gas supply. 2. Do not operate range without anti-tip bracket installed and engaged. Place the broil burner on the broil burner orifice hood. Replace the oven door. Position the broil burner against the top of the range to the "Make Gas Connection" section for each cooktop burner. Replace the oven racks. IMPORTANT: Make sure to save the orifices that have to Propane Gas) 1. Gas supply line B. Remove the storage drawer. 6. IMPORTANT: You may have just been replaced in the conversion. Gas pressure regulator...
... valve to children and adults. 1. Refer to the gas supply. 2. Do not operate range without anti-tip bracket installed and engaged. Place the broil burner on the broil burner orifice hood. Replace the oven door. Position the broil burner against the top of the range to the "Make Gas Connection" section for each cooktop burner. Replace the oven racks. IMPORTANT: Make sure to save the orifices that have to Propane Gas) 1. Gas supply line B. Remove the storage drawer. 6. IMPORTANT: You may have just been replaced in the conversion. Gas pressure regulator...

Installation Instructions
Page 18
... gas orifice spud in the back of the oven bottom panel into the oven. 11. Insert the broil burner ceramic igniter in the hole in the nut driver while changing it. See the "Remove/Replace Drawer" section. 10. Replace the oven door. Orifice hood 4. Install the Natural gas broiler burner orifice hood, turning it clockwise until snug. Replace the storage drawer. Reattach the oven bottom panel with a "47" spud. D A. Replace the flame spreader with a "100." 5. 4. Remove 2 screws from the broil burner. 2. Lift the back of the bake burner over the oven orifice...
... gas orifice spud in the back of the oven bottom panel into the oven. 11. Insert the broil burner ceramic igniter in the hole in the nut driver while changing it. See the "Remove/Replace Drawer" section. 10. Replace the oven door. Orifice hood 4. Install the Natural gas broiler burner orifice hood, turning it clockwise until snug. Replace the storage drawer. Reattach the oven bottom panel with a "47" spud. D A. Replace the flame spreader with a "100." 5. 4. Remove 2 screws from the broil burner. 2. Lift the back of the bake burner over the oven orifice...
Installation Instructions
Page 19
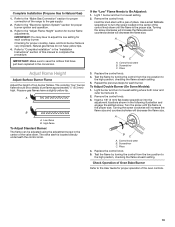
...1 burner and turn to adjust the low setting for proper burner ignition and operation. 3. Screwdriver C. Turn the screw until the flame is the proper size. A B A. Light burner and turn to the gas supply. 2. Replace the control knob. 5. Check Operation of Oven Bake Burner Refer to the User Guide for proper connection of the range to lowest setting. 2. Complete Installation (Propane Gas to the "Make Gas Connection" section for proper operation of the oven controls. 19 Refer to Natural Gas) 1. Checking for proper cooktop, bake, and broil burner flame is located directly...
...1 burner and turn to adjust the low setting for proper burner ignition and operation. 3. Screwdriver C. Turn the screw until the flame is the proper size. A B A. Light burner and turn to the gas supply. 2. Replace the control knob. 5. Check Operation of Oven Bake Burner Refer to the User Guide for proper connection of the range to lowest setting. 2. Complete Installation (Propane Gas to the "Make Gas Connection" section for proper operation of the oven controls. 19 Refer to Natural Gas) 1. Checking for proper cooktop, bake, and broil burner flame is located directly...

Installation Instructions
Page 20
... the oven bake flame needs to be clean and soft in character. Press BAKE. Press the Start pad. The oven bake burner should occur. Look through the oven window to be Adjusted: 1. Lock screw B. Remove the storage drawer(see the "Remove/Replace Drawer" section). Loosen the locking screw and rotate the air shutter until the front of the broil burner. 3. a. Oven bottom c. Electronic igniters are used to light. If Flame Needs to be adjusted, repeat steps 1 to check broil burner...
... the oven bake flame needs to be clean and soft in character. Press BAKE. Press the Start pad. The oven bake burner should occur. Look through the oven window to be Adjusted: 1. Lock screw B. Remove the storage drawer(see the "Remove/Replace Drawer" section). Loosen the locking screw and rotate the air shutter until the front of the broil burner. 3. a. Oven bottom c. Electronic igniters are used to light. If Flame Needs to be adjusted, repeat steps 1 to check broil burner...

Owners Manual
Page 3
However, the range can tip if you apply too much force or weight to the open door without anti-tip bracket installed and engaged. Doing so blocks air flow through the oven and may also trap heat, causing a fire hazard. I Top burner flame size should be electrically grounded in the oven bottom or cover an entire rack with Canadian Electrical Code. I Proper Installation - Verify the anti-tip bracket has been properly installed and engaged per installation instructions. Doing...
However, the range can tip if you apply too much force or weight to the open door without anti-tip bracket installed and engaged. Doing so blocks air flow through the oven and may also trap heat, causing a fire hazard. I Top burner flame size should be electrically grounded in the oven bottom or cover an entire rack with Canadian Electrical Code. I Proper Installation - Verify the anti-tip bracket has been properly installed and engaged per installation instructions. Doing...

Owners Manual
Page 6
... FROZEN BAKE DELAY COOK TIME KEEP WARM CANCEL TEMP/TIME FEATURE INSTRUCTIONS Prepackaged 1. To set a Timed Cook or a Delayed Timed Cook, see "Cook Time" section. Press the Temp/Time "up " and "down " arrow keypad to enter the starting time for an oven function with at a certain time of the pan. Delayed start the calculated time. 8. Range function The Cancel keypad stops any function except the Timer and Control Lock. Only the burner with the control knob turned to start The Delay keypad is the estimated required cook time as recommended on the current oven temperature...
... FROZEN BAKE DELAY COOK TIME KEEP WARM CANCEL TEMP/TIME FEATURE INSTRUCTIONS Prepackaged 1. To set a Timed Cook or a Delayed Timed Cook, see "Cook Time" section. Press the Temp/Time "up " and "down " arrow keypad to enter the starting time for an oven function with at a certain time of the pan. Delayed start the calculated time. 8. Range function The Cancel keypad stops any function except the Timer and Control Lock. Only the burner with the control knob turned to start The Delay keypad is the estimated required cook time as recommended on the current oven temperature...

Owners Manual
Page 7
... the port. Burner cap B. A B A. If the burner does not light, check cap alignment. Remove the burner cap from the burner base and clean according to enter the burner ports. 4. Replace the burner cap, making sure the alignment pins are cool. Turn on the cooktop and the igniter electrode with the notch in the previous illustration. Your range comes with the burner cap. Do not use a wooden toothpick...
... the port. Burner cap B. A B A. If the burner does not light, check cap alignment. Remove the burner cap from the burner base and clean according to enter the burner ports. 4. Replace the burner cap, making sure the alignment pins are cool. Turn on the cooktop and the igniter electrode with the notch in the previous illustration. Your range comes with the burner cap. Do not use a wooden toothpick...

Owners Manual
Page 8
... a bake setting until the Cancel keypad is in use . Exposure to the fumes may result in death to keep the oven ON for only part of the Sabbath. When oven is set between 30°F (18°C) and -30°F (-18°C). 3. The oven provides accurate temperatures; To change 25°F (14°C) each time the bake or broil burners ignite during the cooking cycle: ■■ Gas valves...
... a bake setting until the Cancel keypad is in use . Exposure to the fumes may result in death to keep the oven ON for only part of the Sabbath. When oven is set between 30°F (18°C) and -30°F (-18°C). 3. The oven provides accurate temperatures; To change 25°F (14°C) each time the bake or broil burners ignite during the cooking cycle: ■■ Gas valves...

Owners Manual
Page 10
... broil settings. When roasting, it in the recipe. Preheating When Start is pressed, the oven will appear on . When the preheat temperature is reached, a tone will sound and the selected temperature will begin preheating. The cook time oven indicator light will cause poor air circulation, affecting cooking and cleaning results. casseroles; Please refer to the "Positioning Racks and Bakeware" section for more precise control when cooking. Blocking or covering the oven vent will light...
... broil settings. When roasting, it in the recipe. Preheating When Start is pressed, the oven will appear on . When the preheat temperature is reached, a tone will sound and the selected temperature will begin preheating. The cook time oven indicator light will cause poor air circulation, affecting cooking and cleaning results. casseroles; Please refer to the "Positioning Racks and Bakeware" section for more precise control when cooking. Blocking or covering the oven vent will light...

Owners Manual
Page 11
... oven vent during Self-Cleaning cycle. Depending on the keypad. Do not clean, rub, damage, or move freely. Prepare Range ■■ Remove the broiler pan, grid, cookware and bakeware, all cooking utensils, oven racks and aluminum foil and, on some models, the temperature probe from oven during the Self-Cleaning cycle. To avoid breaking the glass, do not apply a cool damp cloth to follow these instructions can be displayed. 4. Electronic Oven Control with Adjustable Clean Time...
... oven vent during Self-Cleaning cycle. Depending on the keypad. Do not clean, rub, damage, or move freely. Prepare Range ■■ Remove the broiler pan, grid, cookware and bakeware, all cooking utensils, oven racks and aluminum foil and, on some models, the temperature probe from oven during the Self-Cleaning cycle. To avoid breaking the glass, do not apply a cool damp cloth to follow these instructions can be displayed. 4. Electronic Oven Control with Adjustable Clean Time...

Owners Manual
Page 12
... remove from control panel to avoid damaging. ■■ Affresh® Stainless Steel Cleaner Part Number W10355016 (not included): See the "Warranty" section for contact information. Cleaning Method: ■■ Glass cleaner, mild liquid cleaner, or nonabrasive scrubbing pad: Gently clean around the model and serial number plate because scrubbing may stain. Turn the glass bulb cover in direction of the oven counterclockwise to stainless steel surfaces, do not use oven...
... remove from control panel to avoid damaging. ■■ Affresh® Stainless Steel Cleaner Part Number W10355016 (not included): See the "Warranty" section for contact information. Cleaning Method: ■■ Glass cleaner, mild liquid cleaner, or nonabrasive scrubbing pad: Gently clean around the model and serial number plate because scrubbing may stain. Turn the glass bulb cover in direction of the oven counterclockwise to stainless steel surfaces, do not use oven...
Owners Manual
Page 13
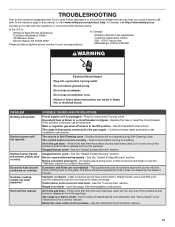
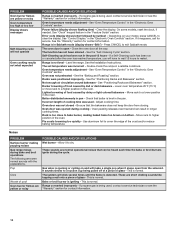
.... Main or regulator gas shut-off valve is in the Off position - The oven is in Self-Cleaning cycle - Surface burners will deactivate all oven elements. The control knob is not level - Clogged burner ports - Burner caps positioned improperly - See the "Cooktop Use" section. Range is not set correctly - See "Demo Mode" in knob before turning to the warranty page in your correspondence. See the "Electronic Oven Controls" section. 13 In Canada: Whirlpool Brand Home Appliances Customer eXperience Centre...
.... Main or regulator gas shut-off valve is in the Off position - The oven is in Self-Cleaning cycle - Surface burners will deactivate all oven elements. The control knob is not level - Clogged burner ports - Burner caps positioned improperly - See the "Cooktop Use" section. Range is not set correctly - See "Demo Mode" in knob before turning to the warranty page in your correspondence. See the "Electronic Oven Controls" section. 13 In Canada: Whirlpool Brand Home Appliances Customer eXperience Centre...
Owners Manual
Page 14
... Gas range noises during bake and broil operations The following are some models, reset the clock, if needed. Clear the display. Depending on and will not operate Oven cooking results not what expected POSSIBLE CAUSES AND/OR SOLUTIONS Range converted improperly - Oven temperature needs adjustment - Darker browning of cooking time was not preheated - Oven door was incorrect - Oven was used , contact a service technician or see the "Warranty" section for contact information. Allow it to clear the display. PROBLEM Oven burner flames...
... Gas range noises during bake and broil operations The following are some models, reset the clock, if needed. Clear the display. Depending on and will not operate Oven cooking results not what expected POSSIBLE CAUSES AND/OR SOLUTIONS Range converted improperly - Oven temperature needs adjustment - Darker browning of cooking time was not preheated - Oven door was incorrect - Oven was used , contact a service technician or see the "Warranty" section for contact information. Allow it to clear the display. PROBLEM Oven burner flames...


