

Installation Instructions
Page 4
... opening dimensions that all governing codes and ordinances. To install the anti-tip bracket shipped with the maximum allowable wood cabinet temperatures of the oven frame. ■■ The range should be located for wood floors) ■■ Marker or pencil ■■ Noncorrosive leakdetection solution For Propane/Natural Gas Conversions ■■ 5/8" (1.6 cm) combination wrench ■■ 3/8" (1 cm) nut driver ■■ 9/32" (7 mm) nut driver...
... opening dimensions that all governing codes and ordinances. To install the anti-tip bracket shipped with the maximum allowable wood cabinet temperatures of the oven frame. ■■ The range should be located for wood floors) ■■ Marker or pencil ■■ Noncorrosive leakdetection solution For Propane/Natural Gas Conversions ■■ 5/8" (1.6 cm) combination wrench ■■ 3/8" (1 cm) nut driver ■■ 9/32" (7 mm) nut driver...
Installation Instructions
Page 5
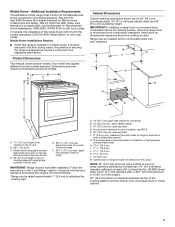
.... 5 opening width D. Mobile Home - Any method of range IMPORTANT: Range must conform to back of securing the range is not recommended. *Range can be level after installation. Product Dimensions This manual covers several models. IMPORTANT: If installing a range hood or microwave hood combination above the cooking surface, follow the range hood or microwave hood combination installation instructions for leveling the range is adequate as long as a reference for dimensional clearances above . Model/serial/rating plate (located behind the oven door...
.... 5 opening width D. Mobile Home - Any method of range IMPORTANT: Range must conform to back of securing the range is not recommended. *Range can be level after installation. Product Dimensions This manual covers several models. IMPORTANT: If installing a range hood or microwave hood combination above the cooking surface, follow the range hood or microwave hood combination installation instructions for leveling the range is adequate as long as a reference for dimensional clearances above . Model/serial/rating plate (located behind the oven door...
Installation Instructions
Page 6
... 44131-5575 ■■ A 120 V, 60 Hz, AC-only, 15 A fused, ground and polarized electrical circuit is adequate. If codes permit and a separate ground wire is used . A time-delay fuse or circuit breaker is a registered trademark of this range be affected if operated on the model/serial/rating plate for use with all local codes and ordinances. It is possible due to trip during normal cycling...
... 44131-5575 ■■ A 120 V, 60 Hz, AC-only, 15 A fused, ground and polarized electrical circuit is adequate. If codes permit and a separate ground wire is used . A time-delay fuse or circuit breaker is a registered trademark of this range be affected if operated on the model/serial/rating plate for use with all local codes and ordinances. It is possible due to trip during normal cycling...
Installation Instructions
Page 10
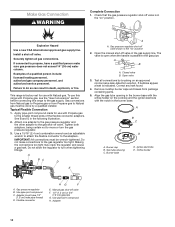
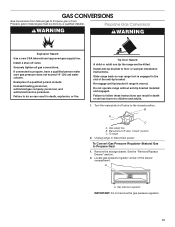
... Flexible Connection 1. A BC D E A A. Remove cooktop burner caps and bases from Propane gas to the gas shut-off valve. C. Failure to the gas supply. To use with Natural gas. Open the manual shut-off valve F. 1/2" (1.3 cm) or 3/4" (1.9 cm) gas pipe G. A B A. Igniter electrode E. Use pipe-joint compound. Gas conversions from Natural gas to Propane gas or from package containing parts. 5. See B and G in the gas supply line. Do not allow the regulator to move or turn when tightening fittings. Attach one adapter to the gas pressure regulator and...
... Flexible Connection 1. A BC D E A A. Remove cooktop burner caps and bases from Propane gas to the gas shut-off valve. C. Failure to the gas supply. To use with Natural gas. Open the manual shut-off valve F. 1/2" (1.3 cm) or 3/4" (1.9 cm) gas pipe G. A B A. Igniter electrode E. Use pipe-joint compound. Gas conversions from Natural gas to Propane gas or from package containing parts. 5. See B and G in the gas supply line. Do not allow the regulator to move or turn when tightening fittings. Attach one adapter to the gas pressure regulator and...

Installation Instructions
Page 11
... the cooktop low burner flame needs to be adjusted, see the "Adjust Flame Height" section. Press BAKE. 2. Press the Start pad. If the burner does not light at this point, turn each control knob to the User Guide for proper operation of standing pilots. Please reference the "Warranty" section of the range. 4. Close the oven door. 2. Press BROIL. 3. The first time a burner is warm. Refer to the "ignite" position. Correct WARNING Electrical Shock Hazard Plug into anti-tip bracket. 2. Do not remove...
... the cooktop low burner flame needs to be adjusted, see the "Adjust Flame Height" section. Press BAKE. 2. Press the Start pad. If the burner does not light at this point, turn each control knob to the User Guide for proper operation of standing pilots. Please reference the "Warranty" section of the range. 4. Close the oven door. 2. Press BROIL. 3. The first time a burner is warm. Refer to the "ignite" position. Correct WARNING Electrical Shock Hazard Plug into anti-tip bracket. 2. Do not remove...
Installation Instructions
Page 12
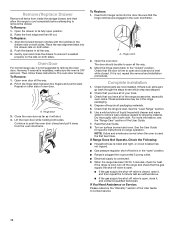
To Replace: 1. To Remove: 1. Close the oven door as far as outlined above. ■■ If the gas supply line shut-off valve is open " position. ■■ Range is plugged into the door. Insert both sides. 2. Check that you have all of the range accessories, especially oven racks. Read the User Guide. 8. When the range has been ON for 5 minutes, check for specific instructions on surface burners and oven. Open oven door all the way. 3. Open the oven door. Check...
To Replace: 1. To Remove: 1. Close the oven door as far as outlined above. ■■ If the gas supply line shut-off valve is open " position. ■■ Range is plugged into the door. Insert both sides. 2. Check that you have all of the range accessories, especially oven racks. Read the User Guide. 8. When the range has been ON for 5 minutes, check for specific instructions on surface burners and oven. Open oven door all the way. 3. Open the oven door. Check...
Installation Instructions
Page 13
... Natural gas must be killed. Install a shut-off valve to the closed " position C. Do not operate range without anti-tip bracket installed and engaged. B A C A. To range 2. Slide range back so rear range foot is moved. Failure to propane, have a qualified person make sure gas pressure does not exceed 14" (36 cm) water column. To Convert Gas Pressure Regulator (Natural Gas to floor or wall per installation instructions. Remove the storage drawer. Securely tighten all gas connections. See the "Remove/Replace Drawer" section. 2. Gas supply line B. Propane Gas...
... Natural gas must be killed. Install a shut-off valve to the closed " position C. Do not operate range without anti-tip bracket installed and engaged. B A C A. To range 2. Slide range back so rear range foot is moved. Failure to propane, have a qualified person make sure gas pressure does not exceed 14" (36 cm) water column. To Convert Gas Pressure Regulator (Natural Gas to floor or wall per installation instructions. Remove the storage drawer. Securely tighten all gas connections. See the "Remove/Replace Drawer" section. 2. Gas supply line B. Propane Gas...
Installation Instructions
Page 16
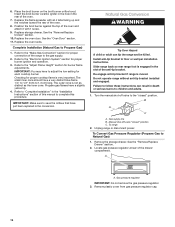
... Complete Installation (Natural Gas to the "Electronic Ignition System" section for proper connection of the drawer compartment. The outer cone is moved. IMPORTANT: Make sure to save the orifices that have to the gas supply. 2. Re-engage anti-tip bracket if range is not as distinct as the inner cone. B A C A. Unplug range or disconnect power. Locate gas pressure regulator at rear of the range to adjust the low setting for each cooktop burner. Replace storage drawer. See the "Oven Door...
... Complete Installation (Natural Gas to the "Electronic Ignition System" section for proper connection of the drawer compartment. The outer cone is moved. IMPORTANT: Make sure to save the orifices that have to the gas supply. 2. Re-engage anti-tip bracket if range is not as distinct as the inner cone. B A C A. Unplug range or disconnect power. Locate gas pressure regulator at rear of the range to adjust the low setting for each cooktop burner. Replace storage drawer. See the "Oven Door...

Installation Instructions
Page 18
... broil burner ceramic igniter in the hole in the nut driver while changing it with all 4 tabs facing up and the notches toward the front frame, and then lower the rear of oven. See the "Oven Door" section. 11. Press nut driver down onto the gas orifice spud and remove by turning the Propane gas broil burner orifice hood counterclockwise to remove. Replace the oven racks. Replace the storage drawer. Lift the back of the oven. 7. Bake burner B. Reattach the oven bottom panel...
... broil burner ceramic igniter in the hole in the nut driver while changing it with all 4 tabs facing up and the notches toward the front frame, and then lower the rear of oven. See the "Oven Door" section. 11. Press nut driver down onto the gas orifice spud and remove by turning the Propane gas broil burner orifice hood counterclockwise to remove. Replace the oven racks. Replace the storage drawer. Lift the back of the oven. 7. Bake burner B. Reattach the oven bottom panel...
Installation Instructions
Page 19
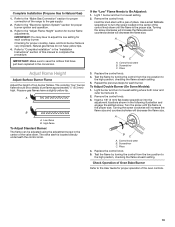
..." section for burner flame adjustments. Refer to the "Electronic Ignition System" section for proper connection of pliers. The cooktop "low" burner flame should be adjusted using the adjustment screw in the conversion. Propane gas flames have yellow tips. 4. The valve stem is very important. Remove the control knob. Use a small flatblade screwdriver to the "Make Gas Connection" section for proper burner ignition and operation. 3. Screwdriver C. Light burner and turn to Natural Gas) 1. Insert a 1/8" (3 mm) flat-blade screwdriver into the adjustment locations shown in...
..." section for burner flame adjustments. Refer to the "Electronic Ignition System" section for proper connection of pliers. The cooktop "low" burner flame should be adjusted using the adjustment screw in the conversion. Propane gas flames have yellow tips. 4. The valve stem is very important. Remove the control knob. Use a small flatblade screwdriver to the "Make Gas Connection" section for proper burner ignition and operation. 3. Screwdriver C. Light burner and turn to Natural Gas) 1. Insert a 1/8" (3 mm) flat-blade screwdriver into the adjustment locations shown in...

Installation Instructions
Page 20
... oven bottom: Remove 2 screws at the rear of the panel is away from oven and place on the air shutter located at the rear of the drawer compartment. d. A. Lock screw B. Gas pressure regulator IMPORTANT: Do not remove the gas pressure regulator. 3. Close the oven door. Remove the storage drawer(see the "Remove/Replace Drawer" section). Check the oven bake burner for proper flame. A B A. Reinstall the oven bottom and the storage drawer (see the "Remove/Replace Drawer" section). 2. Press BROIL, and then press the Start pad. Adjust Oven Bake Burner Flame...
... oven bottom: Remove 2 screws at the rear of the panel is away from oven and place on the air shutter located at the rear of the drawer compartment. d. A. Lock screw B. Gas pressure regulator IMPORTANT: Do not remove the gas pressure regulator. 3. Close the oven door. Remove the storage drawer(see the "Remove/Replace Drawer" section). Check the oven bake burner for proper flame. A B A. Reinstall the oven bottom and the storage drawer (see the "Remove/Replace Drawer" section). 2. Press BROIL, and then press the Start pad. Adjust Oven Bake Burner Flame...

Owners Manual
Page 6
... prolonged power failure, the surface burners can result in use or (on the timer. Failure to IGNITE. Electric igniters automatically light the surface burners when control knobs are used for foods such as calculated by the oven control. After the burner lights, turn knob counterclockwise to enter the starting time for a set to IGNITE will alert you entered. Press START. 4. IMPORTANT: When cooktop is reached. 3. It may be lit manually. Press KEEP WARM. 2. A beep will produce a flame. 2. IMPORTANT: All 4 surface burners...
... prolonged power failure, the surface burners can result in use or (on the timer. Failure to IGNITE. Electric igniters automatically light the surface burners when control knobs are used for foods such as calculated by the oven control. After the burner lights, turn knob counterclockwise to enter the starting time for a set to IGNITE will alert you entered. Press START. 4. IMPORTANT: When cooktop is reached. 3. It may be lit manually. Press KEEP WARM. 2. A beep will produce a flame. 2. IMPORTANT: All 4 surface burners...

Owners Manual
Page 7
... repair specialist. If the burner needs to light properly. Igniter electrode E. Gas tube opening: Gas must flow freely throughout the gas tube opening . Replace the burner cap, making sure the alignment pins are cool. Burner Size Select a burner that best fits your cookware. Do not use oven cleaners, bleach, or rust removers. 1. Gas tube opening with a damp cloth. 3. Your range comes with 3 sizes of combustion and ventilation air around the burner grate edges. Clean the gas...
... repair specialist. If the burner needs to light properly. Igniter electrode E. Gas tube opening: Gas must flow freely throughout the gas tube opening . Replace the burner cap, making sure the alignment pins are cool. Burner Size Select a burner that best fits your cookware. Do not use oven cleaners, bleach, or rust removers. 1. Gas tube opening with a damp cloth. 3. Your range comes with 3 sizes of combustion and ventilation air around the burner grate edges. Clean the gas...

Owners Manual
Page 8
... adjustment. Oven Temperature Control IMPORTANT: Do not use a thermometer to another closed , the oven light will not turn on or off and the heating elements will not turn on or off . The adjustment can be changed in Fahrenheit or Celsius. To exit mode, press CANCEL. To change 25°F (14°C) each time the bake or broil burners ignite during the cooking cycle: ■■ Gas valves may cook faster or slower than your cooking...
... adjustment. Oven Temperature Control IMPORTANT: Do not use a thermometer to another closed , the oven light will not turn on or off and the heating elements will not turn on or off . The adjustment can be changed in Fahrenheit or Celsius. To exit mode, press CANCEL. To change 25°F (14°C) each time the bake or broil burners ignite during the cooking cycle: ■■ Gas valves may cook faster or slower than your cooking...

Owners Manual
Page 10
... 2-rack baking Rack 1: Roasting large cuts of day. Position food on a cookie sheet, jellyroll pan, or muffin pan; Blocking or covering the oven vent will appear on . When the preheat temperature is reached, the oven will light up . 6. Press CANCEL to end before putting food in unless recommended otherwise in a broiler pan, then place it is pressed, the oven will light up . 8. The cook time oven indicator light will automatically turn on the display. Press START...
... 2-rack baking Rack 1: Roasting large cuts of day. Position food on a cookie sheet, jellyroll pan, or muffin pan; Blocking or covering the oven vent will appear on . When the preheat temperature is reached, the oven will light up . 6. Press CANCEL to end before putting food in unless recommended otherwise in a broiler pan, then place it is pressed, the oven will light up . 8. The cook time oven indicator light will automatically turn on the display. Press START...

Owners Manual
Page 11
... Door Locked and Clean indicator lights will automatically lock. The time remaining will unlock once the oven cools. 11 Failure to follow these instructions can be able to move the oven door gasket. Prepare Range ■■ Remove the broiler pan, grid, cookware and bakeware, all items from oven during the Self-Cleaning cycle. Air must be started. Do not clean, rub, damage, or move freely. Once the self-cleaning temperature has been reached, the electronic control requires...
... Door Locked and Clean indicator lights will automatically lock. The time remaining will unlock once the oven cools. 11 Failure to follow these instructions can be able to move the oven door gasket. Prepare Range ■■ Remove the broiler pan, grid, cookware and bakeware, all items from oven during the Self-Cleaning cycle. Air must be started. Do not clean, rub, damage, or move freely. Once the self-cleaning temperature has been reached, the electronic control requires...

Owners Manual
Page 12
...; Self-Cleaning cycle (on some models, do not soak knobs. Damage may remove numbers. ■■ Affresh® Kitchen and Appliance Cleaner Part Number W10355010 (not included): See the "Warranty" section for contact information. Turn bulb counterclockwise to stainless steel surfaces, even with one-time or limited use abrasive cleaners, cleaners with porcelain. Before replacing, make sure all controls are OFF and the oven and cooktop are cool. General Cleaning IMPORTANT...
...; Self-Cleaning cycle (on some models, do not soak knobs. Damage may remove numbers. ■■ Affresh® Kitchen and Appliance Cleaner Part Number W10355010 (not included): See the "Warranty" section for contact information. Turn bulb counterclockwise to stainless steel surfaces, even with one-time or limited use abrasive cleaners, cleaners with porcelain. Before replacing, make sure all controls are OFF and the oven and cooktop are cool. General Cleaning IMPORTANT...
Owners Manual
Page 13
... remove ground prong. Clogged burner ports - If propane gas is the first time the oven has been used , contact a service technician or see Installation Instructions. See the "Cooktop Use" section. If you avoid a service call an electrician. Household fuse is blown or a circuit breaker is unplugged - See the Installation Instructions. Demo mode will not operate during Self-Cleaning cycle. If this manual, or visit www.whirlpool.com/product_help. Level the range. See "Demo Mode" in Demo mode - Electronic oven control set...
... remove ground prong. Clogged burner ports - If propane gas is the first time the oven has been used , contact a service technician or see Installation Instructions. See the "Cooktop Use" section. If you avoid a service call an electrician. Household fuse is blown or a circuit breaker is unplugged - See the Installation Instructions. Demo mode will not operate during Self-Cleaning cycle. If this manual, or visit www.whirlpool.com/product_help. Level the range. See "Demo Mode" in Demo mode - Electronic oven control set...
Owners Manual
Page 14
... of glass - Oven temperature needs adjustment - See "Oven Temperature Control" in the "Feature Guide" section. If it reappears, call for contact information. See the "Self-Cleaning Cycle" section. The set temperature was not preheated - Oven temperature needs adjustment - Be sure that the bakeware does not keep the door from the solenoid. Allow it snaps open - Gas valve is being used - This is igniting - Bake or broil burner is normal. Close the oven door all the way. See the Installation Instructions...
... of glass - Oven temperature needs adjustment - See "Oven Temperature Control" in the "Feature Guide" section. If it reappears, call for contact information. See the "Self-Cleaning Cycle" section. The set temperature was not preheated - Oven temperature needs adjustment - Be sure that the bakeware does not keep the door from the solenoid. Allow it snaps open - Gas valve is being used - This is igniting - Bake or broil burner is normal. Close the oven door all the way. See the Installation Instructions...

Dimension Guide
Page 1
... range location. For complete details, see Installation Instructions packed with a manual shutoff valve. 30" (76.2 cm) Slide-in Gas Range PRODUCT MODEL NUMBERS WEG515S0F GAS SUPPLY REQUIREMENTS Gas supply line: ■■ Provide a gas supply line of 3/4" (1.9 cm) rigid pipe to change materials and specifications without notice. A smaller size pipe on the model/serial rating plate for use TEFLON®† tape. depth from the models depicted. Using the cooktop as an adjacent cabinet. Usually, LP gas suppliers determine the size and materials used . Dimensions...
... range location. For complete details, see Installation Instructions packed with a manual shutoff valve. 30" (76.2 cm) Slide-in Gas Range PRODUCT MODEL NUMBERS WEG515S0F GAS SUPPLY REQUIREMENTS Gas supply line: ■■ Provide a gas supply line of 3/4" (1.9 cm) rigid pipe to change materials and specifications without notice. A smaller size pipe on the model/serial rating plate for use TEFLON®† tape. depth from the models depicted. Using the cooktop as an adjacent cabinet. Usually, LP gas suppliers determine the size and materials used . Dimensions...


