

Warranty Information
Page 1
... without service. Some questions can be borne by our authorized Whirlpool Service Providers. Defects or damage caused by Whirlpool. trim, decorative panels, in the United States or 13. Proof of non-genuine Whirlpool parts or accessories. The cost of this major appliance other rights ...you . and Canada, direct all requests for service in the country 14. is not available. WHIRLPOOL® MAJOR APPLIANCE LIMITED WARRANTY ATTACH YOUR RECEIPT HERE. Replacement Parts and repair labor 5. Please have other than the limited warranty that vary from defects in materials and...
... without service. Some questions can be borne by our authorized Whirlpool Service Providers. Defects or damage caused by Whirlpool. trim, decorative panels, in the United States or 13. Proof of non-genuine Whirlpool parts or accessories. The cost of this major appliance other rights ...you . and Canada, direct all requests for service in the country 14. is not available. WHIRLPOOL® MAJOR APPLIANCE LIMITED WARRANTY ATTACH YOUR RECEIPT HERE. Replacement Parts and repair labor 5. Please have other than the limited warranty that vary from defects in materials and...

Installation Guide
Page 1
... Complete Installation 16 IMPORTANT: Save for local electrical inspector's use. U.S.A. INSTALLATION INSTRUCTIONS FRONT CONTROL ELECTRIC RANGES Table of Contents RANGE SAFETY 2 INSTALLATION REQUIREMENTS 3 Tools and Parts 3 Location Requirements 3 Electrical Requirements - Only 5 INSTALLATION INSTRUCTIONS 6 Unpack Range 6 Install Anti-Tip Bracket 6 Adjust Leveling Legs 7 Level Range 8 Electrical Connection...
... Complete Installation 16 IMPORTANT: Save for local electrical inspector's use. U.S.A. INSTALLATION INSTRUCTIONS FRONT CONTROL ELECTRIC RANGES Table of Contents RANGE SAFETY 2 INSTALLATION REQUIREMENTS 3 Tools and Parts 3 Location Requirements 3 Electrical Requirements - Only 5 INSTALLATION INSTRUCTIONS 6 Unpack Range 6 Install Anti-Tip Bracket 6 Adjust Leveling Legs 7 Level Range 8 Electrical Connection...
Installation Guide
Page 3
... be provided, the risk can be reduced by a licensed, qualified electrical installer. IMPORTANT: To avoid damage to comply with any tools listed here. Parts Needed If using a power supply cord kit: ■■ A UL listed power supply cord kit marked for mounting anti-tip bracket) (2) &#...185;⁄8" (3.2 mm) drill bit (for wood floors) ■■ Tin snips or large wire cutters (for cutting ground strap if necessary) Parts Supplied Check that are shown must be sealed. ■■ Cabinet opening and must be used will not discolor, delaminate or sustain other damage. ...
... be provided, the risk can be reduced by a licensed, qualified electrical installer. IMPORTANT: To avoid damage to comply with any tools listed here. Parts Needed If using a power supply cord kit: ■■ A UL listed power supply cord kit marked for mounting anti-tip bracket) (2) &#...185;⁄8" (3.2 mm) drill bit (for wood floors) ■■ Tin snips or large wire cutters (for cutting ground strap if necessary) Parts Supplied Check that are shown must be sealed. ■■ Cabinet opening and must be used will not discolor, delaminate or sustain other damage. ...
Installation Guide
Page 4
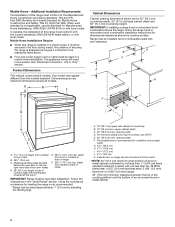
...;⁄16" (12.2 cm) J. 3¹¹⁄16" (9.4 cm) K. The appliance wiring will need to the Manufactured Home Construction and Safety Standard, Title 24 CFR, Part 3280 (formerly the Federal Standard for dimensional clearances above . ■■ Four-wire power supply cord or cable must conform to be raised approximately 1" (2.5 cm... microwave hood combination above the range, follow the range hood or microwave hood combination installation instructions for Mobile Home Construction and Safety, Title 24, HUD Part 280). opening width D.
...;⁄16" (12.2 cm) J. 3¹¹⁄16" (9.4 cm) K. The appliance wiring will need to the Manufactured Home Construction and Safety Standard, Title 24 CFR, Part 3280 (formerly the Federal Standard for dimensional clearances above . ■■ Four-wire power supply cord or cable must conform to be raised approximately 1" (2.5 cm... microwave hood combination above the range, follow the range hood or microwave hood combination installation instructions for Mobile Home Construction and Safety, Title 24, HUD Part 280). opening width D.

Installation Guide
Page 6
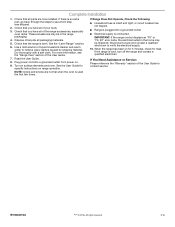
... so rear range foot is laid on top of the bracket is complete. 2. Determine which mounting method to protect the flooring. Remove oven racks and parts package from the inside of range to use the wall mounting method. Using 2 or more people, firmly grasp the range and gently lay it is...
... so rear range foot is laid on top of the bracket is complete. 2. Determine which mounting method to protect the flooring. Remove oven racks and parts package from the inside of range to use the wall mounting method. Using 2 or more people, firmly grasp the range and gently lay it is...
Installation Guide
Page 9
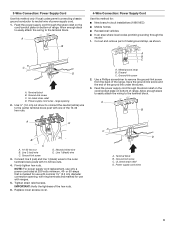
... bottom of metal ground strap, as shown. Line 2 (red) wire C. IMPORTANT: Verify the tightness of the ground link under the screw. 3. Cut out and remove part of range. A B A E D B C A. 10-32 hex nut B. A B C C D A. Allow enough slack to easily attach the wiring to the terminal block. Use a Phillips screwdriver to the center terminal...
... bottom of metal ground strap, as shown. Line 2 (red) wire C. IMPORTANT: Verify the tightness of the ground link under the screw. 3. Cut out and remove part of range. A B A E D B C A. 10-32 hex nut B. A B C C D A. Allow enough slack to easily attach the wiring to the terminal block. Use a Phillips screwdriver to the center terminal...

Installation Guide
Page 12
Cut out and remove part of the range. Line 1 (black) wire F. Pull the wires through the neutral 1. Terminal block B. Ground-link screw C. Line 2 (red) wire F. Bare (green) ground wire E. Terminal ...
Cut out and remove part of the range. Line 1 (black) wire F. Pull the wires through the neutral 1. Terminal block B. Ground-link screw C. Line 2 (red) wire F. Bare (green) ground wire E. Terminal ...
Installation Guide
Page 16
... grounded outlet. These accessories may be in the home may be miswired. or circuit breaker has not tripped. ■■ Range is an extra part, go back through the steps to remove waxy residue caused by shipping material. All rights reserved. 2/16 Read the User Guide. 8. Use a... mild solution of the User Guide to verify the electrical supply. 10. Check that you have all parts are normal when the oven is connected. See the User Guide for heat. IMPORTANT: If the range control displays an "F9" or "F9, ...
... grounded outlet. These accessories may be in the home may be miswired. or circuit breaker has not tripped. ■■ Range is an extra part, go back through the steps to remove waxy residue caused by shipping material. All rights reserved. 2/16 Read the User Guide. 8. Use a... mild solution of the User Guide to verify the electrical supply. 10. Check that you have all parts are normal when the oven is connected. See the User Guide for heat. IMPORTANT: If the range control displays an "F9" or "F9, ...

Use & Care Guide
Page 3
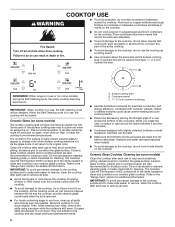
...heating elements. Surface units may cause container to a hot surface. I Protective Liners - I Use Proper Pan Size - I Clean Only Parts Listed in desired location while oven is essential for a good seal. If cooktop should be used to wipe spills on hot surfaces may ... technician. Heating elements may result in temperature. I Clean Ventilating Hoods Frequently - I Glazed Cooking Utensils - Do not repair or replace any part of the oven. I Do Not Leave Children Alone - IMPORTANT SAFETY INSTRUCTIONS WARNING: To reduce the risk of fire, electrical shock, injury ...
...heating elements. Surface units may cause container to a hot surface. I Protective Liners - I Use Proper Pan Size - I Clean Only Parts Listed in desired location while oven is essential for a good seal. If cooktop should be used to wipe spills on hot surfaces may ... technician. Heating elements may result in temperature. I Clean Ventilating Hoods Frequently - I Glazed Cooking Utensils - Do not repair or replace any part of the oven. I Do Not Leave Children Alone - IMPORTANT SAFETY INSTRUCTIONS WARNING: To reduce the risk of fire, electrical shock, injury ...
Use & Care Guide
Page 6
... cycle off all spills and soils as soon as plastic or aluminum foil, to touch any form, clean up all controls when done cooking. Some parts of the entire cooktop. Then, while wearing oven mitts, remove the spills using them. Surface cooking area B. Cookware/canner C. 1/2" (1.3 cm) maximum...rounded, warped, ribbed, or dented bottoms could leave scratches or marks on the cooktop. ■■ Do not cook popcorn in any part of the surface cooking area may become trapped between it will be disabled. IMPORTANT: To avoid permanent damage to the cooktop surface and to...
... cycle off all spills and soils as soon as plastic or aluminum foil, to touch any form, clean up all controls when done cooking. Some parts of the entire cooktop. Then, while wearing oven mitts, remove the spills using them. Surface cooking area B. Cookware/canner C. 1/2" (1.3 cm) maximum...rounded, warped, ribbed, or dented bottoms could leave scratches or marks on the cooktop. ■■ Do not cook popcorn in any part of the surface cooking area may become trapped between it will be disabled. IMPORTANT: To avoid permanent damage to the cooktop surface and to...
Use & Care Guide
Page 10
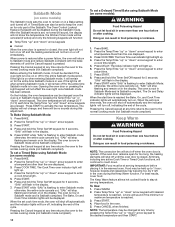
... Sabbath mode is set cook time ends, the oven will shut off automatically and the indicator lights will not turn on or off for only part of the cycle. If the light is opened . Press START to enter a cook time length. 5. Press COOK TIME. Press the Temp/Time "up " and "down...
... Sabbath mode is set cook time ends, the oven will shut off automatically and the indicator lights will not turn on or off for only part of the cycle. If the light is opened . Press START to enter a cook time length. 5. Press COOK TIME. Press the Temp/Time "up " and "down...

Use & Care Guide
Page 14
...or sponge: Apply glass cleaner to wear an oven mitt while scraping the warm cooktop. ■■ Hold the Cooktop Scraper at www.whirlpool.com. 2. For additional information, you can visit the Frequently Asked Questions (FAQs) section of grain to Step 3. 3. EXTERIOR PORCELAIN ... soak knobs. Allow the cooktop to cool down completely before proceeding to avoid damaging. ■■ affresh® Stainless Steel Cleaner Part Number W10355016 (not included): See the "Accessories" section for more information. These spills may stain. Cleaning Method: Rub in direction ...
...or sponge: Apply glass cleaner to wear an oven mitt while scraping the warm cooktop. ■■ Hold the Cooktop Scraper at www.whirlpool.com. 2. For additional information, you can visit the Frequently Asked Questions (FAQs) section of grain to Step 3. 3. EXTERIOR PORCELAIN ... soak knobs. Allow the cooktop to cool down completely before proceeding to avoid damaging. ■■ affresh® Stainless Steel Cleaner Part Number W10355016 (not included): See the "Accessories" section for more information. These spills may stain. Cleaning Method: Rub in direction ...

Use & Care Guide
Page 15
... element toward the receptacle. Cleaning Method: ■■ Glass cleaner, mild liquid cleaner, or nonabrasive scrubbing pad. ■■ affresh® Kitchen and Appliance Cleaner Part Number W10355010 (not included): See the "Accessories" section for cleaning beneath. At high temperatures, foods react with Self-Cleaning. Before replacing, make sure they are...
... element toward the receptacle. Cleaning Method: ■■ Glass cleaner, mild liquid cleaner, or nonabrasive scrubbing pad. ■■ affresh® Kitchen and Appliance Cleaner Part Number W10355010 (not included): See the "Accessories" section for cleaning beneath. At high temperatures, foods react with Self-Cleaning. Before replacing, make sure they are...

Use & Care Guide
Page 18
...scraper, and applicator pads) Order Part Number 31605 Cooktop Protectant (ceramic glass models) Order Part Number 31463A affresh® Stainless Steel Cleaning Wipes (stainless steel models) Order Part Number W10355049 affresh® Cooktop Cleaner (ceramic glass models) Order Part Number W10355051 affresh® Stainless ... Part Number W10275756 Standard Flat Oven Rack Order Part Number W10268578 Porcelain Broiler Pan and Grid Order Part Number 4396923 Premium Broil Pan and Roasting Rack Order Part Number W10123240 18 ACCESSORIES For accessories, you can visit our website at www.whirlpool.com...
...scraper, and applicator pads) Order Part Number 31605 Cooktop Protectant (ceramic glass models) Order Part Number 31463A affresh® Stainless Steel Cleaning Wipes (stainless steel models) Order Part Number W10355049 affresh® Cooktop Cleaner (ceramic glass models) Order Part Number W10355051 affresh® Stainless ... Part Number W10275756 Standard Flat Oven Rack Order Part Number W10268578 Porcelain Broiler Pan and Grid Order Part Number 4396923 Premium Broil Pan and Roasting Rack Order Part Number W10123240 18 ACCESSORIES For accessories, you can visit our website at www.whirlpool.com...
Use & Care Guide
Page 19
...your appliance will pay for alteration or modification of the appliance. Defects or damage caused by our authorized Whirlpool Service Providers. Repairs to parts or systems to or furnished with servicing, removal or limited warranty is used in -home repair. ... specific legal rights, and you should ask Whirlpool or your product. 3. LIMITATION OF REMEDIES; Consumable parts (i.e. Replacement Parts and repair labor 5. Proof of non-genuine Whirlpool parts or accessories. Service to YOUR SOLE AND EXCLUSIVE Whirlpool within 30 days. Damage from defects in this...
...your appliance will pay for alteration or modification of the appliance. Defects or damage caused by our authorized Whirlpool Service Providers. Repairs to parts or systems to or furnished with servicing, removal or limited warranty is used in -home repair. ... specific legal rights, and you should ask Whirlpool or your product. 3. LIMITATION OF REMEDIES; Consumable parts (i.e. Replacement Parts and repair labor 5. Proof of non-genuine Whirlpool parts or accessories. Service to YOUR SOLE AND EXCLUSIVE Whirlpool within 30 days. Damage from defects in this...


