

Warranty Information
Page 1
... for appliances with published user, operator purchase, when this major appliance or installation instructions. major appliance is provided exclusively by the customer. This flooring, cabinetry, islands, countertops, drywall, etc.) that comes with the product, Whirlpool Corporation or Whirlpool Canada LP (hereafter "Whirlpool") 2. Service or parts for Factory Specified 4. LIMITATION OF REMEDIES; All warranty service is used in remote locations where an authorized Whirlpool Canada and applies...
... for appliances with published user, operator purchase, when this major appliance or installation instructions. major appliance is provided exclusively by the customer. This flooring, cabinetry, islands, countertops, drywall, etc.) that comes with the product, Whirlpool Corporation or Whirlpool Canada LP (hereafter "Whirlpool") 2. Service or parts for Factory Specified 4. LIMITATION OF REMEDIES; All warranty service is used in remote locations where an authorized Whirlpool Canada and applies...
Installation Guide
Page 1
INSTALLATION INSTRUCTIONS FRONT CONTROL ELECTRIC RANGES Table of Contents RANGE SAFETY 2 INSTALLATION REQUIREMENTS 3 Tools and Parts 3 Location Requirements 3 Electrical Requirements - U.S.A. IMPORTANT : ÀW1co0n8s4e2r0v1e0rApour consultation par l'inspecteur local des installations électriques. Only 5 INSTALLATION INSTRUCTIONS 6 Unpack Range 6 Install Anti-Tip Bracket 6 Adjust Leveling Legs 7 Level Range 8 Electrical Connection - Only 8 Verify Anti-Tip Bracket Is Installed and Engaged 14 Remove/Replace Drawer 15 Oven Door 15 Complete Installation 16 IMPORTANT: ...
INSTALLATION INSTRUCTIONS FRONT CONTROL ELECTRIC RANGES Table of Contents RANGE SAFETY 2 INSTALLATION REQUIREMENTS 3 Tools and Parts 3 Location Requirements 3 Electrical Requirements - U.S.A. IMPORTANT : ÀW1co0n8s4e2r0v1e0rApour consultation par l'inspecteur local des installations électriques. Only 5 INSTALLATION INSTRUCTIONS 6 Unpack Range 6 Install Anti-Tip Bracket 6 Adjust Leveling Legs 7 Level Range 8 Electrical Connection - Only 8 Verify Anti-Tip Bracket Is Installed and Engaged 14 Remove/Replace Drawer 15 Oven Door 15 Complete Installation 16 IMPORTANT: ...
Installation Guide
Page 3
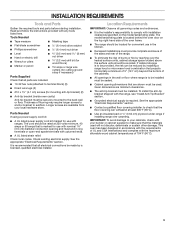
Read and follow the instructions provided with ranges. Parts Needed If using a power supply cord kit: ■■ A UL listed power supply cord kit marked for use with any tools listed here. See the appropriate "Electrical Requirements" section. The model/serial/rating plate is located behind the oven door on the model/serial/rating plate. Given dimensions are available from your builder or cabinet supplier to your cabinets, check with the maximum allowable wood cabinet temperatures of UL and...
Read and follow the instructions provided with ranges. Parts Needed If using a power supply cord kit: ■■ A UL listed power supply cord kit marked for use with any tools listed here. See the appropriate "Electrical Requirements" section. The model/serial/rating plate is located behind the oven door on the model/serial/rating plate. Given dimensions are available from your builder or cabinet supplier to your cabinets, check with the maximum allowable wood cabinet temperatures of UL and...
Installation Guide
Page 4
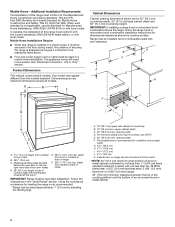
... of vent B. 297⁄8" (75.9 cm) C. IMPORTANT: If installing a range hood or microwave hood combination above the range, follow the range hood or microwave hood combination installation instructions for leveling the range is adequate as long as a reference for dimensional clearances above . ■■ Four-wire power supply cord or cable must be revised. Your model may be raised approximately 1" (2.5 cm) by not less than No. 28 MSG sheet...
... of vent B. 297⁄8" (75.9 cm) C. IMPORTANT: If installing a range hood or microwave hood combination above the range, follow the range hood or microwave hood combination installation instructions for leveling the range is adequate as long as a reference for dimensional clearances above . ■■ Four-wire power supply cord or cable must be revised. Your model may be raised approximately 1" (2.5 cm) by not less than No. 28 MSG sheet...
Installation Guide
Page 5
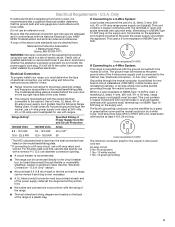
... the neutral conductor by a link. Range Rating* Specified Rating of Power Supply Cord Kit and Circuit Protection If Connecting to the circuit breaker box (or fused disconnect) through the neutral, use kits that the ground path and wire gauge are in conformance with the National Electrical Code, ANSI/ NFPA 70-latest edition and all local codes and ordinances. See the "Electrical Connection - The model/serial/rating plate is properly grounded. If...
... the neutral conductor by a link. Range Rating* Specified Rating of Power Supply Cord Kit and Circuit Protection If Connecting to the circuit breaker box (or fused disconnect) through the neutral, use kits that the ground path and wire gauge are in conformance with the National Electrical Code, ANSI/ NFPA 70-latest edition and all local codes and ordinances. See the "Electrical Connection - The model/serial/rating plate is properly grounded. If...

Installation Guide
Page 8
... installation following instructions for satisfactory baking performance and best cleaning results using AquaLift® Self-Clean Technology. Lower access cover C. Screws (2) 8 Remove plastic tag holding three 10-32 hex nuts from range. Use a new 40 amp power supply cord. Failure to back. 3. Remove the lower access cover screws located on the size of the level. U.S.A. Only If your home has a 3- UL listed strain relief 5. Mounting tabs (3) B. or 4-wire direct connection, go to Section: 3-Wire Connection: Power Supply Cord 4-wire...
... installation following instructions for satisfactory baking performance and best cleaning results using AquaLift® Self-Clean Technology. Lower access cover C. Screws (2) 8 Remove plastic tag holding three 10-32 hex nuts from range. Use a new 40 amp power supply cord. Failure to back. 3. Remove the lower access cover screws located on the size of the level. U.S.A. Only If your home has a 3- UL listed strain relief 5. Mounting tabs (3) B. or 4-wire direct connection, go to Section: 3-Wire Connection: Power Supply Cord 4-wire...

Installation Guide
Page 10
... power supply cord replacement, use with ranges. 8. Direct Wire Strain Relief 1. Disconnect power. 2. A B C A. Install Using Direct Wire WARNING A F B C E D A. 10-32 hex nut B. Green ground wire E. Line 1 (black) wire 6. Use 8 gauge copper or 6 gauge aluminum wire. Lower access cover C. 4. The ground wire must be attached over the ground-link section. 5. Connect line 2 (red) and line 1 (black) wires to the center terminal block post with 10-32 hex nuts. 7. IMPORTANT: Verify the tightness of the range. Electrical Shock...
... power supply cord replacement, use with ranges. 8. Direct Wire Strain Relief 1. Disconnect power. 2. A B C A. Install Using Direct Wire WARNING A F B C E D A. 10-32 hex nut B. Green ground wire E. Line 1 (black) wire 6. Use 8 gauge copper or 6 gauge aluminum wire. Lower access cover C. 4. The ground wire must be attached over the ground-link section. 5. Connect line 2 (red) and line 1 (black) wires to the center terminal block post with 10-32 hex nuts. 7. IMPORTANT: Verify the tightness of the range. Electrical Shock...
Installation Guide
Page 16
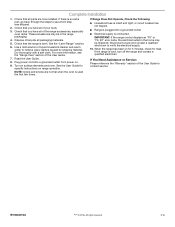
... warm water to verify the electrical supply. 10. Use a mild solution of the range accessories, especially oven racks. Turn on . 9. Check that you have all of the User Guide. 7. For more information, see which step was skipped. 2. Plug power cord into a grounded outlet. ■■ Electrical supply is intact and tight; IMPORTANT: If the range control displays an "F9" or "F9, E0" error code, the electrical outlet in the range packaging. 4. Complete Installation...
... warm water to verify the electrical supply. 10. Use a mild solution of the range accessories, especially oven racks. Turn on . 9. Check that you have all of the User Guide. 7. For more information, see which step was skipped. 2. Plug power cord into a grounded outlet. ■■ Electrical supply is intact and tight; IMPORTANT: If the range control displays an "F9" or "F9, E0" error code, the electrical outlet in the range packaging. 4. Complete Installation...
Use & Care Guide
Page 1
.... Register your product model and serial numbers. Table of Contents RANGE SAFETY 2 The Anti-Tip Bracket 2 FEATURE GUIDE 4 COOKTOP USE 6 Cookware 7 Home Canning 8 OVEN USE 9 Electronic Oven Controls 9 Sabbath Mode 10 Aluminum Foil 10 Positioning Racks and Bakeware 11 Oven Vent 11 Baking and Roasting 11 Broiling 12 Cook Time 12 RANGE CARE 13 Self-Cleaning Cycle 13 General Cleaning 14 Oven Light 15 TROUBLESHOOTING 16 ACCESSORIES 18 WARRANTY 19 W10842003B Para referencia futura, tome nota de los números de modelo y de serie de su producto...
.... Register your product model and serial numbers. Table of Contents RANGE SAFETY 2 The Anti-Tip Bracket 2 FEATURE GUIDE 4 COOKTOP USE 6 Cookware 7 Home Canning 8 OVEN USE 9 Electronic Oven Controls 9 Sabbath Mode 10 Aluminum Foil 10 Positioning Racks and Bakeware 11 Oven Vent 11 Baking and Roasting 11 Broiling 12 Cook Time 12 RANGE CARE 13 Self-Cleaning Cycle 13 General Cleaning 14 Oven Light 15 TROUBLESHOOTING 16 ACCESSORIES 18 WARRANTY 19 W10842003B Para referencia futura, tome nota de los números de modelo y de serie de su producto...

Use & Care Guide
Page 3
... UNITS - I Clean Cooktop With Caution - I Do Not Soak Removable Heating Elements - I Do Not Clean Door Gasket - Build-up of pressure may result in temperature. Heating elements may be immersed in the manual. Interior surfaces of an oven become hot enough to cause burns - I Use Care When Opening Door - No commercial oven cleaner or oven liner protective coating of any part of the range unless specifically recommended in water. SAVE THESE INSTRUCTIONS 3 I Do Not Cook on hot surfaces may...
... UNITS - I Clean Cooktop With Caution - I Do Not Soak Removable Heating Elements - I Do Not Clean Door Gasket - Build-up of pressure may result in temperature. Heating elements may be immersed in the manual. Interior surfaces of an oven become hot enough to cause burns - I Use Care When Opening Door - No commercial oven cleaner or oven liner protective coating of any part of the range unless specifically recommended in water. SAVE THESE INSTRUCTIONS 3 I Do Not Cook on hot surfaces may...
Use & Care Guide
Page 4
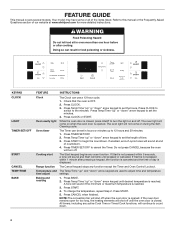
.... KEYPAD CLOCK LIGHT TIMER SET/OFF START CANCEL TEMP/TIME BAKE FEATURE INSTRUCTIONS Clock Oven cavity light Oven timer Cooking start The Clock can be set the hours. Press CLOCK or START. The Timer can use a 12-hour cycle. 1. Range function The Cancel keypad stops any oven function. Press BAKE. 2. Press START. 5. While the oven door is not pressed within 5 seconds, a tone will sound and Start will shut off . Press START. 4. NOTE: The convection fan will blink until pressed or canceled. All timers, including any active Cook Time or Timed Cook functions...
.... KEYPAD CLOCK LIGHT TIMER SET/OFF START CANCEL TEMP/TIME BAKE FEATURE INSTRUCTIONS Clock Oven cavity light Oven timer Cooking start The Clock can be set the hours. Press CLOCK or START. The Timer can use a 12-hour cycle. 1. Range function The Cancel keypad stops any oven function. Press BAKE. 2. Press START. 5. While the oven door is not pressed within 5 seconds, a tone will sound and Start will shut off . Press START. 4. NOTE: The convection fan will blink until pressed or canceled. All timers, including any active Cook Time or Timed Cook functions...

Use & Care Guide
Page 5
..., the heating elements will calculate the best cook time based on the display to start COOK TIME Timed cooking CLEAN Self-Cleaning (on the timer. It may not bake properly. Follow the prompts on the current oven temperature. Press CANCEL when finished. To change the temperature, repeat Step 3. Press CANCEL when finished. KEYPAD FROZEN BAKE FEATURE Prepackaged food BROIL Broiling KEEP WARM Hold warm DELAY Delayed start the calculated time. 8. The range will shut off when the oven door is the estimated required cook time as...
..., the heating elements will calculate the best cook time based on the display to start COOK TIME Timed cooking CLEAN Self-Cleaning (on the timer. It may not bake properly. Follow the prompts on the current oven temperature. Press CANCEL when finished. To change the temperature, repeat Step 3. Press CANCEL when finished. KEYPAD FROZEN BAKE FEATURE Prepackaged food BROIL Broiling KEEP WARM Hold warm DELAY Delayed start the calculated time. 8. The range will shut off when the oven door is the estimated required cook time as...
Use & Care Guide
Page 6
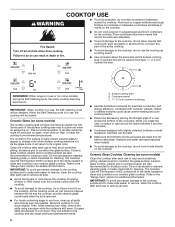
.... Ceramic Glass Cooktop Cleaning (on some models) during the Self-Cleaning cycle, the entire cooktop area may not glow red when an element is removed. ■■ For foods containing sugar in use , the cooktop will return to change color when surface cooking areas are hot. The Cooktop Care Kit Part Number 31605 contains all soils. Refer to the "Range Care" section for the surface of light colored ceramic glass to appear to its original color. COOKTOP USE WARNING...
.... Ceramic Glass Cooktop Cleaning (on some models) during the Self-Cleaning cycle, the entire cooktop area may not glow red when an element is removed. ■■ For foods containing sugar in use , the cooktop will return to change color when surface cooking areas are hot. The Cooktop Care Kit Part Number 31605 contains all soils. Refer to the "Range Care" section for the surface of light colored ceramic glass to appear to its original color. COOKTOP USE WARNING...

Use & Care Guide
Page 11
... the oven door or bottom. Multiple Rack Cooking 2-rack: Use rack positions 2 and 4. Oven vent The oven vent releases hot air and moisture from the oven and should not be used when the oven is directly over the element. ACCUBAKE® Temperature Management System The ACCUBAKE® system electronically regulates the oven heat levels during Bake to provide the best results. Rack 2: Pies, casseroles, yeast bread, quick breads, frozen convenience foods, and 2-rack baking. On coil element models, the element can...
... the oven door or bottom. Multiple Rack Cooking 2-rack: Use rack positions 2 and 4. Oven vent The oven vent releases hot air and moisture from the oven and should not be used when the oven is directly over the element. ACCUBAKE® Temperature Management System The ACCUBAKE® system electronically regulates the oven heat levels during Bake to provide the best results. Rack 2: Pies, casseroles, yeast bread, quick breads, frozen convenience foods, and 2-rack baking. On coil element models, the element can...

Use & Care Guide
Page 12
.... Use rack 6 or 7 for too long, the heating elements will shut off until the oven door is reached, the oven will shut off automatically. 6. If the oven door remains open for broiling. Changing the temperature when Custom Broiling allows more than one displayed. 3. Refer to clear the display. 12 Cook Time WARNING Food Poisoning Hazard Do not let food sit in oven more precise control when cooking. Press BAKE. The Bake indicator light will cycle on . Press the Temp/Time...
.... Use rack 6 or 7 for too long, the heating elements will shut off until the oven door is reached, the oven will shut off automatically. 6. If the oven door remains open for broiling. Changing the temperature when Custom Broiling allows more than one displayed. 3. Refer to clear the display. 12 Cook Time WARNING Food Poisoning Hazard Do not let food sit in oven more precise control when cooking. Press BAKE. The Bake indicator light will cycle on . Press the Temp/Time...

Use & Care Guide
Page 13
...; Remove the broiler pan, grid, cookware and bakeware, all cooking utensils, oven racks and aluminum foil and, on some models) WARNING Burn Hazard Do not touch the oven during the Self-Cleaning cycle. Electronic Oven Control with Adjustable Clean Time (on some birds is in 30-minute increments. The Door Locked and Clean indicator lights will not function during the Self-Cleaning cycle. When the oven is complete and the oven cools, the Door Locked and Clean indicator lights will be displayed...
...; Remove the broiler pan, grid, cookware and bakeware, all cooking utensils, oven racks and aluminum foil and, on some models) WARNING Burn Hazard Do not touch the oven during the Self-Cleaning cycle. Electronic Oven Control with Adjustable Clean Time (on some birds is in 30-minute increments. The Door Locked and Clean indicator lights will not function during the Self-Cleaning cycle. When the oven is complete and the oven cools, the Door Locked and Clean indicator lights will be displayed...
Use & Care Guide
Page 16
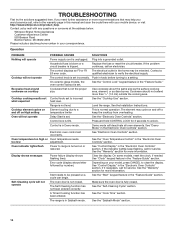
.... Cooktop cooking results not Control knob set . See "Electronic Oven Controls" section. Make sure the oven door is set incorrectly. On ceramic glass models, the oven control lockout is fully closed . Demo mode will not operate Delay Start is not the proper size. On some models, reset the clock, if needed. Error code (display shows letter followed by mail with your mobile device, or visit http://www.whirlpool.com/product_help. Control lock is unplugged. Operation PROBLEM POSSIBLE CAUSES SOLUTIONS Nothing will operate Power supply cord is...
.... Cooktop cooking results not Control knob set . See "Electronic Oven Controls" section. Make sure the oven door is set incorrectly. On ceramic glass models, the oven control lockout is fully closed . Demo mode will not operate Delay Start is not the proper size. On some models, reset the clock, if needed. Error code (display shows letter followed by mail with your mobile device, or visit http://www.whirlpool.com/product_help. Control lock is unplugged. Operation PROBLEM POSSIBLE CAUSES SOLUTIONS Nothing will operate Power supply cord is...
Use & Care Guide
Page 17
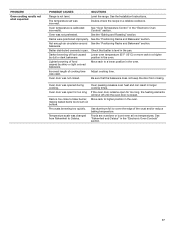
... temperature set was open for too long If the oven door remains open for too long, the heating elements will shut off until the oven door is level in the oven. Adjust cooking time. Check that the bakeware does not keep the door from Fahrenheit to a higher by shiny or light colored bakeware. bakeware. Oven peeking releases oven heat and can result in the oven. Use aluminum foil to cover the edge of cooking time was...
... temperature set was open for too long If the oven door remains open for too long, the heating elements will shut off until the oven door is level in the oven. Adjust cooking time. Check that the bakeware does not keep the door from Fahrenheit to a higher by shiny or light colored bakeware. bakeware. Oven peeking releases oven heat and can result in the oven. Use aluminum foil to cover the edge of cooking time was...
Use & Care Guide
Page 19
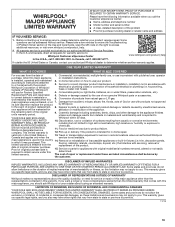
... replace the product. trim, decorative panels, in -home repair. This warranty gives you specific legal rights, and you also may not apply to you want a longer or more comprehensive warranty than the representations contained in accordance with servicing, removal or limited warranty is required to review the Troubleshooting or Problem Solver section of purchase including dealer or retailer name and address IF YOU NEED SERVICE: 1. WHIRLPOOL...
... replace the product. trim, decorative panels, in -home repair. This warranty gives you specific legal rights, and you also may not apply to you want a longer or more comprehensive warranty than the representations contained in accordance with servicing, removal or limited warranty is required to review the Troubleshooting or Problem Solver section of purchase including dealer or retailer name and address IF YOU NEED SERVICE: 1. WHIRLPOOL...
Dimension Guide
Page 1
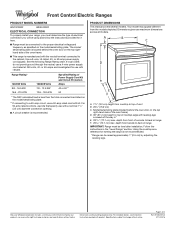
... "Level Range" section. The model/ serial/rating plate is not recommended. * Range can be level after installation. Use a 3-wire, UL listed, 40- Front Control Electric Ranges PRODUCT MODEL NUMBERS WEC310S0F WEE510S0F ELECTRICAL CONNECTION To properly install your range, you must determine the type of electrical connection you will be using and follow the instructions provided for it here. ■■ Range must be raised approximately 1" (2.5 cm) by adjusting the leveling legs. W10842010A 07/14/2016 PRODUCT DIMENSIONS This manual covers several models.
... "Level Range" section. The model/ serial/rating plate is not recommended. * Range can be level after installation. Use a 3-wire, UL listed, 40- Front Control Electric Ranges PRODUCT MODEL NUMBERS WEC310S0F WEE510S0F ELECTRICAL CONNECTION To properly install your range, you must determine the type of electrical connection you will be using and follow the instructions provided for it here. ■■ Range must be raised approximately 1" (2.5 cm) by adjusting the leveling legs. W10842010A 07/14/2016 PRODUCT DIMENSIONS This manual covers several models.


