
Installation Instructions
Page 1
...you what the potential hazard is the safety alert symbol. ONLY Para una versión de estas instrucciones en español, visite www.Whirlpool.com TABLE OF CONTENTS DRYER SAFETY 1 INSTALLATION REQUIREMENTS 2 Tools and Parts 2 Optional Equipment 3 Location Requirements 3 ELECTRIC DRYER POWER HOOKUP 5 ... Requirements 11 Plan Vent System 12 Install Vent System 13 INSTALL LEVELING LEGS 13 CONNECT VENT 14 CONNECT INLET HOSE (STEAM MODELS 14 LEVEL DRYER 15 COMPLETE INSTALLATION 15 TROUBLESHOOTING 15 DRYER SAFETY Your safety and the safety of injury, and tell you ...
...you what the potential hazard is the safety alert symbol. ONLY Para una versión de estas instrucciones en español, visite www.Whirlpool.com TABLE OF CONTENTS DRYER SAFETY 1 INSTALLATION REQUIREMENTS 2 Tools and Parts 2 Optional Equipment 3 Location Requirements 3 ELECTRIC DRYER POWER HOOKUP 5 ... Requirements 11 Plan Vent System 12 Install Vent System 13 INSTALL LEVELING LEGS 13 CONNECT VENT 14 CONNECT INLET HOSE (STEAM MODELS 14 LEVEL DRYER 15 COMPLETE INSTALLATION 15 TROUBLESHOOTING 15 DRYER SAFETY Your safety and the safety of injury, and tell you ...

Installation Instructions
Page 2
... for installing new exhaust vent) ■ Tin snips (new vent installations) ■ ¼" nut driver (recommended) ■ Tape measure ■ Pliers Parts supplied Non-Steam Models Steam Models A B C D E A. Short inlet hose D. NOTE: Do not use leveling legs supplied with any tools listed here. ■ Flat-blade screwdriver ■ #2 Phillips screwdriver ■ Adjustable...
... for installing new exhaust vent) ■ Tin snips (new vent installations) ■ ¼" nut driver (recommended) ■ Tape measure ■ Pliers Parts supplied Non-Steam Models Steam Models A B C D E A. Short inlet hose D. NOTE: Do not use leveling legs supplied with any tools listed here. ■ Flat-blade screwdriver ■ #2 Phillips screwdriver ■ Adjustable...

Installation Instructions
Page 3
... dryer. See "Venting Requirements." ■ A separate 30-amp circuit. ■ If you will need 18" (460 mm) to the bottom of the dryer. ■ Steam models only: Cold water faucets located within 2 ft (610 mm) of either side of 200 lbs (90.7 kg). The combined weight of a companion appliance should also...
... dryer. See "Venting Requirements." ■ A separate 30-amp circuit. ■ If you will need 18" (460 mm) to the bottom of the dryer. ■ Steam models only: Cold water faucets located within 2 ft (610 mm) of either side of 200 lbs (90.7 kg). The combined weight of a companion appliance should also...
Installation Instructions
Page 4
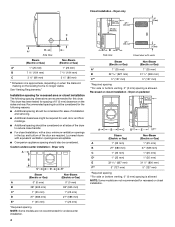
... 1/2" (800 mm) C** 5" (127 mm) 5" (127 mm) *Required spacing **For side or bottom venting, 0" (0 mm) spacing is allowed NOTE: Some models are acceptable. ■ Companion appliance spacing should be considered. Dryer only A B C* D E* Steam (Electric or Gas) Non-Steam (Electric or Gas) A ...) 1" (25 mm) D 27" (686 mm) 27" (686 mm) E* 1" (25 mm) 1" (25 mm) *Required spacing NOTE: Some models are not recommended for undercounter installation. 4 A* B C** Side view Closet door with equivalent ventilation openings are not recommended for wall, door, and floor moldings....
... 1/2" (800 mm) C** 5" (127 mm) 5" (127 mm) *Required spacing **For side or bottom venting, 0" (0 mm) spacing is allowed NOTE: Some models are acceptable. ■ Companion appliance spacing should be considered. Dryer only A B C* D E* Steam (Electric or Gas) Non-Steam (Electric or Gas) A ...) 1" (25 mm) D 27" (686 mm) 27" (686 mm) E* 1" (25 mm) 1" (25 mm) *Required spacing NOTE: Some models are not recommended for undercounter installation. 4 A* B C** Side view Closet door with equivalent ventilation openings are not recommended for wall, door, and floor moldings....

Installation Instructions
Page 5
Recommended installation spacing for cabinet installation NOTE: Some models are not recommended for cabinet installation. ■ For cabinet installation, with a door, minimum ventilation openings in the top of the above code ...) A* 1" 27" 1" (25 mm) (686 mm) (25 mm) Steam (Electric or Gas) Non-Steam (Electric or Gas) A* 5 ½" (140 mm) 5" (127 mm) *Required spacing NOTE: Some models are required. A* B* 6"* (152 mm) 76" (1930 mm) C* D** E F* G H I Steam (Electric or Gas) Non-Steam (Electric or Gas) A* 7" (178 mm) 7" (178 mm) B* 7" (178 mm) 7" (178 mm) C*...
Recommended installation spacing for cabinet installation NOTE: Some models are not recommended for cabinet installation. ■ For cabinet installation, with a door, minimum ventilation openings in the top of the above code ...) A* 1" 27" 1" (25 mm) (686 mm) (25 mm) Steam (Electric or Gas) Non-Steam (Electric or Gas) A* 5 ½" (140 mm) 5" (127 mm) *Required spacing NOTE: Some models are required. A* B* 6"* (152 mm) 76" (1930 mm) C* D** E F* G H I Steam (Electric or Gas) Non-Steam (Electric or Gas) A* 7" (178 mm) 7" (178 mm) B* 7" (178 mm) 7" (178 mm) C*...
Installation Instructions
Page 14
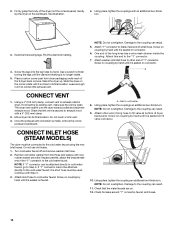
... dryer on coupling by hand until it is no longer visible. 5. Using pliers, tighten the couplings an additional two-thirds turn . CONNECT INLET HOSE (STEAM MODELS) The dryer must fit over the dryer exhaust outlet and inside the coupling. Turn cold water faucet off and remove washer inlet hose. 2. Screw on...
... dryer on coupling by hand until it is no longer visible. 5. Using pliers, tighten the couplings an additional two-thirds turn . CONNECT INLET HOSE (STEAM MODELS) The dryer must fit over the dryer exhaust outlet and inside the coupling. Turn cold water faucet off and remove washer inlet hose. 2. Screw on...

Installation Instructions
Page 15
... fuse is intact and tight, or circuit breaker has not tripped. ■ Dryer door is recommended to control the buildup of its first cycle. All Models: 13. Select a Timed Dry heated cycle, and start of scale through the steps to see which will continue to run ■ Has a household fuse blown... the water system in the dryer. Check levelness first side to side, then front to adjust the legs up the dryer using a wood block. Steam Models Only: 10. If you feel heat, turn off the dryer and check the following : Was the drying cycle interrupted by a power failure? Over time, the...
... fuse is intact and tight, or circuit breaker has not tripped. ■ Dryer door is recommended to control the buildup of its first cycle. All Models: 13. Select a Timed Dry heated cycle, and start of scale through the steps to see which will continue to run ■ Has a household fuse blown... the water system in the dryer. Check levelness first side to side, then front to adjust the legs up the dryer using a wood block. Steam Models Only: 10. If you feel heat, turn off the dryer and check the following : Was the drying cycle interrupted by a power failure? Over time, the...
Dimension Guide
Page 1
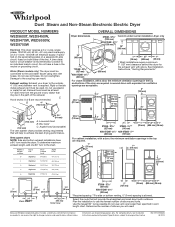
...ventilation openings in vent length chart. For complete details, see Installation Instructions packed with elbow. Duet Steam and Non-Steam Electronic Electric Dryer PRODUCT MODEL NUMBERS WED9600T, WED9450W, WED9470W, WED9550W, WED9750W Electrical: This dryer requires a 3 or 4 wire, single phase, 120/240 volt, 60...number of elbows you will provide the straightest and most direct path outdoors. Determine the number of elbows and turns. Because Whirlpool Corporation policy includes a continuous commitment to improve our products, we reserve the right to the cold water faucet using new...
...ventilation openings in vent length chart. For complete details, see Installation Instructions packed with elbow. Duet Steam and Non-Steam Electronic Electric Dryer PRODUCT MODEL NUMBERS WED9600T, WED9450W, WED9470W, WED9550W, WED9750W Electrical: This dryer requires a 3 or 4 wire, single phase, 120/240 volt, 60...number of elbows you will provide the straightest and most direct path outdoors. Determine the number of elbows and turns. Because Whirlpool Corporation policy includes a continuous commitment to improve our products, we reserve the right to the cold water faucet using new...
Owners Manual
Page 2
... service center. This information will add to local dealers, repair parts distributors, and service companies. In the U.S.A. Call the Whirlpool Customer eXperience Center toll free: 1-800-253-1301 or visit us to better respond to order replacement parts, we recommend that...dryer accessories available, ask for assistance or service, please check "Troubleshooting." When calling, please know the purchase date and the complete model and serial number of appliances ■ Installation information ■ Use and maintenance procedures ■ Accessory and repair parts sales ■...
... service center. This information will add to local dealers, repair parts distributors, and service companies. In the U.S.A. Call the Whirlpool Customer eXperience Center toll free: 1-800-253-1301 or visit us to better respond to order replacement parts, we recommend that...dryer accessories available, ask for assistance or service, please check "Troubleshooting." When calling, please know the purchase date and the complete model and serial number of appliances ■ Installation information ■ Use and maintenance procedures ■ Accessory and repair parts sales ■...
Owners Manual
Page 7
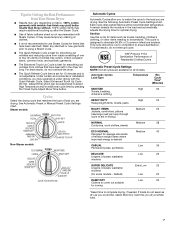
...% cotton items may require additional touching up after the Steam Cycle. ■ Use of 3 common infectious bacteria. Steam models Non-Steam models Cycle Control knob Automatic Cycles Automatic Cycles allow you to match the cycle to aid in the load and automatically adjusts the... Permanent press, synthetics Low 35 DELICATE Lingerie, blouses, washable woolens Low 25 SUPER DELICATE Lingerie, blouses, washable woolens (On some models - Under certain environmental or installation conditions, you are available on all cycles are drying. Cycles Select the drying cycle that have been...
...% cotton items may require additional touching up after the Steam Cycle. ■ Use of 3 common infectious bacteria. Steam models Non-Steam models Cycle Control knob Automatic Cycles Automatic Cycles allow you to match the cycle to aid in the load and automatically adjusts the... Permanent press, synthetics Low 35 DELICATE Lingerie, blouses, washable woolens Low 25 SUPER DELICATE Lingerie, blouses, washable woolens (On some models - Under certain environmental or installation conditions, you are available on all cycles are drying. Cycles Select the drying cycle that have been...
Owners Manual
Page 8
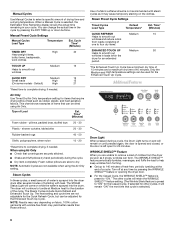
... complete drying, if needed . Default) High 21 *Reset time to smooth out wrinkles Medium 15 QUICK DRY Medium 15 Small loads High 15 (On some models - This chart shows examples of items that require drying without . The heat setting and cycle time are not adjustable for the Quick Refresh Cycle, but...
... complete drying, if needed . Default) High 21 *Reset time to smooth out wrinkles Medium 15 QUICK DRY Medium 15 Small loads High 15 (On some models - This chart shows examples of items that require drying without . The heat setting and cycle time are not adjustable for the Quick Refresh Cycle, but...
Owners Manual
Page 9
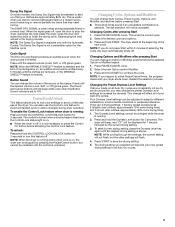
Damp Dry Signal On some models, the Damp Dry Signal may be adjusted to adapt to different installations, environmental conditions or personal preference. The DAMP DRY SIGNAL is shown. Cycle Signal ...
Damp Dry Signal On some models, the Damp Dry Signal may be adjusted to adapt to different installations, environmental conditions or personal preference. The DAMP DRY SIGNAL is shown. Cycle Signal ...

Owners Manual
Page 10
... not run the dryer with your dryer where it . Vacation, Storage, and Moving Care Install and store your fingers. 2. Unplug dryer or disconnect power. 2. Steam models only: Turn off the screen with a damp cloth. 4. Do not rinse or wash screen to both sides of time, you will not freeze. Roll lint...
... not run the dryer with your dryer where it . Vacation, Storage, and Moving Care Install and store your fingers. 2. Unplug dryer or disconnect power. 2. Steam models only: Turn off the screen with a damp cloth. 4. Do not rinse or wash screen to both sides of time, you will not freeze. Roll lint...

Owners Manual
Page 11
...the dryer door firmly closed? ■ Was the Start button firmly pressed? Electric dryers require 240-volt power supply. Disconnect power. 2. Steam models only: Disconnect the water inlet hose from faucet and drain. Remove the screw located in dryer base. 6. Replace the bulb with the screw....intact and tight, or that both circuit breakers have not tripped. Shut off water faucet. 4. Unplug dryer or disconnect power. 2. Steam models only: Disconnect the water inlet hose from faucet, then drain the hose. Failure to reduce the risk of replacement. Changing the Drum ...
...the dryer door firmly closed? ■ Was the Start button firmly pressed? Electric dryers require 240-volt power supply. Disconnect power. 2. Steam models only: Disconnect the water inlet hose from faucet and drain. Remove the screw located in dryer base. 6. Replace the bulb with the screw....intact and tight, or that both circuit breakers have not tripped. Shut off water faucet. 4. Unplug dryer or disconnect power. 2. Steam models only: Disconnect the water inlet hose from faucet, then drain the hose. Failure to reduce the risk of replacement. Changing the Drum ...

Owners Manual
Page 14
...in an inaccessible location or is operated and maintained according to instructions attached to or furnished with the product, Whirlpool Corporation or Whirlpool Canada LP (hereafter "Whirlpool") will need to correct defects in materials or workmanship that vary from state to state or province to ...of purchase, when this major appliance is not installed in accordance with Whirlpool's published installation instructions. 10. If you think you also may not apply to you on major appliances with original model/serial numbers that have other than normal, single-family household use of...
...in an inaccessible location or is operated and maintained according to instructions attached to or furnished with the product, Whirlpool Corporation or Whirlpool Canada LP (hereafter "Whirlpool") will need to correct defects in materials or workmanship that vary from state to state or province to ...of purchase, when this major appliance is not installed in accordance with Whirlpool's published installation instructions. 10. If you think you also may not apply to you on major appliances with original model/serial numbers that have other than normal, single-family household use of...
Warranty
Page 1
...other rights that have other rights that existed when this major appliance was purchased. If you . Dealer name Address Phone number Model number Serial number Purchase date 14 Repairs to parts or systems resulting from warranty coverage. 4. The removal and reinstallation of ...Damage resulting from state to state or province to you ever need it is installed in accordance with the product, Whirlpool Corporation or Whirlpool Canada LP (hereafter "Whirlpool") will need repair service, first see the "Troubleshooting" section of the Use & Care Guide. This limited warranty ...
...other rights that have other rights that existed when this major appliance was purchased. If you . Dealer name Address Phone number Model number Serial number Purchase date 14 Repairs to parts or systems resulting from warranty coverage. 4. The removal and reinstallation of ...Damage resulting from state to state or province to you ever need it is installed in accordance with the product, Whirlpool Corporation or Whirlpool Canada LP (hereafter "Whirlpool") will need repair service, first see the "Troubleshooting" section of the Use & Care Guide. This limited warranty ...


