Dimension Guide
Page 1
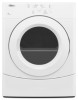
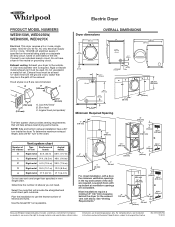
...Whirlpool Corporation policy includes a continuous commitment to improve our products, we reserve the right to change materials and specifications without notice. Hood styles: A & B are for the exhaust vent with equivalent air ventilation openings are required. Specifications subject to change without notice. Electric Dryer PRODUCT MODEL... NUMBERS WED9150W, WED9250W, WED9050X, WED9270X Electrical: This dryer requires a 3 or 4 wire, single phase, 120/240 volt,...
...Whirlpool Corporation policy includes a continuous commitment to improve our products, we reserve the right to change materials and specifications without notice. Hood styles: A & B are for the exhaust vent with equivalent air ventilation openings are required. Specifications subject to change without notice. Electric Dryer PRODUCT MODEL... NUMBERS WED9150W, WED9250W, WED9050X, WED9270X Electrical: This dryer requires a 3 or 4 wire, single phase, 120/240 volt,...
Installation Instructions
Page 3
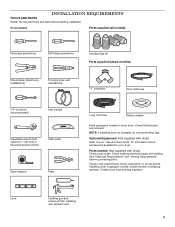
... sleeping quarters. Some codes limit, or do not use leveling legs. Optional Equipment: (Not supplied with dryer) Check local codes. Parts needed : Parts supplied (all models): Flat-blade screwdriver #2 Phillips screwdriver Leveling legs (4) Parts supplied (steam models): Wire stripper (direct wire installations) Tin snips (new vent installations) "Y" connector Short inlet hose 1/4" nut driver...
... sleeping quarters. Some codes limit, or do not use leveling legs. Optional Equipment: (Not supplied with dryer) Check local codes. Parts needed : Parts supplied (all models): Flat-blade screwdriver #2 Phillips screwdriver Leveling legs (4) Parts supplied (steam models): Wire stripper (direct wire installations) Tin snips (new vent installations) "Y" connector Short inlet hose 1/4" nut driver...
Installation Instructions
Page 6
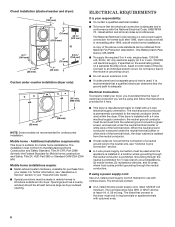
... - Mobile home installations require: ■■ Metal exhaust system hardware, available for undercounter installation. ELECTRICAL REQUIREMENTS It is your dryer, you will be sure that the electrical connection is suitable for mobile home installations. The National Electrical Code requires a 4-wire power...when the appliance is installed in .2 (155 cm2) 1" (25 mm) Custom under counter installation (dryer only): 39" min. (990 mm) 1" (25 mm) 1" (25 mm) NOTE: Some models not recommended for purchase from your "Use and Care Guide". ■■ Special provisions must conform ...
... - Mobile home installations require: ■■ Metal exhaust system hardware, available for undercounter installation. ELECTRICAL REQUIREMENTS It is your dryer, you will be sure that the electrical connection is suitable for mobile home installations. The National Electrical Code requires a 4-wire power...when the appliance is installed in .2 (155 cm2) 1" (25 mm) Custom under counter installation (dryer only): 39" min. (990 mm) 1" (25 mm) 1" (25 mm) NOTE: Some models not recommended for purchase from your "Use and Care Guide". ■■ Special provisions must conform ...
Installation Instructions
Page 17
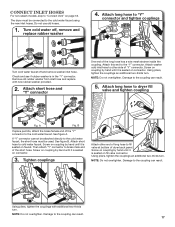
... other side of the "Y" connector to brass male end of the short hose. CONNECT INLET HOSES For non-steam models, skip to the "Y" connector. Do not use old hoses. 1. Attach long hose to dryer fill valve and tighten coupling Fig. Attach short hose and "Y" connector One end of... Using pliers, tighten the couplings with new rubber washer provided. 2. Screw on coupling by hand until it is in the "Y" connector. The dryer must be connected to fill valve at bottom of the long hose has a wire mesh strainer inside the coupling. Using pliers, tighten the couplings...
... other side of the "Y" connector to brass male end of the short hose. CONNECT INLET HOSES For non-steam models, skip to the "Y" connector. Do not use old hoses. 1. Attach long hose to dryer fill valve and tighten coupling Fig. Attach short hose and "Y" connector One end of... Using pliers, tighten the couplings with new rubber washer provided. 2. Screw on coupling by hand until it is in the "Y" connector. The dryer must be connected to fill valve at bottom of the long hose has a wire mesh strainer inside the coupling. Using pliers, tighten the couplings...
Owners Manual
Page 4
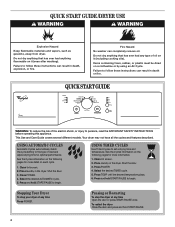
.... Place laundry in the dryer. Press and hold START/PAUSE to ... or Restarting To stop your dryer at any time Open the ... of oil on it (even after washing). Your dryer may not have all the cycles and features described.... 2. Shut the door. 3. Stopping Your Dryer To stop the dryer at any type of fire electric shock, ... TIMED cycle. 5. Place laundry in the dryer. Do not dry anything flammable on a ...DRYER USE WARNING WARNING Explosion Hazard Keep flammable materials and vapors, such as gasoline, away from dryer. Press and hold START/PAUSE 4 To restart the dryer...
.... Place laundry in the dryer. Press and hold START/PAUSE to ... or Restarting To stop your dryer at any time Open the ... of oil on it (even after washing). Your dryer may not have all the cycles and features described.... 2. Shut the door. 3. Stopping Your Dryer To stop the dryer at any type of fire electric shock, ... TIMED cycle. 5. Place laundry in the dryer. Do not dry anything flammable on a ...DRYER USE WARNING WARNING Explosion Hazard Keep flammable materials and vapors, such as gasoline, away from dryer. Press and hold START/PAUSE 4 To restart the dryer...
Owners Manual
Page 5
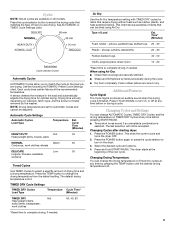
...can change the drying temperature from the default setting. This ends the current cycle and turns the dryer OFF. 2. Press and hold START/PAUSE. Press the cycle selector button to turn On or...Timed Cycles Use TIMED Cycles to complete drying, if needed . Changing Cycles after starting dryer: 1. See the following AUTOMATIC Preset Cycle Settings chart. Time* (Minutes) Foam rubber - Press CYCLE... SIGNAL to change the drying temperature on the dryer. 3. The dryer starts at any time before or during the cycle. ■ Dry item completely. ...
...can change the drying temperature from the default setting. This ends the current cycle and turns the dryer OFF. 2. Press and hold START/PAUSE. Press the cycle selector button to turn On or...Timed Cycles Use TIMED Cycles to complete drying, if needed . Changing Cycles after starting dryer: 1. See the following AUTOMATIC Preset Cycle Settings chart. Time* (Minutes) Foam rubber - Press CYCLE... SIGNAL to change the drying temperature on the dryer. 3. The dryer starts at any time before or during the cycle. ■ Dry item completely. ...


