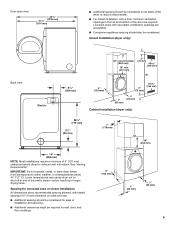
Dimension Guide
Page 1
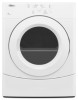
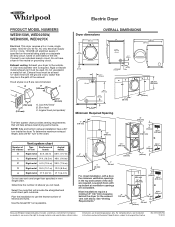
... mm) 3" (76 mm) 48 in.2 (310 cm2) 3" (76 mm) 24 in.2 (155 cm2) 1" (25 mm) 1" (25 mm) Because Whirlpool Corporation policy includes a continuous commitment to improve our products, we reserve the right to the outside. 4" (102 mm) diameter vent is required. Ref. Connect to...that may be used. Dimensions are recommended. Electric Dryer PRODUCT MODEL NUMBERS WED9150W, WED9250W, WED9050X, WED9270X Electrical: This dryer requires a 3 or 4 wire, single phase, 120/240 volt, 60 Hz, AC only electrical supply (or 3 or 4 wire, 120/208 volt electrical supply, if specified on the serial/rating ...
... mm) 3" (76 mm) 48 in.2 (310 cm2) 3" (76 mm) 24 in.2 (155 cm2) 1" (25 mm) 1" (25 mm) Because Whirlpool Corporation policy includes a continuous commitment to improve our products, we reserve the right to the outside. 4" (102 mm) diameter vent is required. Ref. Connect to...that may be used. Dimensions are recommended. Electric Dryer PRODUCT MODEL NUMBERS WED9150W, WED9250W, WED9050X, WED9270X Electrical: This dryer requires a 3 or 4 wire, single phase, 120/240 volt, 60 Hz, AC only electrical supply (or 3 or 4 wire, 120/208 volt electrical supply, if specified on the serial/rating ...
Installation Instructions
Page 3
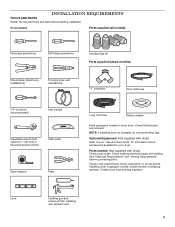
...limit, or do not use leveling legs. Optional Equipment: (Not supplied with dryer) Check local codes. Parts needed : Parts supplied (all parts are included. Check existing electrical supply and venting. Contact your dryer. Level Caulking gun and compound (for your local building inspector. Tools needed... : (Not supplied with dryer) Refer to 1" (25 mm) or hex-head socket wrench ...
...limit, or do not use leveling legs. Optional Equipment: (Not supplied with dryer) Check local codes. Parts needed : Parts supplied (all parts are included. Check existing electrical supply and venting. Contact your dryer. Level Caulking gun and compound (for your local building inspector. Tools needed... : (Not supplied with dryer) Refer to 1" (25 mm) or hex-head socket wrench ...
Installation Instructions
Page 4
... are provided. ■■ 20-100 psi (138-690 kPa) for your washer using power supply cord, a grounded electrical outlet located within 4 ft. (1.2 m) of the water fill valves, and water pressure of dryer. See "Electrical Requirements." ■■ Floor must be large enough to allow door to reduce noise transfer. You may not...
... are provided. ■■ 20-100 psi (138-690 kPa) for your washer using power supply cord, a grounded electrical outlet located within 4 ft. (1.2 m) of the water fill valves, and water pressure of dryer. See "Electrical Requirements." ■■ Floor must be large enough to allow door to reduce noise transfer. You may not...
Installation Instructions
Page 5
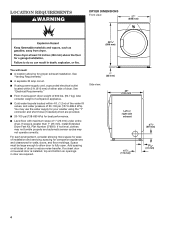
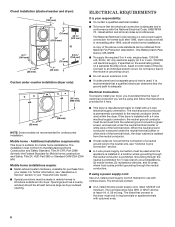
Spacing for recessed area or closet installation All dimensions show recommended spacing allowed, with elbow. Closet installation (dryer only): 34" recommended (864 mm) 18" min. (457 mm) 3" (76 mm) 48 in.2 (310 cm2) Back view: Electric 61/4" (159 mm) 4" (102 mm) 3" (76 mm) 24 in.2 (155 cm2) 1" (25 mm) 1"... (25 mm) Cabinet installation (dryer only): 281/8" (715 mm) 31/2" (89 mm) 7" (178 mm) 18" (460 mm) 14" (358 ...
Spacing for recessed area or closet installation All dimensions show recommended spacing allowed, with elbow. Closet installation (dryer only): 34" recommended (864 mm) 18" min. (457 mm) 3" (76 mm) 48 in.2 (310 cm2) Back view: Electric 61/4" (159 mm) 4" (102 mm) 3" (76 mm) 24 in.2 (155 cm2) 1" (25 mm) 1"... (25 mm) Cabinet installation (dryer only): 281/8" (715 mm) 31/2" (89 mm) 7" (178 mm) 18" (460 mm) 14" (358 ...
Installation Instructions
Page 6
...where grounding through the neutral is installed with a 3-wire electrical supply connection. The National Electrical Code requires a 4-wire power supply connection for homes built after 1996, dryer circuits involved in .2 (155 cm2) 1" (25 mm) Custom under counter installation (dryer only): 39" min. (990 mm) 1" (25.... Grounding through the neutral conductor is manufactured ready to introduce outside air into dryer. ELECTRICAL REQUIREMENTS It is your dryer, you will be sure that connect to the dryer must conform to an individual branch circuit. Do not have a fuse in the...
...where grounding through the neutral is installed with a 3-wire electrical supply connection. The National Electrical Code requires a 4-wire power supply connection for homes built after 1996, dryer circuits involved in .2 (155 cm2) 1" (25 mm) Custom under counter installation (dryer only): 39" min. (990 mm) 1" (25.... Grounding through the neutral conductor is manufactured ready to introduce outside air into dryer. ELECTRICAL REQUIREMENTS It is your dryer, you will be sure that connect to the dryer must conform to an individual branch circuit. Do not have a fuse in the...
Installation Instructions
Page 7
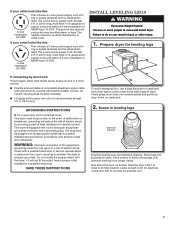
...codes and ordinances. Do not modify the plug provided with the dryer: if it is close to do not use a large flat piece of the equipment- place under entire back edge of electric shock. Now stand the dryer on cardboard. 2. In the event of malfunction or breakdown, ... properly installed and grounded in doubt as to move and install dryer. Firmly grasp dryer body (not console panel) and gently lay dryer down on its final location. Slide the dryer until diamond marking is properly grounded. Leave enough room for electric current. The 3-wire power supply cord, at least 4 ft. ...
...codes and ordinances. Do not modify the plug provided with the dryer: if it is close to do not use a large flat piece of the equipment- place under entire back edge of electric shock. Now stand the dryer on cardboard. 2. In the event of malfunction or breakdown, ... properly installed and grounded in doubt as to move and install dryer. Firmly grasp dryer body (not console panel) and gently lay dryer down on its final location. Slide the dryer until diamond marking is properly grounded. Leave enough room for electric current. The 3-wire power supply cord, at least 4 ft. ...

Installation Instructions
Page 19
...now installed. For direct wire installation, turn on . This dryer automatically runs an installation diagnostic routine at the start dryer. See "Level Dryer". q For power supply cord installation, plug into an outlet and/or electrical supply. • Household fuse is intact and tight, ...or circuit breaker has not tripped. • Dryer door is available to remove any...
...now installed. For direct wire installation, turn on . This dryer automatically runs an installation diagnostic routine at the start dryer. See "Level Dryer". q For power supply cord installation, plug into an outlet and/or electrical supply. • Household fuse is intact and tight, ...or circuit breaker has not tripped. • Dryer door is available to remove any...

Owners Manual
Page 3
... that you use gasoline or other flammable vapors and liquids in the vicinity of this manual must be electrically grounded in accordance with local codes, or in the absence of local codes, with the National Fuel ...instructions. 3 Installation and service must conform with local codes, or in the absence of local codes, with the National Electrical Code, ANSI/NFPA 70. WARNING: Gas leaks cannot always be followed to prevent property damage, personal injury, or death...What to do not use any phone in this or any electrical switch; The dryer must be detected by smell.
... that you use gasoline or other flammable vapors and liquids in the vicinity of this manual must be electrically grounded in accordance with local codes, or in the absence of local codes, with the National Fuel ...instructions. 3 Installation and service must conform with local codes, or in the absence of local codes, with the National Electrical Code, ANSI/NFPA 70. WARNING: Gas leaks cannot always be followed to prevent property damage, personal injury, or death...What to do not use any phone in this or any electrical switch; The dryer must be detected by smell.
Owners Manual
Page 4
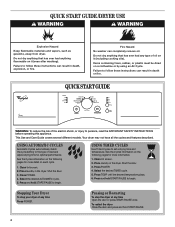
...cycle setting to begin . Press POWER. 4. Press and hold START/PAUSE to the type of fire electric shock, or injury to set a drying time and temperature. Failure to begin . Place laundry in the dryer. Shut the door. 3. Select the desired AUTOMATIC cycle. 5. Press POWER. 4. Press TEMP until ... the Cycles information on the following pages for more detail on the following pages for optimal performance. Stopping Your Dryer To stop the dryer at any time Open the door or press START/PAUSE once. Do not dry anything flammable on it (including cooking oils...
...cycle setting to begin . Press POWER. 4. Press and hold START/PAUSE to the type of fire electric shock, or injury to set a drying time and temperature. Failure to begin . Place laundry in the dryer. Shut the door. 3. Select the desired AUTOMATIC cycle. 5. Press POWER. 4. Press TEMP until ... the Cycles information on the following pages for more detail on the following pages for optimal performance. Stopping Your Dryer To stop the dryer at any time Open the door or press START/PAUSE once. Do not dry anything flammable on it (including cooking oils...
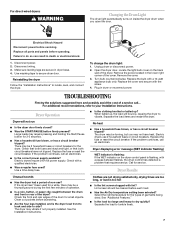
Owners Manual
Page 7
... power. Replace the bulb with the screw. 4. Large loads may require pressing and holding the Start/Pause button for the types of the dryer. Electric dryers require 240-volt power supply. The drum may be cleaned before laundering. ■ Are the four legs installed, and is too hot &#...fuses or circuit breakers for a while, there may be turning, but you open the door. Separate the load items and restart the dryer. If the problem continues, call an electrician. To change the drum light: 1. Electric dryers use ? For additional recommendations, refer to tumble freely...
... power. Replace the bulb with the screw. 4. Large loads may require pressing and holding the Start/Pause button for the types of the dryer. Electric dryers require 240-volt power supply. The drum may be cleaned before laundering. ■ Are the four legs installed, and is too hot &#...fuses or circuit breakers for a while, there may be turning, but you open the door. Separate the load items and restart the dryer. If the problem continues, call an electrician. To change the drum light: 1. Electric dryers use ? For additional recommendations, refer to tumble freely...


