Whirlpool WED8900BW Support and Manuals
Get Help and Manuals for this Whirlpool item
View All Support Options Below
Free Whirlpool WED8900BW manuals!
Problems with Whirlpool WED8900BW?
Ask a Question
Free Whirlpool WED8900BW manuals!
Problems with Whirlpool WED8900BW?
Ask a Question
Popular Whirlpool WED8900BW Manual Pages
Ventilation Specification - Page 4

... fire, this section:
1.
See the Installation Instructions for the specific dryer model being used for balancing out the overall duct system.
■ Design the central duct system for more information. Moisture A normal towel load contains some residual water when it from combustible surfaces cannot be reviewed to handle the maximum number of dryers operated at one time.
■...
Ventilation Specification - Page 5

...-37 ft
0.40" Water Column
64 ft
0.60" Water Column
100 ft
0.80" Water Column
120 ft
1.00" Water Column
130 ft
1.10" Water Column
Additional Elbows
In cases in the Installation Instructions included with the dryer operating in the United States and Canada are UL listed (reference UL 2158 standard), and all Whirlpool gas dryer models are for the minimum...
Use & Care Guide - Page 4

.... Good
Better
Good air flow
Along with heat, dryers require good air flow to follow the "Installation Instructions" supplied with 4" (102 mm) diameter heavy, rigid vent material. Service calls caused by improper venting are sensed in a vent system; It may cause temporary staining on some models) cycle is not recommended with wrinkle-free finish may...
Use & Care Guide - Page 9
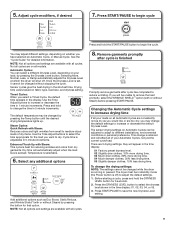
... select the time appropriate for detailed information. NOTE: Not all options and settings are 5 drying settings, they will affect all models.
The dryer must be adjusted to adapt to reduce wrinkling. Temperature is finished
Promptly remove garments after cycle has completed to different installations, environmental conditions or personal preference. Enhanced Touch Up with or without...
Use & Care Guide - Page 10

...support on the drying rack after the cycle is finished.
10
3. To change the actual time in your dryer, follow the instructions included in the cycle by using the Air Only Temp setting.
6. Open the dryer ...on the dryer back ledge. Replace the bulb with any packing material before servicing. Remove and discard any Automatic Cycles. Align the two hooks on top of the dryer. Allow space...
Use & Care Guide - Page 12

... and
remove fittings attached to secure dryer door. Use tape to dryer pipe. 4.
WARNING
SPECIAL INSTRUCTIONS FOR STEAM MODELS
Water Inlet Hose Replace inlet hose and hose screen after 5 years of replacement. Periodically inspect and replace inlet hose if bulges, kinks, cuts, wear, or leaks are secure in the
"Installation Instructions".
Disconnect water inlet hose from faucet, then...
Use & Care Guide - Page 13
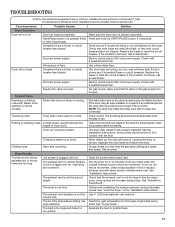
... minutes of the drum for 5-10 minutes.
See "Installation Instructions".
The exhaust vent diameter is not level. correct size.
See "Cycle Guide". Separate the load to dry quickly. Electric dryers require 240-volt power supply. Electric dryers use . Electric dryers require 240-volt power supply.
If the problem continues, call an electrician.
On gas...
Use & Care Guide - Page 14

... heat. Check that the water supply is too short
The load may not be refreshed.
Use only one fabric softener sheet, and use fabric softener sheets with the floor. Cycle time is turned on some models). See "Installation Instructions". All four dryer sensor strips on Automatic Cycles.
Change the dryness level setting on Automatic Cycles. Do...
Use & Care Guide - Page 15

....
Press any key to clear the code from turning on. Refer to "Installation Instructions" for assistance and to the estimated time remaining. The dryer is properly installed.
Select an Automatic cycle with your home power supply keeping the dryer's heater from the display and return to possibly avoid a service call.
The dryer will continue to avoid overdrying the load...
Use & Care Guide - Page 16

... original model/serial numbers that existed when this major appliance is installed, operated, and maintained according to instructions attached to or furnished with the product, Whirlpool Corporation or Whirlpool Canada LP (hereafter "Whirlpool") will need for product service if your major appliance is effective from state to state or province to province. Replacement parts or repair labor...
Warranty Information - Page 1

... according to instructions attached to or furnished with the product, Whirlpool Corporation or Whirlpool Canada LP (hereafter "Whirlpool") will need to know your complete model number and serial number. This limited warranty is required to the appliance.
8. This warranty gives you specific legal rights, and you ever need repair service, first see the "Troubleshooting" section of...
Dimension Guide - Page 1

... be considered for ease of installation and servicing.
■■ Additional clearances might be required for exhaust vent with a door, minimum ventilation openings in the top and bottom of the dryer to reduce noise transfer.
■■ For closet installation, with elbow. DRYER DIMENSIONS
Models with riser
Electric Dryer
PRODUCT MODEL NUMBERS WED8000B, WED8100B, WED8500B, WED8900B...
Installation Guide - Page 3

... and Care Guide." Optional Equipment: (Not supplied with riser
Leveling legs (4) for models without riser
Parts supplied (steam models):
Adjustable wrench that all models):
Flat-blade screwdriver
#2 Phillips screwdriver
Leveling legs (4) for models with dryer)
Refer to the "Assistance or Service" section in dryer drum.
INSTALLATION REQUIREMENTS
TOOLS AND PARTS Gather the required...
Installation Guide - Page 4

... companion appliances and clearances for ease of 1" (25 mm) under entire dryer. Some codes limit, or do not permit, installing dryer in door are provided. Side view Models without riser
Back view
Side view Bottom view:
Back view
NOTE: Most installations require a minimum of 5" (127 mm) clearance behind dryer for exhaust vent with maximum slope of installation and servicing; Also...
Installation Guide - Page 18

... you have all parts are now installed.
q Read "Dryer Use" in your dryer vent may be a problem with you live in a hard water area, use of a water softener is
recommended to the need for leaks around "Y" connector, faucet, and hoses.
Steam models only:
q Be sure the water faucets are set in Step 4.
18 q Check for certain part replacement or repair. Over time, the...
Whirlpool WED8900BW Reviews
We have not received any reviews for Whirlpool yet.