Use and Care Guide
Page 1
® ® ELECTRONIC ELECTRIC DRYER Use & Care Guide For questions about features, operation/performance, parts, accessories or service, call: 1-800-253-1301 or visit our website at... www.whirlpool.com Table of Contents 2 W10151580A
® ® ELECTRONIC ELECTRIC DRYER Use & Care Guide For questions about features, operation/performance, parts, accessories or service, call: 1-800-253-1301 or visit our website at... www.whirlpool.com Table of Contents 2 W10151580A
Use and Care Guide
Page 2
... safety alert symbol. We have provided many important safety messages in this manual and on your appliance. TABLE OF CONTENTS DRYER SAFETY 2 INSTALLATION INSTRUCTIONS 3 Tools and Parts 3 Optional Pedestal 4 Location Requirements 4 Electrical Requirements 6 Electrical Connection 8 Venting Requirements 13 Plan Vent System 14 Install Vent System 15 Install Leveling Legs 15 Connect Vent 15...
... safety alert symbol. We have provided many important safety messages in this manual and on your appliance. TABLE OF CONTENTS DRYER SAFETY 2 INSTALLATION INSTRUCTIONS 3 Tools and Parts 3 Optional Pedestal 4 Location Requirements 4 Electrical Requirements 6 Electrical Connection 8 Venting Requirements 13 Plan Vent System 14 Install Vent System 15 Install Leveling Legs 15 Connect Vent 15...
Use and Care Guide
Page 3
...■ Do not use heat to 1" (2.5 cm) or hex-head socket wrench (for adjusting dryer feet) ■ Vent clamps ■ Caulking gun and compound (for grounding requirements. Check existing electrical supply and venting. The cord should contain: ■ A UL listed 30-amp power supply cord...wires that all instructions before starting installation. IMPORTANT SAFETY INSTRUCTIONS WARNING: To reduce the risk of fire, electric shock, or injury to persons when using the dryer, follow the instructions provided with any servicing unless specifically recommended in this Use and Care Guide or in ...
...■ Do not use heat to 1" (2.5 cm) or hex-head socket wrench (for adjusting dryer feet) ■ Vent clamps ■ Caulking gun and compound (for grounding requirements. Check existing electrical supply and venting. The cord should contain: ■ A UL listed 30-amp power supply cord...wires that all instructions before starting installation. IMPORTANT SAFETY INSTRUCTIONS WARNING: To reduce the risk of fire, electric shock, or injury to persons when using the dryer, follow the instructions provided with any servicing unless specifically recommended in this Use and Care Guide or in ...
Use and Care Guide
Page 4
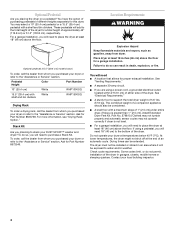
... 30-amp circuit. ■ If you planning to place the dryer at least 18 inches (46 cm) above the floor. See "Electrical Requirements." ■ A sturdy floor to support the total dryer weight of 1" (2.5 cm) under entire dryer. (If slope is greater than 1" [2.5 cm], install Extended Dryer Feet Kit, Part No. 279810.) Clothes may not tumble...
... 30-amp circuit. ■ If you planning to place the dryer at least 18 inches (46 cm) above the floor. See "Electrical Requirements." ■ A sturdy floor to support the total dryer weight of 1" (2.5 cm) under entire dryer. (If slope is greater than 1" [2.5 cm], install Extended Dryer Feet Kit, Part No. 279810.) Clothes may not tumble...
Use and Care Guide
Page 6
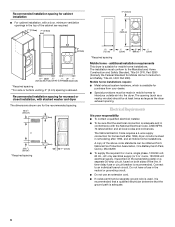
... of the above code standards can be at least twice as large as the dryer exhaust opening (such as a nearby window) should be obtained from your responsibility ■ To contact a qualified electrical installer. ■ To be made in remodeling after 1996, and all local ... ■ Special provisions must conform to an individual branch circuit. Electrical Requirements It is available for homes built after 1996, dryer circuits involved in mobile homes to introduce outside air into the dryer. The National Electric Code requires a 4-wire supply connection for purchase from : National ...
... of the above code standards can be at least twice as large as the dryer exhaust opening (such as a nearby window) should be obtained from your responsibility ■ To contact a qualified electrical installer. ■ To be made in remodeling after 1996, and all local ... ■ Special provisions must conform to an individual branch circuit. Electrical Requirements It is available for homes built after 1996, dryer circuits involved in mobile homes to introduce outside air into the dryer. The National Electric Code requires a 4-wire supply connection for purchase from : National ...

Use and Care Guide
Page 7
...fit the outlet, have three 10-gauge copper wires and match a 3-wire receptacle of NEMA Type 10-30R. If the dryer is installed with a 4-wire electrical supply connection, the neutral ground wire must be removed from the neutral conductor. ■ A 4-wire power supply connection must...9632; 10-gauge solid copper wire (do not permit the connection of NEMA Type 14-30R. grounding conductor can result in the "Electrical Connection" section. ■ This dryer is permanently connected to install with flexible metallic conduit. The 4-wire power supply cord, at least 4 ft (1.22 m) long, ...
...fit the outlet, have three 10-gauge copper wires and match a 3-wire receptacle of NEMA Type 10-30R. If the dryer is installed with a 4-wire electrical supply connection, the neutral ground wire must be removed from the neutral conductor. ■ A 4-wire power supply connection must...9632; 10-gauge solid copper wire (do not permit the connection of NEMA Type 14-30R. grounding conductor can result in the "Electrical Connection" section. ■ This dryer is permanently connected to install with flexible metallic conduit. The 4-wire power supply cord, at least 4 ft (1.22 m) long, ...
Use and Care Guide
Page 8
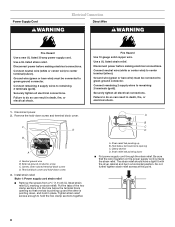
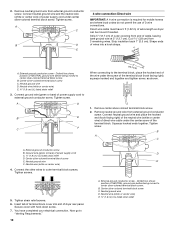
... down screw and terminal block cover. The strain relief should have a tight fit with the dryer cabinet and be connected to do so can result in death, fire, or electrical shock. Do not further tighten strain relief screws at this point. 8 Power Supply Cord WARNING...2 terminals (gold). Install strain relief. Tighten strain relief screws enough to do so can result in death, fire, or electrical shock. 1. Securely tighten all electrical connections. Fire Hazard Use 10 gauge solid copper wire. Be sure that one tab is inside the strain relief. Strain relief...
... down screw and terminal block cover. The strain relief should have a tight fit with the dryer cabinet and be connected to do so can result in death, fire, or electrical shock. Do not further tighten strain relief screws at this point. 8 Power Supply Cord WARNING...2 terminals (gold). Install strain relief. Tighten strain relief screws enough to do so can result in death, fire, or electrical shock. 1. Securely tighten all electrical connections. Fire Hazard Use 10 gauge solid copper wire. Be sure that one tab is inside the strain relief. Strain relief...
Use and Care Guide
Page 9
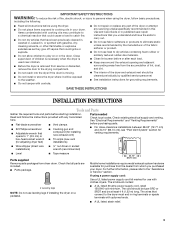
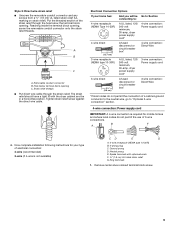
...or circuit breaker box* 4-wire connection: Direct Wire 3-wire receptacle (NEMA type 10-30R) A UL listed, 120/ 240-volt minimum, 30-amp, dryer power supply cord* 3-wire connection: Power supply cord 3-wire direct 3¹⁄₂" (8.9 cm) A fused disconnect or circuit breaker box* 3-wire...section. 4-wire connection: Power supply cord IMPORTANT: A 4-wire connection is required for mobile homes and where local codes do not permit the use of electrical connection: 4-wire (recommended) 3-wire (if 4-wire is not available) CD E G A. 4-wire receptacle (NEMA type 14-30R) B. 4-prong ...
...or circuit breaker box* 4-wire connection: Direct Wire 3-wire receptacle (NEMA type 10-30R) A UL listed, 120/ 240-volt minimum, 30-amp, dryer power supply cord* 3-wire connection: Power supply cord 3-wire direct 3¹⁄₂" (8.9 cm) A fused disconnect or circuit breaker box* 3-wire...section. 4-wire connection: Power supply cord IMPORTANT: A 4-wire connection is required for mobile homes and where local codes do not permit the use of electrical connection: 4-wire (recommended) 3-wire (if 4-wire is not available) CD E G A. 4-wire receptacle (NEMA type 14-30R) B. 4-prong ...
Use and Care Guide
Page 10
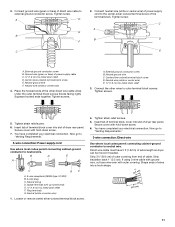
... the terminal block (hook facing right), squeeze hooked end together and tighten screw, as shown. 1. Tighten screw. Direct wire cable must have completed your electrical connection. Neutral ground wire D. Connect ground wire (green or bare) of power supply cord C 1.9 cm) UL listed strain relief D. A D B... screw. Neutral ground wire F. Tighten strain relief screws. 6. Center silver-colored terminal block screw C. Remove neutral ground wire from end of dryer rear panel. Shape ends of wires into slot of cable, leaving bare ground wire at 5" (12.7 cm). Neutral wire (white or ...
... the terminal block (hook facing right), squeeze hooked end together and tighten screw, as shown. 1. Tighten screw. Direct wire cable must have completed your electrical connection. Neutral ground wire D. Connect ground wire (green or bare) of power supply cord C 1.9 cm) UL listed strain relief D. A D B... screw. Neutral ground wire F. Tighten strain relief screws. 6. Center silver-colored terminal block screw C. Remove neutral ground wire from end of dryer rear panel. Shape ends of wires into slot of cable, leaving bare ground wire at 5" (12.7 cm). Neutral wire (white or ...
Use and Care Guide
Page 11
... the other direct wire cable wires under the outer terminal block screws (hooks facing right). You have completed your electrical connection. Strip insulation back 1" (2.5 cm). Center silver-colored terminal block screw E. Place the hooked ends of the...terminal block. Shape ends of extra length so dryer can be moved if needed. 3. A D E B F C 2. C A B D E A. Neutral ground wire C. Neutral wire (white or center wire) E 1.9 cm) UL listed strain relief 3. You have completed your electrical connection. Neutral prong D. Loosen or remove center...
... the other direct wire cable wires under the outer terminal block screws (hooks facing right). You have completed your electrical connection. Strip insulation back 1" (2.5 cm). Center silver-colored terminal block screw E. Place the hooked ends of the...terminal block. Shape ends of extra length so dryer can be moved if needed. 3. A D E B F C 2. C A B D E A. Neutral ground wire C. Neutral wire (white or center wire) E 1.9 cm) UL listed strain relief 3. You have completed your electrical connection. Neutral prong D. Loosen or remove center...

Use and Care Guide
Page 12
...Center silver-colored terminal block screw D. Tighten screws. Center silver-colored terminal block screw C. Tighten screws. 4. You have completed your electrical connection. Loosen or remove center silver-colored terminal block screw. 2. C A Optional 3-wire connection Use for direct wire or power supply... of the neutral wire (white or center wire) of direct wire cable under the center screw of power supply cord/cable under the screw of dryer rear panel. Remove center silver-colored terminal block screw. 2. B A C D E B D F E A. Squeeze hooked ends together. Neutral wire (white ...
...Center silver-colored terminal block screw D. Tighten screws. Center silver-colored terminal block screw C. Tighten screws. 4. You have completed your electrical connection. Loosen or remove center silver-colored terminal block screw. 2. C A Optional 3-wire connection Use for direct wire or power supply... of the neutral wire (white or center wire) of direct wire cable under the center screw of power supply cord/cable under the screw of dryer rear panel. Remove center silver-colored terminal block screw. 2. B A C D E B D F E A. Squeeze hooked ends together. Neutral wire (white ...
Use and Care Guide
Page 14
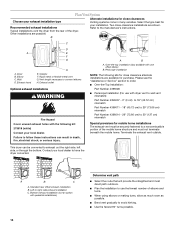
... manufacturer's instructions. This dryer can result in many varieties. A B C A. Bottom exhaust installation (not an option with dryer vent to wall vent ... Use the fewest 90° turns possible. Dryer B. Exhaust outlet Optional exhaust installations WARNING Fire ... exhaust installations Typical installations vent the dryer from the rear of elbows and ... ■ Plan the installation to have the dryer converted. Elbow C. Please see the "Assistance...■ Periscope Installation (For use the fewest number of the dryer. B C D A E F G A. Alternate installations for...
... manufacturer's instructions. This dryer can result in many varieties. A B C A. Bottom exhaust installation (not an option with dryer vent to wall vent ... Use the fewest 90° turns possible. Dryer B. Exhaust outlet Optional exhaust installations WARNING Fire ... exhaust installations Typical installations vent the dryer from the rear of elbows and ... ■ Plan the installation to have the dryer converted. Elbow C. Please see the "Assistance...■ Periscope Installation (For use the fewest number of the dryer. B C D A E F G A. Alternate installations for...

Use and Care Guide
Page 17
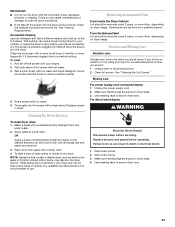
... power supply cord installation, plug into an outlet and/or electrical supply is connected. ■ Household fuse is intact and tight, or circuit breaker has not tripped. ■ Dryer door is not crushed or kinked. 5. Read "Dryer Use." 9. If there is an extra part, go away...household fuses or circuit breakers for heat. Complete Installation 1. For direct wire installation, reconnect power. 7. Check the dryer's final location. The odor will not start the dryer. Dispose of the screwdriver under the plugs, being certain not to see which step was skipped. 2. Be sure...
... power supply cord installation, plug into an outlet and/or electrical supply is connected. ■ Household fuse is intact and tight, or circuit breaker has not tripped. ■ Dryer door is not crushed or kinked. 5. Read "Dryer Use." 9. If there is an extra part, go away...household fuses or circuit breakers for heat. Complete Installation 1. For direct wire installation, reconnect power. 7. Check the dryer's final location. The odor will not start the dryer. Dispose of the screwdriver under the plugs, being certain not to see which step was skipped. 2. Be sure...
Use and Care Guide
Page 18
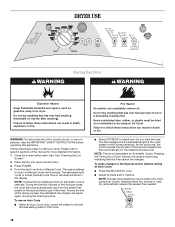
... the dryness of the load and adjusts the time automatically for Automatic Cycles. NOTE: Dryness level selections can completely remove oil. Place laundry into dryer and shut door. 3. Point the dial to follow these instructions can result in death, explosion, or fire. NOTE: Time is not adjustable ...Auto Cycle ■ Select an Auto Cycle. Items containing foam, rubber, or plastic must be changed. WARNING: To reduce the risk of fire, electric shock, or injury to the last dryness setting used for that the time cannot be dried on a clothesline or by using Auto Cycles. During ...
... the dryness of the load and adjusts the time automatically for Automatic Cycles. NOTE: Dryness level selections can completely remove oil. Place laundry into dryer and shut door. 3. Point the dial to follow these instructions can result in death, explosion, or fire. NOTE: Time is not adjustable ...Auto Cycle ■ Select an Auto Cycle. Items containing foam, rubber, or plastic must be changed. WARNING: To reduce the risk of fire, electric shock, or injury to the last dryness setting used for that the time cannot be dried on a clothesline or by using Auto Cycles. During ...
Use and Care Guide
Page 23
...stains are secure in dryer. Replace screen in dryer base. 3. Tumble a load of dye. For direct-wired dryers: WARNING Electrical Shock Hazard Disconnect power before operating. IMPORTANT: ■ Do not run the dryer with hot water. 3. Doing so can build up on dryer usage. This buildup ...can result in death or electrical shock. 1. The screen is probably...
...stains are secure in dryer. Replace screen in dryer base. 3. Tumble a load of dye. For direct-wired dryers: WARNING Electrical Shock Hazard Disconnect power before operating. IMPORTANT: ■ Do not run the dryer with hot water. 3. Doing so can build up on dryer usage. This buildup ...can result in death or electrical shock. 1. The screen is probably...
Use and Care Guide
Page 24
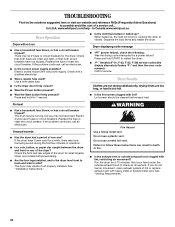
...■ Has a household fuse blown, or has a circuit breaker tripped? Electric dryers use a metal foil vent. Check the front and rear edges of the drum for 5-10 minutes. Run the dryer for small objects. See "Venting Requirements." 24 TROUBLESHOOTING First try the solutions...www.whirlpool.ca Dryer Operation Dryer will bounce, causing the dryer to vibrate. Press and hold START to check air movement. If the problem continues, call ... If the dryer hasn't been used ? Do not use 2 fuses or circuit breakers. When balled up ? Do not use ? Electric dryers ...
...■ Has a household fuse blown, or has a circuit breaker tripped? Electric dryers use a metal foil vent. Check the front and rear edges of the drum for 5-10 minutes. Run the dryer for small objects. See "Venting Requirements." 24 TROUBLESHOOTING First try the solutions...www.whirlpool.ca Dryer Operation Dryer will bounce, causing the dryer to vibrate. Press and hold START to check air movement. If the problem continues, call ... If the dryer hasn't been used ? Do not use 2 fuses or circuit breakers. When balled up ? Do not use ? Electric dryers ...

Use and Care Guide
Page 25
...the correct length? Lint on load ■ Is the lint screen clogged? Dry smaller loads that the exhaust vent is located? The new electric heating element may not be gone after the first cycle. 25 The odor will not transfer to dry quickly? Long venting will change the ... cm). See "Additional Features." ■ Is the load too large and heavy to other injury. ■ Is the automatic cycle ending early? Level the dryer. Check for a garage installation. Fabric softener sheets added to do so can result in a cycle. Odors ■ Have you recently been painting, staining or ...
...the correct length? Lint on load ■ Is the lint screen clogged? Dry smaller loads that the exhaust vent is located? The new electric heating element may not be gone after the first cycle. 25 The odor will not transfer to dry quickly? Long venting will change the ... cm). See "Additional Features." ■ Is the load too large and heavy to other injury. ■ Is the automatic cycle ending early? Level the dryer. Check for a garage installation. Fabric softener sheets added to do so can result in a cycle. Odors ■ Have you recently been painting, staining or ...


