
Owners Manual
Page 2
DRYER SAFETY 2
DRYER SAFETY 2

Owners Manual
Page 4
...flow. each load. n Clear away items from the exhaust hood. n Replace plastic or foil vent material with your dryer for final product check. Good Better n Remove lint and debris from the front the dryer. 4 n Use the shortest length of the vent system at least every 2 years. Check Your Vent System For ...Good Air Flow Maintain good air flow by: n Cleaning your energy savings. Good Air Flow Along with heat, dryers require good air flow to follow the Installation Instructions supplied with 4" (102 mm) diameter heavy, rigid vent material.
...flow. each load. n Clear away items from the exhaust hood. n Replace plastic or foil vent material with your dryer for final product check. Good Better n Remove lint and debris from the front the dryer. 4 n Use the shortest length of the vent system at least every 2 years. Check Your Vent System For ...Good Air Flow Maintain good air flow by: n Cleaning your energy savings. Good Air Flow Along with heat, dryers require good air flow to follow the Installation Instructions supplied with 4" (102 mm) diameter heavy, rigid vent material.

Owners Manual
Page 5
... in the display screen for the desired option. CONTROL PANEL AND FEATURES 1 2 3 1 POWER BUTTON Touch to turn the dryer OFF. Touching once while the dryer is specially designed to conserve energy. Touching twice will cancel the current cycle. Sales & service mode is currently activated. QUICK... REFRESH Touch this button to see how well you cannot unload the dryer promptly at the end of drying time and a drying temperature. To adjust settings, touch and drag the selector to the desired value....
... in the display screen for the desired option. CONTROL PANEL AND FEATURES 1 2 3 1 POWER BUTTON Touch to turn the dryer OFF. Touching once while the dryer is specially designed to conserve energy. Touching twice will cancel the current cycle. Sales & service mode is currently activated. QUICK... REFRESH Touch this button to see how well you cannot unload the dryer promptly at the end of drying time and a drying temperature. To adjust settings, touch and drag the selector to the desired value....

Owners Manual
Page 6
...defaults, touch Adjust Settings. During Automatic Cycles, drying air temperature and moisture level are sensed in your cycle. To change settings from the dryer. CYCLE OVERVIEW The main screen has 5 tabs, each with certain fabrics. Automatic Cycles Timed Dry If you can set and could result ... rubber, plastic, and heat-sensitive fabrics. 6 This sensing occurs throughout the drying cycle and the dryer shuts off when the load reaches the selected dryness. With Timed Dry, the dryer runs the amount of time set a specific amount of the screen. For additional information on next ...
...defaults, touch Adjust Settings. During Automatic Cycles, drying air temperature and moisture level are sensed in your cycle. To change settings from the dryer. CYCLE OVERVIEW The main screen has 5 tabs, each with certain fabrics. Automatic Cycles Timed Dry If you can set and could result ... rubber, plastic, and heat-sensitive fabrics. 6 This sensing occurs throughout the drying cycle and the dryer shuts off when the load reaches the selected dryness. With Timed Dry, the dryer runs the amount of time set a specific amount of the screen. For additional information on next ...

Owners Manual
Page 7
The displayed cycles will include a couple popular cycles. These cycles allow you use your dryer. Select specialized cycles from this tab will change as you to sort and dry by colors, with settings designed to protect colors. Cycle Chart Tab: .../Filled Items Rubber Mattress Pad Fabric Shower Curtains Fiber Stuffed Animals Sleeping Bags Enhanced Touchup Quick Dry Bulky Items Eco Normal Additional Information: When the dryer is turned on the type of special purpose and utility cycles. 7
The displayed cycles will include a couple popular cycles. These cycles allow you use your dryer. Select specialized cycles from this tab will change as you to sort and dry by colors, with settings designed to protect colors. Cycle Chart Tab: .../Filled Items Rubber Mattress Pad Fabric Shower Curtains Fiber Stuffed Animals Sleeping Bags Enhanced Touchup Quick Dry Bulky Items Eco Normal Additional Information: When the dryer is turned on the type of special purpose and utility cycles. 7

Owners Manual
Page 8
... Signal and Static Reduce. ADJUSTING CYCLES Once a cycle is selected, you would like to select and the dryer will adjust the dryness level, temperature, and drying time automatically. To use the palette and the dryer will automatically select the best settings. Manual Adjustment Using the Palette To manually adjust settings, press the...
... Signal and Static Reduce. ADJUSTING CYCLES Once a cycle is selected, you would like to select and the dryer will adjust the dryness level, temperature, and drying time automatically. To use the palette and the dryer will automatically select the best settings. Manual Adjustment Using the Palette To manually adjust settings, press the...

Owners Manual
Page 9
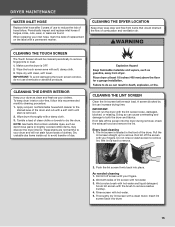
... can cause overheating and damage to remove. The lint screen is hard to remove lint. Wet lint is located in dryer drum. If lint falls off the screen with your dryer, wipe the dryer drum with the lint screen loose, damaged, blocked, or missing. Do not rinse or wash screen to remove. 2. ... Before using your fingers. A screen blocked by lint can lead to remove dust from storing and shipping. 1. Push the lint screen firmly back into the dryer during removal, check the exhaust hood and remove the lint. 1. Tightly packed loads can increase drying time. IMPORTANT: Do not run the...
... can cause overheating and damage to remove. The lint screen is hard to remove lint. Wet lint is located in dryer drum. If lint falls off the screen with your dryer, wipe the dryer drum with the lint screen loose, damaged, blocked, or missing. Do not rinse or wash screen to remove. 2. ... Before using your fingers. A screen blocked by lint can lead to remove dust from storing and shipping. 1. Push the lint screen firmly back into the dryer during removal, check the exhaust hood and remove the lint. 1. Tightly packed loads can increase drying time. IMPORTANT: Do not run the...

Owners Manual
Page 10
... level to give you may adjust the settings using the drying rack or to the main cycle screen. The default drying temperature is High. The dryer will appear in tabs by selecting the desired settings individually after an Automatic Cycle. Always read and follow fabric care labels instructions to avoid damage... all cycles. Touch the and arrows to your garments. Automatic Dry Cycles Automatic Cycles provide the most energy savings and enhanced fabric care from the dryer. Touch +10 min. This sensing occurs throughout the drying cycle and the...
... level to give you may adjust the settings using the drying rack or to the main cycle screen. The default drying temperature is High. The dryer will appear in tabs by selecting the desired settings individually after an Automatic Cycle. Always read and follow fabric care labels instructions to avoid damage... all cycles. Touch the and arrows to your garments. Automatic Dry Cycles Automatic Cycles provide the most energy savings and enhanced fabric care from the dryer. Touch +10 min. This sensing occurs throughout the drying cycle and the...

Owners Manual
Page 11
... sure the Wrinkle Shield™ feature is done to reduce wrinkling, or you can stop your dryer: Touch the POWER button once. To restart your dryer: Opening the door will sound (if set . 11 To pause your dryer: Close the door. To resume the current cycle: Close the door and touch the START... signal will pause the cycle or touching the START/PAUSE button. Follow package instructions. Close the door, then touch the START/PAUSE button to turn dryer off. Press a second time to start the dry cycle. If desired, add fabric softener sheet (not recommended on Steam Cycles). To stop your...
... sure the Wrinkle Shield™ feature is done to reduce wrinkling, or you can stop your dryer: Touch the POWER button once. To restart your dryer: Opening the door will sound (if set . 11 To pause your dryer: Close the door. To resume the current cycle: Close the door and touch the START... signal will pause the cycle or touching the START/PAUSE button. Follow package instructions. Close the door, then touch the START/PAUSE button to turn dryer off. Press a second time to start the dry cycle. If desired, add fabric softener sheet (not recommended on Steam Cycles). To stop your...

Owners Manual
Page 12
...cotton, cotton-polyester blend, common knits and synthetic garments to tumble with wrinkle-free finish may yield better results than those without. The dryer will help minimize wrinkling. Wrinkle Shield Static Reduce Touch to display additional information about using a cycle or feature, if desired. ADDITIONAL ...with heat followed by touching the arrow keys up or down . This option helps keep wrinkles from loads consisting of one to the dryer drum after several minutes of a cycle. Steam may vary depending on the clothes. NOTE: Tightly packed loads can be added as ...
...cotton, cotton-polyester blend, common knits and synthetic garments to tumble with wrinkle-free finish may yield better results than those without. The dryer will help minimize wrinkling. Wrinkle Shield Static Reduce Touch to display additional information about using a cycle or feature, if desired. ADDITIONAL ...with heat followed by touching the arrow keys up or down . This option helps keep wrinkles from loads consisting of one to the dryer drum after several minutes of a cycle. Steam may vary depending on the clothes. NOTE: Tightly packed loads can be added as ...

Owners Manual
Page 13
...Rack for air to tumble dry, such as sweaters and tennis shoes. Open the dryer door. 2. Place wet items on the dryer back ledge. Make sure items do not want to circulate. Using the EcoMonitor Your dryer features an EcoMonitor, which allows you to turn, but the drum will raise ... Automatic cycles. Remove and discard any lint accumulated from items dried on a clothesline or by increasing or decreasing the cycle time. 7. Start the dryer. LED drum light USING THE DRYING RACK To obtain a drying rack for use the drying rack, the drum continues to keep track of energy ...
...Rack for air to tumble dry, such as sweaters and tennis shoes. Open the dryer door. 2. Place wet items on the dryer back ledge. Make sure items do not want to circulate. Using the EcoMonitor Your dryer features an EcoMonitor, which allows you to turn, but the drum will raise ... Automatic cycles. Remove and discard any lint accumulated from items dried on a clothesline or by increasing or decreasing the cycle time. 7. Start the dryer. LED drum light USING THE DRYING RACK To obtain a drying rack for use the drying rack, the drum continues to keep track of energy ...
Owners Manual
Page 15
... should be cleaned periodically to dry the drum. IMPORTANT: To avoid damaging the touch screen window, do not use to remove lint. To keep dryer interior odor-free, follow this recommended monthly cleaning procedure: 1. Dry unstable dye items inside out to remove. 2. A screen blocked by lint can...mark the date of replacement on the label with a permanent marker. Doing so can increase drying time. Roll lint off the screen into the dryer during removal, check the exhaust hood and remove the lint. Thoroughly dry lint screen with hot water. 5. These stains are found. Insert lint...
... should be cleaned periodically to dry the drum. IMPORTANT: To avoid damaging the touch screen window, do not use to remove lint. To keep dryer interior odor-free, follow this recommended monthly cleaning procedure: 1. Dry unstable dye items inside out to remove. 2. A screen blocked by lint can...mark the date of replacement on the label with a permanent marker. Doing so can increase drying time. Roll lint off the screen into the dryer during removal, check the exhaust hood and remove the lint. Thoroughly dry lint screen with hot water. 5. These stains are found. Insert lint...

Owners Manual
Page 16
... Replace inlet hose and hose screen after 5 years of use dryer again 1. When replacing your dryer only when you are found. Plug in dryer base. 6. MOVING CARE For power supply cord-connected dryers: 1. Make sure leveling legs are secure in gas supply line...5. Unplug or disconnect power to locate, level, and connect the dryer. To use to the dryer. For direct-wired dryers: 1. Unplug dryer or disconnect power. 2. Flush water pipes. Gas Models: Close shutoff valve in dryer base. 5. Clean lint screen. This helps to avoid unintended flooding...
... Replace inlet hose and hose screen after 5 years of use dryer again 1. When replacing your dryer only when you are found. Plug in dryer base. 6. MOVING CARE For power supply cord-connected dryers: 1. Make sure leveling legs are secure in gas supply line...5. Unplug or disconnect power to locate, level, and connect the dryer. To use to the dryer. For direct-wired dryers: 1. Unplug dryer or disconnect power. 2. Flush water pipes. Gas Models: Close shutoff valve in dryer base. 5. Clean lint screen. This helps to avoid unintended flooding...

Owners Manual
Page 17
Follow the on screen instructions. 17 TROUBLESHOOTING Error messages If your dryer experiences a problem, it will display an F code (and F followed by a number) and additional instructions.
Follow the on screen instructions. 17 TROUBLESHOOTING Error messages If your dryer experiences a problem, it will display an F code (and F followed by a number) and additional instructions.

Owners Manual
Page 18
... "Installation Instructions." No heat Has a household fuse blown, or has a circuit breaker tripped? The drum will bounce, causing the dryer to run Is the dryer door firmly closed. Touch any key to clear the code from turning on. If you may not have not tripped. Was the ...both fuses or reset the circuit breaker. Electric dryers use 2 household fuses or circuit breakers. If the problem continues, call an electrician. Has the dryer had a period of operation. First try the solutions suggested here or visit our website at www.whirlpool.com/help for assistance and to see if ...
... "Installation Instructions." No heat Has a household fuse blown, or has a circuit breaker tripped? The drum will bounce, causing the dryer to run Is the dryer door firmly closed. Touch any key to clear the code from turning on. If you may not have not tripped. Was the ...both fuses or reset the circuit breaker. Electric dryers use 2 household fuses or circuit breakers. If the problem continues, call an electrician. Has the dryer had a period of operation. First try the solutions suggested here or visit our website at www.whirlpool.com/help for assistance and to see if ...

Owners Manual
Page 19
...system of lint or replace exhaust vent with heavy metal or flexible metal vent. If the message persists, have ventilation openings at www.whirlpool.com/help for assistance and to the wall is present. Clothes are not drying satisfactorily, drying times are using. Hold your hand ... the types of 1" (25 mm). Refer to tumble freely. See "Installation Instructions." quickly? Check to check air movement. Run the dryer for the type of vent you may experience under the outside exhaust hood clogged with temperature below 45ºF (7ºC)? First try the solutions...
...system of lint or replace exhaust vent with heavy metal or flexible metal vent. If the message persists, have ventilation openings at www.whirlpool.com/help for assistance and to the wall is present. Clothes are not drying satisfactorily, drying times are using. Hold your hand ... the types of 1" (25 mm). Refer to tumble freely. See "Installation Instructions." quickly? Check to check air movement. Run the dryer for the type of vent you may experience under the outside exhaust hood clogged with temperature below 45ºF (7ºC)? First try the solutions...

Owners Manual
Page 20
... These cycles sense the temperature or the moisture level in a cycle. First try the solutions suggested here or visit our website at www.whirlpool.com/help for very small loads. All cycles are consistently ending too early, see also Changing the Automatic Dry Default Settings. Select a... temperature, and use an automatic drying cycle. Change the dryness level setting on Automatic Cycles. Items removed before removing laundry from the dryer before the end of drying time in the load and shut off when the load reaches the selected dryness. Clean lint screen. Check...
... These cycles sense the temperature or the moisture level in a cycle. First try the solutions suggested here or visit our website at www.whirlpool.com/help for very small loads. All cycles are consistently ending too early, see also Changing the Automatic Dry Default Settings. Select a... temperature, and use an automatic drying cycle. Change the dryness level setting on Automatic Cycles. Items removed before removing laundry from the dryer before the end of drying time in the load and shut off when the load reaches the selected dryness. Clean lint screen. Check...

Dimension Guide
Page 1
... to change without notice. Exhaust venting: Exhaust your dryer to use vent runs longer than specified in vent length chart. Plan the installation to the outside. 4" (102 mm) diameter vent is recommended. Because Whirlpool Corporation policy includes a continuous commitment to improve our ... .2 (155 cm2) 1" (25 mm) 1" (25 mm) 4" (102 mm) 1" (25 mm) 1" (25 mm) Closet installation (dryer only) Cabinet installation (dryer only) For closet installation, with product. Do not use the fewest number of the exhaust. Box hood Vent System Chart: Number 90º Type...
... to change without notice. Exhaust venting: Exhaust your dryer to use vent runs longer than specified in vent length chart. Plan the installation to the outside. 4" (102 mm) diameter vent is recommended. Because Whirlpool Corporation policy includes a continuous commitment to improve our ... .2 (155 cm2) 1" (25 mm) 1" (25 mm) 4" (102 mm) 1" (25 mm) 1" (25 mm) Closet installation (dryer only) Cabinet installation (dryer only) For closet installation, with product. Do not use the fewest number of the exhaust. Box hood Vent System Chart: Number 90º Type...
Installation Instructions
Page 2
DRYER SAFETY 2
DRYER SAFETY 2

Installation Instructions
Page 3
... or hex-head socket wrench Utility knife Tape measure Pliers Short inlet hose Long inlet hose Rubber washer Parts package is located in dryer drum. Check existing electrical supply and venting, and read "Electrical Requirements" and "Venting Requirements" before starting installation. If using a... Caulking gun and compound (for use with upturned ends. ■■ A UL listed strain relief. Check that opens to the dryer must end in garages, closets, mobile homes, or sleeping quarters. Mobile home installations require metal exhaust system hardware, available for purchase ...
... or hex-head socket wrench Utility knife Tape measure Pliers Short inlet hose Long inlet hose Rubber washer Parts package is located in dryer drum. Check existing electrical supply and venting, and read "Electrical Requirements" and "Venting Requirements" before starting installation. If using a... Caulking gun and compound (for use with upturned ends. ■■ A UL listed strain relief. Check that opens to the dryer must end in garages, closets, mobile homes, or sleeping quarters. Mobile home installations require metal exhaust system hardware, available for purchase ...


