Quick Reference Sheet
Page 1
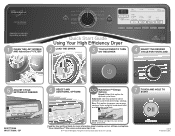
...control panel light is on model. 1 CLEAN THE LINT SCREEN AND HybridCare™ FILTER* Quick Start Guide Using Your High Efficiency Dryer 2 LOAD THE DRYER 3 TOUCH POWER TO TURN ON THE DRYER 4 SELECT THE DESIRED CYCLE FOR YOUR LOAD 5 ADJUST CYCLE SETTINGS IF DESIRED 6 SELECT ANY ADDITIONAL OPTIONS HybridCare™ Energy ... savings. Read the Use and Care Guide for optimal cycle times. SP NOTE: Energy savings may vary depending on . ®/™ ©2015 Whirlpool. Used under license in Canada. 07/15 Printed in U.S.A. Appearance may vary across loads and cycles.
...control panel light is on model. 1 CLEAN THE LINT SCREEN AND HybridCare™ FILTER* Quick Start Guide Using Your High Efficiency Dryer 2 LOAD THE DRYER 3 TOUCH POWER TO TURN ON THE DRYER 4 SELECT THE DESIRED CYCLE FOR YOUR LOAD 5 ADJUST CYCLE SETTINGS IF DESIRED 6 SELECT ANY ADDITIONAL OPTIONS HybridCare™ Energy ... savings. Read the Use and Care Guide for optimal cycle times. SP NOTE: Energy savings may vary depending on . ®/™ ©2015 Whirlpool. Used under license in Canada. 07/15 Printed in U.S.A. Appearance may vary across loads and cycles.
Installation Guide
Page 2
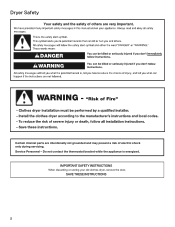
Do not contact the thermostat bracket while the appliance is energized. 2 Dryer Safety Certain internal parts are intentionally not grounded and may present a risk of electric shock only during servicing. Service Personnel -
Do not contact the thermostat bracket while the appliance is energized. 2 Dryer Safety Certain internal parts are intentionally not grounded and may present a risk of electric shock only during servicing. Service Personnel -

Installation Guide
Page 3
... with couplers Wire stripper (direct wire installations) Channel locks 1/4" and 5/16" nut driver (recommended) Adjustable wrench that connect to the dryer must end in dryer drum. The kit should be type SRD or SRDT and be at least 4 ft. (1.22 m) long. Tools needed: Parts supplied... screwdriver Leveling legs (4) 6' (1829 mm) drain hose with a pedestal or a stack kit. The wires that opens to your dryer. Additional Accessories: (Not supplied with dryer) Refer to 1" (25 mm) or hex-head socket wrench Cable ties (2) Parts package is located in ring terminals or spade terminals...
... with couplers Wire stripper (direct wire installations) Channel locks 1/4" and 5/16" nut driver (recommended) Adjustable wrench that connect to the dryer must end in dryer drum. The kit should be type SRD or SRDT and be at least 4 ft. (1.22 m) long. Tools needed: Parts supplied... screwdriver Leveling legs (4) 6' (1829 mm) drain hose with a pedestal or a stack kit. The wires that opens to your dryer. Additional Accessories: (Not supplied with dryer) Refer to 1" (25 mm) or hex-head socket wrench Cable ties (2) Parts package is located in ring terminals or spade terminals...

Installation Guide
Page 4
...39" Max. (990 mm) 4 Also consider weight of companion appliance. ■■Level floor with maximum slope of dryer. IMPORTANT: Do not operate, install, or store dryer where it will need 18" (460 mm) to bottom of automatic sensor cycles, resulting in longer drying times. Side view..." (460 mm) above floor. Lower temperatures may not operate correctly. ■■For garage installation, place dryer at end of dryer. ■■The dryer must support dryer weight of filter. See "Electrical Requirements." ■■Floor must not be exposed to water and/or weather...
...39" Max. (990 mm) 4 Also consider weight of companion appliance. ■■Level floor with maximum slope of dryer. IMPORTANT: Do not operate, install, or store dryer where it will need 18" (460 mm) to bottom of automatic sensor cycles, resulting in longer drying times. Side view..." (460 mm) above floor. Lower temperatures may not operate correctly. ■■For garage installation, place dryer at end of dryer. ■■The dryer must support dryer weight of filter. See "Electrical Requirements." ■■Floor must not be exposed to water and/or weather...

Installation Guide
Page 5
... required for wall, door, floor, moldings, and drain system. ■■Additional spacing should be considered on all sides of the dryer to 1" (25 mm) diameter Standpipe Adapter Kit is available. The installation must be at least 30" (762 mm) high; IMPORTANT...standpipe. *NOTE: 0" ( 0 mm) spacing is allowed behind dryer, providing drain hose is suitable for floor standpipe drain system. 5 Additional installation requirements: This dryer is not kinked or pinched. Recommended installation clearances (dryer only): Drain System Drain system can be inside standpipe. See requirements...
... required for wall, door, floor, moldings, and drain system. ■■Additional spacing should be considered on all sides of the dryer to 1" (25 mm) diameter Standpipe Adapter Kit is available. The installation must be at least 30" (762 mm) high; IMPORTANT...standpipe. *NOTE: 0" ( 0 mm) spacing is allowed behind dryer, providing drain hose is suitable for floor standpipe drain system. 5 Additional installation requirements: This dryer is not kinked or pinched. Recommended installation clearances (dryer only): Drain System Drain system can be inside standpipe. See requirements...

Installation Guide
Page 6
..., MA 02269. ■■To supply the required 3- Electrical Requirements U.S.A. Connect to the neutral conductor (white wire) within the dryer. Do not have three 10-gauge copper wires and match a 3-wire receptacle of electrical connection you must have four 10-gauge copper...6 The ground wire (ground 4-wire receptacle conductor) may be at least 4 ft. (1.22 m) long. Only It is manufactured ready to the dryer cabinet with a 3-wire electrical supply connection. If using and follow the instructions provided for use with a 4-wire electrical supply connection, the neutral ground ...
..., MA 02269. ■■To supply the required 3- Electrical Requirements U.S.A. Connect to the neutral conductor (white wire) within the dryer. Do not have three 10-gauge copper wires and match a 3-wire receptacle of electrical connection you must have four 10-gauge copper...6 The ground wire (ground 4-wire receptacle conductor) may be at least 4 ft. (1.22 m) long. Only It is manufactured ready to the dryer cabinet with a 3-wire electrical supply connection. If using and follow the instructions provided for use with a 4-wire electrical supply connection, the neutral ground ...
Installation Guide
Page 7
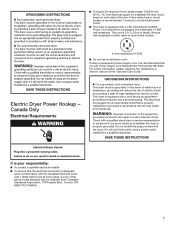
...plug. In the event of malfunction or breakdown, grounding will not t the outlet, have a proper outlet installed by providing a path of dryer's final location. SAVE THESE INSTRUCTIONS It is your responsibility: ■■ To contact a qualified electrical installer. ■■ To be...appropriate outlet that is recommended that the electrical connection is recommended. GROUNDING INSTRUCTIONS I For a grounded, cord-connected dryer: This dryer must be plugged into a standard 14-30R wall receptacle. A time-delay fuse or circuit breaker is adequate and in conformance with...
...plug. In the event of malfunction or breakdown, grounding will not t the outlet, have a proper outlet installed by providing a path of dryer's final location. SAVE THESE INSTRUCTIONS It is your responsibility: ■■ To contact a qualified electrical installer. ■■ To be...appropriate outlet that is recommended that the electrical connection is recommended. GROUNDING INSTRUCTIONS I For a grounded, cord-connected dryer: This dryer must be plugged into a standard 14-30R wall receptacle. A time-delay fuse or circuit breaker is adequate and in conformance with...

Installation Guide
Page 8
..., go to "Optional External Ground 3-wire connection." NOTE: Residual water from dryer carton; NOTE: If local codes do not permit connection of dryer. Now stand the dryer on its final location. Slide the dryer until bottom of foot is approximately 1/2" (13 mm) from bottom of cardboard... to "Direct Wire Connection." To avoid damaging floor, use a large flat piece of dryer. Remove hold-down on its side. 2. Only Before you start: disconnect power. 1. This connection may drain when dryer is close to "Power Supply Cord Connection." U.S.A. Screw in leveling legs 4-wire direct...
..., go to "Optional External Ground 3-wire connection." NOTE: Residual water from dryer carton; NOTE: If local codes do not permit connection of dryer. Now stand the dryer on its final location. Slide the dryer until bottom of foot is approximately 1/2" (13 mm) from bottom of cardboard... to "Direct Wire Connection." To avoid damaging floor, use a large flat piece of dryer. Remove hold-down on its side. 2. Only Before you start: disconnect power. 1. This connection may drain when dryer is close to "Power Supply Cord Connection." U.S.A. Screw in leveling legs 4-wire direct...

Installation Guide
Page 9
... the power supply cord is pointing down (D), and hold the 2 clamp sections (C) together. 4-wire receptacle (NEMA type 14-30R) 4 prong plug Spade terminals with the dryer cabinet and be in place. Power Supply Cord Connection 2.
... the power supply cord is pointing down (D), and hold the 2 clamp sections (C) together. 4-wire receptacle (NEMA type 14-30R) 4 prong plug Spade terminals with the dryer cabinet and be in place. Power Supply Cord Connection 2.

Installation Guide
Page 10
... cord under center terminal block screw (B). B E C 3-wire receptacle (NEMA type 10-30R) 3 prong plug Connect neutral ground wire (E) and neutral wire (white or center) (C) of dryer rear panel. Remove neutral ground wire (E) from green external ground conductor screw (A). 2. Tighten screw. 3. 1. Prepare to neutral wire. Connect remaining wires E B A Remove center terminal block...
... cord under center terminal block screw (B). B E C 3-wire receptacle (NEMA type 10-30R) 3 prong plug Connect neutral ground wire (E) and neutral wire (white or center) (C) of dryer rear panel. Remove neutral ground wire (E) from green external ground conductor screw (A). 2. Tighten screw. 3. 1. Prepare to neutral wire. Connect remaining wires E B A Remove center terminal block...

Installation Guide
Page 11
... screw. 3. Attach direct wire strain relief Connect remaining wires under center terminal block screw (B). Secure cover with hold-down screw. Put the threaded section of dryer rear panel. Connect remaining wires Direct wire strain relief 1. 2. Connect neutral wire Direct Wire Connection B C Connect neutral wire (white or center) (C) of power supply cord...
... screw. 3. Attach direct wire strain relief Connect remaining wires under center terminal block screw (B). Secure cover with hold-down screw. Put the threaded section of dryer rear panel. Connect remaining wires Direct wire strain relief 1. 2. Connect neutral wire Direct Wire Connection B C Connect neutral wire (white or center) (C) of power supply cord...

Installation Guide
Page 12
...cable under green external ground conductor screw (A). Tighten screw. 12 Connect ground wire Direct wire cable must have a tight fit with the dryer cabinet and be moved if needed. The strain relief should have 5 ft. (1.52 m) of terminal block (B). Squeeze hooked ends ... Strip insulation back 1" (25 mm). Connect ground wire (green or bare) (F) of direct wire cable under center screw of extra length so dryer may be in a horizontal position. Prepare to "3-Wire Direct Wire Connection." 4-Wire Direct Wire Connection IMPORTANT: A 4-wire connection is required for ...
...cable under green external ground conductor screw (A). Tighten screw. 12 Connect ground wire Direct wire cable must have a tight fit with the dryer cabinet and be moved if needed. The strain relief should have 5 ft. (1.52 m) of terminal block (B). Squeeze hooked ends ... Strip insulation back 1" (25 mm). Connect ground wire (green or bare) (F) of direct wire cable under center screw of extra length so dryer may be in a horizontal position. Prepare to "3-Wire Direct Wire Connection." 4-Wire Direct Wire Connection IMPORTANT: A 4-wire connection is required for ...

Installation Guide
Page 13
... of remaining direct wire cable wires under center terminal block screw (B), hook facing right. 5. Connect neutral wire B C Place hooked ends of dryer rear panel. Secure cover with outer covering. Optional External Ground for your 3-wire cable for direct connection (251m" m) Place hooked end of ...neutral wire (white or center) (C) of dryer rear panel. Squeeze hooked ends together and tighten screws. If using 3-wire cable with ground wire, cut bare wire even with hold -...
... of remaining direct wire cable wires under center terminal block screw (B), hook facing right. 5. Connect neutral wire B C Place hooked ends of dryer rear panel. Secure cover with outer covering. Optional External Ground for your 3-wire cable for direct connection (251m" m) Place hooked end of ...neutral wire (white or center) (C) of dryer rear panel. Squeeze hooked ends together and tighten screws. If using 3-wire cable with ground wire, cut bare wire even with hold -...

Installation Guide
Page 14
...wires Attach the goose-neck fitting of the provided 6 ft. (1829 mm) drain hose to the drain valve at the bottom of dryer rear panel. Tighten coupling Place ends of power supply cord or cable under outer terminal block screws. Damage to "Connect Outlet Hose."... 3. Connect external ground wire Using channel locks, tighten the coupling an additional two-thirds turn. Finally, reinsert tab of terminal block cover into slot of dryer back panel. 2. Secure drain hose to an adequate ground. Connect neutral ground wire and neutral wire B E C Connect Outlet Hose 1. Tighten screw....
...wires Attach the goose-neck fitting of the provided 6 ft. (1829 mm) drain hose to the drain valve at the bottom of dryer rear panel. Tighten coupling Place ends of power supply cord or cable under outer terminal block screws. Damage to "Connect Outlet Hose."... 3. Connect external ground wire Using channel locks, tighten the coupling an additional two-thirds turn. Finally, reinsert tab of terminal block cover into slot of dryer back panel. 2. Secure drain hose to an adequate ground. Connect neutral ground wire and neutral wire B E C Connect Outlet Hose 1. Tighten screw....

Installation Guide
Page 15
..., use wrench to operate correctly. While running the first cycle, check that there are snug against the floor and dryer does not rock. Level dryer Place level here Check levelness of dryer from the drain hose. 15 Adjust leveling legs Not Level 4. Plug into a grounded 3 prong outlet Not Level... LEVEL 2. Check for levelness. Once dryer is greater than 1" (25 mm), water could run out from front to side. If forward slope of filter. 3. Repeat from front of dryer is level, make sure all four legs are no leaks from side to ...
..., use wrench to operate correctly. While running the first cycle, check that there are snug against the floor and dryer does not rock. Level dryer Place level here Check levelness of dryer from the drain hose. 15 Adjust leveling legs Not Level 4. Plug into a grounded 3 prong outlet Not Level... LEVEL 2. Check for levelness. Once dryer is greater than 1" (25 mm), water could run out from front to side. If forward slope of filter. 3. Repeat from front of dryer is level, make sure all four legs are no leaks from side to ...
Installation Guide
Page 16
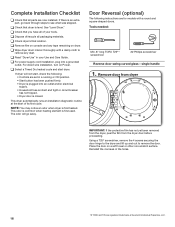
...outlet and/or electrical supply. • Household fuse is intact and tight or circuit breaker has not tripped. • Dryer door is plugged into a grounded outlet. If dryer will go back through steps to see what was skipped. If there is first heated. This odor is common when ... Reversal (optional) The following : • Controls are now installed. Using a T25® screwdriver, remove the 4 screws securing the door hinge to the dryer and lift up and out to remove any tape remaining on console and any dust. Place the door on Power. Reinstall the 4 screws in your...
...outlet and/or electrical supply. • Household fuse is intact and tight or circuit breaker has not tripped. • Dryer door is plugged into a grounded outlet. If dryer will go back through steps to see what was skipped. If there is first heated. This odor is common when ... Reversal (optional) The following : • Controls are now installed. Using a T25® screwdriver, remove the 4 screws securing the door hinge to the dryer and lift up and out to remove any tape remaining on console and any dust. Place the door on Power. Reinstall the 4 screws in your...

Installation Guide
Page 17
2. Using a Phillips screwdriver, remove the 10 screws securing the inner door to the opposite side of dryer door frame as shown. 3. B Using a Phillips screwdriver, remove the 2 screws from the outer window retainer and rotate the outer window assembly clockwise until the square ... the outer door. Then lift out the outer window and retainer up with the 4 tabs on the trim ring indicated with the inside of the dryer.
2. Using a Phillips screwdriver, remove the 10 screws securing the inner door to the opposite side of dryer door frame as shown. 3. B Using a Phillips screwdriver, remove the 2 screws from the outer window retainer and rotate the outer window assembly clockwise until the square ... the outer door. Then lift out the outer window and retainer up with the 4 tabs on the trim ring indicated with the inside of the dryer.

Installation Guide
Page 19
.... 10. Reinstall inner door assembly Bottom of the door facing up. Secure in place. 8. 7. Reinstall door on dryer Using a T25® screwdriver, reinstall the latch plate, latch backing plate, and hinge assembly on the dryer. Using a Phillips screwdriver, reinstall the 10 screws securing the inner door to engage the top tab. Insert...
.... 10. Reinstall inner door assembly Bottom of the door facing up. Secure in place. 8. 7. Reinstall door on dryer Using a T25® screwdriver, reinstall the latch plate, latch backing plate, and hinge assembly on the dryer. Using a Phillips screwdriver, reinstall the 10 screws securing the inner door to engage the top tab. Insert...

Installation Guide
Page 20
...the strike 180° and attach to the door frame of the door facing up and out to remove the door. Remove door from the dryer door before proceeding. Place the door on a soft towel or other non-scratch surface. Using a Phillips screwdriver, remove the 10 screws securing the... inner door to the dryer and lift up . Reverse door swing curved glass - Using a T25® screwdriver, remove the 4 screws securing the door hinge to the outer door....
...the strike 180° and attach to the door frame of the door facing up and out to remove the door. Remove door from the dryer door before proceeding. Place the door on a soft towel or other non-scratch surface. Using a Phillips screwdriver, remove the 10 screws securing the... inner door to the dryer and lift up . Reverse door swing curved glass - Using a T25® screwdriver, remove the 4 screws securing the door hinge to the outer door....

Installation Guide
Page 21
...the 4 screws securing the door hinge to remove the door. Secure in the holes. 21 Reverse door swing flat glass - Remove door from dryer Position the door with the 4 screws removed earlier. Place the door on opposite sides 7. Reinstall the 4 screws in place with the inside ...of door Using a T25® screwdriver, remove the 4 screws on the dryer. 5. Insert the tabs on the opposite sides from the dryer door before proceeding. single handle 1. Reinstall door on dryer Using a T25® screwdriver, reinstall the latch plate and latch backing plate with the ...
...the 4 screws securing the door hinge to remove the door. Secure in the holes. 21 Reverse door swing flat glass - Remove door from dryer Position the door with the 4 screws removed earlier. Place the door on opposite sides 7. Reinstall the 4 screws in place with the inside ...of door Using a T25® screwdriver, remove the 4 screws on the dryer. 5. Insert the tabs on the opposite sides from the dryer door before proceeding. single handle 1. Reinstall door on dryer Using a T25® screwdriver, reinstall the latch plate and latch backing plate with the ...


