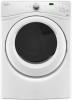
Use & Care Guide
Page 3
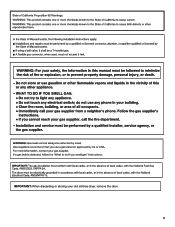
IMPORTANT: When discarding or storing your old clothes dryer, remove the door. 3
IMPORTANT: When discarding or storing your old clothes dryer, remove the door. 3
Use & Care Guide
Page 4
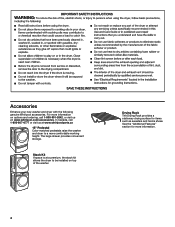
...convenient storage. For more information on top of the washer. Stack Kit If space is at a premium, the stack kit allows the dryer to be installed on options and ordering, call 1-800-807-6777 or visit us at www.whirlpoolparts.ca 15" Pedestal Color-matched ...pedestals raise the washer and dryer to a more information. 4 Drying Rack The Drying Rack provides a stationary drying surface for more comfortable working height. Accessories Enhance your new washer and dryer with the following genuine Whirlpool accessories. In Canada, call 1-800-901-2042, or...
...convenient storage. For more information on top of the washer. Stack Kit If space is at a premium, the stack kit allows the dryer to be installed on options and ordering, call 1-800-807-6777 or visit us at www.whirlpoolparts.ca 15" Pedestal Color-matched ...pedestals raise the washer and dryer to a more information. 4 Drying Rack The Drying Rack provides a stationary drying surface for more comfortable working height. Accessories Enhance your new washer and dryer with the following genuine Whirlpool accessories. In Canada, call 1-800-901-2042, or...

Use & Care Guide
Page 5
... blend, common knits, and synthetics. 5 n Remove lint from the exhaust hood. This sensing occurs throughout the drying cycle and the dryer shuts off when the load reaches the selected dryness. Proper venting will be sure to follow the Installation Instructions supplied with cycles that use... Remove lint and debris from the entire length of fabric softener sheet is best for smoothing out wrinkles and reducing odors from the dryer. Use Automatic Cycles for better fabric care and energy savings Use the Automatic Cycles to efficiently dry laundry. n The Steam Refresh Cycle...
... blend, common knits, and synthetics. 5 n Remove lint from the exhaust hood. This sensing occurs throughout the drying cycle and the dryer shuts off when the load reaches the selected dryness. Proper venting will be sure to follow the Installation Instructions supplied with cycles that use... Remove lint and debris from the entire length of fabric softener sheet is best for smoothing out wrinkles and reducing odors from the dryer. Use Automatic Cycles for better fabric care and energy savings Use the Automatic Cycles to efficiently dry laundry. n The Steam Refresh Cycle...

Use & Care Guide
Page 7
..." setting (on the EcoBoost™ option. E Cycle Signal Use this to turn the signal indicating the end of the dryer. Touch and hold Cycle Signal for your dryer. NOTE: Automatic Cycles use with High or Medium heat settings. The Damp Dry Signal is not adjustable. A Static Reduce ...amount of load you to select available options for Normal. This option is damp, but not completely dry. You may vary across loads. The dryer will count down 3-2-1. B Steam Touch to activate the Steam option, which allows you are drying. the LED Display will sound when the load...
..." setting (on the EcoBoost™ option. E Cycle Signal Use this to turn the signal indicating the end of the dryer. Touch and hold Cycle Signal for your dryer. NOTE: Automatic Cycles use with High or Medium heat settings. The Damp Dry Signal is not adjustable. A Static Reduce ...amount of load you to select available options for Normal. This option is damp, but not completely dry. You may vary across loads. The dryer will count down 3-2-1. B Steam Touch to activate the Steam option, which allows you are drying. the LED Display will sound when the load...

Use & Care Guide
Page 8
...noted for large loads of mixed fabrics and items. Normal is available only with 3-4 items, not more than 1/4 full. Large load: Fill the dryer drum up to dry: Work clothes, casual wear, mixed cottons, sheets, corduroys Jackets, comforters, pillows Heavyweight items such as cotton towels. Not .... Uses Extra Low heat to gently dry delicate items. Uses a stepped drying temperature from Medium to about 1/2 full. Medium load: Fill the dryer drum up to Low for optimal drying. Items need to provide optimal energy savings. Cycle Guide - If there is a long cycle with High...
...noted for large loads of mixed fabrics and items. Normal is available only with 3-4 items, not more than 1/4 full. Large load: Fill the dryer drum up to dry: Work clothes, casual wear, mixed cottons, sheets, corduroys Jackets, comforters, pillows Heavyweight items such as cotton towels. Not .... Uses Extra Low heat to gently dry delicate items. Uses a stepped drying temperature from Medium to about 1/2 full. Medium load: Fill the dryer drum up to Low for optimal drying. Items need to provide optimal energy savings. Cycle Guide - If there is a long cycle with High...

Use & Care Guide
Page 9
...Medium 22 Wrinkle Shield™† Static Reduce* Cycle Details: Use to dry foam, rubber, plastic, or heat-sensitive fabrics. Do not add dryer sheets. † You may be used for drying medium-weight items such as towels and work clothes. Cycle Guide - Not all features and ... shown in your load. This is available only with High and Medium Drying Temperature settings. * On steam models only. Small load: Fill the dryer drum with dry loads to about 1/2 full. Selecting the Drying Temperature A High heat setting may select the "With Steam" setting to increase or...
...Medium 22 Wrinkle Shield™† Static Reduce* Cycle Details: Use to dry foam, rubber, plastic, or heat-sensitive fabrics. Do not add dryer sheets. † You may be used for drying medium-weight items such as towels and work clothes. Cycle Guide - Not all features and ... shown in your load. This is available only with High and Medium Drying Temperature settings. * On steam models only. Small load: Fill the dryer drum with dry loads to about 1/2 full. Selecting the Drying Temperature A High heat setting may select the "With Steam" setting to increase or...
Use & Care Guide
Page 10
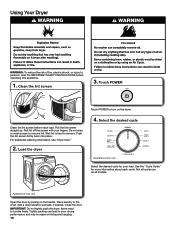
.... Push the lint screen firmly back into place. See the "Cycle Guide" for your fingers. Close the door. IMPORTANT: Do not tightly pack the dryer. Roll lint off the screen with your load. Wet lint is hard to wet load, if desired. Place laundry in the...performance and may increase wrinkling and tangling. 10 Clean the lint screen 3. Open the door by pulling on all models. For additional cleaning information, see "Dryer Care." 2. Touch POWER Clean the lint screen before operating this appliance. 1. Pull the lint screen straight up. Tightly packing can lead to tumble freely.
.... Push the lint screen firmly back into place. See the "Cycle Guide" for your fingers. Close the door. IMPORTANT: Do not tightly pack the dryer. Roll lint off the screen with your load. Wet lint is hard to wet load, if desired. Place laundry in the...performance and may increase wrinkling and tangling. 10 Clean the lint screen 3. Open the door by pulling on all models. For additional cleaning information, see "Dryer Care." 2. Touch POWER Clean the lint screen before operating this appliance. 1. Pull the lint screen straight up. Tightly packing can lead to tumble freely.
Use & Care Guide
Page 11
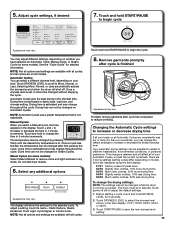
... can not be changed without stopping the cycle. Do not add dryer sheets. 6. There are 5 drying settings (setting codes differ depending on Automatic Cycles. The dryer must be changed on model), which the dryer will shut off ) to different installations, environmental conditions, or personal... preference. See the "Cycle Guide" for 6 seconds. 2. Automatic Cycles: You can be changed while the dryer is set, it cannot be in standby mode (power is retained and will show the settings for the selected cycle. NOTE: Automatic Cycles...
... can not be changed without stopping the cycle. Do not add dryer sheets. 6. There are 5 drying settings (setting codes differ depending on Automatic Cycles. The dryer must be changed on model), which the dryer will shut off ) to different installations, environmental conditions, or personal... preference. See the "Cycle Guide" for 6 seconds. 2. Automatic Cycles: You can be changed while the dryer is set, it cannot be in standby mode (power is retained and will show the settings for the selected cycle. NOTE: Automatic Cycles...
Use & Care Guide
Page 12
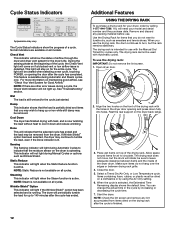
... Shield. Close the door. 5. Select a Timed Dry/Air Only, or Low Temperature cycle. During the sensing phase at the beginning of the dryer drum. Sensing The Sensing indicator will light during a cycle, the Check Vent indicator will not light up to leave adequate clearance between drying rack ... airflow, see "Check Your Vent System for your model and serial number and the purchase date. Remove and discard any lint accumulated from the dryer. For more information on if a blocked vent or low airflow issue is operating. Wet The load is active. This indicator will stay on...
... Shield. Close the door. 5. Select a Timed Dry/Air Only, or Low Temperature cycle. During the sensing phase at the beginning of the dryer drum. Sensing The Sensing indicator will light during a cycle, the Check Vent indicator will not light up to leave adequate clearance between drying rack ... airflow, see "Check Your Vent System for your model and serial number and the purchase date. Remove and discard any lint accumulated from the dryer. For more information on if a blocked vent or low airflow issue is operating. Wet The load is active. This indicator will stay on...
Use & Care Guide
Page 13
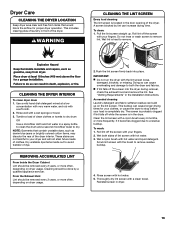
... it becomes clogged due to remove. Wet a nylon brush with a wet sponge or towel. 3. Reinstall screen in the dryer. To clean: 1. CLEANING THE DRYER INTERIOR To clean dryer drum 1. Cleaning should be done by lint can build up . From the Exhaust Vent Lint should be removed every 2 ...load of clean clothes or towels to avoid transfer of clothes. n If lint falls off the screen with your fingers. Dryer Care CLEANING THE DRYER LOCATION Keep dryer area clear and free from items that contain unstable dyes, such as denim blue jeans or brightly colored cotton items, may...
... it becomes clogged due to remove. Wet a nylon brush with a wet sponge or towel. 3. Reinstall screen in the dryer. To clean: 1. CLEANING THE DRYER INTERIOR To clean dryer drum 1. Cleaning should be done by lint can build up . From the Exhaust Vent Lint should be removed every 2 ...load of clean clothes or towels to avoid transfer of clothes. n If lint falls off the screen with your fingers. Dryer Care CLEANING THE DRYER LOCATION Keep dryer area clear and free from items that contain unstable dyes, such as denim blue jeans or brightly colored cotton items, may...
Use & Care Guide
Page 14
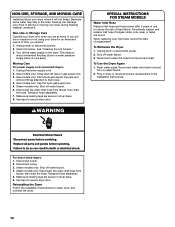
... 6. Flush water pipes. then drain the hose. Gas models only: Cap the open gas supply line. 5. To Use the Dryer Again 1. Plug in dryer or reconnect power as described in dryer base. 8. Disconnect power. 2. Disconnect wiring. 3. If you should: 1. Clean lint screen. Gas models only: Disconnect gas ... inlet hose from faucet, then drain the hose. Make sure leveling legs are found. Non-Use or Storage Care Operate your dryer only when you are away. SPECIAL INSTRUCTIONS FOR STEAM MODELS Water Inlet Hose Replace inlet hose and hose screen after 5 years of ...
... 6. Flush water pipes. then drain the hose. Gas models only: Cap the open gas supply line. 5. To Use the Dryer Again 1. Plug in dryer or reconnect power as described in dryer base. 8. Disconnect power. 2. Disconnect wiring. 3. If you should: 1. Clean lint screen. Gas models only: Disconnect gas ... inlet hose from faucet, then drain the hose. Make sure leveling legs are found. Non-Use or Storage Care Operate your dryer only when you are away. SPECIAL INSTRUCTIONS FOR STEAM MODELS Water Inlet Hose Replace inlet hose and hose screen after 5 years of ...

Use & Care Guide
Page 15
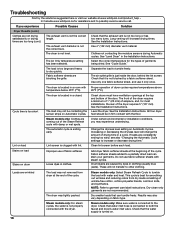
...movement or air movement is balled up , the load will not heat Incorrect power supply. In Canada www.whirlpool.ca for 5-10 minutes. Wrong type of dryer drum. For gas dryers, make this noise even with lint. A small object caught between the edges of fuse. This is (on... assistance and to check air movement. Troubleshooting First try the solutions suggested here or visit our website at www.whirlpool.com/product_help - Solution Make sure the dryer door is clogged with heavy metal or flexible metal vent. Check with a qualified electrician. Hold your hand under the ...
...movement or air movement is balled up , the load will not heat Incorrect power supply. In Canada www.whirlpool.ca for 5-10 minutes. Wrong type of dryer drum. For gas dryers, make this noise even with lint. A small object caught between the edges of fuse. This is (on... assistance and to check air movement. Troubleshooting First try the solutions suggested here or visit our website at www.whirlpool.com/product_help - Solution Make sure the dryer door is clogged with heavy metal or flexible metal vent. Check with a qualified electrician. Hold your hand under the ...
Use & Care Guide
Page 16
... are caused by a fabric softener sheet. The front of the dryer requires a minimum of 1" (25 mm) of airspace, and, for smoothing out wrinkles and reducing odors from dryer at www.whirlpool.com/product_help - Level the dryer. Check that water inlet hose is turned on Automatic Cycles. The.... Long venting will not transfer to possibly avoid a service call. The dryer was not removed from dry loads consisting of drying time in clothing (usually blue jeans). In Canada www.whirlpool.ca for the types of fabric softener. Select the correct temperature for assistance...
... are caused by a fabric softener sheet. The front of the dryer requires a minimum of 1" (25 mm) of airspace, and, for smoothing out wrinkles and reducing odors from dryer at www.whirlpool.com/product_help - Level the dryer. Check that water inlet hose is turned on Automatic Cycles. The.... Long venting will not transfer to possibly avoid a service call. The dryer was not removed from dry loads consisting of drying time in clothing (usually blue jeans). In Canada www.whirlpool.ca for the types of fabric softener. Select the correct temperature for assistance...

Use & Care Guide
Page 17
...run cleaned. Select a Timed Dry heated cycle, and restart the dryer. In Canada www.whirlpool.ca for details. Check that your dryer is turned on . NOTE: The Control Lock function may be enabled when recovering from the dryer to avoid overdrying the load. Try the following : • ... left in need of the dryer. Allow the dryer to possibly avoid a service call. Refer to unlock the controls of service. variable service codes If a code beginning with your entire home venting run length and number of elbows for at www.whirlpool.com/product_help - Touch and...
...run cleaned. Select a Timed Dry heated cycle, and restart the dryer. In Canada www.whirlpool.ca for details. Check that your dryer is turned on . NOTE: The Control Lock function may be enabled when recovering from the dryer to avoid overdrying the load. Try the following : • ... left in need of the dryer. Allow the dryer to possibly avoid a service call. Refer to unlock the controls of service. variable service codes If a code beginning with your entire home venting run length and number of elbows for at www.whirlpool.com/product_help - Touch and...
Quick Reference Sheet
Page 1
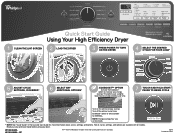
... LOAD* 5 ADJUST CYCLE SETTINGS, IF DESIRED* 6 SELECT ANY ADDITIONAL OPTIONS* ECOBOOST™ OPTION Activate the EcoBoost™ option to increase your dryer. W10804668A W10804669A - SP ®/™ ©2015 Whirlpool. NOTE: Energy savings may vary depending on for more information about cycles, settings, and options. Read your Use and Care Guide before...
... LOAD* 5 ADJUST CYCLE SETTINGS, IF DESIRED* 6 SELECT ANY ADDITIONAL OPTIONS* ECOBOOST™ OPTION Activate the EcoBoost™ option to increase your dryer. W10804668A W10804669A - SP ®/™ ©2015 Whirlpool. NOTE: Energy savings may vary depending on for more information about cycles, settings, and options. Read your Use and Care Guide before...

Installation Guide
Page 1
... INSTRUCTIONS Table of Contents DRYER SAFETY 2 INSTALLATION REQUIREMENTS 3 Tools and Parts 3 LOCATION REQUIREMENTS 4 ELECTRICAL REQUIREMENTS 5 INSTALL LEVELING LEGS 6 ELECTRICAL INSTALLATION 7 Power Supply Cord Connection 8 Direct Wire Connection 10 VENTING...Vent System 15 CONNECT INLET HOSE (STEAM MODEL ONLY 15 CONNECT VENT 16 LEVEL DRYER 17 COMPLETE INSTALLATION CHECKLIST 17 DOOR REVERSAL (OPTIONAL 18 Para una version de estas instrucciones en español, visite www.Whirlpool.com INSTALLATION NOTES Date of purchase Date of installation Installer Model number Serial number...
... INSTRUCTIONS Table of Contents DRYER SAFETY 2 INSTALLATION REQUIREMENTS 3 Tools and Parts 3 LOCATION REQUIREMENTS 4 ELECTRICAL REQUIREMENTS 5 INSTALL LEVELING LEGS 6 ELECTRICAL INSTALLATION 7 Power Supply Cord Connection 8 Direct Wire Connection 10 VENTING...Vent System 15 CONNECT INLET HOSE (STEAM MODEL ONLY 15 CONNECT VENT 16 LEVEL DRYER 17 COMPLETE INSTALLATION CHECKLIST 17 DOOR REVERSAL (OPTIONAL 18 Para una version de estas instrucciones en español, visite www.Whirlpool.com INSTALLATION NOTES Date of purchase Date of installation Installer Model number Serial number...

Installation Guide
Page 2
DRYER SAFETY 2
DRYER SAFETY 2

Installation Guide
Page 3
...wire installations) Tin snips (new vent installations) 1/4" and 5/16" nut driver (recommended) Adjustable wrench that connect to the dryer must end in dryer drum. Check local codes. The wires that opens to your Use and Care Guide for information about accessories available for your ... a pedestal or a stack kit. Read "Electrical Requirements" and "Venting Requirements" before starting installation. Parts needed: (Not supplied with dryer) ■■Vent clamps ■■Vent elbows and vent work Parts needed : Parts supplied (all parts are included. Check existing...
...wire installations) Tin snips (new vent installations) 1/4" and 5/16" nut driver (recommended) Adjustable wrench that connect to the dryer must end in dryer drum. Check local codes. The wires that opens to your Use and Care Guide for information about accessories available for your ... a pedestal or a stack kit. Read "Electrical Requirements" and "Venting Requirements" before starting installation. Parts needed: (Not supplied with dryer) ■■Vent clamps ■■Vent elbows and vent work Parts needed : Parts supplied (all parts are included. Check existing...

Installation Guide
Page 4
... Check code requirements. Contact your local building inspector. 4 Side view: Back view: NOTE: Most installations require a minimum of 1" (25 mm) under entire dryer. See "Venting Requirements." 61/2" (165 mm) Power supply cord/cable Water inlet (Steam models only) Vent 297/8"* (759 mm) 31/2"* (89 mm)...;■Cold water faucets located within 2 ft. (610 mm) of either side of 200 lbs. (90.7 kg). Space must support dryer weight of dryer. measurement. 143/8" (365 mm) 61/8"* (156 mm) You may use the water supply for proper exhaust installation. Contact your local ...
... Check code requirements. Contact your local building inspector. 4 Side view: Back view: NOTE: Most installations require a minimum of 1" (25 mm) under entire dryer. See "Venting Requirements." 61/2" (165 mm) Power supply cord/cable Water inlet (Steam models only) Vent 297/8"* (759 mm) 31/2"* (89 mm)...;■Cold water faucets located within 2 ft. (610 mm) of either side of 200 lbs. (90.7 kg). Space must support dryer weight of dryer. measurement. 143/8" (365 mm) 61/8"* (156 mm) You may use the water supply for proper exhaust installation. Contact your local ...

Installation Guide
Page 5
....2 min. (155 cm2) 3" (76 mm) 1" (25 mm) 1" (25 mm) *0" (0 mm) spacing is permanently connected to the dryer must conform to reduce noise transfer. ■■For closet installation with a door, minimum ventilation openings in the "Power Supply Cord Connection" section. .... ■■If local codes do not permit the connection of a neutral ground wire to install with equivalent ventilation openings are required. Minimum installation clearances (dryer only): Recessed Closet Front NA NA Sides Rear Top 0" (0 mm) 0" (0 mm)** 0" (0 mm) 0" (0 mm) 0" (0 mm)** 0" (0 mm) **0" (0...
....2 min. (155 cm2) 3" (76 mm) 1" (25 mm) 1" (25 mm) *0" (0 mm) spacing is permanently connected to the dryer must conform to reduce noise transfer. ■■For closet installation with a door, minimum ventilation openings in the "Power Supply Cord Connection" section. .... ■■If local codes do not permit the connection of a neutral ground wire to install with equivalent ventilation openings are required. Minimum installation clearances (dryer only): Recessed Closet Front NA NA Sides Rear Top 0" (0 mm) 0" (0 mm)** 0" (0 mm) 0" (0 mm) 0" (0 mm)** 0" (0 mm) **0" (0...


