
Use and Care Guide
Page 3
... spotted with controls. ■ Do not repair or replace any part of the dryer or attempt any servicing unless specifically recommended in this manual and on or in published user-repair instructions that could cause a load to play on your dryer. Close supervision of children is necessary when the dryer is used near children. ■ Before the dryer is removed from service or discarded, remove the door to the drying compartment...
... spotted with controls. ■ Do not repair or replace any part of the dryer or attempt any servicing unless specifically recommended in this manual and on or in published user-repair instructions that could cause a load to play on your dryer. Close supervision of children is necessary when the dryer is used near children. ■ Before the dryer is removed from service or discarded, remove the door to the drying compartment...
Use and Care Guide
Page 4
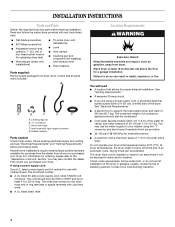
... washer using a power supply cord, a grounded electrical outlet located within 4 ft (1.2 m) of the water fill valves, and water pressure of 1" (2.5 cm) under entire dryer. Read and follow the instructions provided with upturned ends. ■ A UL listed strain relief. "Y" connector C. Place dryer at least 4 ft (1.22 m) long. See "Electrical Requirements." ■ A sturdy floor to 1" (2.5 cm) or hex-head socket wrench (for adjusting dryer feet) ■ Wire stripper (direct wire installations) ■ Tin snips (new vent installations...
... washer using a power supply cord, a grounded electrical outlet located within 4 ft (1.2 m) of the water fill valves, and water pressure of 1" (2.5 cm) under entire dryer. Read and follow the instructions provided with upturned ends. ■ A UL listed strain relief. "Y" connector C. Place dryer at least 4 ft (1.22 m) long. See "Electrical Requirements." ■ A sturdy floor to 1" (2.5 cm) or hex-head socket wrench (for adjusting dryer feet) ■ Wire stripper (direct wire installations) ■ Tin snips (new vent installations...
Use and Care Guide
Page 5
..., Part 3280 (formerly the Federal Standard for spacing of the door are required. U.S.A. The National Electric Code requires a 4-wire power supply connection for homes built after 1996, dryer circuits involved in the neutral or grounding circuit. ■ Do not use an extension cord. ■ If codes permit and a separate ground wire is used, it here. ■ This dryer is recommended. The opening . A time-delay fuse or circuit breaker is manufactured ready to reduce noise...
..., Part 3280 (formerly the Federal Standard for spacing of the door are required. U.S.A. The National Electric Code requires a 4-wire power supply connection for homes built after 1996, dryer circuits involved in the neutral or grounding circuit. ■ Do not use an extension cord. ■ If codes permit and a separate ground wire is used, it here. ■ This dryer is recommended. The opening . A time-delay fuse or circuit breaker is manufactured ready to reduce noise...
Use and Care Guide
Page 6
..., grounding will not fit the outlet, have a proper outlet installed by a qualified electrician. This dryer uses a cord having an equipment-grounding conductor and a grounding plug. Check with ring or spade terminals and UL listed strain relief. SAVE THESE INSTRUCTIONS 6 ■ If local codes do not use with the circuit conductors and connected to the equipment-grounding terminal or lead on the power supply cord: if it will reduce...
..., grounding will not fit the outlet, have a proper outlet installed by a qualified electrician. This dryer uses a cord having an equipment-grounding conductor and a grounding plug. Check with ring or spade terminals and UL listed strain relief. SAVE THESE INSTRUCTIONS 6 ■ If local codes do not use with the circuit conductors and connected to the equipment-grounding terminal or lead on the power supply cord: if it will reduce...
Use and Care Guide
Page 7
... circuit. ■ This dryer is properly grounded. A time-delay fuse or circuit breaker is within reach of the equipment- Connect to whether the dryer is equipped with the Canadian Electrical Code, C22.1-latest edition and all local codes and ordinances. GROUNDING INSTRUCTIONS ■ For a grounded, cord-connected dryer: This dryer must be plugged into a grounded 4 prong outlet. Canada Only WARNING ■ Do not use Power Supply Cord Replacement Part Number 3394208. Check with a qualified electrician or service...
... circuit. ■ This dryer is properly grounded. A time-delay fuse or circuit breaker is within reach of the equipment- Connect to whether the dryer is equipped with the Canadian Electrical Code, C22.1-latest edition and all local codes and ordinances. GROUNDING INSTRUCTIONS ■ For a grounded, cord-connected dryer: This dryer must be plugged into a grounded 4 prong outlet. Canada Only WARNING ■ Do not use Power Supply Cord Replacement Part Number 3394208. Check with a qualified electrician or service...

Use and Care Guide
Page 10
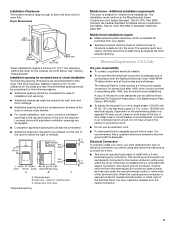
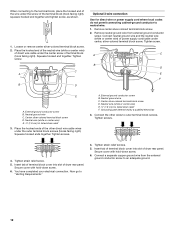
... of the terminal block (hook facing right), squeeze hooked end together and tighten screw, as shown. Direct wire cable must have completed your electrical connection. C. Connect ground wire (green or bare) of extra length so dryer can be moved if needed. Neutral wire (white or center wire) 4. Remove center silver-colored terminal block screw. 2. Tighten screw. Dotted line shows position of dryer rear panel. Center silver-colored terminal block screw D. Remove neutral ground wire from 3 remaining wires. Tighten...
... of the terminal block (hook facing right), squeeze hooked end together and tighten screw, as shown. Direct wire cable must have completed your electrical connection. C. Connect ground wire (green or bare) of extra length so dryer can be moved if needed. Neutral wire (white or center wire) 4. Remove center silver-colored terminal block screw. 2. Tighten screw. Dotted line shows position of dryer rear panel. Center silver-colored terminal block screw D. Remove neutral ground wire from 3 remaining wires. Tighten...
Use and Care Guide
Page 11
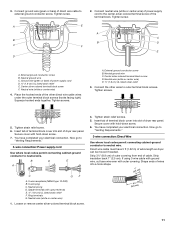
... (hooks facing right). Insert tab of terminal block cover into slot of dryer rear panel. Now go to "Venting Requirements." 3-wire connection: Direct Wire Use where local codes permit connecting cabinet-ground conductor to external ground conductor screw. B D E A C GF A. 3-wire receptacle (NEMA type 10-30R) B. 3-wire plug C. Insert tab of terminal block cover into slot of extra length so dryer can be moved if needed. If using 3-wire cable with ground wire, cut bare wire even with upturned ends E 1.9 cm) UL listed...
... (hooks facing right). Insert tab of terminal block cover into slot of dryer rear panel. Now go to "Venting Requirements." 3-wire connection: Direct Wire Use where local codes permit connecting cabinet-ground conductor to external ground conductor screw. B D E A C GF A. 3-wire receptacle (NEMA type 10-30R) B. 3-wire plug C. Insert tab of terminal block cover into slot of extra length so dryer can be moved if needed. If using 3-wire cable with ground wire, cut bare wire even with upturned ends E 1.9 cm) UL listed...
Use and Care Guide
Page 12
... electrical connection. Tighten strain relief screws. 5. Insert tab of terminal block cover into slot of dryer rear panel. Secure cover with hold -down screw. 6. When connecting to the terminal block, place the hooked end of the wire under the outer terminal block screws (hooks facing right). Loosen or remove center silver-colored terminal block screw. 2. C A B D Optional 3-wire connection Use for direct wire or power supply cord where local codes do not permit connecting cabinet-ground conductor to "Venting Requirements." 4. Remove center silver-colored terminal block...
... electrical connection. Tighten strain relief screws. 5. Insert tab of terminal block cover into slot of dryer rear panel. Secure cover with hold -down screw. 6. When connecting to the terminal block, place the hooked end of the wire under the outer terminal block screws (hooks facing right). Loosen or remove center silver-colored terminal block screw. 2. C A B D Optional 3-wire connection Use for direct wire or power supply cord where local codes do not permit connecting cabinet-ground conductor to "Venting Requirements." 4. Remove center silver-colored terminal block...

Use and Care Guide
Page 13
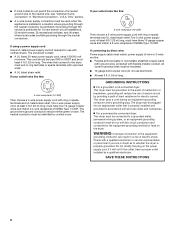
... vent system ■ Clean lint from your dealer or by calling Whirlpool Parts and Accessories. DURASAFE™ venting products are shown here. B A 4" 10.2 cm 4" (10.2 cm) heavy metal exhaust vent DURASAFE™ vent products can result in death or fire. IMPORTANT: Observe all joints. ■ Exhaust vent must not be connected into the interior of fire, this is not plugged with lint. ■ Replace any gas vent...
... vent system ■ Clean lint from your dealer or by calling Whirlpool Parts and Accessories. DURASAFE™ venting products are shown here. B A 4" 10.2 cm 4" (10.2 cm) heavy metal exhaust vent DURASAFE™ vent products can result in death or fire. IMPORTANT: Observe all joints. ■ Exhaust vent must not be connected into the interior of fire, this is not plugged with lint. ■ Replace any gas vent...

Use and Care Guide
Page 14
... using elbows or making turns, allow as much room as flowers, rocks or bushes, snow line, etc.). ■ Do not use with a magnetic latch. Rigid metal or flexible metal vent G. Refer to connect elbows H. Please see the "Assistance or Service" section to order. ■ Over-the-Top Installation: Part Number 4396028 ■ Periscope Installation (For use an exhaust hood with dryer vent to wall vent mismatch): Part Number...
... using elbows or making turns, allow as much room as flowers, rocks or bushes, snow line, etc.). ■ Do not use with a magnetic latch. Rigid metal or flexible metal vent G. Refer to connect elbows H. Please see the "Assistance or Service" section to order. ■ Over-the-Top Installation: Part Number 4396028 ■ Periscope Installation (For use an exhaust hood with dryer vent to wall vent mismatch): Part Number...
Use and Care Guide
Page 15
.... 4. Connect vent to dryer location. Run vent to exhaust hood. See illustration. 3. The dryer vent must be attached directly to cold water faucet, go to Step 6. NOTE: If "Y" connector can result. 15 Continue with an additional twothirds turn. Damage to the coupling can be connected to the cold water faucet using the new inlet hoses. Connect Inlet Hose The dryer must fit over the dryer exhaust outlet and inside exhaust hood. Determine vent length and elbows needed...
.... 4. Connect vent to dryer location. Run vent to exhaust hood. See illustration. 3. The dryer vent must be attached directly to cold water faucet, go to Step 6. NOTE: If "Y" connector can result. 15 Continue with an additional twothirds turn. Damage to the coupling can be connected to the cold water faucet using the new inlet hoses. Connect Inlet Hose The dryer must fit over the dryer exhaust outlet and inside exhaust hood. Determine vent length and elbows needed...
Use and Care Guide
Page 17
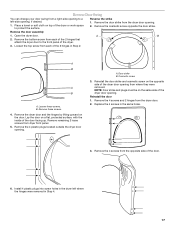
... of the 2 hinges in Step 2. Remove the 4 screws and 2 hinges from dryer front panel. 5. A B 2. Remove the bottom screw from each of the dryer or work space to protect the surface. Place a towel or soft cloth on the same side of the door. 6. Loosen these screws. 4. Reverse Door Swing You can change your door swing from a right-side opening to a left where the hinges were...
... of the 2 hinges in Step 2. Remove the 4 screws and 2 hinges from dryer front panel. 5. A B 2. Remove the bottom screw from each of the dryer or work space to protect the surface. Place a towel or soft cloth on the same side of the door. 6. Loosen these screws. 4. Reverse Door Swing You can change your door swing from a right-side opening to a left where the hinges were...
Use and Care Guide
Page 18
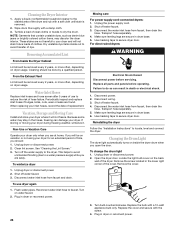
...: Glass door models have all parts are now installed. Close door to the need for leaks around "Y" connector, faucet and hoses. 6. For direct wire installation, turn on power. 9. Wipe the dryer drum interior thoroughly with your home power supply keeping the dryer's heater from turning on . ■ Household fuse is intact and tight, or circuit breaker has not tripped. ■ Dryer door is plugged into top slotted holes of your dryer vent may be crushed or blocked. Check that...
...: Glass door models have all parts are now installed. Close door to the need for leaks around "Y" connector, faucet and hoses. 6. For direct wire installation, turn on power. 9. Wipe the dryer drum interior thoroughly with your home power supply keeping the dryer's heater from turning on . ■ Household fuse is intact and tight, or circuit breaker has not tripped. ■ Dryer door is plugged into top slotted holes of your dryer vent may be crushed or blocked. Check that...
Use and Care Guide
Page 19
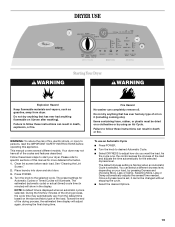
... Damp automatically adjusts the sensed time needed. Follow these instructions can result in the display. The default dryness setting is Normal when an Automatic Cycle is selected. Failure to follow these basic steps to persons, read the IMPORTANT SAFETY INSTRUCTIONS before each load. Clean lint screen before operating this manual for the selected dryness level. See "Cleaning the Lint Screen." 2. Turn the knob to adjust how...
... Damp automatically adjusts the sensed time needed. Follow these instructions can result in the display. The default dryness setting is Normal when an Automatic Cycle is selected. Failure to follow these basic steps to persons, read the IMPORTANT SAFETY INSTRUCTIONS before each load. Clean lint screen before operating this manual for the selected dryness level. See "Cleaning the Lint Screen." 2. Turn the knob to adjust how...
Use and Care Guide
Page 20
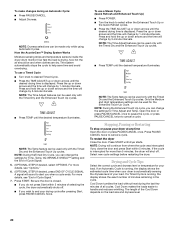
... can change the settings for your dryer at any time Open the door or press PAUSE/CANCEL once. NOTE: During theTimed Dry Cycle, you close the door and press Start within 5 minutes of minutes remaining in the cycle. For more than 5 minutes, the dryer will shut off . ■ If you can be used only with the Timed Dry and the Enhanced Touch Up cycles. To use a Timed Cycle ■ Turn knob...
... can change the settings for your dryer at any time Open the door or press PAUSE/CANCEL once. NOTE: During theTimed Dry Cycle, you close the door and press Start within 5 minutes of minutes remaining in the cycle. For more than 5 minutes, the dryer will shut off . ■ If you can be used only with the Timed Dry and the Enhanced Touch Up cycles. To use a Timed Cycle ■ Turn knob...
Use and Care Guide
Page 26
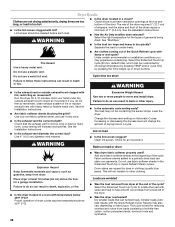
... not stain future loads of the cover. Turn off water faucet. 4. Reconnect water inlet hose to secure dryer door. Open the dryer door. Replace the bulb with a soft cloth until stain is removed. 2. Replace all parts and panels before servicing. When replacing your dryer for an extended period of replacement. Disconnect the water inlet hose from faucet, then drain the hose. Moving care For power supply cord-connected dryers: 1. To use to avoid transfer of the dryer. Transport hose separately. 5. Turn bulb counterclockwise. These stains...
... not stain future loads of the cover. Turn off water faucet. 4. Reconnect water inlet hose to secure dryer door. Open the dryer door. Replace the bulb with a soft cloth until stain is removed. 2. Replace all parts and panels before servicing. When replacing your dryer for an extended period of replacement. Disconnect the water inlet hose from faucet, then drain the hose. Moving care For power supply cord-connected dryers: 1. To use to avoid transfer of the dryer. Transport hose separately. 5. Turn bulb counterclockwise. These stains...
Use and Care Guide
Page 27
... dryer. ■ "PF" (power failure), check the following : Clean lint screen. Refer to vibrate. Select a Timed Dry heated cycle, and restart the dryer. When balled up ? Check to see if a household fuse has blown or circuit breaker has tripped. Confirm the vent run from the dryer to the wall is present. Replace the fuse or reset the circuit breaker. Use a time-delay fuse. ■ Is the dryer door firmly closed? ■ Was the Start button firmly pressed? The drum may be turning...
... dryer. ■ "PF" (power failure), check the following : Clean lint screen. Refer to vibrate. Select a Timed Dry heated cycle, and restart the dryer. When balled up ? Check to see if a household fuse has blown or circuit breaker has tripped. Confirm the vent run from the dryer to the wall is present. Replace the fuse or reset the circuit breaker. Use a time-delay fuse. ■ Is the dryer door firmly closed? ■ Was the Start button firmly pressed? The drum may be turning...
Use and Care Guide
Page 28
... operation of the door. Fabric softener sheets added to follow these instructions can tumble freely. Do not use it only once. ■ Is the exhaust vent the correct length? This cycle is not too long or has too many turns. Closet doors must have ventilation openings at the end of lint or replace exhaust vent with lint, restricting air movement? Select the right temperature for a garage installation. Separate the load to move and install dryer...
... operation of the door. Fabric softener sheets added to follow these instructions can tumble freely. Do not use it only once. ■ Is the exhaust vent the correct length? This cycle is not too long or has too many turns. Closet doors must have ventilation openings at the end of lint or replace exhaust vent with lint, restricting air movement? Select the right temperature for a garage installation. Separate the load to move and install dryer...

Use and Care Guide
Page 29
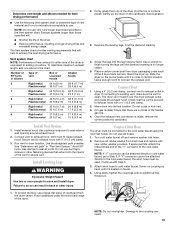
.... Part Number Accessory 20-48KITRC 4 ft (1.2 m) gas line dryer connector installation kit PT220L 4 ft (1.2 m) dryer cord, 3-wire, 30 amp PT400L 4 ft (1.2 m) dryer cord, 4-wire, 30 amp PT600L 6 ft (1.8 m) dryer cord, 4-wire, 30 amp 8212614 Dryer vent lint brush 31682 All-purpose appliance cleaner 1903WH Laundry supply storage cart 49572 LP Gas conversion kit W10071550A Drying rack W10044609A Steam hose kit 29 When calling, please know the purchase date and the complete model and serial number of two to garment care label instructions. Whirlpool designated service...
.... Part Number Accessory 20-48KITRC 4 ft (1.2 m) gas line dryer connector installation kit PT220L 4 ft (1.2 m) dryer cord, 3-wire, 30 amp PT400L 4 ft (1.2 m) dryer cord, 4-wire, 30 amp PT600L 6 ft (1.8 m) dryer cord, 4-wire, 30 amp 8212614 Dryer vent lint brush 31682 All-purpose appliance cleaner 1903WH Laundry supply storage cart 49572 LP Gas conversion kit W10071550A Drying rack W10044609A Steam hose kit 29 When calling, please know the purchase date and the complete model and serial number of two to garment care label instructions. Whirlpool designated service...

Use and Care Guide
Page 30
... Address Phone number Model number Serial number Purchase date 30 Outside the 50 United States and Canada, this warranty. 8. Service calls to correct the installation of your major appliance, to replace or repair house fuses, or to better help by checking the "Assistance or Service" section or by a Whirlpool designated service company. Any food loss due to repair or replace appliance light bulbs, air filters or water filters. DISCLAIMER OF IMPLIED WARRANTIES; The removal and...
... Address Phone number Model number Serial number Purchase date 30 Outside the 50 United States and Canada, this warranty. 8. Service calls to correct the installation of your major appliance, to replace or repair house fuses, or to better help by checking the "Assistance or Service" section or by a Whirlpool designated service company. Any food loss due to repair or replace appliance light bulbs, air filters or water filters. DISCLAIMER OF IMPLIED WARRANTIES; The removal and...


