Use and Care Manual
Page 3
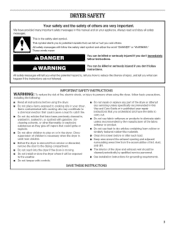
...Keep area around the exhaust opening and adjacent surrounding areas free from the accumulation of lint, dust, and dirt. [] The interior of the dryer and exhaust vent should be killed or seriously injured if you don't follow instructions. These words mean: You can be killed or seriously injured ...vapors that can happen if the instructions are very important. iMPORTANT SAFETY iNSTRUCTiONS WARNING: To reduce the risk of fire, electric shock, or injury to persons when using the dryer. [] Do not place items exposed to potential hazards that could cause a load to catch fire. [] Do not dry...
...Keep area around the exhaust opening and adjacent surrounding areas free from the accumulation of lint, dust, and dirt. [] The interior of the dryer and exhaust vent should be killed or seriously injured if you don't follow instructions. These words mean: You can be killed or seriously injured ...vapors that can happen if the instructions are very important. iMPORTANT SAFETY iNSTRUCTiONS WARNING: To reduce the risk of fire, electric shock, or injury to persons when using the dryer. [] Do not place items exposed to potential hazards that could cause a load to catch fire. [] Do not dry...
Use and Care Manual
Page 4
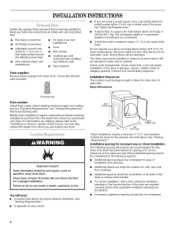
... needed: Check local codes. Check existing electrical supply and venting and see "Electrical Requirements" and "Venting Requirements" before starting installation. Explosion Hazard Keep flammable materials and vapors, such as gasoline, away from dryer drum. See "Venting Requirements." • A separate 30-amp circuit. 431/2' (110.5 *29¼" (74.3 cm), 29" (73.7 cm) !2¼" (56.5 cm) *Most...
... needed: Check local codes. Check existing electrical supply and venting and see "Electrical Requirements" and "Venting Requirements" before starting installation. Explosion Hazard Keep flammable materials and vapors, such as gasoline, away from dryer drum. See "Venting Requirements." • A separate 30-amp circuit. 431/2' (110.5 *29¼" (74.3 cm), 29" (73.7 cm) !2¼" (56.5 cm) *Most...
Use and Care Manual
Page 5
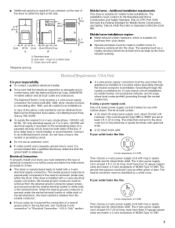
...If local codes do not permit the connection of a neutral ground wire to the neutral conductor (white wire) within the dryer. Electrical Connection To properly install your outlet looks like this : 3-wire receptacle (10-30R) Then choose a 3-wire power supply ... acinigsrequireidfyouexhausotutthereaor f thedryetroeithetrherighot rleftside. _f 3 'j* _.6 cm) Mobile home - Additional installation requirements This dryer is installed in ring terminals or spade terminals with a 4-wire electrical supply connection, the neutral ground conductor must have four 10-gauge copper wires and match a 4-...
...If local codes do not permit the connection of a neutral ground wire to the neutral conductor (white wire) within the dryer. Electrical Connection To properly install your outlet looks like this : 3-wire receptacle (10-30R) Then choose a 3-wire power supply ... acinigsrequireidfyouexhausotutthereaor f thedryetroeithetrherighot rleftside. _f 3 'j* _.6 cm) Mobile home - Additional installation requirements This dryer is installed in ring terminals or spade terminals with a 4-wire electrical supply connection, the neutral ground conductor must have four 10-gauge copper wires and match a 4-...
Use and Care Manual
Page 6
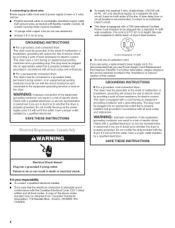
...- grounding conductor can result in the "Assistance or Service" section of this manual. Check with the dryer: if it will reduce the risk of electric shock by a qualified electrician. Connect to the equipment-grounding terminal or lead on both sides of the... ground wire), protected with flexible metallic conduit. GROUNDING INSTRUCTIONS [] For a grounded, cord-connected dryer: This dryer must be grounded. grounding conductor can result in a risk of electric shock. This dryer uses a cord having an equipmentgrounding conductor and a grounding plug. SAVE THESE INSTRUCTIONS To supply...
...- grounding conductor can result in the "Assistance or Service" section of this manual. Check with the dryer: if it will reduce the risk of electric shock by a qualified electrician. Connect to the equipment-grounding terminal or lead on both sides of the... ground wire), protected with flexible metallic conduit. GROUNDING INSTRUCTIONS [] For a grounded, cord-connected dryer: This dryer must be grounded. grounding conductor can result in a risk of electric shock. This dryer uses a cord having an equipmentgrounding conductor and a grounding plug. SAVE THESE INSTRUCTIONS To supply...
Use and Care Manual
Page 8
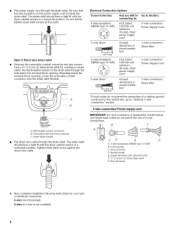
... strain relief screw against the direct wire cable. Neutral prong E. Put the threaded section of electrical connection: 4-wire (recommended) 3-wire (if 4-wire is not available Electrical Connection Options If your type of the strain relief through the strain relief. Style 2: Direct wire... or (12.7 cm) cbiorcxu* it breaker 3-wire receptacle (NEMA type 10-30R) A UL listed, 120/240-volt 3-wire direct 30-amp, dryer mpoinwimerumsu, pply cord* A fused disconnect or cbiorcxu* it breaker Go to "Optional 3-wire connection" section. 4-wire connection: Power supply cord IMPORTANT: ...
... strain relief screw against the direct wire cable. Neutral prong E. Put the threaded section of electrical connection: 4-wire (recommended) 3-wire (if 4-wire is not available Electrical Connection Options If your type of the strain relief through the strain relief. Style 2: Direct wire... or (12.7 cm) cbiorcxu* it breaker 3-wire receptacle (NEMA type 10-30R) A UL listed, 120/240-volt 3-wire direct 30-amp, dryer mpoinwimerumsu, pply cord* A fused disconnect or cbiorcxu* it breaker Go to "Optional 3-wire connection" section. 4-wire connection: Power supply cord IMPORTANT: ...

Use and Care Manual
Page 9
... wire at 5" (12.7 cm). Direct wire cable must have completed your electrical connection. Center silver-colored terminal block screw D. Tighten screw. Remove neutral ground wire from end of extra length so dryer can be moved if needed. Strip 5" (12.7 cm) of dryer rear panel. Neutral ground wire B. External ground conductor screw - Center silver...
... wire at 5" (12.7 cm). Direct wire cable must have completed your electrical connection. Center silver-colored terminal block screw D. Tighten screw. Remove neutral ground wire from end of extra length so dryer can be moved if needed. Strip 5" (12.7 cm) of dryer rear panel. Neutral ground wire B. External ground conductor screw - Center silver...
Use and Care Manual
Page 10
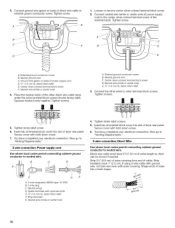
... block screw D. Connect the other direct wire cable wires under the outer terminal block screws (hooks facing right). You have completed your electrical connection. Tighten screws. !! !! 5. Secure cover with hold -down screw. 6. Neutral prong D. Neutral wire (white or center wire... A. External ground conductor screw B. Neutral ground wire C. You have 5 ft (1.52 m) of the terminal block. Ring terminals G. Insert tab of dryer rear panel. Neutral ground wire C. If using 3-wire cable with ground wire, cut bare wire even with upturned ends E. _" (1.9 cm) UL ...
... block screw D. Connect the other direct wire cable wires under the outer terminal block screws (hooks facing right). You have completed your electrical connection. Tighten screws. !! !! 5. Secure cover with hold -down screw. 6. Neutral prong D. Neutral wire (white or center wire... A. External ground conductor screw B. Neutral ground wire C. You have 5 ft (1.52 m) of the terminal block. Ring terminals G. Insert tab of dryer rear panel. Neutral ground wire C. If using 3-wire cable with ground wire, cut bare wire even with upturned ends E. _" (1.9 cm) UL ...

Use and Care Manual
Page 11
...screw D. Tighten strain relief screw. 5. Insert tab of terminal block cover into slot of dryer rear panel. External ground conductor screw B. Insert tab of terminal block cover into slot of dryer rear panel. Optional 3-wire connection Use for direct wire or power supply cord where local ...-colored terminal block screw. 2. Now go to an adequate ground. 11 Secure cover with hold -down screw. 6= You have completed your electrical connection. Place the hooked end of the neutral wire (white or center wire) of direct wire cable under the outer terminal block screws (hooks...
...screw D. Tighten strain relief screw. 5. Insert tab of terminal block cover into slot of dryer rear panel. External ground conductor screw B. Insert tab of terminal block cover into slot of dryer rear panel. Optional 3-wire connection Use for direct wire or power supply cord where local ...-colored terminal block screw. 2. Now go to an adequate ground. 11 Secure cover with hold -down screw. 6= You have completed your electrical connection. Place the hooked end of the neutral wire (white or center wire) of direct wire cable under the outer terminal block screws (hooks...
Use and Care Manual
Page 16
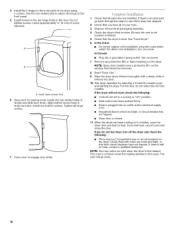
... both circuit breakers have all packaging materials. 4. Be sure the vent is an extra part, go away. 16 Test dryer operation by placing screw heads into an outlet and/or electrical supply is closed. 11. Check that all hinge screws. ] 7. Install the 2 hinges to see which step was ...skipped. 2. Read "Dryer Use." 9. For this test, do not feel heat, cancel cycle and close the door. When the dryer has been running or "On"...
... both circuit breakers have all packaging materials. 4. Be sure the vent is an extra part, go away. 16 Test dryer operation by placing screw heads into an outlet and/or electrical supply is closed. 11. Check that all hinge screws. ] 7. Install the 2 hinges to see which step was ...skipped. 2. Read "Dryer Use." 9. For this test, do not feel heat, cancel cycle and close the door. When the dryer has been running or "On"...
Use and Care Manual
Page 17
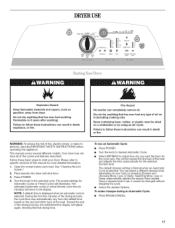
...IMPORTANT SAFETY INSTRUCTIONS before each load. WARNING: To reduce the risk of fire, electric shock, or injury to follow these basic steps to specific sections of this appliance. Place laundry into dryer and shut door. 3. You can completely remove oil. This manual covers several ... Once a dryness level is selected. Do not dry anything flammable on it (including cooking oils). Press POWER. 4. Your dryer may automatically vary from dryer. See "Cleaning the Lint Screen." 2. The preset settings for Automatic Cycles or Timed Cycles will adjust again, showing the final...
...IMPORTANT SAFETY INSTRUCTIONS before each load. WARNING: To reduce the risk of fire, electric shock, or injury to follow these basic steps to specific sections of this appliance. Place laundry into dryer and shut door. 3. You can completely remove oil. This manual covers several ... Once a dryness level is selected. Do not dry anything flammable on it (including cooking oils). Press POWER. 4. Your dryer may automatically vary from dryer. See "Cleaning the Lint Screen." 2. The preset settings for Automatic Cycles or Timed Cycles will adjust again, showing the final...
Use and Care Manual
Page 23
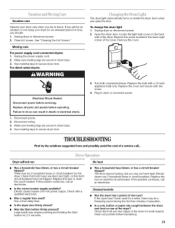
... disconnect power. 2. Disconnect wiring. 3. Plug in the lower right corner of the drum for small objects. If the problem continues, call an electrician. Electric dryers require 240-volt power supply. Check with a qualified electrician. • Was a regular fuse used for a while, there may not have not tripped. The drum may ...
... disconnect power. 2. Disconnect wiring. 3. Plug in the lower right corner of the drum for small objects. If the problem continues, call an electrician. Electric dryers require 240-volt power supply. Check with a qualified electrician. • Was a regular fuse used for a while, there may not have not tripped. The drum may ...
Use and Care Manual
Page 25
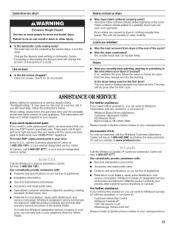
...of the cycle. The new electric heating element may save you only use FSP° factory specified parts. Lint on Automatic Cycles. If so, ventilate the area. To locate FSP® replacement parts in your dryer is located? Call the Whirlpool Customer eXperience Center toll free:... 1-800-253-1301. Failure to move and install dryer. Add dryer fabric softener sheets at the beginning of a service call the Customer eXperience Center...
...of the cycle. The new electric heating element may save you only use FSP° factory specified parts. Lint on Automatic Cycles. If so, ventilate the area. To locate FSP® replacement parts in your dryer is located? Call the Whirlpool Customer eXperience Center toll free:... 1-800-253-1301. Failure to move and install dryer. Add dryer fabric softener sheets at the beginning of a service call the Customer eXperience Center...


