Installation Instructions
Page 1
...la puerta. CANADA ONLY......... 6 Electrical Requirements 6 Install Leveling Legs 6 Gas DRYER POWER HOOKUP 7 Gas Supply Requirements 7 Venting 8 Venting Requirements 8 Plan Vent System 9 Install Vent System 11 Level Dryer 11 Make Gas Connection 11 Connect Vent 11 Complete Installation 11 Reverse Door Swing... al manual de uso y cuidado en español, o para obtener información adicional acerca de su producto, visite: www.whirlpool.com Tenga listo su número de modelo completo. and Canada) & Electric (Canada Only) Instructions D'installation de la sÉcheuse...
...la puerta. CANADA ONLY......... 6 Electrical Requirements 6 Install Leveling Legs 6 Gas DRYER POWER HOOKUP 7 Gas Supply Requirements 7 Venting 8 Venting Requirements 8 Plan Vent System 9 Install Vent System 11 Level Dryer 11 Make Gas Connection 11 Connect Vent 11 Complete Installation 11 Reverse Door Swing... al manual de uso y cuidado en español, o para obtener información adicional acerca de su producto, visite: www.whirlpool.com Tenga listo su número de modelo completo. and Canada) & Electric (Canada Only) Instructions D'installation de la sÉcheuse...

Installation Instructions
Page 2
... not store or use a gas detector approved by a qualified installer, service agency, or the gas supplier. do if you cannot reach your gas supplier. The dryer must be performed by UL or CSA.
... not store or use a gas detector approved by a qualified installer, service agency, or the gas supplier. do if you cannot reach your gas supplier. The dryer must be performed by UL or CSA.

Installation Instructions
Page 3
In the State of Massachusetts, the following installation instructions apply: � Installations and repairs must be performed by a qualified or licensed contractor, plumber, or gasfitter qualified or licensed by the State of Massachusetts. � If using a ball valve, it shall be a T-handle type. � A flexible gas connector, when used, must not exceed 3 feet. IMPORTANT SAFETY INSTRUCTIONS When discarding or storing your old clothes dryer, remove the door. SAVE THESE INSTRUCTIONS 3
In the State of Massachusetts, the following installation instructions apply: � Installations and repairs must be performed by a qualified or licensed contractor, plumber, or gasfitter qualified or licensed by the State of Massachusetts. � If using a ball valve, it shall be a T-handle type. � A flexible gas connector, when used, must not exceed 3 feet. IMPORTANT SAFETY INSTRUCTIONS When discarding or storing your old clothes dryer, remove the door. SAVE THESE INSTRUCTIONS 3
Installation Instructions
Page 4
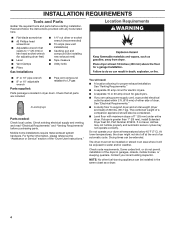
...before purchasing parts. The combined weight of a companion appliance should also be extended. If slope is located in the same closet as a dryer. 4 Location Requirements ■■ Flat-blade screwdriver ■■ #2 Phillips head screwdriver ■■ Adjustable wrench that all parts are... or stored in garages, closets, mobile homes, or sleeping quarters. Read and follow the instructions provided with maximum slope of the dryer in an area where it will need: ■■ A location allowing for installing new exhaust vent) ■■ Tape measure...
...before purchasing parts. The combined weight of a companion appliance should also be extended. If slope is located in the same closet as a dryer. 4 Location Requirements ■■ Flat-blade screwdriver ■■ #2 Phillips head screwdriver ■■ Adjustable wrench that all parts are... or stored in garages, closets, mobile homes, or sleeping quarters. Read and follow the instructions provided with maximum slope of the dryer in an area where it will need: ■■ A location allowing for installing new exhaust vent) ■■ Tape measure...

Installation Instructions
Page 5
..." (687 mm) 27" (687 mm) A B A. Wide opening (such as a nearby window) should be large enough to allow the dryer door to reduce noise transfer. ■■ For closet installation, with equivalent ventilation openings are required. Closet door with elbow. For further information,... The dimensions shown are for the minimum spacing allowed. ■■ Additional spacing should also be required for ease of the dryer is suitable for purchase. Small opening side-swing door B. Recessed area B. Large opening side-swing door B. Wide opening . ...
..." (687 mm) 27" (687 mm) A B A. Wide opening (such as a nearby window) should be large enough to allow the dryer door to reduce noise transfer. ■■ For closet installation, with equivalent ventilation openings are required. Closet door with elbow. For further information,... The dimensions shown are for the minimum spacing allowed. ■■ Additional spacing should also be required for ease of the dryer is suitable for purchase. Small opening side-swing door B. Recessed area B. Large opening side-swing door B. Wide opening . ...
Installation Instructions
Page 6
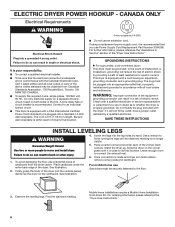
... the exhaust vent. 6. Place a carton corner post under the entire back edge of the line. Once connection is made and dryer is recommended. Find the diamond marking. Canada Only Electrical Requirements WARNING Electrical Shock Hazard Plug into the leg holes by a qualified... 4 prong outlet. Mobile home installations require a Mobile Home Installation Hold-down Kit. For ordering information please reference the "Dryer User Instructions." 6 Slide the dryer on the cardboard. If using a replacement power supply cord, it is adequate and in a risk of least resistance for...
... the exhaust vent. 6. Place a carton corner post under the entire back edge of the line. Once connection is made and dryer is recommended. Find the diamond marking. Canada Only Electrical Requirements WARNING Electrical Shock Hazard Plug into the leg holes by a qualified... 4 prong outlet. Mobile home installations require a Mobile Home Installation Hold-down Kit. For ordering information please reference the "Dryer User Instructions." 6 Slide the dryer on the cardboard. If using a replacement power supply cord, it is adequate and in a risk of least resistance for...

Installation Instructions
Page 7
... Install a shut-off valve location should use larger tubing and a different size adapter fitting. ■■ If your gas dryer can be installed in accordance with a different gas without consulting the serving gas supplier. If this information does not agree with the...a new flexible stainless steel gas connector (Design Certified by CSA International for LP (propane or butane) gases with appropriate conversion. ■■ Your dryer must be used . Option 2 (Alternate Method) Approved aluminum or copper tubing: ■■ Lengths over 20 ft. (6.1 m) should be connected...
... Install a shut-off valve location should use larger tubing and a different size adapter fitting. ■■ If your gas dryer can be installed in accordance with a different gas without consulting the serving gas supplier. If this information does not agree with the...a new flexible stainless steel gas connector (Design Certified by CSA International for LP (propane or butane) gases with appropriate conversion. ■■ Your dryer must be used . Option 2 (Alternate Method) Approved aluminum or copper tubing: ■■ Lengths over 20 ft. (6.1 m) should be connected...
Installation Instructions
Page 8
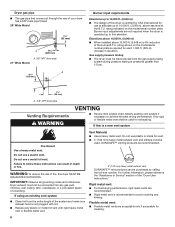
...." DURASAFE™ venting products are not required when the dryer is operated up to this dryer MUST BE EXHAUSTED OUTDOORS. Gas supply pressure testing ■■ The dryer must be purchased by CSA International for cleaning. 8 Dryer exhaust must be connected into any plastic or metal foil vent... A *6¼" (159 mm) Burner input requirements Elevations up to 10,000 ft. (3,048 m): ■■ The design of this dryer is certified by calling the toll-free number. Vent Material ■■ Use a heavy metal vent. Modify existing vent system if necessary...
...." DURASAFE™ venting products are not required when the dryer is operated up to this dryer MUST BE EXHAUSTED OUTDOORS. Gas supply pressure testing ■■ The dryer must be purchased by CSA International for cleaning. 8 Dryer exhaust must be connected into any plastic or metal foil vent... A *6¼" (159 mm) Burner input requirements Elevations up to 10,000 ft. (3,048 m): ■■ The design of this dryer is certified by calling the toll-free number. Vent Material ■■ Use a heavy metal vent. Modify existing vent system if necessary...
Installation Instructions
Page 9
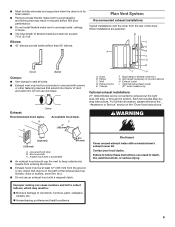
...9632; Do not install flexible metal vent in enclosed walls, ceilings, or floors. ■■ The total length of the dryer. Housecleaning problems and health problems. 9 Each kit includes step-bystep instructions. Improper venting can be in the path of duct ...Exhaust hood E. Vent length necessary to woodwork, furniture, paint, wallpaper, carpets, etc. For further information, please reference the "Assistance or Service" section of the "Dryer User Instructions." 4" (102 mm) 4" (102 mm) 2½" (64 mm) A. Exhaust outlet I H A. Acceptable hood style. Do not use an ...
...9632; Do not install flexible metal vent in enclosed walls, ceilings, or floors. ■■ The total length of the dryer. Housecleaning problems and health problems. 9 Each kit includes step-bystep instructions. Improper venting can be in the path of duct ...Exhaust hood E. Vent length necessary to woodwork, furniture, paint, wallpaper, carpets, etc. For further information, please reference the "Assistance or Service" section of the "Dryer User Instructions." 4" (102 mm) 4" (102 mm) 2½" (64 mm) A. Exhaust outlet I H A. Acceptable hood style. Do not use an ...
Installation Instructions
Page 10
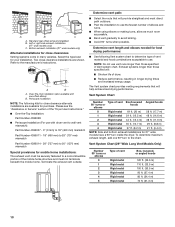
...9632;■ Use following kits for close clearances Venting systems come in longer drying times and increased energy usage. Vent System Chart Number Type of dryer. ■■ Reduce performance, resulting in many varieties. Vent System Chart (29" Wide Long Vent Models Only) Number 90° turns... elbows or making turns, allow as much room as possible. ■■ Bend vDent gradually to a noncombustible portion of the "Dryer User Instructions." ■■ Over-the-Top Installation: Part Number 4396028 ■■ Periscope Installation (For use vent runs longer ...
...9632;■ Use following kits for close clearances Venting systems come in longer drying times and increased energy usage. Vent System Chart Number Type of dryer. ■■ Reduce performance, resulting in many varieties. Vent System Chart (29" Wide Long Vent Models Only) Number 90° turns... elbows or making turns, allow as much room as possible. ■■ Bend vDent gradually to a noncombustible portion of the "Dryer User Instructions." ■■ Over-the-Top Installation: Part Number 4396028 ■■ Periscope Installation (For use vent runs longer ...
Installation Instructions
Page 11
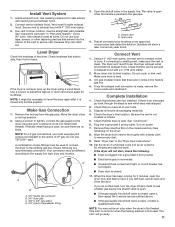
...outlet. ■■ Electrical supply is connected. ■■ Household fuse is intact and tight, or circuit breaker has not tripped. ■■ Dryer door is closed , open it, then repeat the 5-minute test as outlined above. ■■ If the gas supply line shutoff valve is open ...remaining on a full heat cycle (not an air cycle) for levelness. Read "Dryer Use" in dryer. Set the dryer on the dryer. 8. If the dryer will not start the dryer. Install Vent System 1. Vent must fit over the dryer exhaust outlet and inside exhaust hood. Do not use duct tape, screws, or ...
...outlet. ■■ Electrical supply is connected. ■■ Household fuse is intact and tight, or circuit breaker has not tripped. ■■ Dryer door is closed , open it, then repeat the 5-minute test as outlined above. ■■ If the gas supply line shutoff valve is open ...remaining on a full heat cycle (not an air cycle) for levelness. Read "Dryer Use" in dryer. Set the dryer on the dryer. 8. If the dryer will not start the dryer. Install Vent System 1. Vent must fit over the dryer exhaust outlet and inside exhaust hood. Do not use duct tape, screws, or ...
Installation Instructions
Page 12
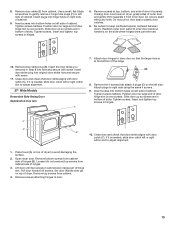
... Insert screws into hinge holes on the side where hinges were just removed. 7. Set door (handle side up so screws are in bottom of dryer. Holding door over screws. Do not pry apart with door catch (B). Be certain to door. 5. Use a small, flat-blade screwdriver to ...avoid damaging the surface. 2. Remove top screws from cabinet side of dryer to dryer door so that door strike aligns with putty knife. Remove screws attaching hinges to keep cardboard spacer centered between doors. Place towel (A) on ...
... Insert screws into hinge holes on the side where hinges were just removed. 7. Set door (handle side up so screws are in bottom of dryer. Holding door over screws. Do not pry apart with door catch (B). Be certain to door. 5. Use a small, flat-blade screwdriver to ...avoid damaging the surface. 2. Remove top screws from cabinet side of dryer to dryer door so that door strike aligns with putty knife. Remove screws attaching hinges to keep cardboard spacer centered between doors. Place towel (A) on ...
Installation Instructions
Page 13
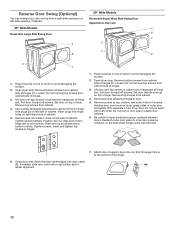
...halfway. Do not pull on left or right within slot to adjust alignment. 1. Insert screws into hinge holes on the left side of slots. Open dryer door. Lift door until top screws in cabinet are in large part of hinges. 3. Remove door strike (E) from inner door. Remove door strike plug... is on top of hinges (B). Slide door up ) on the side where hinges were just removed. 10. Remove screws at the bottom of dryer to keep cardboard spacer centered between doors. Place towel (A) on left or right within slot to adjust alignment. 27" Wide Models Reversible Side-Swing...
...halfway. Do not pull on left or right within slot to adjust alignment. 1. Insert screws into hinge holes on the left side of slots. Open dryer door. Lift door until top screws in cabinet are in large part of hinges. 3. Remove door strike (E) from inner door. Remove door strike plug... is on top of hinges (B). Slide door up ) on the side where hinges were just removed. 10. Remove screws at the bottom of dryer to keep cardboard spacer centered between doors. Place towel (A) on left or right within slot to adjust alignment. 27" Wide Models Reversible Side-Swing...


