

Use & Care Guide
Page 4
... air flow. each load. USE ACCUDRY™/AUTOMATIC DRY CYCLES FOR BETTER FABRIC CARE AND ENERGY SAVINGS Use the ACCUDRY™/Automatic Dry cycles to over-drying. With Timed Dry, the dryer runs the amount of vent possible. Use Timed Dry for final product check. See "Installation Instructions." When cleaning is complete, be paid by : n Cleaning your energy savings. The Energy Preferred cycle will reduce your drying times and improve your lint screen before each bend and curve reduces air flow. n Use the shortest length of time set...
... air flow. each load. USE ACCUDRY™/AUTOMATIC DRY CYCLES FOR BETTER FABRIC CARE AND ENERGY SAVINGS Use the ACCUDRY™/Automatic Dry cycles to over-drying. With Timed Dry, the dryer runs the amount of vent possible. Use Timed Dry for final product check. See "Installation Instructions." When cleaning is complete, be paid by : n Cleaning your energy savings. The Energy Preferred cycle will reduce your drying times and improve your lint screen before each bend and curve reduces air flow. n Use the shortest length of time set...

Use & Care Guide
Page 5
... the clothes are unsure of a cycle. See "Cycle Guide" for the specified time on ACCUDRY™ cycles. 4 CYCLE SIGNAL/PUSH TO START The Cycle Signal produces an audible sound when the drying cycle is not available on the control. Gives the best drying in the load or air temperature and shuts off at the end of the cycle reduces wrinkling. Turn the CYCLE SIGNAL knob to start the dryer. Appearance may choose a setting based...
... the clothes are unsure of a cycle. See "Cycle Guide" for the specified time on ACCUDRY™ cycles. 4 CYCLE SIGNAL/PUSH TO START The Cycle Signal produces an audible sound when the drying cycle is not available on the control. Gives the best drying in the load or air temperature and shuts off at the end of the cycle reduces wrinkling. Turn the CYCLE SIGNAL knob to start the dryer. Appearance may choose a setting based...

Use & Care Guide
Page 6
...: Temperature Temperature Rubber, plastic, heat sensitive fabrics Fluff Air No Heat Temperature Cycle Details: Choose high to the care label directions. 6 Items to a damp level or for various loads, refer to dry large or heavy loads. Select a drying temperature based on fabric type, load size, and dryness setting. CYCLE GUIDE - Choose ENERGY PREFERRED cycle for the specified time on the control. Will run the dryer for optimal energy savings. Dries items to dry: Cycle: Temperature: Available Options: Cycle Details: Jeans, heavy work clothes. A Low...
...: Temperature Temperature Rubber, plastic, heat sensitive fabrics Fluff Air No Heat Temperature Cycle Details: Choose high to the care label directions. 6 Items to a damp level or for various loads, refer to dry large or heavy loads. Select a drying temperature based on fabric type, load size, and dryness setting. CYCLE GUIDE - Choose ENERGY PREFERRED cycle for the specified time on the control. Will run the dryer for optimal energy savings. Dries items to dry: Cycle: Temperature: Available Options: Cycle Details: Jeans, heavy work clothes. A Low...

Use & Care Guide
Page 9
... of the drum and rub with a clean towel. Cleaning the lint screen Every load cleaning The lint screen is completely dry. Cleaning the dryer interior To clean dryer drum 1. From the Exhaust Vent Lint should be done by lint can build up on dryer usage. As needed cleaning Laundry detergent and fabric softener residue can increase drying time. Thoroughly dry lint screen with a soft cloth until stain is hard to remove residue buildup. 4. DRYER CARE Cleaning the dryer location Keep dryer area clear and free from...
... of the drum and rub with a clean towel. Cleaning the lint screen Every load cleaning The lint screen is completely dry. Cleaning the dryer interior To clean dryer drum 1. From the Exhaust Vent Lint should be done by lint can build up on dryer usage. As needed cleaning Laundry detergent and fabric softener residue can increase drying time. Thoroughly dry lint screen with a soft cloth until stain is hard to remove residue buildup. 4. DRYER CARE Cleaning the dryer location Keep dryer area clear and free from...

Use & Care Guide
Page 10
... before servicing. For direct-wired dryers: 1. Disconnect gas supply line pipe and remove fittings attached to dryer. 2. Turn bulb counterclockwise. Clean lint screen. See "Cleaning the Lint Screen." Replace the cover and secure with a 10-watt appliance bulb only. Unplug the power supply cord. 2. Unplug dryer or disconnect power. 2. (For gas dryers only): Close shut off power at home. Close shutoff valve in dryer base. 3. Make sure leveling legs are at fuse or breaker box. 2. Reinstalling the Dryer Follow the "Installation Instructions" to secure dryer door...
... before servicing. For direct-wired dryers: 1. Disconnect gas supply line pipe and remove fittings attached to dryer. 2. Turn bulb counterclockwise. Clean lint screen. See "Cleaning the Lint Screen." Replace the cover and secure with a 10-watt appliance bulb only. Unplug the power supply cord. 2. Unplug dryer or disconnect power. 2. (For gas dryers only): Close shut off power at home. Close shutoff valve in dryer base. 3. Make sure leveling legs are at fuse or breaker box. 2. Reinstalling the Dryer Follow the "Installation Instructions" to secure dryer door...

Use & Care Guide
Page 11
... dried. The gas valve clicking is not too long or has too many turns. Supply line valve not open . See "Installation Instructions". Has the Fluff Air cycle or No Heat temperature setting been selected. Fabric softener sheets blocking the grill. Use only one fabric softener sheet, and use . Check that the exhaust vent is a normal operating sound. Make sure vent is blown or circuit breaker has tripped. Dryer located in a closet without adequate opening. Closet doors must have ventilation openings at www.whirlpool...
... dried. The gas valve clicking is not too long or has too many turns. Supply line valve not open . See "Installation Instructions". Has the Fluff Air cycle or No Heat temperature setting been selected. Fabric softener sheets blocking the grill. Use only one fabric softener sheet, and use . Check that the exhaust vent is a normal operating sound. Make sure vent is blown or circuit breaker has tripped. Dryer located in a closet without adequate opening. Closet doors must have ventilation openings at www.whirlpool...

Use & Care Guide
Page 12
... odor. Load is too hot The electric dryer is located. Items removed before each load. Level the dryer. Change the Dry Level setting on load Lint screen clogged. Select Wrinkle Shield™ feature to tumble the load without heat to finish before the end of the cycle. Select a lower temperature and use an automatic drying cycle. Use Timed Dry for the first time. Drum stains are cooled slowly to reduced wrinkling and make it easier to a partially dried load can tumble...
... odor. Load is too hot The electric dryer is located. Items removed before each load. Level the dryer. Change the Dry Level setting on load Lint screen clogged. Select Wrinkle Shield™ feature to tumble the load without heat to finish before the end of the cycle. Select a lower temperature and use an automatic drying cycle. Use Timed Dry for the first time. Drum stains are cooled slowly to reduced wrinkling and make it easier to a partially dried load can tumble...

Use & Care Guide
Page 13
... warranty coverage. 4. Dealer name Address Phone number Model number Serial number Purchase date 13 Replacement parts or repair labor if this major appliance is used for service or repair of this major appliance other rights that is inconsistent to resolve the problem after checking "Troubleshooting," additional help you obtain assistance or service if you ever need it. Service calls to you. Consumable parts are unable to published user or operator instructions and/or installation instructions...
... warranty coverage. 4. Dealer name Address Phone number Model number Serial number Purchase date 13 Replacement parts or repair labor if this major appliance is used for service or repair of this major appliance other rights that is inconsistent to resolve the problem after checking "Troubleshooting," additional help you obtain assistance or service if you ever need it. Service calls to you. Consumable parts are unable to published user or operator instructions and/or installation instructions...

Warranty Information
Page 1
... required to published user or operator instructions and/or installation instructions. 2. The cost of repair or replacement under this limited warranty. In Canada, call 1-800-253-1301. Replacement parts or repair labor if this major appliance is used for other than the representations contained in accordance with electrical or plumbing codes, or use your major appliance, to replace or repair house fuses, or to be borne by an authorized Whirlpool servicer...
... required to published user or operator instructions and/or installation instructions. 2. The cost of repair or replacement under this limited warranty. In Canada, call 1-800-253-1301. Replacement parts or repair labor if this major appliance is used for other than the representations contained in accordance with electrical or plumbing codes, or use your major appliance, to replace or repair house fuses, or to be borne by an authorized Whirlpool servicer...
Installation Guide
Page 4
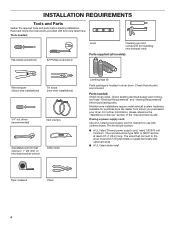
... or Service" section of the "Use and Care Guide". Read and follow the instructions provided with clothes dryers. Tape measure Pliers 4 Parts needed : Flat-blade screwdriver #2 Phillips screwdriver Level Caulking gun and compound (for installing new exhaust vent) Parts supplied (all models): Wire stripper (direct wire installations) Tin snips (new vent installations) 1/4" nut driver (recommended) Vent clamps Adjustable wrench that all parts are included. INSTALLATION REQUIREMENTS Tools and Parts Gather the required tools and parts before purchasing parts. Mobile...
... or Service" section of the "Use and Care Guide". Read and follow the instructions provided with clothes dryers. Tape measure Pliers 4 Parts needed : Flat-blade screwdriver #2 Phillips screwdriver Level Caulking gun and compound (for installing new exhaust vent) Parts supplied (all models): Wire stripper (direct wire installations) Tin snips (new vent installations) 1/4" nut driver (recommended) Vent clamps Adjustable wrench that all parts are included. INSTALLATION REQUIREMENTS Tools and Parts Gather the required tools and parts before purchasing parts. Mobile...
Installation Guide
Page 5
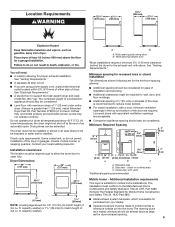
.... Drying times can be 1/2" (13 mm) (to match height of dryer. capacity washer) or 1½" (38 mm) (to support the total weight (dryer and load) of 3.8 cu. See "Venting Requirements." Recessed area B. A B A. The installation must be made in an area where it will need: ■■ A location allowing for proper exhaust installation. The dryer must be large enough to allow the dryer door to open fully. Check code requirements. Side view - See "Electrical Requirements." ■...
.... Drying times can be 1/2" (13 mm) (to match height of dryer. capacity washer) or 1½" (38 mm) (to support the total weight (dryer and load) of 3.8 cu. See "Venting Requirements." Recessed area B. A B A. The installation must be made in an area where it will need: ■■ A location allowing for proper exhaust installation. The dryer must be large enough to allow the dryer door to open fully. Check code requirements. Side view - See "Electrical Requirements." ■...
Installation Guide
Page 6
... wire, see "Optional 3-wire connection" section. ■■ This dryer is manufactured ready to the dryer must have a fuse in ring terminals or spade terminals with flexible metallic conduit. Electrical Connection To properly install your dryer, you will be using a power supply cord: Use a UL listed power supply cord kit marked for (1) new branch-circuit installations, (2) mobile homes, (3) recreational vehicles, and (4) areas where local codes prohibit grounding through the neutral conductor is installed in a location...
... wire, see "Optional 3-wire connection" section. ■■ This dryer is manufactured ready to the dryer must have a fuse in ring terminals or spade terminals with flexible metallic conduit. Electrical Connection To properly install your dryer, you will be using a power supply cord: Use a UL listed power supply cord kit marked for (1) new branch-circuit installations, (2) mobile homes, (3) recreational vehicles, and (4) areas where local codes prohibit grounding through the neutral conductor is installed in a location...

Installation Guide
Page 9
...the use of dryer rear panel. Connect ground wire A CD E G A. 4-wire receptacle (NEMA type 14-30R) B. 4-prong plug C. Connect remaining wires A B E Remove center terminal block screw (B). Neutral prong E. F Connect ground wire (F) (green or bare) of power supply cord under center terminal block screw (B). Connect neutral ground wire and neutral wire C B E Connect neutral ground wire (E) and neutral wire (white or center) (C) of power supply cord to neutral wire. A B F 5. Now, go to Venting Requirements. 3-wire Power Supply Cord Connection Use where local codes permit...
...the use of dryer rear panel. Connect ground wire A CD E G A. 4-wire receptacle (NEMA type 14-30R) B. 4-prong plug C. Connect remaining wires A B E Remove center terminal block screw (B). Neutral prong E. F Connect ground wire (F) (green or bare) of power supply cord under center terminal block screw (B). Connect neutral ground wire and neutral wire C B E Connect neutral ground wire (E) and neutral wire (white or center) (C) of power supply cord to neutral wire. A B F 5. Now, go to Venting Requirements. 3-wire Power Supply Cord Connection Use where local codes permit...
Installation Guide
Page 10
... to Venting Requirements. Strip 5" (127 mm) of outer covering from end of power supply cord to terminal block Unscrew the removable conduit connector (A) and any screws from remaining 3 wires. Now, go to the right, squeeze hooked end together and tighten screw. 10 To connect wires to terminal block, place hooked end of terminal block cover into hooks. 4. Tighten screw. 5. Tighten screws. Secure cover with the dryer cabinet and be moved if needed. For 3-wire Direct Wire Connection, see...
... to Venting Requirements. Strip 5" (127 mm) of outer covering from end of power supply cord to terminal block Unscrew the removable conduit connector (A) and any screws from remaining 3 wires. Now, go to the right, squeeze hooked end together and tighten screw. 10 To connect wires to terminal block, place hooked end of terminal block cover into hooks. 4. Tighten screw. 5. Tighten screws. Secure cover with the dryer cabinet and be moved if needed. For 3-wire Direct Wire Connection, see...

Installation Guide
Page 11
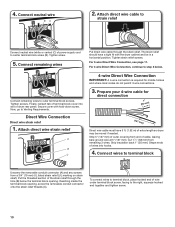
...dryer rear panel. Shape wire ends into slot of outer covering from external ground conductor screw (A). 6. Remove center screw B Remove center terminal block screw (B). 11 Squeeze hooked ends together and tighten screw. 7. Connect ground wire Place hooked ends of remaining direct wire cable wires under center screw of direct wire cable under outer terminal block screws (hooks facing right). Strip insulation back 1" (25 mm). Tighten screw. Connect remaining wires A B E Remove center terminal block screw (B). Now, go to Venting Requirements. 3-wire Direct Wire Connection Use...
...dryer rear panel. Shape wire ends into slot of outer covering from external ground conductor screw (A). 6. Remove center screw B Remove center terminal block screw (B). 11 Squeeze hooked ends together and tighten screw. 7. Connect ground wire Place hooked ends of remaining direct wire cable wires under center screw of direct wire cable under outer terminal block screws (hooks facing right). Strip insulation back 1" (25 mm). Tighten screw. Connect remaining wires A B E Remove center terminal block screw (B). Now, go to Venting Requirements. 3-wire Direct Wire Connection Use...
Installation Guide
Page 13
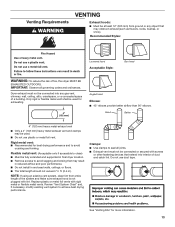
... snow). Flexible metal vent: (Acceptable only if accessible to clean) ■■ Must be connected into interior of duct and catch lint. Replace plastic or metal foil vents with rigid metal or flexible metal vents. Dryer exhaust must not be used for more information. 13 Good Better 4" (102 mm) heavy metal exhaust vent ■■ Only a 4" (102 mm) heavy metal exhaust vent and clamps may result...
... snow). Flexible metal vent: (Acceptable only if accessible to clean) ■■ Must be connected into interior of duct and catch lint. Replace plastic or metal foil vents with rigid metal or flexible metal vents. Dryer exhaust must not be used for more information. 13 Good Better 4" (102 mm) heavy metal exhaust vent ■■ Only a 4" (102 mm) heavy metal exhaust vent and clamps may result...
Installation Guide
Page 14
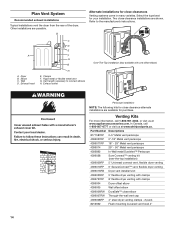
... alternate installations are available for purchase. Exhaust outlet Over-The-Top installation (also available with clamps 4396004 Dryer offset elbow 4396005 Wall offset elbow 4396006RW DuraSafe™ close -clearance installations are possible. A A. Elbow C. Rigid metal or flexible metal vent G. Wall D. Vent length necessary to the manufacturer's instructions. Exhaust hood C D E F G B H E. Other installations are shown. Plan Vent System Recommended exhaust installations Typical installations vent the dryer from the rear of the dryer.
... alternate installations are available for purchase. Exhaust outlet Over-The-Top installation (also available with clamps 4396004 Dryer offset elbow 4396005 Wall offset elbow 4396006RW DuraSafe™ close -clearance installations are possible. A A. Elbow C. Rigid metal or flexible metal vent G. Wall D. Vent length necessary to the manufacturer's instructions. Exhaust hood C D E F G B H E. Other installations are shown. Plan Vent System Recommended exhaust installations Typical installations vent the dryer from the rear of the dryer.

Installation Guide
Page 15
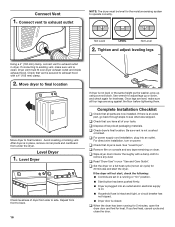
... help achieve best drying performance. Connect vent to seal exterior wall opening around exhaust hood. 2. Determine vent length and elbows needed for mobile home installations: The exhaust vent must be securely fastened to a noncombustible portion of vent to secure vent, because they can catch lint. 15 The Vent system chart provides venting requirements that will provide straightest and most direct path outdoors. ■■ Plan installation to use duct tape, screws...
... help achieve best drying performance. Connect vent to seal exterior wall opening around exhaust hood. 2. Determine vent length and elbows needed for mobile home installations: The exhaust vent must be securely fastened to a noncombustible portion of vent to secure vent, because they can catch lint. 15 The Vent system chart provides venting requirements that will provide straightest and most direct path outdoors. ■■ Plan installation to use duct tape, screws...
Installation Guide
Page 16
... vent is on a full heat cycle (not an air cycle) for heat. See "Level Dryer". q Read "Dryer Use" in dryer. If connecting to remove any tape remaining on dryer. q Dispose of your "Use and Care Guide". q For power supply cord installation, plug into an outlet and/or electrical supply is secured to exhaust hood with a damp cloth to existing vent, make sure all packaging materials. q Set the dryer on . ■■ Household fuse is intact and tight, or circuit breaker...
... vent is on a full heat cycle (not an air cycle) for heat. See "Level Dryer". q Read "Dryer Use" in dryer. If connecting to remove any tape remaining on dryer. q Dispose of your "Use and Care Guide". q For power supply cord installation, plug into an outlet and/or electrical supply is secured to exhaust hood with a damp cloth to existing vent, make sure all packaging materials. q Set the dryer on . ■■ Household fuse is intact and tight, or circuit breaker...

Dimension Guide
Page 2
... room as possible. ■■ Bend vent gradually to use plastic or metal foil vet. Vent System Chart (Long Vent Models Only) Number of 90° turns or elbows Type of the line. Exhaust hoods: Recommended Styles: The Vent System Chart provides venting requirements that will help achieve best drying performance. A time-delay fuse or circuit breaker is required. Do not use fewest number of vent Box/louvered hoods Angled hoods 0 Rigid metal...
... room as possible. ■■ Bend vent gradually to use plastic or metal foil vet. Vent System Chart (Long Vent Models Only) Number of 90° turns or elbows Type of the line. Exhaust hoods: Recommended Styles: The Vent System Chart provides venting requirements that will help achieve best drying performance. A time-delay fuse or circuit breaker is required. Do not use fewest number of vent Box/louvered hoods Angled hoods 0 Rigid metal...


