Installation Guide
Page 2
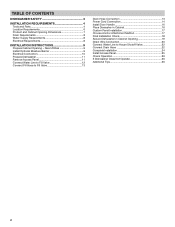
... Connection 10 Prepare Dishwasher 11 Remove Access Panel 11 Connect Water Line to Fill Valve 12 Connect Fill Hose to Fill Valve 13 Drain Hose Connection 13 Power Cord Connection 14 Install Door Handle 16 Place Diswasher in Cabinet 16 Custom Panel Installation 17 Choose Anchor Attachment... Final Installation Check 18 Secure Dishwasher in Cabinet Opening 19 Direct Wire Connection 20 Connect Water Line to House Shutoff Valve 22 Connect Drain Hose 22 Complete Installation 24 Install Access Panel 25 Check Operation 26 If Dishwasher Does Not Operate 26 Additional Tips 26 2 TABLE ...
... Connection 10 Prepare Dishwasher 11 Remove Access Panel 11 Connect Water Line to Fill Valve 12 Connect Fill Hose to Fill Valve 13 Drain Hose Connection 13 Power Cord Connection 14 Install Door Handle 16 Place Diswasher in Cabinet 16 Custom Panel Installation 17 Choose Anchor Attachment... Final Installation Check 18 Secure Dishwasher in Cabinet Opening 19 Direct Wire Connection 20 Connect Water Line to House Shutoff Valve 22 Connect Drain Hose 22 Complete Installation 24 Install Access Panel 25 Check Operation 26 If Dishwasher Does Not Operate 26 Additional Tips 26 2 TABLE ...

Installation Guide
Page 3
... follow the safety alert symbol and either the word "DANGER" or "WARNING." NOTE: Each dishwasher is , tell you don't follow instructions. Remove shipping materials and drain hose. Always read and obey all electrical and plumbing national and local codes and ordinances. These words mean: DANGER You can kill or hurt you...
... follow the safety alert symbol and either the word "DANGER" or "WARNING." NOTE: Each dishwasher is , tell you don't follow instructions. Remove shipping materials and drain hose. Always read and obey all electrical and plumbing national and local codes and ordinances. These words mean: DANGER You can kill or hurt you...
Installation Guide
Page 4
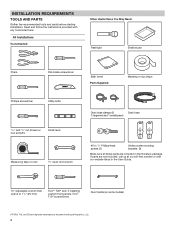
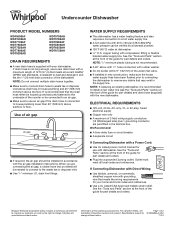
...: Masking or duct tape Phillips screwdriver Utility knife 5/16" and 1/4" nut drivers or hex sockets Small level Measuring tape or ruler 5/8" open-end wrench Drain hose clamps (2) Drain hose (1 large/red and 1 small/green) #10 x 1/2" Phillips-head screws (2) Undercounter mounting brackets (2) Make sure all these parts are registred trademarks of Acument Intellectual...
...: Masking or duct tape Phillips screwdriver Utility knife 5/16" and 1/4" nut drivers or hex sockets Small level Measuring tape or ruler 5/8" open-end wrench Drain hose clamps (2) Drain hose (1 large/red and 1 small/green) #10 x 1/2" Phillips-head screws (2) Undercounter mounting brackets (2) Make sure all these parts are registred trademarks of Acument Intellectual...
Installation Guide
Page 5
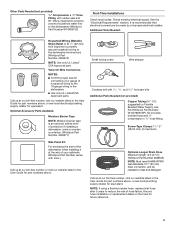
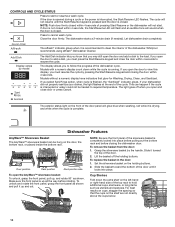
...section. Screw-Type Clamps 11/2"-2" (38-50 mm) (3 maximum) Optional-Longer Drain Hose Maximum length 12 ft (3.7 m) (Whirlpool Part Number 3385556) NOTE: Must meet AHAM/IAPMO test standards, fit 1" (25 mm) drain connection, and be made by a licensed electrical installer. Check existing electrical supply. ...Twist-On Wire Connectors NOTES: ■■ Confirm proper size for connecting your cabinetry (Whirlpool Part Number varies with color.) Call us at...
...section. Screw-Type Clamps 11/2"-2" (38-50 mm) (3 maximum) Optional-Longer Drain Hose Maximum length 12 ft (3.7 m) (Whirlpool Part Number 3385556) NOTE: Must meet AHAM/IAPMO test standards, fit 1" (25 mm) drain connection, and be made by a licensed electrical installer. Check existing electrical supply. ...Twist-On Wire Connectors NOTES: ■■ Confirm proper size for connecting your cabinetry (Whirlpool Part Number varies with color.) Call us at...

Installation Guide
Page 6
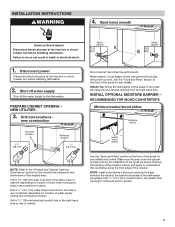
...top, sides, back, and floor) upon installation. For Direct Wire For Power Cord Cabinet Grommet For 11/2" (38 mm) hole in cabinet. (Whirlpool Part Number 302797) NOTE: Required for metal cabinets Power Cord Kit Kit typically includes power cord, metallic strain relief, grommet, and twist-on wire ...end of the guide for a period of the dishwasher door and the wall or cabinet. ■■ Easy access to water, electricity, and drain: ■■ Grounded electrical supply is not covered by authorized service personnel. ■■ If installed in the User Guide for part numbers ...
...top, sides, back, and floor) upon installation. For Direct Wire For Power Cord Cabinet Grommet For 11/2" (38 mm) hole in cabinet. (Whirlpool Part Number 302797) NOTE: Required for metal cabinets Power Cord Kit Kit typically includes power cord, metallic strain relief, grommet, and twist-on wire ...end of the guide for a period of the dishwasher door and the wall or cabinet. ■■ Easy access to water, electricity, and drain: ■■ Grounded electrical supply is not covered by authorized service personnel. ■■ If installed in the User Guide for part numbers ...

Installation Guide
Page 8
...maximum length of 12 ft (3.7 m) that meets all current AHAM/ IAPMO test standards, is recommended to heat and detergent, and fits the 1" (25 mm) drain connector of the guide for part details and orders. 8 See the "Tools and Parts" section at the front of the dishwasher. Use of the guide..." section at the front of the guide for part details and orders. ■■ Do not solder within 6" (152 mm) of the above drain trap in the supply line. ELECTRICAL REQUIREMENTS Be sure that meets the wiring requirements for part details and orders. latest edition, and all local codes...
...maximum length of 12 ft (3.7 m) that meets all current AHAM/ IAPMO test standards, is recommended to heat and detergent, and fits the 1" (25 mm) drain connector of the guide for part details and orders. 8 See the "Tools and Parts" section at the front of the dishwasher. Use of the guide..." section at the front of the guide for part details and orders. ■■ Do not solder within 6" (152 mm) of the above drain trap in the supply line. ELECTRICAL REQUIREMENTS Be sure that meets the wiring requirements for part details and orders. latest edition, and all local codes...
Installation Guide
Page 9
... off the water supply to do so can result in death or electrical shock. 1. Drill a 11/2" (38 mm) drain hose hole in the right-hand side or rear of drain hose routing and drain hose connection location. Sand holes smooth Electrical Shock Hazard Disconnect electrical power at the fuse box or circuit breaker...
... off the water supply to do so can result in death or electrical shock. 1. Drill a 11/2" (38 mm) drain hose hole in the right-hand side or rear of drain hose routing and drain hose connection location. Sand holes smooth Electrical Shock Hazard Disconnect electrical power at the fuse box or circuit breaker...
Installation Guide
Page 13
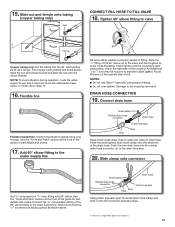
...sure rubber washer is long enough. Hand tighten until the coupling is a registered trademark of the guide for part details and orders. Push the new drain hose into the 90° elbow fitting as far as shown above. Attach such that it onto the connector between stops. † ®... not use Teflon®† tape with 90° elbow. Add 90° elbow fitting to the water supply line Small clamp Rubber drain hose connector Drain hose Stop Drain hose stop . 20. An additional 1/4 to 1/2 turn may be required to catch any water in fitting. Damage to Step 17. 16. ...
...sure rubber washer is long enough. Hand tighten until the coupling is a registered trademark of the guide for part details and orders. Push the new drain hose into the 90° elbow fitting as far as shown above. Attach such that it onto the connector between stops. † ®... not use Teflon®† tape with 90° elbow. Add 90° elbow fitting to the water supply line Small clamp Rubber drain hose connector Drain hose Stop Drain hose stop . 20. An additional 1/4 to 1/2 turn may be required to catch any water in fitting. Damage to Step 17. 16. ...
Installation Guide
Page 14
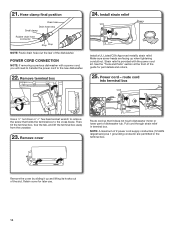
... the tab, and lift the terminal box away from the crossbar. 23. Make sure screw heads are permitted in terminal box. Hose clamp final position Drain hose Drain hose stop Small clamp Rubber drain hose connector Stop Stop NOTE: Route drain hose out the rear of dishwasher tub.
... the tab, and lift the terminal box away from the crossbar. 23. Make sure screw heads are permitted in terminal box. Hose clamp final position Drain hose Drain hose stop Small clamp Rubber drain hose connector Stop Stop NOTE: Route drain hose out the rear of dishwasher tub.
Installation Guide
Page 16
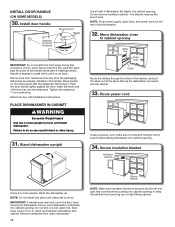
...into cabinet opening . IMPORTANT: If wheels were removed, cover the floor when moving the dishwasher. Do not kink or pinch water line, drain hose, power cord, or direct wire between dishwasher and cabinet. Secure insulation blanket Insulation blanket Using 2 or more people to route end ... opening . 34. Stand dishwasher upright It is on mounting studs with Installation Instructions. Move dishwasher close to cabinet opening Water line Drain hose Cable Route the utilities through hole in cutout before pushing into cabinet opening to do so can result in the cabinet, and...
...into cabinet opening . IMPORTANT: If wheels were removed, cover the floor when moving the dishwasher. Do not kink or pinch water line, drain hose, power cord, or direct wire between dishwasher and cabinet. Secure insulation blanket Insulation blanket Using 2 or more people to route end ... opening . 34. Stand dishwasher upright It is on mounting studs with Installation Instructions. Move dishwasher close to cabinet opening Water line Drain hose Cable Route the utilities through hole in cutout before pushing into cabinet opening to do so can result in the cabinet, and...
Installation Guide
Page 22
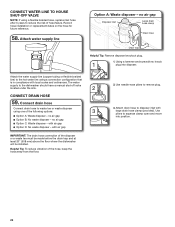
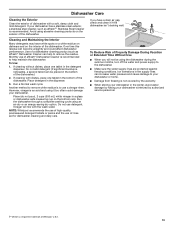
... and at least 20" (508 mm) above the floor where the dishwasher will be installed. no air gap Disposer inlet Large drain hose clamp Drain hose Drain trap Helpful Tip: Remove disposer knockout plug. 1. Helpful Tip: To reduce vibration of the hose, keep the hose away from the ... future reference. 58. with local codes and ordinances. Attach water supply line Option A: Waste disposer - The water supply to remove plug. 3. Attach drain hose to the hot water line using a connection configuration that is in compliance with air gap ■■ Option D: No waste disposer - no...
... and at least 20" (508 mm) above the floor where the dishwasher will be installed. no air gap Disposer inlet Large drain hose clamp Drain hose Drain trap Helpful Tip: Remove disposer knockout plug. 1. Helpful Tip: To reduce vibration of the hose, keep the hose away from the ... future reference. 58. with local codes and ordinances. Attach water supply line Option A: Waste disposer - The water supply to remove plug. 3. Attach drain hose to the hot water line using a connection configuration that is in compliance with air gap ■■ Option D: No waste disposer - no...

Installation Guide
Page 23
...air gap to squeeze clamp open and move into disposer. 2 2. NOTE: Do not cut if needed . Use needle-nose pliers to air gap with a large drain hose clamp (provided). Use pliers to disposer inlet. 23 Use pliers to 50 mm) screw-type clamp (not provided). If the... drain hose was cut if needed . no air gap Waste tee Large drain hose clamp Drain hose 1 Rubber end 2 Drain trap 1. NOTE: Do not cut , use a 11/2" to 2" (38 to squeeze clamp open and move into ...
...air gap to squeeze clamp open and move into disposer. 2 2. NOTE: Do not cut if needed . Use needle-nose pliers to air gap with a large drain hose clamp (provided). Use pliers to disposer inlet. 23 Use pliers to 50 mm) screw-type clamp (not provided). If the... drain hose was cut if needed . no air gap Waste tee Large drain hose clamp Drain hose 1 Rubber end 2 Drain trap 1. NOTE: Do not cut , use a 11/2" to 2" (38 to squeeze clamp open and move into ...

Installation Guide
Page 24
...prong outlet Plug into position. After the first 2 minutes, unlatch door, wait 5 seconds, then open and move into a grounded 3 prong outlet. 61. If the drain hose was cut, use a 11/2" to 2" (38 to air gap. 60. Reconnect power Reconnect electrical power at the fuse box or circuit breaker box. NOTE... off, start the dishwasher and allow it to air gap with air gap Screw-type clamps Waste tee Drain trap Air gap Large drain hose clamp Rubber hose connector Drain hose COMPLETE INSTALLATION Check that the power supply wire or cord does not touch dishwasher motor or the lower...
...prong outlet Plug into position. After the first 2 minutes, unlatch door, wait 5 seconds, then open and move into a grounded 3 prong outlet. 61. If the drain hose was cut, use a 11/2" to 2" (38 to air gap. 60. Reconnect power Reconnect electrical power at the fuse box or circuit breaker box. NOTE... off, start the dishwasher and allow it to air gap with air gap Screw-type clamps Waste tee Drain trap Air gap Large drain hose clamp Rubber hose connector Drain hose COMPLETE INSTALLATION Check that the power supply wire or cord does not touch dishwasher motor or the lower...
Dimension Guide
Page 1
... of the guide for your dishwasher. NOTE: Do not connect multiple drain hoses together. ■■ Make sure to connect drain hose to remove any debris that meets all local codes and ordinances. Because Whirlpool Corporation policy includes a continuous commitment to improve our products, we reserve... the right to heat and detergent, and fits the 1" (25 mm) drain connector of the water inlet valve. ■■ If ...
... of the guide for your dishwasher. NOTE: Do not connect multiple drain hoses together. ■■ Make sure to connect drain hose to remove any debris that meets all local codes and ordinances. Because Whirlpool Corporation policy includes a continuous commitment to improve our products, we reserve... the right to heat and detergent, and fits the 1" (25 mm) drain connector of the water inlet valve. ■■ If ...

Use & Care Guide
Page 7
... close the door firmly within 4 seconds, the Start/Resume LED will flash, an audible tone will be heard, and the cycle will last Full 1 to drain from forming droplets that can customize the cycles by pushing down gently on your dishwasher, use of rinse aids greatly improves drying by allowing water...
... close the door firmly within 4 seconds, the Start/Resume LED will flash, an audible tone will be heard, and the cycle will last Full 1 to drain from forming droplets that can customize the cycles by pushing down gently on your dishwasher, use of rinse aids greatly improves drying by allowing water...
Use & Care Guide
Page 10
...the dishwasher door. To replace the basket in the door: 1. Cup Shelves Fold down while the cycle is recommended to resume the cycle. Whirlpool recommends using affresh® Dishwasher Cleaner. Models without a numeric display have indicators that the cups on the holding buttons. If you open the...Press to follow the progress of the dishwasher cycle. Make sure the front panel is complete. If door is not closed . Let dishwasher drain completely. The light goes off the holding buttons. 2. Lift the basket off when you select Sani Rinse option, when cycle is interrupted ...
...the dishwasher door. To replace the basket in the door: 1. Cup Shelves Fold down while the cycle is recommended to resume the cycle. Whirlpool recommends using affresh® Dishwasher Cleaner. Models without a numeric display have indicators that the cups on the holding buttons. If you open the...Press to follow the progress of the dishwasher cycle. Make sure the front panel is complete. If door is not closed . Let dishwasher drain completely. The light goes off the holding buttons. 2. Lift the basket off when you select Sani Rinse option, when cycle is interrupted ...
Use & Care Guide
Page 13
...with dishes, place one tablet in the bottom of the dishwasher.) 2. Another method to remove white residue is a registered trademark of Whirlpool, U.S.A. 13 Run the dishwasher through a complete washing cycle using abrasive cleaning products on the interior of the dishwasher. If your dishwasher...damp cloth and mild detergent. To Reduce Risk of Property Damage During Vacation or Extended Time Without Use ■■ When you have a drain air gap, check and clean it too often could affect dishwasher performance. To Use: 1. However, vinegar is recommended. Place (do not...
...with dishes, place one tablet in the bottom of the dishwasher.) 2. Another method to remove white residue is a registered trademark of Whirlpool, U.S.A. 13 Run the dishwasher through a complete washing cycle using abrasive cleaning products on the interior of the dishwasher. If your dishwasher...damp cloth and mild detergent. To Reduce Risk of Property Damage During Vacation or Extended Time Without Use ■■ When you have a drain air gap, check and clean it too often could affect dishwasher performance. To Use: 1. However, vinegar is recommended. Place (do not...
Use & Care Guide
Page 15
... detergent from dishes prior to loading (do not prerinse). Clean it difficult to 120ºF (49°C). See "Cleaning Instructions" in the drain or disposer. Call for dishwashers. If dishwasher is loaded correctly. Check for food obstructions in the "Filtration System" section for tougher loads. NOTE.... Suds can occur periodically throughout the cycle while the dishwasher is opened at any time during the cycle and when the door is draining. Set your house fuse or circuit breaker. If foam or suds are properly installed. See "Cleaning Instructions" in the lower rack....
... detergent from dishes prior to loading (do not prerinse). Clean it difficult to 120ºF (49°C). See "Cleaning Instructions" in the drain or disposer. Call for dishwashers. If dishwasher is loaded correctly. Check for food obstructions in the "Filtration System" section for tougher loads. NOTE.... Suds can occur periodically throughout the cycle while the dishwasher is opened at any time during the cycle and when the door is draining. Set your house fuse or circuit breaker. If foam or suds are properly installed. See "Cleaning Instructions" in the lower rack....

Installation Guide
Page 2
...Electrical Connection 10 Prepare Dishwasher 11 Remove Access Panel 11 Connect Water Line to Fill Valve 12 Connect Fill Hose to Fill Valve 13 Drain Hose Connection 13 Power Cord Connection 14 Install Door Handle 16 Place Diswasher in Cabinet 16 Custom Panel Installation 17 Choose Anchor Attachment Method... Check 18 Secure Dishwasher in Cabinet Opening 19 Direct Wire Connection 20 Connect Water Line to House Shutoff Valve 22 Connect Drain Hose 22 Complete Installation 24 Install Access Panel 25 Check Operation 26 If Dishwasher Does Not Operate 26 Additional Tips 26 2
...Electrical Connection 10 Prepare Dishwasher 11 Remove Access Panel 11 Connect Water Line to Fill Valve 12 Connect Fill Hose to Fill Valve 13 Drain Hose Connection 13 Power Cord Connection 14 Install Door Handle 16 Place Diswasher in Cabinet 16 Custom Panel Installation 17 Choose Anchor Attachment Method... Check 18 Secure Dishwasher in Cabinet Opening 19 Direct Wire Connection 20 Connect Water Line to House Shutoff Valve 22 Connect Drain Hose 22 Complete Installation 24 Install Access Panel 25 Check Operation 26 If Dishwasher Does Not Operate 26 Additional Tips 26 2

Installation Guide
Page 3
...;■ Slowly open door. WARNING Tip Over Hazard Do not use dishwasher until latched. Do not push down on your appliance. Remove shipping materials and drain hose. Always read and obey all governing codes and ordinances. ■■ Install this manual and on open dishwasher door while someone grasps the rear...
...;■ Slowly open door. WARNING Tip Over Hazard Do not use dishwasher until latched. Do not push down on your appliance. Remove shipping materials and drain hose. Always read and obey all governing codes and ordinances. ■■ Install this manual and on open dishwasher door while someone grasps the rear...


