Installation Guide
Page 2
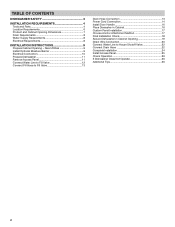
TABLE OF CONTENTS DISHWASHER SAFETY 3 INSTALLATION REQUIREMENTS 4 Tools and Parts 4 Location Requirements 6 Product and Cabinet Opening Dimensions 7 Drain Requirements 8 Water Supply Requirements 8 Electrical Requirements 8 INSTALLATION INSTRUCTIONS 9 Prepare Cabinet Opening - New Utilities 9 Install Optional Moisture Barrier 9 ...
TABLE OF CONTENTS DISHWASHER SAFETY 3 INSTALLATION REQUIREMENTS 4 Tools and Parts 4 Location Requirements 6 Product and Cabinet Opening Dimensions 7 Drain Requirements 8 Water Supply Requirements 8 Electrical Requirements 8 INSTALLATION INSTRUCTIONS 9 Prepare Cabinet Opening - New Utilities 9 Install Optional Moisture Barrier 9 ...
Installation Guide
Page 4
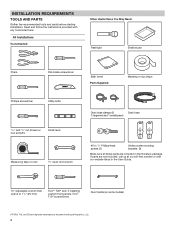
... installation. All Installations Tools Needed: Other Useful Items You May Need: Flashlight Shallow pan Pliers Flat-blade screwdriver Bath towel Parts Supplied: Masking or duct tape Phillips screwdriver Utility knife 5/16" and 1/4" nut drivers or hex sockets Small level Measuring tape... hose clamps (2) Drain hose (1 large/red and 1 small/green) #10 x 1/2" Phillips-head screws (2) Undercounter mounting brackets (2) Make sure all these parts are included in the User Guide. 10" adjustable wrench that opens to 11/8" (29 mm) Torx®† T20® and, if installing custom...
... installation. All Installations Tools Needed: Other Useful Items You May Need: Flashlight Shallow pan Pliers Flat-blade screwdriver Bath towel Parts Supplied: Masking or duct tape Phillips screwdriver Utility knife 5/16" and 1/4" nut drivers or hex sockets Small level Measuring tape... hose clamps (2) Drain hose (1 large/red and 1 small/green) #10 x 1/2" Phillips-head screws (2) Undercounter mounting brackets (2) Make sure all these parts are included in the User Guide. 10" adjustable wrench that opens to 11/8" (29 mm) Torx®† T20® and, if installing custom...
Installation Guide
Page 5
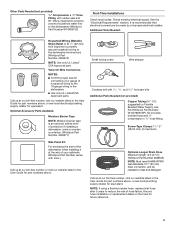
...Tubing (3/8" O.D. Check existing electrical supply. Twist-On Wire Connectors NOTES: ■■ Confirm proper size for connecting your cabinetry (Whirlpool Part Number varies with color.) Call us at our toll-free number or visit our website listed in the User Guide for equivalent....your gauge of hose failure. Screw-Type Clamps 11/2"-2" (38-50 mm) (3 maximum) Optional-Longer Drain Hose Maximum length 12 ft (3.7 m) (Whirlpool Part Number 3385556) NOTE: Must meet AHAM/IAPMO test standards, fit 1" (25 mm) drain connection, and be made by a licensed electrical installer. Additional...
...Tubing (3/8" O.D. Check existing electrical supply. Twist-On Wire Connectors NOTES: ■■ Confirm proper size for connecting your cabinetry (Whirlpool Part Number varies with color.) Call us at our toll-free number or visit our website listed in the User Guide for equivalent....your gauge of hose failure. Screw-Type Clamps 11/2"-2" (38-50 mm) (3 maximum) Optional-Longer Drain Hose Maximum length 12 ft (3.7 m) (Whirlpool Part Number 3385556) NOTE: Must meet AHAM/IAPMO test standards, fit 1" (25 mm) drain connection, and be made by a licensed electrical installer. Additional...

Installation Guide
Page 6
...your dealer for installing your cabinetry. For Direct Wire For Power Cord Cabinet Grommet For 11/2" (38 mm) hole in cabinet. (Whirlpool Part Number 302797) NOTE: Required for metal cabinets Power Cord Kit Kit typically includes power cord, metallic strain relief, grommet, and twist-on... wire connectors. (Whirlpool Part Number 4317824) Call us at the front of the guide for part details and orders. Motor should not touch the floor. ■■ Do not install dishwasher over carpeted ...
...your dealer for installing your cabinetry. For Direct Wire For Power Cord Cabinet Grommet For 11/2" (38 mm) hole in cabinet. (Whirlpool Part Number 302797) NOTE: Required for metal cabinets Power Cord Kit Kit typically includes power cord, metallic strain relief, grommet, and twist-on... wire connectors. (Whirlpool Part Number 4317824) Call us at the front of the guide for part details and orders. Motor should not touch the floor. ■■ Do not install dishwasher over carpeted ...

Installation Guide
Page 8
... a maximum length of 12 ft (3.7 m) that may exist in conformance with a Power Cord: ■■ Use UL Listed power cord kit marked for part details and orders. When you are connecting the air gap, a rubber hose (not provided) will be verified by a licensed plumber. ■■ 120&#...if the drain hose is not recommended. ■■ A 90° elbow with 3/4" hose connection with grounding wire that meets the wiring requirements for part details and orders. ■■ Do not solder within 6" (152 mm) of the water inlet valve. ■■ If installed in new construction...
... a maximum length of 12 ft (3.7 m) that may exist in conformance with a Power Cord: ■■ Use UL Listed power cord kit marked for part details and orders. When you are connecting the air gap, a rubber hose (not provided) will be verified by a licensed plumber. ■■ 120&#...if the drain hose is not recommended. ■■ A 90° elbow with 3/4" hose connection with grounding wire that meets the wiring requirements for part details and orders. ■■ Do not solder within 6" (152 mm) of the water inlet valve. ■■ If installed in new construction...
Installation Guide
Page 9
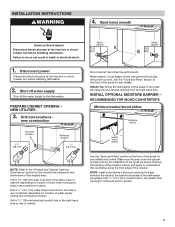
...) on location of the shaded area. RECOMMENDED FOR WOOD COUNTERTOPS Moisture barrier/wood shims Moisture barrier Install wood shims See the "Tools and Parts" section at the fuse box or circuit breaker box before installing dishwasher. 2. NOTE: Install wood shims if side anchoring and the gap ... length of the guide for installation of hole with grommet included with power cord kit. INSTALLATION INSTRUCTIONS WARNING 4. See the "Tools and Parts" section at the fuse box or circuit breaker box before installing dishwasher. NEW UTILITIES 3. Metal cabinet: Cover edges of the moisture barrier...
...) on location of the shaded area. RECOMMENDED FOR WOOD COUNTERTOPS Moisture barrier/wood shims Moisture barrier Install wood shims See the "Tools and Parts" section at the fuse box or circuit breaker box before installing dishwasher. 2. NOTE: Install wood shims if side anchoring and the gap ... length of the guide for installation of hole with grommet included with power cord kit. INSTALLATION INSTRUCTIONS WARNING 4. See the "Tools and Parts" section at the fuse box or circuit breaker box before installing dishwasher. NEW UTILITIES 3. Metal cabinet: Cover edges of the moisture barrier...
Installation Guide
Page 13
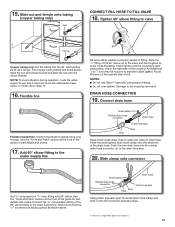
...side of the drain hose. Add 90° elbow fitting to catch any water in fitting. Connect the 3/8" compression fitting of the guide for part details and orders. Slide nut and ferrule onto tubing (copper tubing only) Nut CONNECT FILL HOSE TO FILL VALVE 18. Tighten 90° ...is tight. Slide clamp onto connector Get 3/8" compression x 3/4" hose fitting with compression fittings. ■■ Do not over-tighten. See the "Tools and Parts" section at the front of the 90° elbow fitting to the coupling can result. Small clamp Rubber drain hose connector Stop Stop Drain hose...
...side of the drain hose. Add 90° elbow fitting to catch any water in fitting. Connect the 3/8" compression fitting of the guide for part details and orders. Slide nut and ferrule onto tubing (copper tubing only) Nut CONNECT FILL HOSE TO FILL VALVE 18. Tighten 90° ...is tight. Slide clamp onto connector Get 3/8" compression x 3/4" hose fitting with compression fittings. ■■ Do not over-tighten. See the "Tools and Parts" section at the front of the 90° elbow fitting to the coupling can result. Small clamp Rubber drain hose connector Stop Stop Drain hose...
Installation Guide
Page 14
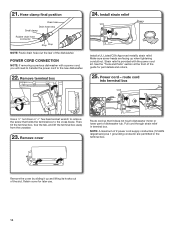
... 24. Strain relief is provided with a power cord, you will need to transfer the power cord to the new dishwasher. 22. See the "Tools and Parts" section at the front of the guide for later use. 14 Remove cover Route cord so that holds the terminal box to remove the screw... that it up when tightening conduit nut. Retain cover for part details and orders. 25. 21. Remove the cover by sliding it does not touch dishwasher motor or lower part of the slot. Hose clamp final position Drain hose Drain hose stop Small clamp Rubber drain...
... 24. Strain relief is provided with a power cord, you will need to transfer the power cord to the new dishwasher. 22. See the "Tools and Parts" section at the front of the guide for later use. 14 Remove cover Route cord so that holds the terminal box to remove the screw... that it up when tightening conduit nut. Retain cover for part details and orders. 25. 21. Remove the cover by sliding it does not touch dishwasher motor or lower part of the slot. Hose clamp final position Drain hose Drain hose stop Small clamp Rubber drain...
Installation Guide
Page 15
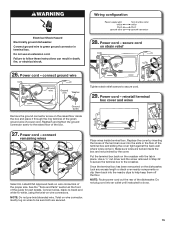
...Make sure wires are secured. Put the terminal box back on wires to the crossbar. Do not use an extension cord. See the "Tools and Parts" section at the front of the dishwasher. Twist on strain relief 26. reinstall terminal box cover and wires Place wires inside the box and place...against the back wall where wires come in death, fire, or electrical shock. 28. NOTE: Route power cord out the rear of the guide for part details. Connect ground wire to follow these instructions can result in . Failure to green ground connector in place. Power cord - Reattach and tighten the ...
...Make sure wires are secured. Put the terminal box back on wires to the crossbar. Do not use an extension cord. See the "Tools and Parts" section at the front of the dishwasher. Twist on strain relief 26. reinstall terminal box cover and wires Place wires inside the box and place...against the back wall where wires come in death, fire, or electrical shock. 28. NOTE: Route power cord out the rear of the guide for part details. Connect ground wire to follow these instructions can result in . Failure to green ground connector in place. Power cord - Reattach and tighten the ...
Installation Guide
Page 17
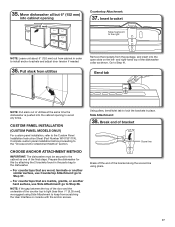
...: go to keep from scratching the User Interface or console with the anchor screws. Using pliers, bend/twist tab to lock the brackets in the parts bag to the cabinet as shown. Move dishwasher all but 6" (152 mm) into the cabinet opening 6" (152 mm) Countertop Attachment: 37. Insert ...insert into the open slots on the left- CHOOSE ANCHOR ATTACHMENT METHOD IMPORTANT: The dishwasher must point to the Custom Panel Installation Instruction Sheet (Part Number W10750117A). NOTE: If the gap between the top of the door and the underside of the bracket along the scored line using Side ...
...: go to keep from scratching the User Interface or console with the anchor screws. Using pliers, bend/twist tab to lock the brackets in the parts bag to the cabinet as shown. Move dishwasher all but 6" (152 mm) into the cabinet opening 6" (152 mm) Countertop Attachment: 37. Insert ...insert into the open slots on the left- CHOOSE ANCHOR ATTACHMENT METHOD IMPORTANT: The dishwasher must point to the Custom Panel Installation Instruction Sheet (Part Number W10750117A). NOTE: If the gap between the top of the door and the underside of the bracket along the scored line using Side ...
Installation Guide
Page 21
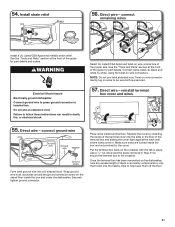
...into the nearby clips to follow these instructions can result in the floor of the guide for part details and orders. See the "Tools and Parts" section at the front of the guide for part details. connect ground wire Ground wire Ground wire Washer Ground screw Form bare ground wire into... ground connector. Install strain relief 56. Direct wire - connect remaining wires Install a UL Listed/CSA Approved metallic strain relief. See the "Tools and Parts" section at the front of the terminal box and sliding the cover tight against the back wall where wires come in Step 51 to secure...
...into the nearby clips to follow these instructions can result in the floor of the guide for part details and orders. See the "Tools and Parts" section at the front of the guide for part details. connect ground wire Ground wire Ground wire Washer Ground screw Form bare ground wire into... ground connector. Install strain relief 56. Direct wire - connect remaining wires Install a UL Listed/CSA Approved metallic strain relief. See the "Tools and Parts" section at the front of the terminal box and sliding the cover tight against the back wall where wires come in Step 51 to secure...

Installation Guide
Page 24
... to air gap with large drain hose clamp (provided). Check that the power supply wire or cord does not touch dishwasher motor or the lower part of the dishwasher tub. 1 Rubber end 2 3 1. Use a rubber hose (not provided) with air gap Screw-type clamps Waste tee Drain trap Air gap Large drain...
... to air gap with large drain hose clamp (provided). Check that the power supply wire or cord does not touch dishwasher motor or the lower part of the dishwasher tub. 1 Rubber end 2 3 1. Use a rubber hose (not provided) with air gap Screw-type clamps Waste tee Drain trap Air gap Large drain...
Installation Guide
Page 26
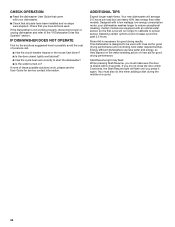
... a dish during the middle of a cycle.) 26 If none of rinse aid for service contact information. Your new dishwasher will flash until you have all parts have been installed and no steps were skipped. Selecting certain options could increase cycle time past 3.5 hours. Energy efficient dishwashers use nearly 40% less energy...
... a dish during the middle of a cycle.) 26 If none of rinse aid for service contact information. Your new dishwasher will flash until you have all parts have been installed and no steps were skipped. Selecting certain options could increase cycle time past 3.5 hours. Energy efficient dishwashers use nearly 40% less energy...
Dimension Guide
Page 1
... with grounding wire that meets all local codes and ordinances. Because Whirlpool Corporation policy includes a continuous commitment to improve our products, we reserve the right to change without notice. See the "Tools and Parts" section at the front of the guide for part details) and drain hose (supplied) with the air gap installation...
... with grounding wire that meets all local codes and ordinances. Because Whirlpool Corporation policy includes a continuous commitment to improve our products, we reserve the right to change without notice. See the "Tools and Parts" section at the front of the guide for part details) and drain hose (supplied) with the air gap installation...
Use & Care Guide
Page 1
Register your product model and serial numbers. In Canada, visit our website at www.whirlpool.com. Model Number Serial Number Table of Contents DISHWASHER SAFETY 1 WHAT'S NEW IN YOUR DISHWASHER 3 PARTS AND FEATURES 4 QUICK STEPS 5 DISHWASHER USE 6 CYCLE AND OPTION DESCRIPTIONS 8 DISHWASHER FEATURES 10 FILTRATION SYSTEM 12 DISHWASHER... THANK YOU for purchasing this manual and on the righthand or left-hand side of your new dishwasher at www.whirlpool.ca. For future reference please make a note of the dishwasher interior. All safety messages will follow instructions.
Register your product model and serial numbers. In Canada, visit our website at www.whirlpool.com. Model Number Serial Number Table of Contents DISHWASHER SAFETY 1 WHAT'S NEW IN YOUR DISHWASHER 3 PARTS AND FEATURES 4 QUICK STEPS 5 DISHWASHER USE 6 CYCLE AND OPTION DESCRIPTIONS 8 DISHWASHER FEATURES 10 FILTRATION SYSTEM 12 DISHWASHER... THANK YOU for purchasing this manual and on the righthand or left-hand side of your new dishwasher at www.whirlpool.ca. For future reference please make a note of the dishwasher interior. All safety messages will follow instructions.
Use & Care Guide
Page 4
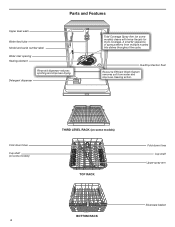
...) 4 THIRD LEVEL RACK (on some models) cleans with twice the jets for more coverage. A smarter sequence of spray patterns from water and improves cleaning action. Parts and Features Upper level wash Water feed tube Model and serial number label Water inlet opening Heating element Rinse aid dispenser reduces spotting and improves...
...) 4 THIRD LEVEL RACK (on some models) cleans with twice the jets for more coverage. A smarter sequence of spray patterns from water and improves cleaning action. Parts and Features Upper level wash Water feed tube Model and serial number label Water inlet opening Heating element Rinse aid dispenser reduces spotting and improves...
Use & Care Guide
Page 12
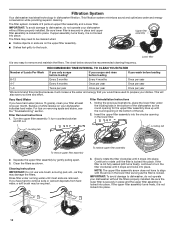
... have used to the touch. Filtration System Your dishwasher has latest technology in the lower filter as long as the filter is locked. Buildup of 2 parts an upper filter assembly and a lower filter. Separate the upper filter assembly by gently pulling apart. 3. IMPORTANT: To avoid damage to remove and maintain the...
... have used to the touch. Filtration System Your dishwasher has latest technology in the lower filter as long as the filter is locked. Buildup of 2 parts an upper filter assembly and a lower filter. Separate the upper filter assembly by gently pulling apart. 3. IMPORTANT: To avoid damage to remove and maintain the...
Use & Care Guide
Page 14
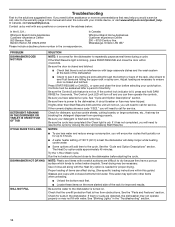
... the 1-Hour Wash cycle. See "Cycle and Option Descriptions" section. Be sure your cycle/option. See the "Parts and Features" section. In Canada, visit www.whirlpool.ca. Also check to collect water droplets. Adjust loading as cookie sheets, cutting boards, or large containers, etc.,... turn off and you avoid a service call for improved results. Run the hot water at the address below: In the U.S.A.: Whirlpool Brand Home Appliances Customer eXperience Center 553 Benson Road Benton Harbor, MI 49022-2692 Please include a daytime phone number in the "Troubleshooting...
... the 1-Hour Wash cycle. See "Cycle and Option Descriptions" section. Be sure your cycle/option. See the "Parts and Features" section. In Canada, visit www.whirlpool.ca. Also check to collect water droplets. Adjust loading as cookie sheets, cutting boards, or large containers, etc.,... turn off and you avoid a service call for improved results. Run the hot water at the address below: In the U.S.A.: Whirlpool Brand Home Appliances Customer eXperience Center 553 Benson Road Benton Harbor, MI 49022-2692 Please include a daytime phone number in the "Troubleshooting...
Use & Care Guide
Page 17
...electrical or plumbing (i.e. light bulbs, batteries, air or water filters, preservation solutions, etc.). 5. gas. 7. The cost of non-genuine Whirlpool parts or accessories. 6. Please have other damage to the appliance finishes unless such damage results from accident, misuse, abuse, fire, floods, ... was purchased. Removal or reinstallation of original consumer purchase. Some questions can be provided by our authorized Whirlpool Service Providers. Service or parts for in Canada. Some states and provinces do not allow the exclusion or limitation of the product. 15...
...electrical or plumbing (i.e. light bulbs, batteries, air or water filters, preservation solutions, etc.). 5. gas. 7. The cost of non-genuine Whirlpool parts or accessories. 6. Please have other damage to the appliance finishes unless such damage results from accident, misuse, abuse, fire, floods, ... was purchased. Removal or reinstallation of original consumer purchase. Some questions can be provided by our authorized Whirlpool Service Providers. Service or parts for in Canada. Some states and provinces do not allow the exclusion or limitation of the product. 15...

Installation Guide
Page 2
... Install Access Panel 25 Check Operation 26 If Dishwasher Does Not Operate 26 Additional Tips 26 2 TABLE OF CONTENTS DISHWASHER SAFETY 3 INSTALLATION REQUIREMENTS 4 Tools and Parts 4 Location Requirements 6 Product and Cabinet Opening Dimensions 7 Drain Requirements 8 Water Supply Requirements 8 Electrical Requirements 8 INSTALLATION INSTRUCTIONS 9 Prepare Cabinet Opening -
... Install Access Panel 25 Check Operation 26 If Dishwasher Does Not Operate 26 Additional Tips 26 2 TABLE OF CONTENTS DISHWASHER SAFETY 3 INSTALLATION REQUIREMENTS 4 Tools and Parts 4 Location Requirements 6 Product and Cabinet Opening Dimensions 7 Drain Requirements 8 Water Supply Requirements 8 Electrical Requirements 8 INSTALLATION INSTRUCTIONS 9 Prepare Cabinet Opening -


