Installation Guide
Page 2
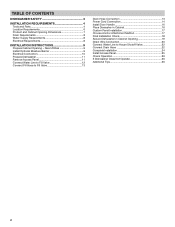
... Fill Valve 13 Drain Hose Connection 13 Power Cord Connection 14 Install Door Handle 16 Place Diswasher in Cabinet 16 Custom Panel Installation 17 Choose Anchor Attachment Method 17 Final Installation Check 18 Secure Dishwasher in Cabinet Opening 19 Direct Wire Connection ...Water Line to House Shutoff Valve 22 Connect Drain Hose 22 Complete Installation 24 Install Access Panel 25 Check Operation 26 If Dishwasher Does Not Operate 26 Additional Tips 26 2 TABLE OF CONTENTS DISHWASHER SAFETY 3 INSTALLATION REQUIREMENTS 4 Tools and Parts 4 Location Requirements 6 Product and ...
... Fill Valve 13 Drain Hose Connection 13 Power Cord Connection 14 Install Door Handle 16 Place Diswasher in Cabinet 16 Custom Panel Installation 17 Choose Anchor Attachment Method 17 Final Installation Check 18 Secure Dishwasher in Cabinet Opening 19 Direct Wire Connection ...Water Line to House Shutoff Valve 22 Connect Drain Hose 22 Complete Installation 24 Install Access Panel 25 Check Operation 26 If Dishwasher Does Not Operate 26 Additional Tips 26 2 TABLE OF CONTENTS DISHWASHER SAFETY 3 INSTALLATION REQUIREMENTS 4 Tools and Parts 4 Location Requirements 6 Product and ...

Installation Guide
Page 3
... Tip Over Hazard Do not use dishwasher until latched. Care shall be killed or seriously injured if you what the potential hazard is installed or removed, to meet all electrical and plumbing national and local codes and ordinances. You Need to the power cord. This is ... appliance. Doing so can happen if the instructions are very important. Always read and obey all governing codes and ordinances. ■■ Install this manual and on open dishwasher door while someone grasps the rear of injury, and tell you don't immediately follow instructions. All safety...
... Tip Over Hazard Do not use dishwasher until latched. Care shall be killed or seriously injured if you what the potential hazard is installed or removed, to meet all electrical and plumbing national and local codes and ordinances. You Need to the power cord. This is ... appliance. Doing so can happen if the instructions are very important. Always read and obey all governing codes and ordinances. ■■ Install this manual and on open dishwasher door while someone grasps the rear of injury, and tell you don't immediately follow instructions. All safety...
Installation Guide
Page 4
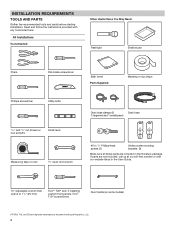
...parts are registred trademarks of Acument Intellectual Properties, LLC. 4 Read and follow the instructions provided with any tools listed here. All Installations Tools Needed: Other Useful Items You May Need: Flashlight Shallow pan Pliers Flat-blade screwdriver Bath towel Parts Supplied: Masking or duct... parts are included in the User Guide. 10" adjustable wrench that opens to 11/8" (29 mm) Torx®† T20® and, if installing custom front panels, Torx® T15® screwdrivers Door handle (on some models) †®TORX, T15, and T20 are not included, call...
...parts are registred trademarks of Acument Intellectual Properties, LLC. 4 Read and follow the instructions provided with any tools listed here. All Installations Tools Needed: Other Useful Items You May Need: Flashlight Shallow pan Pliers Flat-blade screwdriver Bath towel Parts Supplied: Masking or duct... parts are included in the User Guide. 10" adjustable wrench that opens to 11/8" (29 mm) Torx®† T20® and, if installing custom front panels, Torx® T15® screwdrivers Door handle (on some models) †®TORX, T15, and T20 are not included, call...
Installation Guide
Page 5
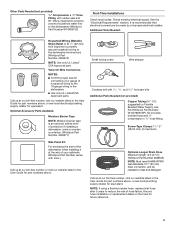
...): Copper Tubing (3/8" O.D. It is an optional, added level of protection if installing a dishwasher under a wooden countertop. (Whirlpool Part Number 4396277) Side Panel Kit For enclosing the side of the dishwasher when installing it at our toll-free number, visit our website listed in the User Guide... test standards, fit 1" (25 mm) drain connection, and be made by a licensed electrical installer. Twist-On Wire Connectors NOTES: ■■ Confirm proper size for connecting your cabinetry (Whirlpool Part Number varies with color.) Call us at the end of your gauge of hose failure....
...): Copper Tubing (3/8" O.D. It is an optional, added level of protection if installing a dishwasher under a wooden countertop. (Whirlpool Part Number 4396277) Side Panel Kit For enclosing the side of the dishwasher when installing it at our toll-free number, visit our website listed in the User Guide... test standards, fit 1" (25 mm) drain connection, and be made by a licensed electrical installer. Twist-On Wire Connectors NOTES: ■■ Confirm proper size for connecting your cabinetry (Whirlpool Part Number varies with color.) Call us at the end of your gauge of hose failure....

Installation Guide
Page 6
... access for loading and unloading dishes. Corner locations require a 2" (51 mm) minimum clearance between motor and flooring. NOTE: If dishwasher will be installed must be securely attached to the floor. ■■ The location where the dishwasher will be left unused for a period of time or in ...; The cabinet front to level dishwasher. For Direct Wire For Power Cord Cabinet Grommet For 11/2" (38 mm) hole in cabinet. (Whirlpool Part Number 302797) NOTE: Required for metal cabinets Power Cord Kit Kit typically includes power cord, metallic strain relief, grommet, and twist-on...
... access for loading and unloading dishes. Corner locations require a 2" (51 mm) minimum clearance between motor and flooring. NOTE: If dishwasher will be installed must be securely attached to the floor. ■■ The location where the dishwasher will be left unused for a period of time or in ...; The cabinet front to level dishwasher. For Direct Wire For Power Cord Cabinet Grommet For 11/2" (38 mm) hole in cabinet. (Whirlpool Part Number 302797) NOTE: Required for metal cabinets Power Cord Kit Kit typically includes power cord, metallic strain relief, grommet, and twist-on...

Installation Guide
Page 7
Insulation may be compressed (not used on dishwasher. C. May be installed. 3" (76 mm) 24" (620 mm) 21/4" (64 mm) 13/4" (44 mm) 61/4" (159 mm) 2" (51 mm) D. with wheels removed 30" (762 mm) 241/2" (622 mm) B C 3/4" (...19 mm) A 31/2" - 41/2" (88 mm - 106 mm) For 4" (100 mm) toe kick, height of the countertop. Check that would prohibit dishwasher installation. 34" (864 mm) D 4" (102 mm) 101/2" (267 mm) 63/4" (172 mm) NOTE: Shaded areas of opening is 24" (610 mm), not including the 3/4" (19 mm...
Insulation may be compressed (not used on dishwasher. C. May be installed. 3" (76 mm) 24" (620 mm) 21/4" (64 mm) 13/4" (44 mm) 61/4" (159 mm) 2" (51 mm) D. with wheels removed 30" (762 mm) 241/2" (622 mm) B C 3/4" (...19 mm) A 31/2" - 41/2" (88 mm - 106 mm) For 4" (100 mm) toe kick, height of the countertop. Check that would prohibit dishwasher installation. 34" (864 mm) D 4" (102 mm) 101/2" (267 mm) 63/4" (172 mm) NOTE: Shaded areas of opening is 24" (610 mm), not including the 3/4" (19 mm...

Installation Guide
Page 8
.../NFPA 70 - When you are permitted in accordance with compression fitting or flexible braided water supply line. copper tubing with the air gap installation instructions. See the "Tools and Parts" section at the front of 2 field wiring supply conductors (12 AWG largest size) plus 1 grounding... conductor are connecting the air gap, a rubber hose (not provided) will be installed in the terminal box. or 20-amp, fused electrical supply ■■ Copper wire only ■■ A maximum of the guide for your...
.../NFPA 70 - When you are permitted in accordance with compression fitting or flexible braided water supply line. copper tubing with the air gap installation instructions. See the "Tools and Parts" section at the front of 2 field wiring supply conductors (12 AWG largest size) plus 1 grounding... conductor are connecting the air gap, a rubber hose (not provided) will be installed in the terminal box. or 20-amp, fused electrical supply ■■ Copper wire only ■■ A maximum of the guide for your...
Installation Guide
Page 9
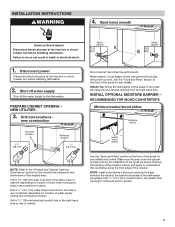
...each side or are greater than the length of the shaded area. Wood cabinet Metal cabinet Wood cabinet: Sand the hole until smooth. INSTALLATION INSTRUCTIONS WARNING 4. PREPARE CABINET OPENING - Make sure the area under the cabinet is clean and dry for the correct hole placement and ... cabinet: Cover edges of the counter. Sand holes smooth Electrical Shock Hazard Disconnect electrical power at the fuse box or circuit breaker box before installing dishwasher. Drill a 11/2" (38 mm) drain hose hole in the right-hand side or rear of the guide for part details and...
...each side or are greater than the length of the shaded area. Wood cabinet Metal cabinet Wood cabinet: Sand the hole until smooth. INSTALLATION INSTRUCTIONS WARNING 4. PREPARE CABINET OPENING - Make sure the area under the cabinet is clean and dry for the correct hole placement and ... cabinet: Cover edges of the counter. Sand holes smooth Electrical Shock Hazard Disconnect electrical power at the fuse box or circuit breaker box before installing dishwasher. Drill a 11/2" (38 mm) drain hose hole in the right-hand side or rear of the guide for part details and...
Installation Guide
Page 10
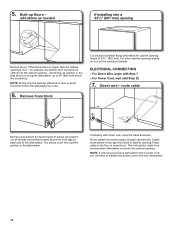
.... 10 5. add shims, as shown. ELECTRICAL CONNECTION - route cable Foam block Remove and discard the foam blocks (if blocks are present; If installing with Step 7 - This will need to transfer the power cord to the right front side of cabinet opening 's floor - For other cabinet opening..., the kitchen floor tile does not extend into cabinet opening - For Direct Wire, begin with direct wire, route the cable as needed If installing into a 331/2" (851 mm) opening Built-up to avoid movement when the dishwasher is moved into the cabinet opening . Route cable from...
.... 10 5. add shims, as shown. ELECTRICAL CONNECTION - route cable Foam block Remove and discard the foam blocks (if blocks are present; If installing with Step 7 - This will need to transfer the power cord to the right front side of cabinet opening 's floor - For other cabinet opening..., the kitchen floor tile does not extend into cabinet opening - For Direct Wire, begin with direct wire, route the cable as needed If installing into a 331/2" (851 mm) opening Built-up to avoid movement when the dishwasher is moved into the cabinet opening . Route cable from...
Installation Guide
Page 11
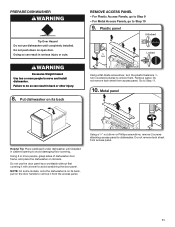
...Do not remove tech sheet from the access panel. Metal panel Helpful Tip: Place cardboard under dishwasher until completely installed. Do not use dishwasher until installed in cabinet opening to avoid damaging floor covering. NOTE: On some models, once the dishwasher is on its... turn Using a flat-blade screwdriver, turn the plastic fasteners 1/4 turn counterclockwise to Step 11. 10. Using 2 or more people to move and install dishwasher. Go to unlock them. Using a 1/4" nut driver or Phillips screwdriver, remove 2 screws attaching access panel to Step 10 9. PREPARE DISHWASHER ...
...Do not remove tech sheet from the access panel. Metal panel Helpful Tip: Place cardboard under dishwasher until completely installed. Do not use dishwasher until installed in cabinet opening to avoid damaging floor covering. NOTE: On some models, once the dishwasher is on its... turn Using a flat-blade screwdriver, turn the plastic fasteners 1/4 turn counterclockwise to Step 11. 10. Using 2 or more people to move and install dishwasher. Go to unlock them. Using a 1/4" nut driver or Phillips screwdriver, remove 2 screws attaching access panel to Step 10 9. PREPARE DISHWASHER ...
Installation Guide
Page 12
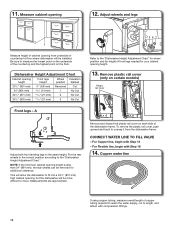
.... For Copper line, begin with Step 14 - Dishwasher Height Adjustment Chart Cabinet opening height is less than 34" (864 mm), the rear wheels can be installed. NOTE: If the minimum cabinet opening height Front legs height Wheel Insulation position blanket 331/2" (851 mm) 34" (864 mm) 341/4" (871 mm) 341/2" (876...
.... For Copper line, begin with Step 14 - Dishwasher Height Adjustment Chart Cabinet opening height is less than 34" (864 mm), the rear wheels can be installed. NOTE: If the minimum cabinet opening height Front legs height Wheel Insulation position blanket 331/2" (851 mm) 34" (864 mm) 341/4" (871 mm) 341/2" (876...
Installation Guide
Page 14
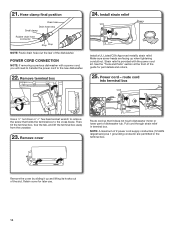
... through strain relief in the terminal box. Remove the cover by sliding it does not touch dishwasher motor or lower part of the slot. Install strain relief Install a UL Listed/CSA Approved metallic strain relief. Power cord - Remove cover Route cord so that holds the terminal box to the new dishwasher. 22...
... through strain relief in the terminal box. Remove the cover by sliding it does not touch dishwasher motor or lower part of the slot. Install strain relief Install a UL Listed/CSA Approved metallic strain relief. Power cord - Remove cover Route cord so that holds the terminal box to the new dishwasher. 22...
Installation Guide
Page 16
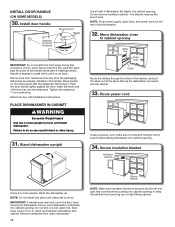
..., cover the floor when moving the dishwasher. If door panel has a protective film, peel film back past snug. Setscrews are already installed in bottom of the handle studs before sliding dishwasher into cabinet opening. 34. Secure insulation blanket Insulation blanket Using 2 or more people to... Do not scratch the front panel during this procedure. Retain hex key with the setscrews facing down. Remove cardboard from the packaging. Install door handle Setscrew (in the handle. Remove the door handle and hex key from under dishwasher. 16 Secure blanket NOTE: Make sure...
..., cover the floor when moving the dishwasher. If door panel has a protective film, peel film back past snug. Setscrews are already installed in bottom of the handle studs before sliding dishwasher into cabinet opening. 34. Secure insulation blanket Insulation blanket Using 2 or more people to... Do not scratch the front panel during this procedure. Retain hex key with the setscrews facing down. Remove cardboard from the packaging. Install door handle Setscrew (in the handle. Remove the door handle and hex key from under dishwasher. 16 Secure blanket NOTE: Make sure...
Installation Guide
Page 17
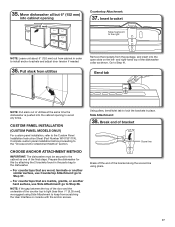
...Countertop Attachment: go to lock the brackets in place. 35. CHOOSE ANCHOR ATTACHMENT METHOD IMPORTANT: The dishwasher must point to the Custom Panel Installation Instruction Sheet (Part Number W10750117A). NOTE: Leave unit about 6" (152 mm) out from cabinet in the parts bag to keep from ... (less than 1/4" [6,35 mm]), we suggest using pliers. 17 Go to the "Choose Anchor Attachment Method" section. Complete custom panel installation before proceeding to Step 41. Using pliers, bend/twist tab to Step 38. For countertops that are marble, granite, or another similar surface...
...Countertop Attachment: go to lock the brackets in place. 35. CHOOSE ANCHOR ATTACHMENT METHOD IMPORTANT: The dishwasher must point to the Custom Panel Installation Instruction Sheet (Part Number W10750117A). NOTE: Leave unit about 6" (152 mm) out from cabinet in the parts bag to keep from ... (less than 1/4" [6,35 mm]), we suggest using pliers. 17 Go to the "Choose Anchor Attachment Method" section. Complete custom panel installation before proceeding to Step 41. Using pliers, bend/twist tab to Step 38. For countertops that are marble, granite, or another similar surface...
Installation Guide
Page 18
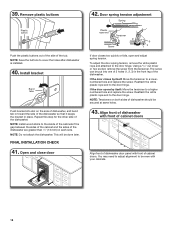
... be secured at same holes. 43. Reattach the white plastic rope end to cover the holes after dishwasher is installed. 40. NOTE: Save the buttons to the door hinge. FINAL INSTALLATION CHECK 41. Open and close door 42. To adjust the door spring tension, remove the white plastic rope end... NOTE: Tensioners on both sides of the dishwasher are greater than 1/2" (13 mm) on the side of dishwasher, and bend tab in place. NOTE: Install wood shims to a lowernumbered hole and replace the screw. Reattach the white plastic rope end to the door hinge. Align front of dishwasher with front...
... be secured at same holes. 43. Reattach the white plastic rope end to cover the holes after dishwasher is installed. 40. NOTE: Save the buttons to the door hinge. FINAL INSTALLATION CHECK 41. Open and close door 42. To adjust the door spring tension, remove the white plastic rope end... NOTE: Tensioners on both sides of the dishwasher are greater than 1/2" (13 mm) on the side of dishwasher, and bend tab in place. NOTE: Install wood shims to a lowernumbered hole and replace the screw. Reattach the white plastic rope end to the door hinge. Align front of dishwasher with front...

Installation Guide
Page 19
... to back and side-to the countertop or side cabinet. Check that dishwasher is plumb. With some installations, it may be secured to keep it from falling into bottom of dishwasher. ■■ Locate brackets installed in the "Choose Anchor Attachment Method" section, either on top or on front of dishwasher. Open...
... to back and side-to the countertop or side cabinet. Check that dishwasher is plumb. With some installations, it may be secured to keep it from falling into bottom of dishwasher. ■■ Locate brackets installed in the "Choose Anchor Attachment Method" section, either on top or on front of dishwasher. Open...
Installation Guide
Page 21
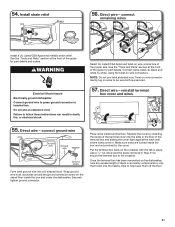
Direct wire - connect remaining wires Install a UL Listed/CSA Approved metallic strain relief. See the "Tools and Parts" section at the front of the proper size. Gently tug on wire connector. ... and under the dishwasher. Connect wires, black-to-black and white-to follow these instructions can result in place. Make sure wires are secured. 57. Install strain relief 56. Failure to -white, using the twist-on the dishwasher, tuck any excess length or slack over nearby components or clip them off...
Direct wire - connect remaining wires Install a UL Listed/CSA Approved metallic strain relief. See the "Tools and Parts" section at the front of the proper size. Gently tug on wire connector. ... and under the dishwasher. Connect wires, black-to-black and white-to follow these instructions can result in place. Make sure wires are secured. 57. Install strain relief 56. Failure to -white, using the twist-on the dishwasher, tuck any excess length or slack over nearby components or clip them off...
Installation Guide
Page 22
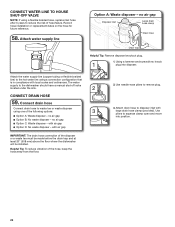
...to the dishwasher should have a manual shut-off valve located under the sink. 2 CONNECT DRAIN HOSE 59. with large drain hose clamp (provided). Record hose installation or replacement dates on the hose for future reference. 58. Connect drain hose Connect drain hose to disposer inlet with air gap ■■ Option...disposer or a waste tee must be made before the drain trap and at least 20" (508 mm) above the floor where the dishwasher will be installed. no air gap Disposer inlet Large drain hose clamp Drain hose Drain trap Helpful Tip: Remove disposer knockout plug. 1.
...to the dishwasher should have a manual shut-off valve located under the sink. 2 CONNECT DRAIN HOSE 59. with large drain hose clamp (provided). Record hose installation or replacement dates on the hose for future reference. 58. Connect drain hose Connect drain hose to disposer inlet with air gap ■■ Option...disposer or a waste tee must be made before the drain trap and at least 20" (508 mm) above the floor where the dishwasher will be installed. no air gap Disposer inlet Large drain hose clamp Drain hose Drain trap Helpful Tip: Remove disposer knockout plug. 1.

Installation Guide
Page 24
... to air gap with air gap Screw-type clamps Waste tee Drain trap Air gap Large drain hose clamp Rubber hose connector Drain hose COMPLETE INSTALLATION Check that the power supply wire or cord does not touch dishwasher motor or the lower part of the dishwasher tub. NOTE: Do not cut...
... to air gap with air gap Screw-type clamps Waste tee Drain trap Air gap Large drain hose clamp Rubber hose connector Drain hose COMPLETE INSTALLATION Check that the power supply wire or cord does not touch dishwasher motor or the lower part of the dishwasher tub. NOTE: Do not cut...

Installation Guide
Page 25
... touches the floor. Make sure insulation does not interfere with the float assembly. 63. Check access panel edge Place the panel against the dishwasher leg. INSTALL ACCESS PANEL - Adjust if necessary. 64. Go to lock into place. Tighten access panel screws. 25
... touches the floor. Make sure insulation does not interfere with the float assembly. 63. Check access panel edge Place the panel against the dishwasher leg. INSTALL ACCESS PANEL - Adjust if necessary. 64. Go to lock into place. Tighten access panel screws. 25


