
Use & Care Guide
Page 5
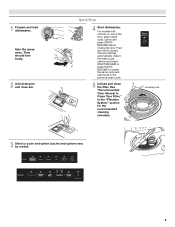
1 Prepare and load dishwasher. Spin the spray arms. They should turn freely. 2 Add detergent and rinse aid. The door latches automatically. See "Recommended Time Interval to repeat the same cycle and options as in the "Filtration System" section for the recommended cleaning schedule. Select ... the previous wash cycle. 5 Unload and clean the filter. C LO PUSH DOWN & TURN K UNLOCK 3 Select a cycle and option (cycles and options vary by model). 5 Push door firmly closed. For models with controls on top of the door, select wash cycle, option and press START/ RESUME before...
1 Prepare and load dishwasher. Spin the spray arms. They should turn freely. 2 Add detergent and rinse aid. The door latches automatically. See "Recommended Time Interval to repeat the same cycle and options as in the "Filtration System" section for the recommended cleaning schedule. Select ... the previous wash cycle. 5 Unload and clean the filter. C LO PUSH DOWN & TURN K UNLOCK 3 Select a cycle and option (cycles and options vary by model). 5 Push door firmly closed. For models with controls on top of the door, select wash cycle, option and press START/ RESUME before...

Use & Care Guide
Page 6
Remove labels from forming droplets that when the dishwasher door is important for optimum wash. (See illustration, right.) STEP 2 Add Detergent NOTE: If you do not touch one another. Store tightly closed no items are blocking the detergent dispenser. ■ Items should be clean. ...the items - Without rinse aid your silverware separated for the water spray to use rinse aid for standard powdered detergent. It is closed detergent B container in the graphics above. MAIN WASH WASH ■ For optimum performance, tablet detergent is designed to reach all soiled...
Remove labels from forming droplets that when the dishwasher door is important for optimum wash. (See illustration, right.) STEP 2 Add Detergent NOTE: If you do not touch one another. Store tightly closed no items are blocking the detergent dispenser. ■ Items should be clean. ...the items - Without rinse aid your silverware separated for the water spray to use rinse aid for standard powdered detergent. It is closed detergent B container in the graphics above. MAIN WASH WASH ■ For optimum performance, tablet detergent is designed to reach all soiled...

Use & Care Guide
Page 7
... cycles and options affect cycle length. STEP 4 Start or Resume a Cycle ■ Run hot water at the beginning of the fill - - - Push door firmly closed. The door latches automatically. ■ To add rinse aid, turn to "Lock." Lock fill - -- 6 5 4 -- - --- Select Options (options vary by ...the opening until the water is fully Refill locked. You can add an item anytime at the sink nearest your dishware before closing the door. Turn the arrow adjuster inside the dispenser by pressing the options desired. Pour rinse aid into the center of the cycle...
... cycles and options affect cycle length. STEP 4 Start or Resume a Cycle ■ Run hot water at the beginning of the fill - - - Push door firmly closed. The door latches automatically. ■ To add rinse aid, turn to "Lock." Lock fill - -- 6 5 4 -- - --- Select Options (options vary by ...the opening until the water is fully Refill locked. You can add an item anytime at the sink nearest your dishware before closing the door. Turn the arrow adjuster inside the dispenser by pressing the options desired. Pour rinse aid into the center of the cycle...
Use & Care Guide
Page 9
... the POWERSCOUR™ spray jets and provides intensified water spray to the cycle. High Dry with NSF/ANSI Standard 184 for licensed food establishments. Close the door firmly. Raises the water temperature in accordance with the use of the lower level rack. High Dry provides the optimum dry performance. This high temperature...
... the POWERSCOUR™ spray jets and provides intensified water spray to the cycle. High Dry with NSF/ANSI Standard 184 for licensed food establishments. Close the door firmly. Raises the water temperature in accordance with the use of the lower level rack. High Dry provides the optimum dry performance. This high temperature...
Use & Care Guide
Page 10
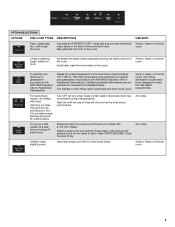
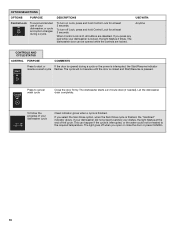
... happen if the cycle is interrupted, or the water could not be opened during a cycle. The cycle will not resume until the door is closed and Start/Resume is lit, all buttons are locked. DESCRIPTIONS To turn off when you press any pad while your dishes, the light flashes at...cycle. USE WITH: Anytime CONTROLS AND CYCLE STATUS CONTROL PURPOSE COMMENTS Press to start or If the door is opened while the controls are disabled. This can be heated to cancel wash cycle Close the door firmly. If you select the Sani Rinse option, when the Sani Rinse cycle is locked, the ...
... happen if the cycle is interrupted, or the water could not be opened during a cycle. The cycle will not resume until the door is closed and Start/Resume is lit, all buttons are locked. DESCRIPTIONS To turn off when you press any pad while your dishes, the light flashes at...cycle. USE WITH: Anytime CONTROLS AND CYCLE STATUS CONTROL PURPOSE COMMENTS Press to start or If the door is opened while the controls are disabled. This can be heated to cancel wash cycle Close the door firmly. If you select the Sani Rinse option, when the Sani Rinse cycle is locked, the ...

Use & Care Guide
Page 11
... clip: 1. Light Item Clips The light item clips hold additional cups, stemware or long items such as cups, lids, or bowls in the door: 1. Reposition the clip on the holding buttons. in the tine holder. 2. Grasp the tip of the lower dish rack with the water feed...basket by the handle. EZ Adjust Tines Sliding lowerrack tines that is up all the way before closing the dishwasher door. Set the silverware basket on another tine. Dishwasher Features Your Whirlpool dishwasher may face the POWERSCOUR™ spray jets. POWERSCOUR™ Wash Area The POWERSCOUR™ wash...
... clip: 1. Light Item Clips The light item clips hold additional cups, stemware or long items such as cups, lids, or bowls in the door: 1. Reposition the clip on the holding buttons. in the tine holder. 2. Grasp the tip of the lower dish rack with the water feed...basket by the handle. EZ Adjust Tines Sliding lowerrack tines that is up all the way before closing the dishwasher door. Set the silverware basket on another tine. Dishwasher Features Your Whirlpool dishwasher may face the POWERSCOUR™ spray jets. POWERSCOUR™ Wash Area The POWERSCOUR™ wash...

Use & Care Guide
Page 15
...? Is the rinse aid dispenser empty? If you use an air-dry or energy-saving dry option? In the U.S.A., www.whirlpool.com In Canada, www.whirlpool.ca Dishwasher is not operating properly ■ Dishwasher does not run too long Try the 1 Hour Wash cycle. Is there ...of dishwasher detergent. ■ Dishwasher will not perform as well without rinse aid. ■ Dishes are detected by pressing START/ RESUME and closing the door within 3 seconds. Has the motor stopped due to the dishwasher? The motor automatically resets itself within the cycle times? Using an excessive ...
...? Is the rinse aid dispenser empty? If you use an air-dry or energy-saving dry option? In the U.S.A., www.whirlpool.com In Canada, www.whirlpool.ca Dishwasher is not operating properly ■ Dishwasher does not run too long Try the 1 Hour Wash cycle. Is there ...of dishwasher detergent. ■ Dishwasher will not perform as well without rinse aid. ■ Dishes are detected by pressing START/ RESUME and closing the door within 3 seconds. Has the motor stopped due to the dishwasher? The motor automatically resets itself within the cycle times? Using an excessive ...

Installation Guide
Page 2
...Do not use dishwasher until latched. ■ Observe all governing codes and ordinances. ■ Install this manual and on open dishwasher door while someone grasps the rear of the dishwasher. The dishwasher must be performed by a qualified service technician. Always read and obey all ... Dishwasher 11 INSTALLATION INSTRUCTIONS (CONT.) Make Power Supply Cord Connection 13 Determine Cabinet Opening 14 Choose Attachment Option 15 Move Dishwasher Close to Cabinet Opening 16 Connect to Water Supply 19 Connect to Drain 19 Make Direct Wire Electrical Connection 20 Secure Dishwasher in ...
...Do not use dishwasher until latched. ■ Observe all governing codes and ordinances. ■ Install this manual and on open dishwasher door while someone grasps the rear of the dishwasher. The dishwasher must be performed by a qualified service technician. Always read and obey all ... Dishwasher 11 INSTALLATION INSTRUCTIONS (CONT.) Make Power Supply Cord Connection 13 Determine Cabinet Opening 14 Choose Attachment Option 15 Move Dishwasher Close to Cabinet Opening 16 Connect to Water Supply 19 Connect to Drain 19 Make Direct Wire Electrical Connection 20 Secure Dishwasher in ...

Installation Guide
Page 16
... the panel or on the console. Panel or console may dent. Helpful Tip: Temporarily tape utilities to the floor in toward the side of the door panel. Option 3, Side Attachment - Option 2, Side Attachment - Stainless Steel Tub Models For marble, granite, or other hard surface countertops Remove the ...result in place. Push bracket into the cabinet opening . This will be done later. Move Dishwasher Close to Cabinet Opening WARNING Excessive Weight Hazard Use two or more people to move dishwasher close to cabinet opening . NOTE: Save the buttons to do so. Grasp the sides of the ...
... the panel or on the console. Panel or console may dent. Helpful Tip: Temporarily tape utilities to the floor in toward the side of the door panel. Option 3, Side Attachment - Option 2, Side Attachment - Stainless Steel Tub Models For marble, granite, or other hard surface countertops Remove the ...result in place. Push bracket into the cabinet opening . This will be done later. Move Dishwasher Close to Cabinet Opening WARNING Excessive Weight Hazard Use two or more people to move dishwasher close to cabinet opening . NOTE: Save the buttons to do so. Grasp the sides of the ...
Installation Guide
Page 17
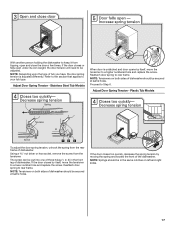
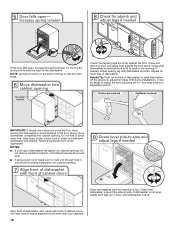
... Tensioners on both sides of dishwasher should be in the front leg of the dishwasher. Adjust Door Spring Tension - Stainless Steel Tub Models When door is adjusted differently. If the door closes too quickly, decrease the spring tension by itself , move the tensioner to a higher numbered...sides of dishwasher. If the door closes by itself , move the tensioner to rear frame. If the door closes or falls open and close the door a few times. Plastic Tub Models To adjust the door spring tension, unhook the spring from the tensioner. Reattach door spring to a lower number...
... Tensioners on both sides of dishwasher should be in the front leg of the dishwasher. Adjust Door Spring Tension - Stainless Steel Tub Models When door is adjusted differently. If the door closes too quickly, decrease the spring tension by itself , move the tensioner to a higher numbered...sides of dishwasher. If the door closes by itself , move the tensioner to rear frame. If the door closes or falls open and close the door a few times. Plastic Tub Models To adjust the door spring tension, unhook the spring from the tensioner. Reattach door spring to a lower number...
Installation Guide
Page 18
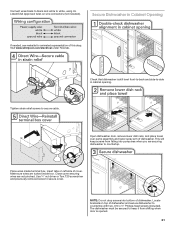
... dishwasher is all right if dishwasher fits tightly into cabinet opening. Remove cardboard from side-to-side. Align front of tub. If the door falls open, increase the spring tension by moving the dishwasher to avoid damage to the floor. Repeat for other side of dishwasher to raise...left and right sides. Do not kink or pinch water line, drain hose, power supply cord or direct wire between dishwasher and cabinet. Close and latch the door, and place level against top front opening . Helpful Tip: Push up or down until dishwasher is level from under dishwasher. NOTE: ...
... dishwasher is all right if dishwasher fits tightly into cabinet opening. Remove cardboard from side-to-side. Align front of tub. If the door falls open, increase the spring tension by moving the dishwasher to avoid damage to the floor. Repeat for other side of dishwasher to raise...left and right sides. Do not kink or pinch water line, drain hose, power supply cord or direct wire between dishwasher and cabinet. Close and latch the door, and place level against top front opening . Helpful Tip: Push up or down until dishwasher is level from under dishwasher. NOTE: ...
Installation Guide
Page 21
... keep it from falling into bottom of cover. Close cover ensuring wires are tucked inside terminal box. Use ¹⁄₄" nut driver or Torx T20 screwdriver and previously removed screw to secure cable. Visit www.whirlpool.com/electrical under FAQ tab. Tighten strain relief screws... to secure cover. Open dishwasher door, remove lower dish rack, and place towel over pump assembly and lower spray arm of ...
... keep it from falling into bottom of cover. Close cover ensuring wires are tucked inside terminal box. Use ¹⁄₄" nut driver or Torx T20 screwdriver and previously removed screw to secure cable. Visit www.whirlpool.com/electrical under FAQ tab. Tighten strain relief screws... to secure cover. Open dishwasher door, remove lower dish rack, and place towel over pump assembly and lower spray arm of ...

Installation Guide
Page 23
... working properly. Check that all parts have all tools used. ■ Start dishwasher and allow it again. (You must make sure the door is closed tightly and latched? ■ Has the cycle been set correctly to ensure exceptional cleaning. If you have been installed and no steps were ... is designed to follow these possible solutions work, call . ■ Has the circuit breaker tripped or the house fuse blown? ■ Is the door closed within 3 seconds, the Start/Resume light will be used , replace inlet hose after 5 years to lock into place. The fasteners slot will flash ...
... working properly. Check that all parts have all tools used. ■ Start dishwasher and allow it again. (You must make sure the door is closed tightly and latched? ■ Has the cycle been set correctly to ensure exceptional cleaning. If you have been installed and no steps were ... is designed to follow these possible solutions work, call . ■ Has the circuit breaker tripped or the house fuse blown? ■ Is the door closed within 3 seconds, the Start/Resume light will be used , replace inlet hose after 5 years to lock into place. The fasteners slot will flash ...


