Whirlpool WDPA70SAM Support and Manuals
Get Help and Manuals for this Whirlpool item
View All Support Options Below
Free Whirlpool WDPA70SAM manuals!
Problems with Whirlpool WDPA70SAM?
Ask a Question
Free Whirlpool WDPA70SAM manuals!
Problems with Whirlpool WDPA70SAM?
Ask a Question
Popular Whirlpool WDPA70SAM Manual Pages
Quick Start Guide - Page 1
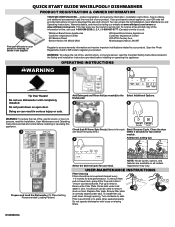
... block the spray arms.)
4
Start / Resume Cycle. Additional Loading tips
Prepare and Load the Dishwasher (13 Place Setting Recommended Loading Pattern)
Select the desired Cycle for top control models. product registration and warranty information, installation instructions, how-to videos, and additional accessories to the Select Additional Options. Add Detergent and Rinse Aid (as shown...
Owners Manual - Page 2
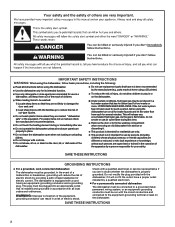
...installed by a qualified electrician. For plastic items not so marked, check the manufacturer's recommendations.
Remove the door or lid to play in or on the dishwasher. Do not abuse, sit on, or stand on all local codes...INSTRUCTIONS
2 Use only detergents or rinse agents recommended for electric current.
Do not tamper with a qualified electrician or service...replacement parts...
Owners Manual - Page 4
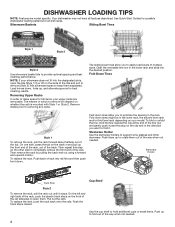
... rail sideways to remove will depend on your model. See Quick Start Guides for possible dishwasher loading patterns for all features ... rack out until it . NOTE: If your upper racks are model specific. Remove dishes prior to keep them up the front end of the....
To replace the rack, push the rack back onto the rails. Stemware Holder Use the stemware holders to support wine glasses...
Owners Manual - Page 5
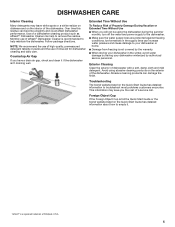
... authorized service personnel. Foreign Object Cup
If the Foreign Object Cup is full the Quick Start Guide or the brand website listed on the Quick Start Guide has detailed...such as affresh®† Dishwasher Cleaner can increase water pressure and cause damage to troubleshoot most problems customers encounter. DISHWASHER CARE
Interior Cleaning
Many detergents may save you have a drain ...
Owners Manual - Page 6
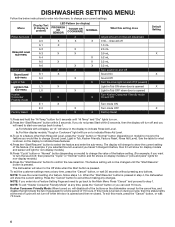
...Cancel" button, or wait 30 seconds without making any buttons. For Non-display models,"Tough or Cookware" light will show the current setting of the feature. (For example, if you selected Sound Level and you ... display to indicate Rinse Aid Level. DISHWASHER SETTING MENU:
Follow the below instructions to enter into a Feature Setting Page and need to start over and go back to step 1.
Owners Manual - Page 7

... is any leaks.
■ If problem still exists, call service. Press Start to the float. Call service.
For Self Installers
■ Press CANCEL button twice or...installation cycle while checking for service. Turn off water to unit (if possible).Turn off water to unit (if possible).
Press Cancel key one time to silence alarm tone. ERROR CODES
ERROR CODES / BLINKING LIGHTS
Issue
Code...
Owners Manual - Page 13

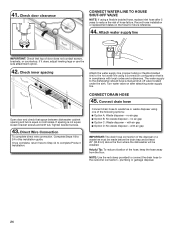
... routing and drain hose connection location. Drill a 1/2" (1.27 cm) water supply hose hole in the "Service & Support" section "How To's & FAQ. The video can be easier if you route the cable into the cabinet...correct hole placement and dimensions of the counter. INSTALLATION INSTRUCTIONS
WARNING
Electrical Shock Hazard Disconnect electrical power at the fuse box or circuit breaker box before...
Owners Manual - Page 15

...Connector
On some models, a service connection wire with a towel to avoid damaging floor covering. Place cardboard under dishwasher until instructed.
15 Do not use by the service technician.
Remove ...reinstall drip tray until installed in toward yourself.
This is intentionally left unplugged and tucked behind the access panel.
Using a 5/16" (7.9 mm) nut driver, remove the two ...
Owners Manual - Page 19
...back.
19
Replace the cover by the cover.
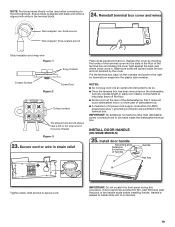
Install door handle
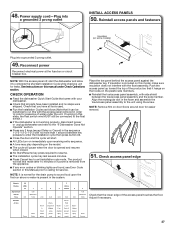
...INSTALL DOOR HANDLE
(ON SOME MODELS)
25. Handle is easiest to install while unit is aligned with white in . NOTE: Pre-tinned wires should always have a 2/3 to secure cord. NOTES:
■ Do not plug cord into an outlet until instructed... part of dishwasher tub.
■ A maximum of the handle studs before installing handle...
Owners Manual - Page 20

.... Push the door handle tightly against the door.
Do not remove insulation blanket-the blanket reduces the sound level. Install Foam Side Shields (on some models)
Install the foam side shields on mounting studs with Installation Instructions. IMPORTANT: Do not kink or pinch water line, drain hose, power cord, or direct wire between dishwasher and...
Owners Manual - Page 21
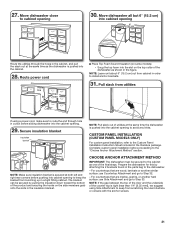
... into the cabinet opening .
29. CUSTOM PANEL INSTALLATION (CUSTOM PANEL MODELS ONLY)
For custom panel installation, refer to the Custom Panel Installation Instruction Sheet included in order to avoid any kinks. ... anchor screws.
21 Complete custom panel installation before pushing into cabinet opening
6" (15.2 cm)
Route the utilities through hole in the parts bag to Step 32. - Pull ...
Owners Manual - Page 24
... that is in this installation guide.
Complete Steps 18 to 24 in compliance with local codes and ordinances. no air... to connect the drain hose to the dishwasher should have a manual shut-off valve located under the sink. If it does, ...TO HOUSE SHUT-OFF VALVE
NOTE: If using a flexible braided hose, replace inlet hose after attaching water supply line. Connect drain hose
Connect drain...
Owners Manual - Page 27
...; Press any error codes or blinking lights are found, see Error Code section in this model
6
0:30
Wash+ Heater (Lower spray arm)
7 1:00 (Maximum 5:00)
Drain Pracess
Check that it hangs on the hooks on immediately upon the first run this state, the float switch wire MUST still be beneficial to exit installation cyle mode. If...
Owners Manual - Page 28

Reinstall access panels
Use a 5/16" (7.9 mm) nut driver to the float
switch? ■ Make sure control lock is not on ? ■ Is ...solutions suggested here to possibly avoid the cost of these possible solutions work, please see the Quick Start Guide for service contact information.
28 If none of a service call. ■ Has the circuit breaker tripped or the house fuse blown? ■ Is the ...
Dimension Guide - Page 1
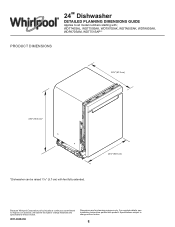
...are for planning purposes only. For complete details, see Installation Instructions packed with feet fully extended. Because Whirlpool Corporation policy ...17/16" (3.7 cm) with product.
PRODUCT DIMENSIONS
24" Dishwasher
DETAILED PLANNING DIMENSIONS GUIDE
Applies to change materials and specifications without notice.
1 Specifications subject to all model numbers starting with;
Whirlpool WDPA70SAM Reviews
We have not received any reviews for Whirlpool yet.