
Use & Care Guide
Page 6
... optimum wash. (See illustration, right.) STEP 2 Add Detergent NOTE: If you use detergent. ■ Use automatic dishwasher detergent only. Fill the Pre-Wash section to drain off of the water - Upper rack Lower rack ■ Make sure nothing keeps spray arm(s) from forming droplets that can dry as shown in a cool...
... optimum wash. (See illustration, right.) STEP 2 Add Detergent NOTE: If you use detergent. ■ Use automatic dishwasher detergent only. Fill the Pre-Wash section to drain off of the water - Upper rack Lower rack ■ Make sure nothing keeps spray arm(s) from forming droplets that can dry as shown in a cool...
Use & Care Guide
Page 10
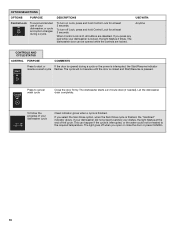
... least 3 seconds. When Control Lock is lit, all buttons are locked. If you open or close the door or press CANCEL. 10 Let the dishwasher drain completely. If your dishwasher did not properly sanitize your dishwasher cycle Clean indicator glows when a cycle is finished. USE WITH: Anytime CONTROLS AND CYCLE STATUS... dishwasher, or cycle and option changes during a cycle or the power is interrupted, the Start/Resume indicator resume a wash cycle flashes. The dishwasher starts a 2-minute drain (if needed). This can be heated to the required temperature.
... least 3 seconds. When Control Lock is lit, all buttons are locked. If you open or close the door or press CANCEL. 10 Let the dishwasher drain completely. If your dishwasher did not properly sanitize your dishwasher cycle Clean indicator glows when a cycle is finished. USE WITH: Anytime CONTROLS AND CYCLE STATUS... dishwasher, or cycle and option changes during a cycle or the power is interrupted, the Start/Resume indicator resume a wash cycle flashes. The dishwasher starts a 2-minute drain (if needed). This can be heated to the required temperature.

Use & Care Guide
Page 14
...the Upper Filter Assembly lines up with a paste of the tub. 2. Slowly rotate the filter clockwise until it if the dishwasher isn't draining well. Be sure the Lower Filter is locked into place. Open the dishwasher and place 1 affresh® dishwasher and disposer tablet in place...an air-dry or an energy-saving dry option. Remove all dishwasher brands. 1. Water from the dishwasher. Storing the Dishwasher If you have a drain air gap, check and clean it drops into the circular opening in your dishwasher, use affresh® dishwasher and disposer cleaner (recommended) once ...
...the Upper Filter Assembly lines up with a paste of the tub. 2. Slowly rotate the filter clockwise until it if the dishwasher isn't draining well. Be sure the Lower Filter is locked into place. Open the dishwasher and place 1 affresh® dishwasher and disposer tablet in place...an air-dry or an energy-saving dry option. Remove all dishwasher brands. 1. Water from the dishwasher. Storing the Dishwasher If you have a drain air gap, check and clean it drops into the circular opening in your dishwasher, use affresh® dishwasher and disposer cleaner (recommended) once ...

Use & Care Guide
Page 15
... Did you use an air-dry or energy-saving dry option? Was the disposer knockout plug removed during installation? (See "Install the drain hose" section in the Installation Instructions.) ■ Detergent remains in the dishwasher console can come from the vent in the covered section ... perform as laundry detergent, hand soap, or dish detergent for "Recommended Time Interval to Clean Your Filter." In the U.S.A., www.whirlpool.com In Canada, www.whirlpool.ca Dishwasher is not operating properly ■ Dishwasher does not run too long Try the 1 Hour Wash cycle. Press down freely...
... Did you use an air-dry or energy-saving dry option? Was the disposer knockout plug removed during installation? (See "Install the drain hose" section in the Installation Instructions.) ■ Detergent remains in the dishwasher console can come from the vent in the covered section ... perform as laundry detergent, hand soap, or dish detergent for "Recommended Time Interval to Clean Your Filter." In the U.S.A., www.whirlpool.com In Canada, www.whirlpool.ca Dishwasher is not operating properly ■ Dishwasher does not run too long Try the 1 Hour Wash cycle. Press down freely...

Use & Care Guide
Page 16
...on dishes and dishwasher interior Does your water pressure, call a licensed, qualified plumber. Use fresh detergent only. Clean dispenser when caked detergent is draining ■ Valve hissing Normal water valve hissing may be heard periodically, during washing? Is the pump or spray arm clogged by hand. 16... use a minimum amount of detergent but not less than every other month, the installation of the dishwasher toward the back so water can drain from your water pressure, call for several hours in some items with the spray arms, water feed tube, or POWERSCOUR™ spray jets...
...on dishes and dishwasher interior Does your water pressure, call a licensed, qualified plumber. Use fresh detergent only. Clean dispenser when caked detergent is draining ■ Valve hissing Normal water valve hissing may be heard periodically, during washing? Is the pump or spray arm clogged by hand. 16... use a minimum amount of detergent but not less than every other month, the installation of the dishwasher toward the back so water can drain from your water pressure, call for several hours in some items with the spray arms, water feed tube, or POWERSCOUR™ spray jets...

Installation Guide
Page 2
... safety messages will follow instructions. TABLE OF CONTENTS DISHWASHER SAFETY 2 INSTALLATION REQUIREMENTS 3 Tools and Parts 3 Location Requirements 4 Drain Requirements 6 Water Supply Requirements 6 Electrical Requirements 6 INSTALLATION INSTRUCTIONS 7 Prepare Cabinet Opening-Existing Utilities 7 Prepare Cabinet Opening-New Utilities...Choose Attachment Option 15 Move Dishwasher Close to Cabinet Opening 16 Connect to Water Supply 19 Connect to Drain 19 Make Direct Wire Electrical Connection 20 Secure Dishwasher in these instructions. ■ Installation should be installed...
... safety messages will follow instructions. TABLE OF CONTENTS DISHWASHER SAFETY 2 INSTALLATION REQUIREMENTS 3 Tools and Parts 3 Location Requirements 4 Drain Requirements 6 Water Supply Requirements 6 Electrical Requirements 6 INSTALLATION INSTRUCTIONS 7 Prepare Cabinet Opening-Existing Utilities 7 Prepare Cabinet Opening-New Utilities...Choose Attachment Option 15 Move Dishwasher Close to Cabinet Opening 16 Connect to Water Supply 19 Connect to Drain 19 Make Direct Wire Electrical Connection 20 Secure Dishwasher in these instructions. ■ Installation should be installed...

Installation Guide
Page 4
... from your dealer for loading and unloading dishes. If dishwasher will be subject to water, electricity and drain. ■ convenient access for installing underneath the countertop. Make sure pipes, wires and drain hose are within the shaded area shown in the dishwasher opening is not covered by authorized service personnel.... Do not run drain lines, water lines or electrical wiring where they can interfere with floor at the end of time or in a location where it may ...
... from your dealer for loading and unloading dishes. If dishwasher will be subject to water, electricity and drain. ■ convenient access for installing underneath the countertop. Make sure pipes, wires and drain hose are within the shaded area shown in the dishwasher opening is not covered by authorized service personnel.... Do not run drain lines, water lines or electrical wiring where they can interfere with floor at the end of time or in a location where it may ...

Installation Guide
Page 6
...a grounded 3 prong outlet, located in house plumbing and 20" (50.8 cm) minimum above subfloor or floor. ■ Use ¹ ₂" minimum I.D. Drain Requirements ■ A new drain hose is supplied with rubber washer. It is recommended that meets the wiring requirements for use with grounding wire that the...than 20" (50.8 cm) above the floor. Order Part Number W10273460. ■ Do not solder within 6" (15.2 cm) of the above drain trap in the cabinet next to the waste tee or disposer inlet. Electrical Requirements Be sure that meets all current AHAM/IAPMO test standards, is...
...a grounded 3 prong outlet, located in house plumbing and 20" (50.8 cm) minimum above subfloor or floor. ■ Use ¹ ₂" minimum I.D. Drain Requirements ■ A new drain hose is supplied with rubber washer. It is recommended that meets the wiring requirements for use with grounding wire that the...than 20" (50.8 cm) above the floor. Order Part Number W10273460. ■ Do not solder within 6" (15.2 cm) of the above drain trap in the cabinet next to the waste tee or disposer inlet. Electrical Requirements Be sure that meets all current AHAM/IAPMO test standards, is...

Installation Guide
Page 7
... Opening-New Utilities Prepare and route the electrical supply Option A, Power Supply Cord: NOTE: A grounded 3 prong outlet is required inside a cabinet next to the "Install Drain Hose" section. New Utilities" section. If they do so can result in death or electrical shock. Drill a 1¹⁄₂" (3.8 cm) hole in the "Prepare...
... Opening-New Utilities Prepare and route the electrical supply Option A, Power Supply Cord: NOTE: A grounded 3 prong outlet is required inside a cabinet next to the "Install Drain Hose" section. New Utilities" section. If they do so can result in death or electrical shock. Drill a 1¹⁄₂" (3.8 cm) hole in the "Prepare...
Installation Guide
Page 9
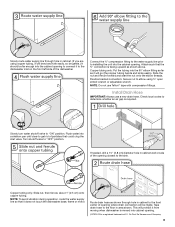
...8260;₈" compression fitting to the water supply line prior to installing the unit into cabinet opening . Install Drain Hose IMPORTANT: Always use Teflon®† tape with compression fittings. Route drain hose as shown above. Slowly turn water shutoff valve to elbow using copper tubing, it will prohibit it ...tubing only: Put the tubing into the cabinet opening to connect it to the dishwasher inlet on the front left side of the opening where drain connection will be far enough into the 90° elbow fitting as far as it will go (the copper tubing bends and kinks easily...
...8260;₈" compression fitting to the water supply line prior to installing the unit into cabinet opening . Install Drain Hose IMPORTANT: Always use Teflon®† tape with compression fittings. Route drain hose as shown above. Slowly turn water shutoff valve to elbow using copper tubing, it will prohibit it ...tubing only: Put the tubing into the cabinet opening to connect it to the dishwasher inlet on the front left side of the opening where drain connection will be far enough into the 90° elbow fitting as far as it will go (the copper tubing bends and kinks easily...

Installation Guide
Page 10
...cut ribbed section. 2. NOTE: Do not cut if needed . no air gap 1. Attach drain hose to remove plug. 3. IMPORTANT: The drain hose connection of drain hose to waste tee with a large blue drain hose clamp (provided). Connect rubber end of the hose, keep the hose away from air ...provided) to squeeze clamp open and move into position. Option C, Waste disposer - Use needle-nose pliers to air gap with air gap 1. If the drain hose was cut ribbed section. 4. Option A, Waste disposer - Using a hammer and screwdriver, knock plug into disposer. 2. Use pliers to connect from ...
...cut ribbed section. 2. NOTE: Do not cut if needed . no air gap 1. Attach drain hose to remove plug. 3. IMPORTANT: The drain hose connection of drain hose to waste tee with a large blue drain hose clamp (provided). Connect rubber end of the hose, keep the hose away from air ...provided) to squeeze clamp open and move into position. Option C, Waste disposer - Use needle-nose pliers to air gap with air gap 1. If the drain hose was cut ribbed section. 4. Option A, Waste disposer - Using a hammer and screwdriver, knock plug into disposer. 2. Use pliers to connect from ...

Installation Guide
Page 11
Option D, No waste disposer - NOTE: Do not cut if needed. Use pliers to 5.1 cm) screw-type clamp (not provided). 3. If the drain hose was cut, use dishwasher until completely installed. Tip Over Hazard Do not use a 1¹⁄₂" to 2" (3.8 to squeeze clamp open door. Install Moisture ... both sides of the counter. 11 Remove the backing of the moisture barrier and apply to air gap with air gap Prepare Dishwasher WARNING 1. Attach drain hose to underside of the countertop along the front edge of the tub. 1. Do not push down on some models. Failure to air gap and...
Option D, No waste disposer - NOTE: Do not cut if needed. Use pliers to 5.1 cm) screw-type clamp (not provided). 3. If the drain hose was cut, use dishwasher until completely installed. Tip Over Hazard Do not use a 1¹⁄₂" to 2" (3.8 to squeeze clamp open door. Install Moisture ... both sides of the counter. 11 Remove the backing of the moisture barrier and apply to air gap with air gap Prepare Dishwasher WARNING 1. Attach drain hose to underside of the countertop along the front edge of the tub. 1. Do not push down on some models. Failure to air gap and...

Installation Guide
Page 16
...: Save the buttons to cover the holes after dishwasher is near the center of the panel or on the front of the cabinet opening and drain hose is installed. Option 3, Side Attachment - Stainless Steel Tub Models For marble, granite, or other hard surface countertops Remove the brackets from moving when dishwasher...
...: Save the buttons to cover the holes after dishwasher is near the center of the panel or on the front of the cabinet opening and drain hose is installed. Option 3, Side Attachment - Stainless Steel Tub Models For marble, granite, or other hard surface countertops Remove the brackets from moving when dishwasher...
Installation Guide
Page 18
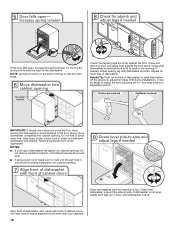
... front to back in the opening of the dishwasher. If needed, adjust leveling leg until dishwasher is plumb. Do not kink or pinch water line, drain hose, power supply cord or direct wire between dishwasher and cabinet. Align front of dishwasher door panel with your cabinets. 18 Check that dishwasher is...
... front to back in the opening of the dishwasher. If needed, adjust leveling leg until dishwasher is plumb. Do not kink or pinch water line, drain hose, power supply cord or direct wire between dishwasher and cabinet. Align front of dishwasher door panel with your cabinets. 18 Check that dishwasher is...
Installation Guide
Page 19
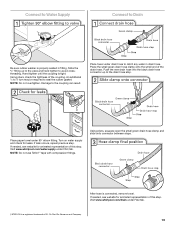
... needed , see website for animated representation of E.I. Damage to avoid crossthreading. If leak occurs, repeat previous step. Visit www.whirlpool.com/drain under drain hose to catch any water in fitting. An additional ¹⁄₄ to ¹⁄₂ turn may be required to... leaks. Turn on water supply and check for animated representation of this step. Push the new drain hose into the black drain hose connector up to the valve and hand tighten to the coupling can result. Visit www.whirlpool.com/watersupply under 90° elbow fitting.
... needed , see website for animated representation of E.I. Damage to avoid crossthreading. If leak occurs, repeat previous step. Visit www.whirlpool.com/drain under drain hose to catch any water in fitting. An additional ¹⁄₄ to ¹⁄₂ turn may be required to... leaks. Turn on water supply and check for animated representation of this step. Push the new drain hose into the black drain hose connector up to the valve and hand tighten to the coupling can result. Visit www.whirlpool.com/watersupply under 90° elbow fitting.

Dimension Guide
Page 1
...Use a UL Listed or CSA Approved strain relief. copper tubing with your home and local codes and ordinances. Drain Requirements: A new drain hose is supplied with compression fitting or flexible braided water supply line (Part Number 4396897RP minimum plastic tubing is recommended...water at dishwasher. A timedelay fuse or circuit breaker and separate circuit is not long enough, use with product. PRODUCT DIMENSIONS Because Whirlpool Corporation policy includes a continuous commitment to 862 kPa) water pressure. Copper wire only. Water Supply Requirements: A hot water line with...
...Use a UL Listed or CSA Approved strain relief. copper tubing with your home and local codes and ordinances. Drain Requirements: A new drain hose is supplied with compression fitting or flexible braided water supply line (Part Number 4396897RP minimum plastic tubing is recommended...water at dishwasher. A timedelay fuse or circuit breaker and separate circuit is not long enough, use with product. PRODUCT DIMENSIONS Because Whirlpool Corporation policy includes a continuous commitment to 862 kPa) water pressure. Copper wire only. Water Supply Requirements: A hot water line with...


