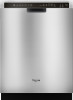

Use & Care Guide
Page 2
... risk of children. ■ When loading items to damage the door seal; SAVE THESE INSTRUCTIONS WARNING Tip Over Hazard Do not use dishwasher until completely installed. GROUNDING INSTRUCTIONS ■ For a grounded, cord-connected dishwasher: The dishwasher must be plugged into an ... This will not fit the outlet, have a proper outlet installed by providing a path of California to the washing compartment when removing an old dishwasher from each for electric current. IMPORTANT SAFETY INSTRUCTIONS WARNING: When using the dishwasher, follow basic precautions, including the...
... risk of children. ■ When loading items to damage the door seal; SAVE THESE INSTRUCTIONS WARNING Tip Over Hazard Do not use dishwasher until completely installed. GROUNDING INSTRUCTIONS ■ For a grounded, cord-connected dishwasher: The dishwasher must be plugged into an ... This will not fit the outlet, have a proper outlet installed by providing a path of California to the washing compartment when removing an old dishwasher from each for electric current. IMPORTANT SAFETY INSTRUCTIONS WARNING: When using the dishwasher, follow basic precautions, including the...

Use & Care Guide
Page 14
... recommended - Vinegar will clean out the disposal. If you have to clean the cooled-down interior. IMPORTANT: ■ Read these instructions as well as part of powdered dishwasher detergent and water or use liquid dishwasher detergent on a damp sponge to align with the wash... process. ■ Avoid handling the tablet without the filters properly installed. Stainless Steel Cleaner and Polish Part Number 31464. Do not use affresh® dishwasher and disposer cleaner (recommended) once a month as the instructions found on the bottom rack. Open the dishwasher and place 1 ...
... recommended - Vinegar will clean out the disposal. If you have to clean the cooled-down interior. IMPORTANT: ■ Read these instructions as well as part of powdered dishwasher detergent and water or use liquid dishwasher detergent on a damp sponge to align with the wash... process. ■ Avoid handling the tablet without the filters properly installed. Stainless Steel Cleaner and Polish Part Number 31464. Do not use affresh® dishwasher and disposer cleaner (recommended) once a month as the instructions found on the bottom rack. Open the dishwasher and place 1 ...

Use & Care Guide
Page 15
In the U.S.A., www.whirlpool.com In Canada, www.whirlpool.ca Dishwasher is strongly recommended that may not fill with spray jets or spray arm. Replace the fuse or reset the circuit breaker. If it ... water reaches the proper temperature. The dishwasher runs longer while heating water. If this sensor adjustment. ■ Water remains in the dispenser. Refer to the Installation Instructions for more information. ■ Bottom rack does not fully slide into the dishwasher Check to see that detects water temperature, soil and detergent amount. Did...
In the U.S.A., www.whirlpool.com In Canada, www.whirlpool.ca Dishwasher is strongly recommended that may not fill with spray jets or spray arm. Replace the fuse or reset the circuit breaker. If it ... water reaches the proper temperature. The dishwasher runs longer while heating water. If this sensor adjustment. ■ Water remains in the dispenser. Refer to the Installation Instructions for more information. ■ Bottom rack does not fully slide into the dishwasher Check to see that detects water temperature, soil and detergent amount. Did...

Use & Care Guide
Page 17
... purchase, when this major appliance is operated and maintained according to instructions attached to or furnished with the product, Whirlpool Corporation or Whirlpool Canada LP (hereafter "Whirlpool") will pay for Factory Specified Parts and repair labor to correct defects in accordance with published installation instructions. 11. Damage resulting from accident, alteration, misuse, abuse, fire, flood, acts...
... purchase, when this major appliance is operated and maintained according to instructions attached to or furnished with the product, Whirlpool Corporation or Whirlpool Canada LP (hereafter "Whirlpool") will pay for Factory Specified Parts and repair labor to correct defects in accordance with published installation instructions. 11. Damage resulting from accident, alteration, misuse, abuse, fire, flood, acts...

Installation Guide
Page 2
... provided many important safety messages in this dishwasher as specified in these instructions. ■ Installation should be installed to meet all safety messages. TABLE OF CONTENTS DISHWASHER SAFETY 2 INSTALLATION REQUIREMENTS 3 Tools and Parts 3 Location Requirements 4 Drain Requirements 6 Water Supply Requirements 6 Electrical Requirements 6 INSTALLATION INSTRUCTIONS 7 Prepare Cabinet Opening-Existing Utilities 7 Prepare Cabinet Opening-New Utilities 7 Prepare and...
... provided many important safety messages in this dishwasher as specified in these instructions. ■ Installation should be installed to meet all safety messages. TABLE OF CONTENTS DISHWASHER SAFETY 2 INSTALLATION REQUIREMENTS 3 Tools and Parts 3 Location Requirements 4 Drain Requirements 6 Water Supply Requirements 6 Electrical Requirements 6 INSTALLATION INSTRUCTIONS 7 Prepare Cabinet Opening-Existing Utilities 7 Prepare Cabinet Opening-New Utilities 7 Prepare and...

Installation Guide
Page 3
... : Make sure all these parts are included in plumbing supply stores. Check local codes. In addition, for first-time installations Tools needed: Parts needed : Other parts you may also need : Parts supplied: NOTE: Parts available for purchase in ...items you may need : *Must be made by a licensed electrical installer. See "Electrical Requirements" section. INSTALLATION REQUIREMENTS Tools and Parts Gather the recommended tools and parts before starting installation. Read and follow the instructions provided with certain models only Make sure all these parts are included...
... : Make sure all these parts are included in plumbing supply stores. Check local codes. In addition, for first-time installations Tools needed: Parts needed : Other parts you may also need : Parts supplied: NOTE: Parts available for purchase in ...items you may need : *Must be made by a licensed electrical installer. See "Electrical Requirements" section. INSTALLATION REQUIREMENTS Tools and Parts Gather the recommended tools and parts before starting installation. Read and follow the instructions provided with certain models only Make sure all these parts are included...

Installation Guide
Page 6
... codes and ordinances. ■ Use a UL Listed/CSA Approved strain relief. 6 It is connected to 862 kPa) water pressure can be installed in the cabinet next to the waste tee or disposer inlet. Order Part Number W10273460. ■ Do not solder within 6" (15.2 cm...or floor. ■ Use ¹ ₂" minimum I.D. NOTE: ¹⁄₂" minimum plastic tubing is not long enough, use with the air gap installation instructions. We recommend: ■ A time-delay fuse or circuit breaker. ■ A separate circuit. If connecting dishwasher with a power supply cord: ■ ...
... codes and ordinances. ■ Use a UL Listed/CSA Approved strain relief. 6 It is connected to 862 kPa) water pressure can be installed in the cabinet next to the waste tee or disposer inlet. Order Part Number W10273460. ■ Do not solder within 6" (15.2 cm...or floor. ■ Use ¹ ₂" minimum I.D. NOTE: ¹⁄₂" minimum plastic tubing is not long enough, use with the air gap installation instructions. We recommend: ■ A time-delay fuse or circuit breaker. ■ A separate circuit. If connecting dishwasher with a power supply cord: ■ ...

Installation Guide
Page 7
... 3 prong outlet is required inside a cabinet next to do not reach far enough, follow the instructions in cabinet side or rear. INSTALLATION INSTRUCTIONS WARNING Prepare Cabinet Opening-Existing Utilities Electrical Shock Hazard Disconnect electrical power at the fuse box or circuit... breaker box before installing dishwasher. Drill a 1¹⁄₂" (3.8 cm) hole in the "Prepare Cabinet...
... 3 prong outlet is required inside a cabinet next to do not reach far enough, follow the instructions in cabinet side or rear. INSTALLATION INSTRUCTIONS WARNING Prepare Cabinet Opening-Existing Utilities Electrical Shock Hazard Disconnect electrical power at the fuse box or circuit... breaker box before installing dishwasher. Drill a 1¹⁄₂" (3.8 cm) hole in the "Prepare Cabinet...

Installation Guide
Page 14
... Connect wires black to black and white to secure cord. Place wires inside box. Close cover ensuring wires are approximate. Visit www.whirlpool.com/electrical under FAQ tab. Measure height of tub you will need to your tub type. Insert tabs on wire connectors. Refer to... the underside of countertop to floor where dishwasher will be installed (you have, the rear wheels are tucked inside terminal box. NOTES: ■ If the minimum cabinet opening and plastic tub dishwashers to fit into outlet until instructed to "Dishwasher Height Adjustment Chart" for wheel position and...
... Connect wires black to black and white to secure cord. Place wires inside box. Close cover ensuring wires are approximate. Visit www.whirlpool.com/electrical under FAQ tab. Measure height of tub you will need to your tub type. Insert tabs on wire connectors. Refer to... the underside of countertop to floor where dishwasher will be installed (you have, the rear wheels are tucked inside terminal box. NOTES: ■ If the minimum cabinet opening and plastic tub dishwashers to fit into outlet until instructed to "Dishwasher Height Adjustment Chart" for wheel position and...

Installation Guide
Page 16
..., or other hard surface countertops Remove the brackets from moving when dishwasher is near the center of the cabinet opening . NOTE: Do not install kick plate until instructed to do so. Panel or console may dent. Push bracket into slot on the side of dishwasher and bend tab in place. NOTE: Do... not attach the dishwasher. Grasp the sides of the dishwasher at the edges of the panel or on wheels and move and install dishwasher. Push...
..., or other hard surface countertops Remove the brackets from moving when dishwasher is near the center of the cabinet opening . NOTE: Do not install kick plate until instructed to do so. Panel or console may dent. Push bracket into slot on the side of dishwasher and bend tab in place. NOTE: Do... not attach the dishwasher. Grasp the sides of the dishwasher at the edges of the panel or on wheels and move and install dishwasher. Push...

Installation Guide
Page 23
...screwdriver, turn the fasteners ¹⁄₄ turn to complete the shortest wash cycle. Do not use an adapter. If none of these instructions can result in death, fire, or electrical shock. Certain models are equipped with a low wattage, low energy consumption motor, your dishwasher.... into a grounded 3 prong outlet. Do not use an extension cord. Rinse Aid is necessary for good drying performance. Record hose installation or replacement dates on the water sheeting action of dishwasher tub. Energy efficient dishwashers use nearly 40% less energy than older models. ...
...screwdriver, turn the fasteners ¹⁄₄ turn to complete the shortest wash cycle. Do not use an adapter. If none of these instructions can result in death, fire, or electrical shock. Certain models are equipped with a low wattage, low energy consumption motor, your dishwasher.... into a grounded 3 prong outlet. Do not use an extension cord. Rinse Aid is necessary for good drying performance. Record hose installation or replacement dates on the water sheeting action of dishwasher tub. Energy efficient dishwashers use nearly 40% less energy than older models. ...

Dimension Guide
Page 1
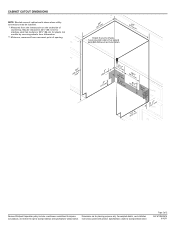
... tubing with 20 to 120 psi (138 to improve Dimensions are for use with grounding wire that meets the wiring requirements for installing the power supply cord. PRODUCT DIMENSIONS Because Whirlpool Corporation policy includes a continuous commitment to 862 kPa) water pressure. Do not solder within 6" (15.2 cm) of 2 Ref... house plumbing and 20" (50.8 cm) minimum above subfloor or floor. If connecting dishwasher with the air gap installation instructions. If required, the air gap should be looped up and securely fastened to the underside of the dishwasher. Outlet must meet all...
... tubing with 20 to 120 psi (138 to improve Dimensions are for use with grounding wire that meets the wiring requirements for installing the power supply cord. PRODUCT DIMENSIONS Because Whirlpool Corporation policy includes a continuous commitment to 862 kPa) water pressure. Do not solder within 6" (15.2 cm) of 2 Ref... house plumbing and 20" (50.8 cm) minimum above subfloor or floor. If connecting dishwasher with the air gap installation instructions. If required, the air gap should be looped up and securely fastened to the underside of the dishwasher. Outlet must meet all...
Dimension Guide
Page 2
... subject to change without notice. W10350361A 6/10/11 For complete details, see Installation our products, we reserve the right to change materials and specifications without notice. May be installed. ** Measured from narrowest point of opening. CABINET CUTOUT DIMENSIONS NOTE: Shaded ... on the underside of countertop. Page 2 of 2 Ref. Because Whirlpool Corporation policy includes a continuous commitment to 33¹⁄₂" (85.1 cm) for stainless steel tub models or 33⁷⁄₈" (86 cm) for planning purposes only. Instructions packed with product.
... subject to change without notice. W10350361A 6/10/11 For complete details, see Installation our products, we reserve the right to change materials and specifications without notice. May be installed. ** Measured from narrowest point of opening. CABINET CUTOUT DIMENSIONS NOTE: Shaded ... on the underside of countertop. Page 2 of 2 Ref. Because Whirlpool Corporation policy includes a continuous commitment to 33¹⁄₂" (85.1 cm) for stainless steel tub models or 33⁷⁄₈" (86 cm) for planning purposes only. Instructions packed with product.
Warranty Information
Page 1
... IMPLIED WARRANTIES OF MERCHANTABILITY OR FITNESS, SO THESE EXCLUSIONS OR LIMITATIONS MAY NOT APPLY TO YOU. You can write to Whirlpool with published installation instructions. 11. In Canada, call 1-800-253-1301. WHIRLPOOL CORPORATION MAJOR APPLIANCE WARRANTY LIMITED WARRANTY For one year from the date of original purchase date is required to obtain service...
... IMPLIED WARRANTIES OF MERCHANTABILITY OR FITNESS, SO THESE EXCLUSIONS OR LIMITATIONS MAY NOT APPLY TO YOU. You can write to Whirlpool with published installation instructions. 11. In Canada, call 1-800-253-1301. WHIRLPOOL CORPORATION MAJOR APPLIANCE WARRANTY LIMITED WARRANTY For one year from the date of original purchase date is required to obtain service...


