
Installation Guide
Page 2
... Opening-New Utilities 7 Prepare and Route Water Line 8 Install Drain Hose 9 Install Moisture Barrier (under a wood countertop 11 Prepare Dishwasher 11 INSTALLATION INSTRUCTIONS (CONT.) Make Power Supply Cord Connection 13 Determine Cabinet Opening 14 Choose Attachment Option 15 Move Dishwasher ...Close to Cabinet Opening 16 Connect to Water Supply 19 Connect to Drain 19 Make Direct Wire Electrical Connection 20 Secure Dishwasher in these instructions. ■ Installation should be killed or seriously ...
... Opening-New Utilities 7 Prepare and Route Water Line 8 Install Drain Hose 9 Install Moisture Barrier (under a wood countertop 11 Prepare Dishwasher 11 INSTALLATION INSTRUCTIONS (CONT.) Make Power Supply Cord Connection 13 Determine Cabinet Opening 14 Choose Attachment Option 15 Move Dishwasher ...Close to Cabinet Opening 16 Connect to Water Supply 19 Connect to Drain 19 Make Direct Wire Electrical Connection 20 Secure Dishwasher in these instructions. ■ Installation should be killed or seriously ...

Installation Guide
Page 6
...that meets the wiring requirements for use an air gap if the drain hose is recommended that the drain hose either be looped up and securely fastened to the underside of the dishwasher. ■ Make sure to connect drain hose to the dishwasher opening. When you are adequate and in... house plumbing and 20" (50.8 cm) minimum above drain trap in conformance with compression fitting or flexible braided water supply line (Part Number ...
...that meets the wiring requirements for use an air gap if the drain hose is recommended that the drain hose either be looped up and securely fastened to the underside of the dishwasher. ■ Make sure to connect drain hose to the dishwasher opening. When you are adequate and in... house plumbing and 20" (50.8 cm) minimum above drain trap in conformance with compression fitting or flexible braided water supply line (Part Number ...
Installation Guide
Page 9
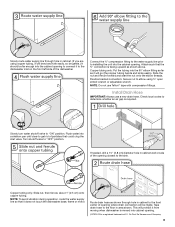
Flexible braided connection: Secure nut to determine whether an air gap is required. Check local codes to elbow using copper tubing, it will go (the copper tubing bends and kinks easily). Flush water into a shallow pan until clear to the floor in area shown. Tape drain hose to get rid of E.I. Slowly route... into cabinet opening. †®TEFLON is moved into the cabinet opening to the dishwasher inlet on the front left side of the opening where drain connection will prohibit it does not touch the dishwasher base, frame or motor.
Flexible braided connection: Secure nut to determine whether an air gap is required. Check local codes to elbow using copper tubing, it will go (the copper tubing bends and kinks easily). Flush water into a shallow pan until clear to the floor in area shown. Tape drain hose to get rid of E.I. Slowly route... into cabinet opening. †®TEFLON is moved into the cabinet opening to the dishwasher inlet on the front left side of the opening where drain connection will prohibit it does not touch the dishwasher base, frame or motor.

Installation Guide
Page 10
... floor where the dishwasher will be installed. Attach rubber end of drain hose to squeeze clamp open and move into disposer. 2. Option C, Waste disposer - Use a rubber hose (not provided) with screw-type clamps (not provided) to connect from the floor. Use pliers to air gap and cut ribbed ...section. 2. NOTE: Do not cut if needed . Connect rubber end of drain hose to disposer inlet. 10 IMPORTANT: The drain hose connection of the hose, keep the hose away from air gap to waste tee with air gap 1. Use pliers to...
... floor where the dishwasher will be installed. Attach rubber end of drain hose to squeeze clamp open and move into disposer. 2. Option C, Waste disposer - Use a rubber hose (not provided) with screw-type clamps (not provided) to connect from the floor. Use pliers to air gap and cut ribbed ...section. 2. NOTE: Do not cut if needed . Connect rubber end of drain hose to disposer inlet. 10 IMPORTANT: The drain hose connection of the hose, keep the hose away from air gap to waste tee with air gap 1. Use pliers to...

Installation Guide
Page 11
...(under the cabinet is provided on open and move and install dishwasher. Use a rubber hose (not provided) with screw-type clamps (not provided) to connect from waste tee to Step 2. If your model does not have insulation, proceed to air gap. Be sure to air gap and cut if needed.... Connect rubber end of the tub. 1. NOTE: Do not cut , use dishwasher until completely installed. Attach drain hose to 5.1 cm) screw-type clamp (not provided). 3. If the drain hose was cut ribbed section. 2. Do not push down on both sides...
...(under the cabinet is provided on open and move and install dishwasher. Use a rubber hose (not provided) with screw-type clamps (not provided) to connect from waste tee to Step 2. If your model does not have insulation, proceed to air gap. Be sure to air gap and cut if needed.... Connect rubber end of the tub. 1. NOTE: Do not cut , use dishwasher until completely installed. Attach drain hose to 5.1 cm) screw-type clamp (not provided). 3. If the drain hose was cut ribbed section. 2. Do not push down on both sides...
Installation Guide
Page 19
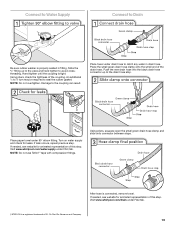
...needed , see website for animated representation of this step. Using pliers, squeeze open the small green drain hose clamp and slide onto connector between stops. Visit www.whirlpool.com/drain under 90° elbow fitting. Slide the ³⁄₄" fitting up to avoid crossthreading.... step. Place paper towel under FAQ tab. †®TEFLON is properly seated in drain hose. After hose is tight. NOTE: Do not overtighten. Visit www.whirlpool.com/watersupply under drain hose to the coupling can result. Connect to Water Supply Connect to seal the rubber gasket.
...needed , see website for animated representation of this step. Using pliers, squeeze open the small green drain hose clamp and slide onto connector between stops. Visit www.whirlpool.com/drain under 90° elbow fitting. Slide the ³⁄₄" fitting up to avoid crossthreading.... step. Place paper towel under FAQ tab. †®TEFLON is properly seated in drain hose. After hose is tight. NOTE: Do not overtighten. Visit www.whirlpool.com/watersupply under drain hose to the coupling can result. Connect to Water Supply Connect to seal the rubber gasket.

Dimension Guide
Page 1
...gap installation instructions. Do not solder within 6" (15.2 cm) of 2 Ref. If this is not long enough, use an air gap if the drain hose is not recommended). Use a UL Listed or CSA Approved strain relief. Use ³⁄₈" O.D. Use ¹⁄₂" (1.3 cm) ... Electrical Requirements: 120-volt, 60-Hz, AC-only, 15- When connecting the air gap a rubber hose (not provided) will be connected to improve Dimensions are for installing the power supply cord. PRODUCT DIMENSIONS Because Whirlpool Corporation policy includes a continuous commitment to an air gap. copper tubing ...
...gap installation instructions. Do not solder within 6" (15.2 cm) of 2 Ref. If this is not long enough, use an air gap if the drain hose is not recommended). Use a UL Listed or CSA Approved strain relief. Use ³⁄₈" O.D. Use ¹⁄₂" (1.3 cm) ... Electrical Requirements: 120-volt, 60-Hz, AC-only, 15- When connecting the air gap a rubber hose (not provided) will be connected to improve Dimensions are for installing the power supply cord. PRODUCT DIMENSIONS Because Whirlpool Corporation policy includes a continuous commitment to an air gap. copper tubing ...


