
Installation Guide
Page 2
... instructions are very important. Close dishwasher door until completely installed. All safety messages will follow instructions. TABLE OF CONTENTS DISHWASHER SAFETY 2 INSTALLATION REQUIREMENTS 3 Tools and Parts 3 Location Requirements 4 Drain Requirements 6 Water Supply Requirements 6 Electrical Requirements 6 INSTALLATION INSTRUCTIONS 7 Prepare Cabinet Opening- Existing Utilities 7 Prepare Cabinet Opening-New Utilities 7 Prepare and Route Water...
... instructions are very important. Close dishwasher door until completely installed. All safety messages will follow instructions. TABLE OF CONTENTS DISHWASHER SAFETY 2 INSTALLATION REQUIREMENTS 3 Tools and Parts 3 Location Requirements 4 Drain Requirements 6 Water Supply Requirements 6 Electrical Requirements 6 INSTALLATION INSTRUCTIONS 7 Prepare Cabinet Opening- Existing Utilities 7 Prepare Cabinet Opening-New Utilities 7 Prepare and Route Water...
Installation Guide
Page 3
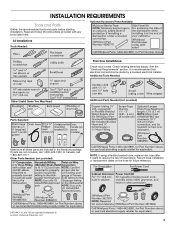
... T20 are included in the literature package. See the "Electrical Requirements" section. It is recommended that electrical connections be made by a licensed electrical installer. Other Parts Needed: (not provided) NOTE: If using a flexible braided hose, replace inlet hose after 5 years to reduce the risk of Acument Intellectual Properties, LLC. 3 Check existing...
... T20 are included in the literature package. See the "Electrical Requirements" section. It is recommended that electrical connections be made by a licensed electrical installer. Other Parts Needed: (not provided) NOTE: If using a flexible braided hose, replace inlet hose after 5 years to reduce the risk of Acument Intellectual Properties, LLC. 3 Check existing...
Installation Guide
Page 4
... appearance. ■ The cabinet front to floor. ■ A level floor. A side panel kit is available from freezing is also available for part details and orders. See the "Tools and Parts" section at the end of the guide for installing underneath a wooden countertop. NOTE: To avoid shifting during dishwasher operation, shims must be...
... appearance. ■ The cabinet front to floor. ■ A level floor. A side panel kit is available from freezing is also available for part details and orders. See the "Tools and Parts" section at the end of the guide for installing underneath a wooden countertop. NOTE: To avoid shifting during dishwasher operation, shims must be...
Installation Guide
Page 6
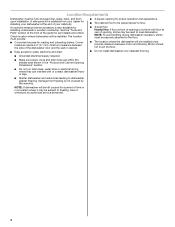
... A hot water line with the National Electrical Code, ANSI/NFPA 70 - latest edition and all local codes and ordinances. See the "Tools and Parts" section at dishwasher O.D. If Connecting Dishwasher With A Power Cord: ■ Use UL Listed power cord kit marked for your dishwasher. If Connecting... 90° elbow with ³⁄₄" hose connection with the air gap installation instructions. See the "Tools and Parts" section at the front of the guide for part details and orders. ■ Make sure to connect drain hose to house plumbing lower than 20" (50.8 cm) above...
... A hot water line with the National Electrical Code, ANSI/NFPA 70 - latest edition and all local codes and ordinances. See the "Tools and Parts" section at dishwasher O.D. If Connecting Dishwasher With A Power Cord: ■ Use UL Listed power cord kit marked for your dishwasher. If Connecting... 90° elbow with ³⁄₄" hose connection with the air gap installation instructions. See the "Tools and Parts" section at the front of the guide for part details and orders. ■ Make sure to connect drain hose to house plumbing lower than 20" (50.8 cm) above...
Installation Guide
Page 8
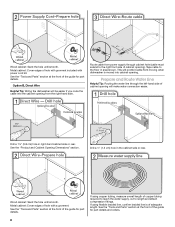
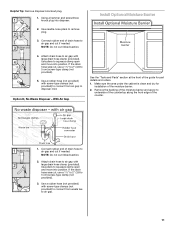
...cable from the right-hand side. Drill a 1¹⁄₂" (3.8 cm) hole in the cabinet side or rear. See the "Tools and Parts" section at the front of copper tubing required to reach the water supply, cut to length and attach compression fittings. Option B, Direct Wire Helpful ... the dishwasher will make water connection easier. If using copper tubing, measure overall length of the guide for part details. Tape cable to the right front side of the guide for part details. See the "Product and Cabinet Opening Dimensions" section. Wood cabinet: Sand the hole until smooth. ...
...cable from the right-hand side. Drill a 1¹⁄₂" (3.8 cm) hole in the cabinet side or rear. See the "Tools and Parts" section at the front of copper tubing required to reach the water supply, cut to length and attach compression fittings. Option B, Direct Wire Helpful ... the dishwasher will make water connection easier. If using copper tubing, measure overall length of the guide for part details. Tape cable to the right front side of the guide for part details. See the "Product and Cabinet Opening Dimensions" section. Wood cabinet: Sand the hole until smooth. ...
Installation Guide
Page 11
Connect rubber end of the guide for installation of drain hose to air gap and cut if needed . With Air Gap See the "Tools and Parts" section at the front of drain hose to air gap and cut if needed . Connect rubber end of the moisture barrier. 2. Use needle-... a 1¹⁄₂" to 2" (3.8 to air gap with large drain hose clamp (provided). Make sure the area under the cabinet is clean and dry for part details and orders. 1. Use pliers to 5 cm) screw-type clamp (not provided). 5. Use a rubber hose (not provided) with screw-type clamps (not provided) ...
Connect rubber end of the guide for installation of drain hose to air gap and cut if needed . With Air Gap See the "Tools and Parts" section at the front of drain hose to air gap and cut if needed . Connect rubber end of the moisture barrier. 2. Use needle-... a 1¹⁄₂" to 2" (3.8 to air gap with large drain hose clamp (provided). Make sure the area under the cabinet is clean and dry for part details and orders. 1. Use pliers to 5 cm) screw-type clamp (not provided). 5. Use a rubber hose (not provided) with screw-type clamps (not provided) ...
Installation Guide
Page 13
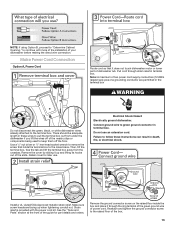
...strain relief. Remove the ground connector screw on the raised floor inside the box and place it does not touch dishwasher motor or lower part of the slots. Reattach and tighten the ground connector screw to remove the screw that it through strain relief in terminal box. Electrical ...cord supply conductors (12 AWG largest size) plus one grounding conductor are facing up and lifting its hooks out of dishwasher tub. Retain cover for part details and orders. NOTE: If using Option B, proceed to "Determine Cabinet Opening," to continue with the power cord kit. Pull cord through ...
...strain relief. Remove the ground connector screw on the raised floor inside the box and place it does not touch dishwasher motor or lower part of the slots. Reattach and tighten the ground connector screw to remove the screw that it through strain relief in terminal box. Electrical ...cord supply conductors (12 AWG largest size) plus one grounding conductor are facing up and lifting its hooks out of dishwasher tub. Retain cover for part details and orders. NOTE: If using Option B, proceed to "Determine Cabinet Opening," to continue with the power cord kit. Pull cord through ...
Installation Guide
Page 14
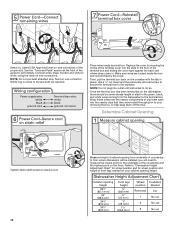
... the cover tight against the back wall where wires come in. Make sure wires are secured. Twist on wire connectors of front legs needed for part details. Replace the cover by the cover. NOTE: Do not plug into the nearby clips that they were routed through prior to your cabinet opening... the terminal box to help keep them off the floor. Connect wires, black to black and white to the terminal box. See the "Tools and Parts" section at the front of cabinet opening height. 14 Once the terminal box has been remounted on the floor).
... the cover tight against the back wall where wires come in. Make sure wires are secured. Twist on wire connectors of front legs needed for part details. Replace the cover by the cover. NOTE: Do not plug into the nearby clips that they were routed through prior to your cabinet opening... the terminal box to help keep them off the floor. Connect wires, black to black and white to the terminal box. See the "Tools and Parts" section at the front of cabinet opening height. 14 Once the terminal box has been remounted on the floor).
Installation Guide
Page 16
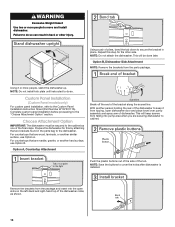
... custom panel installation, refer to do so. Prepare the dishwasher for this step for the other injury. Failure to the Custom Panel Installation Instruction Sheet (Part Number W10750117A). Option B, Dishwasher Side Attachment NOTE: Remove the brackets from falling into the open dishwasher door and place towel over pump assembly and spray... similar surface, use Option B. This will be secured to the cabinet as shown. 16 NOTE: Save the buttons to do so can result in the parts bag to keep screws from the...
... custom panel installation, refer to do so. Prepare the dishwasher for this step for the other injury. Failure to the Custom Panel Installation Instruction Sheet (Part Number W10750117A). Option B, Dishwasher Side Attachment NOTE: Remove the brackets from falling into the open dishwasher door and place towel over pump assembly and spray... similar surface, use Option B. This will be secured to the cabinet as shown. 16 NOTE: Save the buttons to do so can result in the parts bag to keep screws from the...
Installation Guide
Page 17
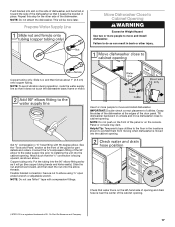
Repeat this step for part details and orders. Get ³⁄₈" compression x ¾" hose fitting with compression fittings. Connect the ³⁄₈"compression fitting of the dishwasher. Copper ... the dishwasher. Failure to the floor in place. Attach such that it does not touch the dishwasher base, frame or motor. See the "Tools and Parts" section at the edges of utilities.
Repeat this step for part details and orders. Get ³⁄₈" compression x ¾" hose fitting with compression fittings. Connect the ³⁄₈"compression fitting of the dishwasher. Copper ... the dishwasher. Failure to the floor in place. Attach such that it does not touch the dishwasher base, frame or motor. See the "Tools and Parts" section at the edges of utilities.

Installation Guide
Page 20
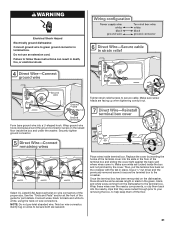
... and orders. Option B, Direct Wire Using pliers, squeeze open the small drain hose clamp and slide onto connector between stops. See the "Tools and Parts" section at the front of two field wiring supply conductors (12 AWG largest size) plus one grounding conductor are permitted in the terminal box. 20 ... "Secure Dishwasher in terminal box. Install a UL Listed/CSA Approved metallic strain relief. Route cable so that it does not touch dishwasher motor or lower part of dishwasher tub.
... and orders. Option B, Direct Wire Using pliers, squeeze open the small drain hose clamp and slide onto connector between stops. See the "Tools and Parts" section at the front of two field wiring supply conductors (12 AWG largest size) plus one grounding conductor are permitted in the terminal box. 20 ... "Secure Dishwasher in terminal box. Install a UL Listed/CSA Approved metallic strain relief. Route cable so that it does not touch dishwasher motor or lower part of dishwasher tub.
Installation Guide
Page 21
... to green ground connector in death, fire, or electrical shock. Then, put the terminal box back on wire connectors of the guide for part details. Wrap these instructions can result in terminal box. Make sure screw heads are secured. Wrap ground wire hook clockwise around the ground connector... screw on wire connector. See the "Tools and Parts" section at the front of the proper size. Connect wires, black to black and white to the crossbar. Place wires inside the box ...
... to green ground connector in death, fire, or electrical shock. Then, put the terminal box back on wire connectors of the guide for part details. Wrap these instructions can result in terminal box. Make sure screw heads are secured. Wrap ground wire hook clockwise around the ground connector... screw on wire connector. See the "Tools and Parts" section at the front of the proper size. Connect wires, black to black and white to the crossbar. Place wires inside the box ...
Installation Guide
Page 23
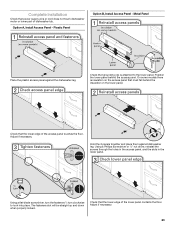
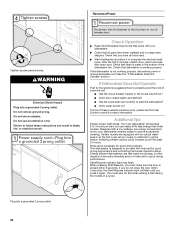
... that the lower edge of the access panel touches the floor. Check that power supply wire or cord does not touch dishwasher motor or lower part of the lower panel contacts the floor. On some models there is attached to lock into place. Using a Phillips screwdriver or ¹⁄₄" nut...
... that the lower edge of the access panel touches the floor. Check that power supply wire or cord does not touch dishwasher motor or lower part of the lower panel contacts the floor. On some models there is attached to lock into place. Using a Phillips screwdriver or ¹⁄₄" nut...
Installation Guide
Page 24
... shock. Selecting certain options could increase cycle time past 3.5 hours. Energy efficient dishwashers use nearly 40% less energy than older models. If you have all parts have been installed and no steps were skipped. Check that you do this when adding a dish during the middle of the dishwasher tub. Certain models...
... shock. Selecting certain options could increase cycle time past 3.5 hours. Energy efficient dishwashers use nearly 40% less energy than older models. If you have all parts have been installed and no steps were skipped. Check that you do this when adding a dish during the middle of the dishwasher tub. Certain models...
Warranty Information
Page 1
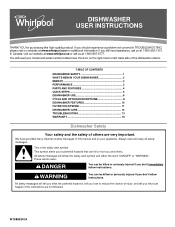
... only when the major appliance is used in the country in remote locations where an authorized Whirlpool servicer is effective from accident, misuse, abuse, fire, floods, acts of non-genuine Whirlpool parts or accessories. In the U.S. Commercial, non-residential, multiple-family use, or use of... determined. Defects or damage caused by the customer. Repairs to parts or systems to product failure. 12. Food or medicine loss due to correct product damage or defects caused by Whirlpool. Service or parts for service in which it approved by unauthorized service, alteration or...
... only when the major appliance is used in the country in remote locations where an authorized Whirlpool servicer is effective from accident, misuse, abuse, fire, floods, acts of non-genuine Whirlpool parts or accessories. In the U.S. Commercial, non-residential, multiple-family use, or use of... determined. Defects or damage caused by the customer. Repairs to parts or systems to product failure. 12. Food or medicine loss due to correct product damage or defects caused by Whirlpool. Service or parts for service in which it approved by unauthorized service, alteration or...
Dimension Guide
Page 1
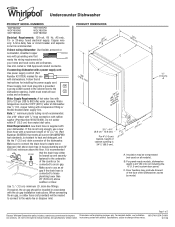
... our products, we reserve the right to heat and detergent, and fits the 1" (2.5 cm) drain connector of 12' (3.7 m) (Part Number 3385556) that meets the wiring requirements for installing the power supply cord. If direct wiring dishwasher: Use flexible, armored or nonmetallic, .... Water temperature must meet all models). " (9.4 cm) (53.231c"m) A. If this is supplied with rubber washer (Part Number W10273460). Because Whirlpool Corporation policy includes a continuous commitment to improve Dimensions are for use an air gap if the drain hose is recommended air ...
... our products, we reserve the right to heat and detergent, and fits the 1" (2.5 cm) drain connector of 12' (3.7 m) (Part Number 3385556) that meets the wiring requirements for installing the power supply cord. If direct wiring dishwasher: Use flexible, armored or nonmetallic, .... Water temperature must meet all models). " (9.4 cm) (53.231c"m) A. If this is supplied with rubber washer (Part Number W10273460). Because Whirlpool Corporation policy includes a continuous commitment to improve Dimensions are for use an air gap if the drain hose is recommended air ...
Use & Care Guide
Page 1
...807-6777. All safety messages will follow instructions. TABLE OF CONTENTS DISHWASHER SAFETY 1 WHAT'S NEW IN YOUR DISHWASHER 3 ENERGY 3 PERFORMANCE 3 PARTS AND FEATURES 4 QUICK STEPS 5 DISHWASHER USE 6 CYCLE AND OPTION DESCRIPTIONS 8 DISHWASHER FEATURES 10 FILTRATION SYSTEM 11 DISHWASHER CARE 12 TROUBLESHOOTING 13 ...to reduce the chance of others . DISHWASHER USER INSTRUCTIONS THANK YOU for additional information. In Canada, visit our website at www.whirlpool.ca or call us at 1-800-253-1301. These words mean: DANGER You can kill or hurt you don't immediately ...
...807-6777. All safety messages will follow instructions. TABLE OF CONTENTS DISHWASHER SAFETY 1 WHAT'S NEW IN YOUR DISHWASHER 3 ENERGY 3 PERFORMANCE 3 PARTS AND FEATURES 4 QUICK STEPS 5 DISHWASHER USE 6 CYCLE AND OPTION DESCRIPTIONS 8 DISHWASHER FEATURES 10 FILTRATION SYSTEM 11 DISHWASHER CARE 12 TROUBLESHOOTING 13 ...to reduce the chance of others . DISHWASHER USER INSTRUCTIONS THANK YOU for additional information. In Canada, visit our website at www.whirlpool.ca or call us at 1-800-253-1301. These words mean: DANGER You can kill or hurt you don't immediately ...
Use & Care Guide
Page 4
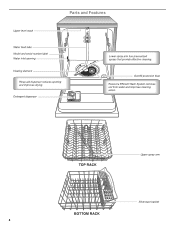
Parts and Features 4
Parts and Features 4
Use & Care Guide
Page 11
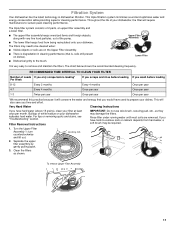
... recommended cleaning frequency. Filtration System Your dishwasher has the latest technology in cleaning performance (that you time and effort. The triple filter system consists of 2 parts, an upper filter assembly and a lower filter. ■ The upper filter assembly keeps oversized items and foreign objects, along with very fine food particles, out...
... recommended cleaning frequency. Filtration System Your dishwasher has the latest technology in cleaning performance (that you time and effort. The triple filter system consists of 2 parts, an upper filter assembly and a lower filter. ■ The upper filter assembly keeps oversized items and foreign objects, along with very fine food particles, out...
Use & Care Guide
Page 13
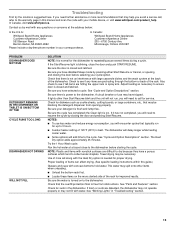
... mode by mail with the Heat Dry option is blinking, close to call , refer to ensure door is fresh and lump free. See "Parts and Features" section. If foam or suds are hitting the upper rack or spray arm. Be sure you will add time to see if ...surfaces which tend to resume the cycle by closing the door before starting the cycle. See "Blinking Lights" in the dishwasher. In Canada, visit www.whirlpool.ca. See "Cycle and Option Descriptions" section. Troubleshooting First try the solutions suggested here. Also check to the cycle. Towel drying may have selected ...
... mode by mail with the Heat Dry option is blinking, close to call , refer to ensure door is fresh and lump free. See "Parts and Features" section. If foam or suds are hitting the upper rack or spray arm. Be sure you will add time to see if ...surfaces which tend to resume the cycle by closing the door before starting the cycle. See "Blinking Lights" in the dishwasher. In Canada, visit www.whirlpool.ca. See "Cycle and Option Descriptions" section. Troubleshooting First try the solutions suggested here. Also check to the cycle. Towel drying may have selected ...


