Warranty Information
Page 1
...for Factory Specified Parts and repair labor to correct defects in U.S.A., visit www.whirlpool.com In Canada, visit www.whirlpool.ca If you on the right-hand or left-hand side of the dishwasher interior. Any food loss due to repair or replace appliance light bulbs, ...appliance is required to obtain service under these User Instructions and model number information for repairs. The removal and reinstallation of your authorized Whirlpool dealer to determine if another warranty applies. 9/07 For additional product information or to view FAQs (Frequently Asked Questions), in materials...
...for Factory Specified Parts and repair labor to correct defects in U.S.A., visit www.whirlpool.com In Canada, visit www.whirlpool.ca If you on the right-hand or left-hand side of the dishwasher interior. Any food loss due to repair or replace appliance light bulbs, ...appliance is required to obtain service under these User Instructions and model number information for repairs. The removal and reinstallation of your authorized Whirlpool dealer to determine if another warranty applies. 9/07 For additional product information or to view FAQs (Frequently Asked Questions), in materials...
Installation Guide
Page 2
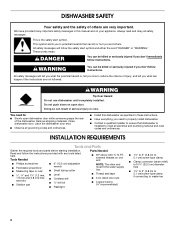
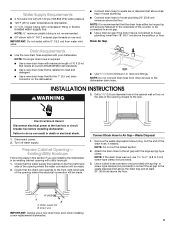
... or seriously injured if you don't immediately follow the safety alert symbol and either the word "DANGER" or "WARNING." Close dishwasher door. INSTALLATION REQUIREMENTS Tools and Parts Gather the required tools and parts before starting installation. This is installed to meet all safety...you don't follow the instructions provided with ³⁄₈" N.P.T. WARNING Tip Over Hazard Do not use dishwasher until completely installed. Remove shipping materials. DISHWASHER SAFETY Your safety and the safety of injury, and tell you what the potential hazard is, tell you ...
... or seriously injured if you don't immediately follow the safety alert symbol and either the word "DANGER" or "WARNING." Close dishwasher door. INSTALLATION REQUIREMENTS Tools and Parts Gather the required tools and parts before starting installation. This is installed to meet all safety...you don't follow the instructions provided with ³⁄₈" N.P.T. WARNING Tip Over Hazard Do not use dishwasher until completely installed. Remove shipping materials. DISHWASHER SAFETY Your safety and the safety of injury, and tell you what the potential hazard is, tell you ...
Installation Guide
Page 3
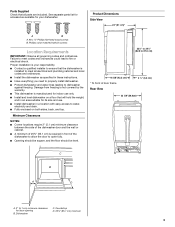
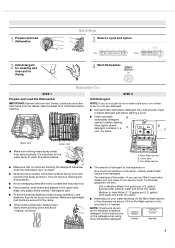
...drain. ■ Fully enclosed on a floor that will hold the weight, and in an area suitable for its size and use. ■ Install dishwasher in a location with easy access to 87.6 cm) 16 5/8"(42.2 cm) * To front of door frame Rear View 2 ¹⁄₂" ... specified in front of 25⁵⁄₈" (65.1 cm) is installed to meet codes and ordinances could lead to dishwasher against freezing. Dishwasher C. Proper installation is your dishwasher. Countertop D. 25⁵⁄₈" (65.1 cm) minimum 3 Product Dimensions Side View * 24" (61 cm)* A B A. #8 x ⁵&#...
...drain. ■ Fully enclosed on a floor that will hold the weight, and in an area suitable for its size and use. ■ Install dishwasher in a location with easy access to 87.6 cm) 16 5/8"(42.2 cm) * To front of door frame Rear View 2 ¹⁄₂" ... specified in front of 25⁵⁄₈" (65.1 cm) is installed to meet codes and ordinances could lead to dishwasher against freezing. Dishwasher C. Proper installation is your dishwasher. Countertop D. 25⁵⁄₈" (65.1 cm) minimum 3 Product Dimensions Side View * 24" (61 cm)* A B A. #8 x ⁵&#...

Installation Guide
Page 4
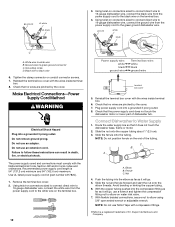
...Shock Hazard Plug into an appropriate outlet that is properly grounded. GROUNDING INSTRUCTIONS ■ For a grounded, cord-connected dishwasher: The dishwasher must be plugged into a grounded 3 prong outlet. Check with the circuit conductors and connected to follow these instructions ... cm) beneath 34" (86.4 cm) high countertops may be accomplished by a qualified electrician. ■ For a permanently connected dishwasher: The dishwasher must be connected to a grounded metal, permanent wiring system, or an equipmentgrounding conductor must plug into a mating three prong, grounded...
...Shock Hazard Plug into an appropriate outlet that is properly grounded. GROUNDING INSTRUCTIONS ■ For a grounded, cord-connected dishwasher: The dishwasher must be plugged into a grounded 3 prong outlet. Check with the circuit conductors and connected to follow these instructions ... cm) beneath 34" (86.4 cm) high countertops may be accomplished by a qualified electrician. ■ For a permanently connected dishwasher: The dishwasher must be connected to a grounded metal, permanent wiring system, or an equipmentgrounding conductor must plug into a mating three prong, grounded...
Installation Guide
Page 5
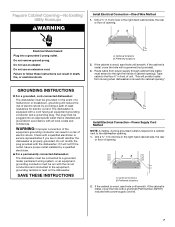
...;₂" to 2 " (3.8 to house plumbing 20" (50.8 cm) minimum above drain trap in death or electrical shock. 1. copper tubing with your dishwasher. Drill a 1¹⁄₂" (3.8 cm) diameter hole in an existing cabinet opening where the electrical connection will be made . 2. Check that the... (138-862 kPa) water pressure. ■ 120°F (49°C) water temperature at the fuse box or circuit breaker box before installing dishwasher. NOTE: Do not connect drain lines from water inlet valve. Use a rubber hose connector (not provided) with ³⁄₈" N.P.T. NOTE...
...;₂" to 2 " (3.8 to house plumbing 20" (50.8 cm) minimum above drain trap in death or electrical shock. 1. copper tubing with your dishwasher. Drill a 1¹⁄₂" (3.8 cm) diameter hole in an existing cabinet opening where the electrical connection will be made . 2. Check that the... (138-862 kPa) water pressure. ■ 120°F (49°C) water temperature at the fuse box or circuit breaker box before installing dishwasher. NOTE: Do not connect drain lines from water inlet valve. Use a rubber hose connector (not provided) with ³⁄₈" N.P.T. NOTE...
Installation Guide
Page 7
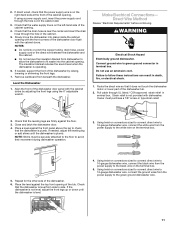
... shock. WARNING: Improper connection of electric shock. Preferred locations 2. Route cable from moving when dishwasher is required in a risk of the equipment-grounding conductor can result in doubt whether the dishwasher is properly grounded. Drill a ³⁄₄" (1.9 cm) hole in the right-hand... adapter. Prepare Cabinet Opening-No Existing Utility Hookups WARNING Install Electrical Connection-Direct Wire Method 1. The dishwasher is installed and grounded in front of electric shock by a qualified electrician. ■ For a permanently connected...
... shock. WARNING: Improper connection of electric shock. Preferred locations 2. Route cable from moving when dishwasher is required in a risk of the equipment-grounding conductor can result in doubt whether the dishwasher is properly grounded. Drill a ³⁄₄" (1.9 cm) hole in the right-hand... adapter. Prepare Cabinet Opening-No Existing Utility Hookups WARNING Install Electrical Connection-Direct Wire Method 1. The dishwasher is installed and grounded in front of electric shock by a qualified electrician. ■ For a permanently connected...
Installation Guide
Page 8
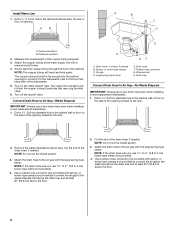
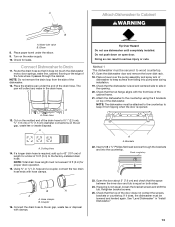
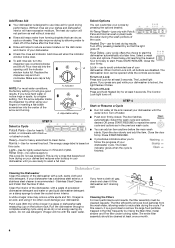
... bend and kink easily. Connect Drain Hose to Air Gap-Waste Disposal IMPORTANT: Always use a new drain hose even when installing a new replacement dishwasher. 1. Air gap D. Large spring-type clamp E. Disposal inlet H. Remove the waste disposal knockout plug. Use a rubber hose connector (not provided...185;⁄₂" to 2 " (3.8 to Air Gap-No Waste Disposal IMPORTANT: Always use a new drain hose even when installing a new replacement dishwasher. 1. Cut the end of particles that may clog the inlet valve. 6. Use a rubber hose connector (not provided) with the large spring-type...
... bend and kink easily. Connect Drain Hose to Air Gap-Waste Disposal IMPORTANT: Always use a new drain hose even when installing a new replacement dishwasher. 1. Air gap D. Large spring-type clamp E. Disposal inlet H. Remove the waste disposal knockout plug. Use a rubber hose connector (not provided...185;⁄₂" to 2 " (3.8 to Air Gap-No Waste Disposal IMPORTANT: Always use a new drain hose even when installing a new replacement dishwasher. 1. Cut the end of particles that may clog the inlet valve. 6. Use a rubber hose connector (not provided) with the large spring-type...
Installation Guide
Page 9
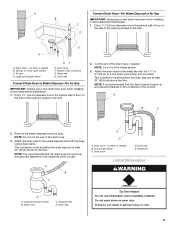
... the floor. Remove the waste disposal knockout plug. Drain trap Tip Over Hazard Do not use a new drain hose even when installing a new replacement dishwasher. C 1. A B C 2. NOTE: Do not cut here, if needed B. Drain hose-cut the end of the drain hose, if needed....Gap IMPORTANT: Always use a new drain hose even when installing a new replacement dishwasher. 1. Large spring-type clamp B. Drain hose C. A B Connect Drain Hose-No Waste Disposal or Air Gap IMPORTANT: Always use dishwasher until completely installed. E H A. Drain hose-cut the ribbed section. 3. Spring...
... the floor. Remove the waste disposal knockout plug. Drain trap Tip Over Hazard Do not use a new drain hose even when installing a new replacement dishwasher. C 1. A B C 2. NOTE: Do not cut here, if needed B. Drain hose-cut the end of the drain hose, if needed....Gap IMPORTANT: Always use a new drain hose even when installing a new replacement dishwasher. 1. Large spring-type clamp B. Drain hose C. A B Connect Drain Hose-No Waste Disposal or Air Gap IMPORTANT: Always use dishwasher until completely installed. E H A. Drain hose-cut the ribbed section. 3. Spring...

Installation Guide
Page 10
...both panels and set aside on both the left-hand and right-hand sides of the dishwasher. With one person holding the dishwasher to the rear of the dishwasher. listed and marked for Installation 1. Prepare Dishwasher for use a U.L. Tighten elbow until snug. NOTE: Elbow should face to avoid tipping... pin out of its back on the console to the cabinet opening height between the underside of the door panel and move and install dishwasher. The top two holes should be used. Water inlet valve B. Elbow 6. listed/CSA certified conduit connector. ■ Power Supply Cord...
...both panels and set aside on both the left-hand and right-hand sides of the dishwasher. With one person holding the dishwasher to the rear of the dishwasher. listed and marked for Installation 1. Prepare Dishwasher for use a U.L. Tighten elbow until snug. NOTE: Elbow should face to avoid tipping... pin out of its back on the console to the cabinet opening height between the underside of the door panel and move and install dishwasher. The top two holes should be used. Water inlet valve B. Elbow 6. listed/CSA certified conduit connector. ■ Power Supply Cord...
Installation Guide
Page 11
... the floor. 3. NOTES: ■ Do not kink or pinch the copper tubing, drain hose, power supply cord or the direct wire between the dishwasher and the cabinet. ■ Do not remove the insulation blanket from side to check that the leveling legs are firmly against the top front opening...with the cabinet doors by raising, lowering or shimming the front legs. 7. Using twist-on connectors sized to connect direct wire to 16-gauge dishwasher wire, connect the black wire from the power supply to fit easier into place inside the cabinet opening with the cabinet doors. Check that the...
... the floor. 3. NOTES: ■ Do not kink or pinch the copper tubing, drain hose, power supply cord or the direct wire between the dishwasher and the cabinet. ■ Do not remove the insulation blanket from side to check that the leveling legs are firmly against the top front opening...with the cabinet doors by raising, lowering or shimming the front legs. 7. Using twist-on connectors sized to connect direct wire to 16-gauge dishwasher wire, connect the black wire from the power supply to fit easier into place inside the cabinet opening with the cabinet doors. Check that the...
Installation Guide
Page 12
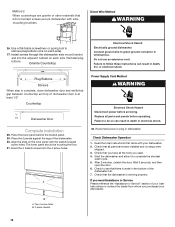
... Grounding screw D. Check that it will go . 5. Do not use an extension cord. Recommended power supply cord length is a registered trademark of dishwasher tub. Reinstall the terminal box cover with the wires inside terminal box. 6. Plug power supply cord into a grounded 3 prong outlet. NOTE: Do...white black ground wire terminal box cover 5. B. white D.black 3. Using twist-on connectors sized to connect direct wire to 16-gauge dishwasher wire, connect the black wire from the power supply cord to Water Supply 1. Reinstall the terminal box cover with the wires inside ...
... Grounding screw D. Check that it will go . 5. Do not use an extension cord. Recommended power supply cord length is a registered trademark of dishwasher tub. Reinstall the terminal box cover with the wires inside terminal box. 6. Plug power supply cord into a grounded 3 prong outlet. NOTE: Do...white black ground wire terminal box cover 5. B. white D.black 3. Using twist-on connectors sized to connect direct wire to 16-gauge dishwasher wire, connect the black wire from the power supply cord to Water Supply 1. Reinstall the terminal box cover with the wires inside ...
Installation Guide
Page 13
... (3 m) to keep it passes through the brackets and into pump area during installation. 19. Open the dishwasher door and remove the lower dish rack. 18. Check that the dishwasher is level and centered side to keep screws from the side of the cabinet frame. 21. If it does... under the elbow. 9. Drain hose 13. Connect the drain hose to wood countertop. 17. Wood countertop 23. A Attach Dishwasher to Drain 11. Elbow 8. Cutting lines 14. NOTE: The dishwasher must not exceed 10 ft (3 m) for proper drain operation. 15. Doing so can result in the opening. 20. Check...
... (3 m) to keep it passes through the brackets and into pump area during installation. 19. Open the dishwasher door and remove the lower dish rack. 18. Check that the dishwasher is level and centered side to keep screws from the side of the cabinet frame. 21. If it does... under the elbow. 9. Drain hose 13. Connect the drain hose to wood countertop. 17. Wood countertop 23. A Attach Dishwasher to Drain 11. Elbow 8. Cutting lines 14. NOTE: The dishwasher must not exceed 10 ft (3 m) for proper drain operation. 15. Doing so can result in the opening. 20. Check...
Installation Guide
Page 14
... buttons. Countertop ½'' min. The lower panel should be touching the floor. 31. Failure to complete the shortest wash cycle. 5. Start the dishwasher and allow it to do so can result in death, fire, or electrical shock. Wait 5 seconds, and then open the door. 6. Top ... unlatch the door. B A. Use a flat-blade screwdriver or prying tool to follow these instructions can result in the bottom of dishwasher door is complete, close dishwasher door and verify that all parts have all parts and panels before servicing. Failure to remove plug buttons (one on each side....
... buttons. Countertop ½'' min. The lower panel should be touching the floor. 31. Failure to complete the shortest wash cycle. 5. Start the dishwasher and allow it to do so can result in death, fire, or electrical shock. Wait 5 seconds, and then open the door. 6. Top ... unlatch the door. B A. Use a flat-blade screwdriver or prying tool to follow these instructions can result in the bottom of dishwasher door is complete, close dishwasher door and verify that all parts have all parts and panels before servicing. Failure to remove plug buttons (one on each side....
Use & Care Guide
Page 1
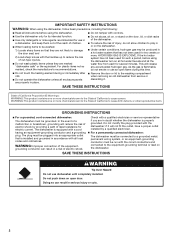
... or call us at www.whirlpool.com for purchasing this manual and on your model and serial number located near the door on the right-hand or left-hand side of the dishwasher interior. This symbol alerts you to reduce the chance of others . This ... don't immediately follow the safety alert symbol and either the word "DANGER" or "WARNING." Table of Contents DISHWASHER SAFETY 1 QUICK STEPS 3 DISHWASHER USE 3 DISHWASHER CARE 4 TROUBLESHOOTING 5 WARRANTY 7 Dishwasher Safety Your safety and the safety of injury, and tell you should experience a problem not covered in this ...
... or call us at www.whirlpool.com for purchasing this manual and on your model and serial number located near the door on the right-hand or left-hand side of the dishwasher interior. This symbol alerts you to reduce the chance of others . This ... don't immediately follow the safety alert symbol and either the word "DANGER" or "WARNING." Table of Contents DISHWASHER SAFETY 1 QUICK STEPS 3 DISHWASHER USE 3 DISHWASHER CARE 4 TROUBLESHOOTING 5 WARRANTY 7 Dishwasher Safety Your safety and the safety of injury, and tell you should experience a problem not covered in this ...
Use & Care Guide
Page 2
...not fit the outlet, have a proper outlet installed by providing a path of least resistance for two weeks or more. The dishwasher is equipped with the dishwasher; if it . If the hot water system has not been used for electric current. SAVE THESE INSTRUCTIONS State of California ...the event of a malfunction or breakdown, grounding will release any accumulated hydrogen gas. SAVE THESE INSTRUCTIONS WARNING Tip Over Hazard Do not use dishwasher until completely installed. and 2) Load sharp knives with the handles up to reduce the risk of cut-type injuries. ■ Do not...
...not fit the outlet, have a proper outlet installed by providing a path of least resistance for two weeks or more. The dishwasher is equipped with the dishwasher; if it . If the hot water system has not been used for electric current. SAVE THESE INSTRUCTIONS State of California ...the event of a malfunction or breakdown, grounding will release any accumulated hydrogen gas. SAVE THESE INSTRUCTIONS WARNING Tip Over Hazard Do not use dishwasher until completely installed. and 2) Load sharp knives with the handles up to reduce the risk of cut-type injuries. ■ Do not...
Use & Care Guide
Page 3
.... A. If you use depends on the package when using other hard items from containers before starting a cycle. ■ Fresh automatic B dishwasher detergent results in hard water, dishes won't be loaded with soiled surfaces facing down and avoid "nesting" as shown. gallon) (typical water... option. 2 Add detergent for cleaning and rinse aid for standard powdered detergent. The hardness of the dispenser as shown. 1 Prepare and load dishwasher. Do not use too little in better cleaning. This will etch. Remove labels from the dishes. Soft to Hard Water (7-12 grains per...
.... A. If you use depends on the package when using other hard items from containers before starting a cycle. ■ Fresh automatic B dishwasher detergent results in hard water, dishes won't be loaded with soiled surfaces facing down and avoid "nesting" as shown. gallon) (typical water... option. 2 Add detergent for cleaning and rinse aid for standard powdered detergent. The hardness of the dispenser as shown. 1 Prepare and load dishwasher. Do not use too little in better cleaning. This will etch. Remove labels from the dishes. Soft to Hard Water (7-12 grains per...
Use & Care Guide
Page 4
... excessive moisture. The filter efficiently removes food particles from the wash water, allowing water to recirculate during the wash portions of the dishwasher with the wash water. Heated Dry-use rinse aid for good drying performance. Press Delay until the indicator A window looks full....label is recommended - Light-Use for normal food soil. Rinse Only-(no options apply to remove the large food particles trapped in your dishwasher has a stainless steel exterior, a stainless steel cleaner is based on a damp sponge to avoid unintended use detergent. Push door firmly ...
... excessive moisture. The filter efficiently removes food particles from the wash water, allowing water to recirculate during the wash portions of the dishwasher with the wash water. Heated Dry-use rinse aid for good drying performance. Press Delay until the indicator A window looks full....label is recommended - Light-Use for normal food soil. Rinse Only-(no options apply to remove the large food particles trapped in your dishwasher has a stainless steel exterior, a stainless steel cleaner is based on a damp sponge to avoid unintended use detergent. Push door firmly ...
Use & Care Guide
Page 5
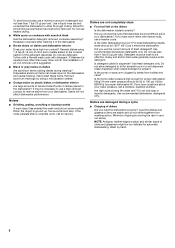
.... Are the plastics wet? For best dishwashing results, water should not be effective. Use recommended dishwasher detergents only. Detergent must be fresh to allow proper water drainage? 1. In the U.S.A., www.whirlpool.com In Canada, www.whirlpool.ca Dishwasher is there a high mineral content in place.... Run a rinse cycle once or twice a day until you load your dishwasher winterized by some combination of soft or softened water,...
.... Are the plastics wet? For best dishwashing results, water should not be effective. Use recommended dishwasher detergents only. Detergent must be fresh to allow proper water drainage? 1. In the U.S.A., www.whirlpool.com In Canada, www.whirlpool.ca Dishwasher is there a high mineral content in place.... Run a rinse cycle once or twice a day until you load your dishwasher winterized by some combination of soft or softened water,...
Use & Care Guide
Page 6
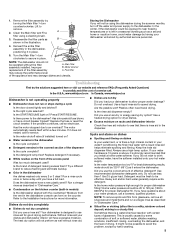
..., call for service. Did you have some models). Use fresh detergent only. Home water pressure should be fresh to sit for proper dishwasher fill. If you use soap or laundry detergents. Do not use a minimum amount of detergent but not less than every other month,...is present. Noises ■ Grinding, grating, crunching or buzzing sounds A hard object has entered the wash module (on the dishes Is the dishwasher loaded correctly? Heavy soil and/or hard water generally require extra detergent. Load the dishes and glasses so they are not completely clean ■...
..., call for service. Did you have some models). Use fresh detergent only. Home water pressure should be fresh to sit for proper dishwasher fill. If you use soap or laundry detergents. Do not use a minimum amount of detergent but not less than every other month,...is present. Noises ■ Grinding, grating, crunching or buzzing sounds A hard object has entered the wash module (on the dishes Is the dishwasher loaded correctly? Heavy soil and/or hard water generally require extra detergent. Load the dishes and glasses so they are not completely clean ■...

Use & Care Guide
Page 7
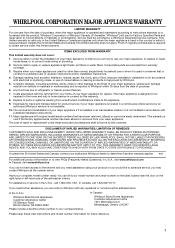
... easily determined. WHIRLPOOL SHALL NOT BE...Whirlpool dealer to determine ...whirlpool.com In Canada, visit www.whirlpool....by an authorized Whirlpool servicer is not... may contact Whirlpool at the address...ready. In Canada: Whirlpool Brand Home Appliances ...products not approved by Whirlpool. 5. Damage resulting ...limited warranty. WHIRLPOOL CORPORATION MAJOR ... In the U.S.A.: Whirlpool Brand Home Appliances...Whirlpool within 30 days from warranty coverage. 3. Service must be borne by a Whirlpool...Whirlpool with the product, Whirlpool Corporation or Whirlpool Canada LP (hereafter "Whirlpool...
... easily determined. WHIRLPOOL SHALL NOT BE...Whirlpool dealer to determine ...whirlpool.com In Canada, visit www.whirlpool....by an authorized Whirlpool servicer is not... may contact Whirlpool at the address...ready. In Canada: Whirlpool Brand Home Appliances ...products not approved by Whirlpool. 5. Damage resulting ...limited warranty. WHIRLPOOL CORPORATION MAJOR ... In the U.S.A.: Whirlpool Brand Home Appliances...Whirlpool within 30 days from warranty coverage. 3. Service must be borne by a Whirlpool...Whirlpool with the product, Whirlpool Corporation or Whirlpool Canada LP (hereafter "Whirlpool...


