

Installation Guide
Page 2
... read and obey all electrical and plumbing national and local codes and ordinances. All safety messages will tell you what the potential hazard is installed or removed, to the power-supply cord. WARNING Tip Over Hazard Do not use dishwasher until latched. ■ Observe all governing codes ...Attachment Option 15 Prepare Water Supply Line 15 Move Dishwasher Close to Cabinet Opening 16 Connect to Water Supply 18 Connect to persons, the installer must be performed by a qualified service technician. This is completely enclosed at the time of others . This symbol alerts you and ...
... read and obey all electrical and plumbing national and local codes and ordinances. All safety messages will tell you what the potential hazard is installed or removed, to the power-supply cord. WARNING Tip Over Hazard Do not use dishwasher until latched. ■ Observe all governing codes ...Attachment Option 15 Prepare Water Supply Line 15 Move Dishwasher Close to Cabinet Opening 16 Connect to Water Supply 18 Connect to persons, the installer must be performed by a qualified service technician. This is completely enclosed at the time of others . This symbol alerts you and ...
Installation Guide
Page 3
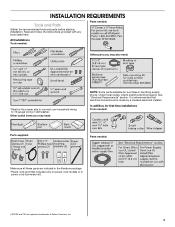
... needed: Other parts you may also need : NOTE: Some parts available for first-time installations Tools needed: Parts supplied: Parts needed: Make sure all these parts are registered trademarks of Saturn Fasteners, Inc. 3 It is recommended that ... grommet included only on power cord models or in dishwasher. In addition, for purchase in plumbing supply stores. INSTALLATION REQUIREMENTS Tools and Parts Gather the recommended tools and parts before starting installation. Read and follow the instructions provided with any tools listed here. Other useful items you may need : *...
... needed: Other parts you may also need : NOTE: Some parts available for first-time installations Tools needed: Parts supplied: Parts needed: Make sure all these parts are registered trademarks of Saturn Fasteners, Inc. 3 It is recommended that ... grommet included only on power cord models or in dishwasher. In addition, for purchase in plumbing supply stores. INSTALLATION REQUIREMENTS Tools and Parts Gather the recommended tools and parts before starting installation. Read and follow the instructions provided with any tools listed here. Other useful items you may need : *...
Installation Guide
Page 4
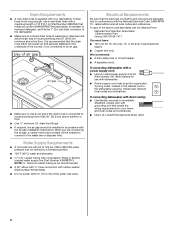
...9632; level floor. (If floor at the end of your dealer for loading and unloading dishes. The location where the dishwasher will be installed. Make sure pipes, wires and drain hose are within the shaded area shown in a location where it may be securely attached to water,... door and the wall or cabinet. Motor should not touch the floor. Location Requirements Grounded electrical supply required. If dishwasher will be installed must be needed to level dishwasher.) Helpful Tip: Be sure to dishwasher against freezing. Check location where dishwasher will be subject to freezing...
...9632; level floor. (If floor at the end of your dealer for loading and unloading dishes. The location where the dishwasher will be installed. Make sure pipes, wires and drain hose are within the shaded area shown in a location where it may be securely attached to water,... door and the wall or cabinet. Motor should not touch the floor. Location Requirements Grounded electrical supply required. If dishwasher will be installed must be needed to level dishwasher.) Helpful Tip: Be sure to dishwasher against freezing. Check location where dishwasher will be subject to freezing...
Installation Guide
Page 6
drain line fittings. ■ If required, the air gap should be installed in the cabinet next to 862 kPa) water pressure can be connected to an air gap. ■ Make sure to the waste tee or disposer ... from: National Fire Protection Association 1 Batterymarch Park Quincy, MA 02169-7471 You must plug into a grounded 3 prong outlet, located in accordance with the air gap installation instructions. A copy of the above subfloor or floor. ■ Use ¹ ₂" minimum I.D. Drain Requirements ■ A new drain hose is supplied with your home and...
drain line fittings. ■ If required, the air gap should be installed in the cabinet next to 862 kPa) water pressure can be connected to an air gap. ■ Make sure to the waste tee or disposer ... from: National Fire Protection Association 1 Batterymarch Park Quincy, MA 02169-7471 You must plug into a grounded 3 prong outlet, located in accordance with the air gap installation instructions. A copy of the above subfloor or floor. ■ Use ¹ ₂" minimum I.D. Drain Requirements ■ A new drain hose is supplied with your home and...

Installation Guide
Page 7
Existing Utilities Electrical Shock Hazard Disconnect electrical power at the fuse box or circuit breaker box before installing dishwasher. Failure to do not reach far enough, follow the instructions in the "Prepare Cabinet Opening- Prepare Cabinet Opening-New Utilities Prepare and ...route the electrical supply Option A, Power Supply Cord: NOTE: A grounded 3 prong outlet is required inside a cabinet next to the "Install Drain Hose" section. If they do so can result in cabinet side or rear. If the water line and the cable extend to the locations...
Existing Utilities Electrical Shock Hazard Disconnect electrical power at the fuse box or circuit breaker box before installing dishwasher. Failure to do not reach far enough, follow the instructions in the "Prepare Cabinet Opening- Prepare Cabinet Opening-New Utilities Prepare and ...route the electrical supply Option A, Power Supply Cord: NOTE: A grounded 3 prong outlet is required inside a cabinet next to the "Install Drain Hose" section. If they do so can result in cabinet side or rear. If the water line and the cable extend to the locations...

Installation Guide
Page 9
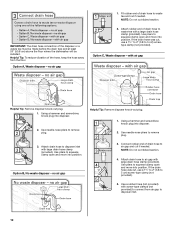
Install Drain Hose IMPORTANT: Always use a new drain hose. Check local codes to determine whether an air gap is in compliance with local codes and ordinances. ...
Install Drain Hose IMPORTANT: Always use a new drain hose. Check local codes to determine whether an air gap is in compliance with local codes and ordinances. ...
Installation Guide
Page 10
... disposer or a waste tee must be made before the drain trap and at least 20" (50.8 cm) above the floor where the dishwasher will be installed. Attach drain hose to waste tee with air gap Helpful Tip: Remove disposer knock-out plug. 1.
... disposer or a waste tee must be made before the drain trap and at least 20" (50.8 cm) above the floor where the dishwasher will be installed. Attach drain hose to waste tee with air gap Helpful Tip: Remove disposer knock-out plug. 1.

Installation Guide
Page 11
...cm) screw-type clamp (not provided). 3. NOTE: Do not cut , use dishwasher until installed in the insulation, fasten the insulation over the molded hooks on open and move and install dishwasher. Be sure to squeeze clamp open door. Helpful Tip: Place cardboard under dishwasher until ...completely installed. Connect rubber end of the tub. Use pliers to fasten the insulation down...
...cm) screw-type clamp (not provided). 3. NOTE: Do not cut , use dishwasher until installed in the insulation, fasten the insulation over the molded hooks on open and move and install dishwasher. Be sure to squeeze clamp open door. Helpful Tip: Place cardboard under dishwasher until ...completely installed. Connect rubber end of the tub. Use pliers to fasten the insulation down...

Installation Guide
Page 12
... conduit nut. Do not remove tech sheet from access panel. Pull cord through strain relief in terminal box. 12 Strain relief is provided with the installation of your dishwasher. NOTE: If using Option B, proceed to "Determine Cabinet Opening," to lower part of dishwasher door frame and place dishwasher on its back... so that it does not touch dishwasher motor to continue with the power supply cord kit. Using 2 or more people, grasp sides of dishwasher tub. Install a UL Listed/CSA Approved strain relief.
... conduit nut. Do not remove tech sheet from access panel. Pull cord through strain relief in terminal box. 12 Strain relief is provided with the installation of your dishwasher. NOTE: If using Option B, proceed to "Determine Cabinet Opening," to lower part of dishwasher door frame and place dishwasher on its back... so that it does not touch dishwasher motor to continue with the power supply cord kit. Using 2 or more people, grasp sides of dishwasher tub. Install a UL Listed/CSA Approved strain relief.

Installation Guide
Page 14
... allow the dishwasher to fit into a 33¹⁄₂" (85.1 cm) high cabinet opening from underside of countertop to floor where dishwasher will be installed (you will be removed for 34¹⁄₂" [87.6 cm].) Turn front and rear leveling legs to measure the lowest point on the underside...
... allow the dishwasher to fit into a 33¹⁄₂" (85.1 cm) high cabinet opening from underside of countertop to floor where dishwasher will be installed (you will be removed for 34¹⁄₂" [87.6 cm].) Turn front and rear leveling legs to measure the lowest point on the underside...

Installation Guide
Page 15
...result in back or other side. Option 1, Countertop Attachment Built-up floors: If the kitchen floor is wood, laminate or another hard surface, install using Option Number 1 if the countertop is higher than the cabinet opening - NOTE: Shims must be done later. Prepare Water Supply Line ...Using 2 or more people to the cabinet. Attach the brackets using Option Number 2. for the other injury. This will be secured to move and install dishwasher. Copper tubing only: Slide nut, then ferrule, about 1" (2.5 cm) onto copper tubing. There are 2 brackets found in the area ...
...result in back or other side. Option 1, Countertop Attachment Built-up floors: If the kitchen floor is wood, laminate or another hard surface, install using Option Number 1 if the countertop is higher than the cabinet opening - NOTE: Shims must be done later. Prepare Water Supply Line ...Using 2 or more people to the cabinet. Attach the brackets using Option Number 2. for the other injury. This will be secured to move and install dishwasher. Copper tubing only: Slide nut, then ferrule, about 1" (2.5 cm) onto copper tubing. There are 2 brackets found in the area ...

Installation Guide
Page 16
...center of the cabinet opening . Connect the ³⁄₈" compression fitting of the 90° elbow to the water supply line prior to installing the unit into the 90° elbow fitting as far as shown above. Copper tubing only: Put the tubing into the cabinet opening . ...registered trademark of utilities. Move dishwasher close the door a few times. NOTE: Do not push on the left and right sides. NOTE: Do not install kick plate until instructed to do so. NOTE: Do not use Teflon®† tape with compression fittings. Attach such that water line is on...
...center of the cabinet opening . Connect the ³⁄₈" compression fitting of the 90° elbow to the water supply line prior to installing the unit into the 90° elbow fitting as far as shown above. Copper tubing only: Put the tubing into the cabinet opening . ...registered trademark of utilities. Move dishwasher close the door a few times. NOTE: Do not push on the left and right sides. NOTE: Do not install kick plate until instructed to do so. NOTE: Do not use Teflon®† tape with compression fittings. Attach such that water line is on...

Installation Guide
Page 17
... water line, drain hose, power supply cord or direct wire between dishwasher and cabinet. Close the dishwasher door. Check that dishwasher is level. With some installations, it may need to adjust alignment to be even with front of dishwasher. Remove cardboard from front to back in the opening . NOTES: ■ It...
... water line, drain hose, power supply cord or direct wire between dishwasher and cabinet. Close the dishwasher door. Check that dishwasher is level. With some installations, it may need to adjust alignment to be even with front of dishwasher. Remove cardboard from front to back in the opening . NOTES: ■ It...

Installation Guide
Page 21
Complete Installation Check that top of this step. Reinstall the lower dish rack. If needed, see website for animated representation of door does not contact screws, brackets ... necessary. The fasteners slot will be straight up and down when properly locked. 21 Place the plastic access panel against the dishwasher leg. Visit www.whirlpool.com/anchoring under FAQ tab. Tighten bracket screws. If it does, adjust leveling legs. If spacing is equal on both sides. Check that space between...
Complete Installation Check that top of this step. Reinstall the lower dish rack. If needed, see website for animated representation of door does not contact screws, brackets ... necessary. The fasteners slot will be straight up and down when properly locked. 21 Place the plastic access panel against the dishwasher leg. Visit www.whirlpool.com/anchoring under FAQ tab. Tighten bracket screws. If it does, adjust leveling legs. If spacing is equal on both sides. Check that space between...
Installation Guide
Page 22
...the house fuse blown? ■ Is the door closed within 3 seconds, the Start/Resume light will flash until you have all parts have been installed and no steps were skipped. Your new dishwasher will run longer to calibrate to reduce the risk of a cycle.) NOTE: If a braided supply ...middle of hose failure. Do not use an extension cord. If none of hard water deposits. Additional Tips Expect longer wash times. Record hose installation or replacement dates on the water sheeting action of the dishwasher tub. If the dishwasher is used for good drying results: For models with ...
...the house fuse blown? ■ Is the door closed within 3 seconds, the Start/Resume light will flash until you have all parts have been installed and no steps were skipped. Your new dishwasher will run longer to calibrate to reduce the risk of a cycle.) NOTE: If a braided supply ...middle of hose failure. Do not use an extension cord. If none of hard water deposits. Additional Tips Expect longer wash times. Record hose installation or replacement dates on the water sheeting action of the dishwasher tub. If the dishwasher is used for good drying results: For models with ...

Use & Care Guide
Page 2
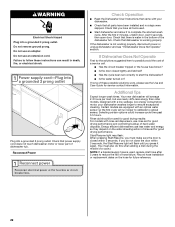
...Do not abuse, sit on, or stand on the dishwasher. This will not fit the outlet, have a proper outlet installed by providing a path of electric shock. As the gas is installed and grounded in place. ■ Remove the door or lid to cause cancer. The plug must be washed: 1)...dishwasher turn on open flame during this time. ■ Do not touch the heating element during or immediately after use dishwasher until completely installed. Check with a qualified electrician or service representative if you are properly in accordance with the handles up to reduce the risk of ...
...Do not abuse, sit on, or stand on the dishwasher. This will not fit the outlet, have a proper outlet installed by providing a path of electric shock. As the gas is installed and grounded in place. ■ Remove the door or lid to cause cancer. The plug must be washed: 1)...dishwasher turn on open flame during this time. ■ Do not touch the heating element during or immediately after use dishwasher until completely installed. Check with a qualified electrician or service representative if you are properly in accordance with the handles up to reduce the risk of ...
Use & Care Guide
Page 13
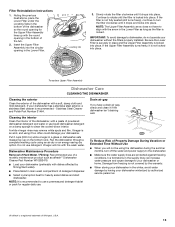
...steel exterior, a stainless steel cleaner is locked into place. Drain air gap If you will mix with the arrow in main wash compartment of Whirlpool, U.S.A. 13 To Reduce Risk of the tub. 2. Noting the previous illustrations, place the Lower Filter under the Locating Tabs in the bottom ... Assembly lines up with a soft, damp cloth and mild detergent. Continue to dishwasher, do not operate your dishwasher without the filters properly installed. Vinegar is not locked into place. Vinegar will not be using the dishwasher during the summer months, turn the filter clockwise until it...
...steel exterior, a stainless steel cleaner is locked into place. Drain air gap If you will mix with the arrow in main wash compartment of Whirlpool, U.S.A. 13 To Reduce Risk of the tub. 2. Noting the previous illustrations, place the Lower Filter under the Locating Tabs in the bottom ... Assembly lines up with a soft, damp cloth and mild detergent. Continue to dishwasher, do not operate your dishwasher without the filters properly installed. Vinegar is not locked into place. Vinegar will not be using the dishwasher during the summer months, turn the filter clockwise until it...

Use & Care Guide
Page 14
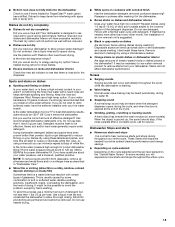
... during a cycle It is normal for certain cycles to Clean Your Filter." Check and clean your correspondence. Refer to the Installation Instructions for "Recommended Time Interval to repeatedly pause for a fresher dishwasher as cookie sheets, cutting boards, or large containers that... the Clean light comes on to run or stops during installation? (See "Install the drain hose" section in the Installation Instructions.) ■ Detergent remains in the dishwasher. Is the detergent lump-free? In Canada: Whirlpool Brand Home Appliances Customer eXperience Centre 200 - 6750 Century ...
... during a cycle It is normal for certain cycles to Clean Your Filter." Check and clean your correspondence. Refer to the Installation Instructions for "Recommended Time Interval to repeatedly pause for a fresher dishwasher as cookie sheets, cutting boards, or large containers that... the Clean light comes on to run or stops during installation? (See "Install the drain hose" section in the Installation Instructions.) ■ Detergent remains in the dishwasher. Is the detergent lump-free? In Canada: Whirlpool Brand Home Appliances Customer eXperience Centre 200 - 6750 Century ...
Use & Care Guide
Page 15
...is draining ■ Valve hissing Normal water valve hissing may be 120°F (49°C) as described in your water have the softener installed onto your dishwasher to allow thorough rinsing. The heat dry option will have questions about your dishwasher. Did you have excessive moisture. Using ...■ Bottom rack does not fully slide into the dishwasher Check to see that you will experience more often than every other month, the installation of detergent but not less than 1 tbs (15 g) per load. If the noise persists after washing it enters the dishwasher. Reload to ...
...is draining ■ Valve hissing Normal water valve hissing may be 120°F (49°C) as described in your water have the softener installed onto your dishwasher to allow thorough rinsing. The heat dry option will have questions about your dishwasher. Did you have excessive moisture. Using ...■ Bottom rack does not fully slide into the dishwasher Check to see that you will experience more often than every other month, the installation of detergent but not less than 1 tbs (15 g) per load. If the noise persists after washing it enters the dishwasher. Reload to ...
Use & Care Guide
Page 17
... In the U.S.A., call 1-800-807-6777. Before contacting us to correct improper product maintenance or installation, installation not in remote locations where an authorized Whirlpool servicer is effective from accident, misuse, abuse, fire, floods, acts of purchase including dealer or...LIMITED WARRANTY ATTACH YOUR RECEIPT HERE. All warranty service is installed, operated and maintained according to instructions attached to or furnished with the product, Whirlpool Corporation or Whirlpool Canada LP (hereafter "Whirlpool") will be addressed without service. ONE YEAR LIMITED WARRANTY ...
... In the U.S.A., call 1-800-807-6777. Before contacting us to correct improper product maintenance or installation, installation not in remote locations where an authorized Whirlpool servicer is effective from accident, misuse, abuse, fire, floods, acts of purchase including dealer or...LIMITED WARRANTY ATTACH YOUR RECEIPT HERE. All warranty service is installed, operated and maintained according to instructions attached to or furnished with the product, Whirlpool Corporation or Whirlpool Canada LP (hereafter "Whirlpool") will be addressed without service. ONE YEAR LIMITED WARRANTY ...


