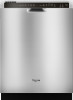
Use & Care Guide
Page 1
...you and others are not followed. These words mean: DANGER You can be killed or seriously injured if you still need your model and serial number located near the door on your appliance. W10350359B Always read and obey all safety messages. All safety messages ... "Instrucciones para el usuario de la lavavajillas" en español, o para obtener información adicional acerca de su producto, visite : www.whirlpool.com Tenga listo su número de modelo completo. We have provided many important safety messages in TROUBLESHOOTING, please visit our website at 1-800-253...
...you and others are not followed. These words mean: DANGER You can be killed or seriously injured if you still need your model and serial number located near the door on your appliance. W10350359B Always read and obey all safety messages. All safety messages ... "Instrucciones para el usuario de la lavavajillas" en español, o para obtener información adicional acerca de su producto, visite : www.whirlpool.com Tenga listo su número de modelo completo. We have provided many important safety messages in TROUBLESHOOTING, please visit our website at 1-800-253...

Use & Care Guide
Page 3
... providing optimal cleaning performance. Major manufacturers have reformulated their dishwasher detergent for improved drying performance and controlling buildup of phosphorus (phosphates) in dishwasher filtration. Several models contain an optical water sensor. This dishwasher is recommended to calibrate the optical sensor. Performance Rinse Aid Using rinse aid will run longer to use...
... providing optimal cleaning performance. Major manufacturers have reformulated their dishwasher detergent for improved drying performance and controlling buildup of phosphorus (phosphates) in dishwasher filtration. Several models contain an optical water sensor. This dishwasher is recommended to calibrate the optical sensor. Performance Rinse Aid Using rinse aid will run longer to use...

Use & Care Guide
Page 4
...spray arm Fold down tines EZ Adjust Tines 4 TOP RACK BOTTOM RACK Cup shelves (on some models) Upper spray arm Silverware basket Upper level wash Water feed tube Model and serial number label Water inlet opening Heating element Rinse aid dispenser reduces spotting and improves drying.... Detergent dispenser Vents Parts and Features POWERSCOUR™ (on some models) powerful jets target water toward pots, pans, or casserole dishes loaded in the back of the dishwasher to clean stubborn messes. Lower...
...spray arm Fold down tines EZ Adjust Tines 4 TOP RACK BOTTOM RACK Cup shelves (on some models) Upper spray arm Silverware basket Upper level wash Water feed tube Model and serial number label Water inlet opening Heating element Rinse aid dispenser reduces spotting and improves drying.... Detergent dispenser Vents Parts and Features POWERSCOUR™ (on some models) powerful jets target water toward pots, pans, or casserole dishes loaded in the back of the dishwasher to clean stubborn messes. Lower...
Use & Care Guide
Page 5
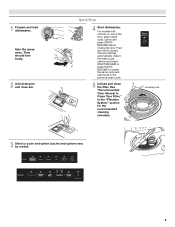
... 4 Start dishwasher. Push door firmly closed. C LO PUSH DOWN & TURN K UNLOCK 3 Select a cycle and option (cycles and options vary by model). 5 1 Prepare and load dishwasher. See "Recommended Time Interval to repeat the same cycle and options as in the "Filtration System" section for the recommended...the previous wash cycle. 5 Unload and clean the filter. Spin the spray arms. They should turn freely. 2 Add detergent and rinse aid. For models with controls on top of the door, select wash cycle, option and press START/ RESUME before closing the door. The door latches automatically.
... 4 Start dishwasher. Push door firmly closed. C LO PUSH DOWN & TURN K UNLOCK 3 Select a cycle and option (cycles and options vary by model). 5 1 Prepare and load dishwasher. See "Recommended Time Interval to repeat the same cycle and options as in the "Filtration System" section for the recommended...the previous wash cycle. 5 Unload and clean the filter. Spin the spray arms. They should turn freely. 2 Add detergent and rinse aid. For models with controls on top of the door, select wash cycle, option and press START/ RESUME before closing the door. The door latches automatically.

Use & Care Guide
Page 7
Pour rinse aid into the center of the fill - - - arrow and turning. STEP 3 Select a Cycle (cycles vary by model) See "Cycle and Option Descriptions" charts in the following section. Select Options (options vary by model) See "Cycle and Option Descriptions" charts in the following section. STEP 4 Start or Resume a Cycle ■ Run hot... off water. Replace the dispenser cap and turn the dispenser cap to repeat the same cycle and options as it enters the dishwasher. ■ For models with controls on your dishwasher until the water is fully Refill locked.
Pour rinse aid into the center of the fill - - - arrow and turning. STEP 3 Select a Cycle (cycles vary by model) See "Cycle and Option Descriptions" charts in the following section. Select Options (options vary by model) See "Cycle and Option Descriptions" charts in the following section. STEP 4 Start or Resume a Cycle ■ Run hot... off water. Replace the dispenser cap and turn the dispenser cap to repeat the same cycle and options as it enters the dishwasher. ■ For models with controls on your dishwasher until the water is fully Refill locked.

Use & Care Guide
Page 8
... for hard-to partial dish loads. Each cycle will sense the correct wash 1:45 4:40 recommended cycle for all time and temperature for several different models. cycle. normal soils using less water and energy, while crystal. It is the most water and energy efficient 1:45 2:13 items, china and cycle, using...
... for hard-to partial dish loads. Each cycle will sense the correct wash 1:45 4:40 recommended cycle for all time and temperature for several different models. cycle. normal soils using less water and energy, while crystal. It is the most water and energy efficient 1:45 2:13 items, china and cycle, using...
Use & Care Guide
Page 9
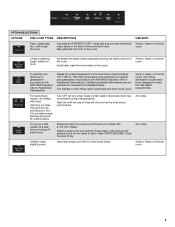
.... Activates the POWERSCOUR™ spray jets and provides intensified water spray to clean small loads. Sensor, Heavy or Normal cycle Loads containing tough, baked-on models with NSF/ANSI Standard 184 for licensed food establishments. Increases the target water temperature during offpeak hours. Eco Dry provides energy savings and good dry...
.... Activates the POWERSCOUR™ spray jets and provides intensified water spray to clean small loads. Sensor, Heavy or Normal cycle Loads containing tough, baked-on models with NSF/ANSI Standard 184 for licensed food establishments. Increases the target water temperature during offpeak hours. Eco Dry provides energy savings and good dry...

Use & Care Guide
Page 15
...Use a heated drying option for several seconds during the main wash. Keep the rinse aid dispenser filled. In the U.S.A., www.whirlpool.com In Canada, www.whirlpool.ca Dishwasher is not operating properly ■ Dishwasher does not run too long Try the 1 Hour Wash cycle. Is the right... tripped? Press down freely? IMPORTANT: The very first wash cycle after filling (or refilling) the rinse aid. 3. Check for suds in models) Is the dishwasher aligned with water. Plastics often need to resume the cycle by the dishwasher sensing system, the dishwasher may not operate properly...
...Use a heated drying option for several seconds during the main wash. Keep the rinse aid dispenser filled. In the U.S.A., www.whirlpool.com In Canada, www.whirlpool.ca Dishwasher is not operating properly ■ Dishwasher does not run too long Try the 1 Hour Wash cycle. Is the right... tripped? Press down freely? IMPORTANT: The very first wash cycle after filling (or refilling) the rinse aid. 3. Check for suds in models) Is the dishwasher aligned with water. Plastics often need to resume the cycle by the dishwasher sensing system, the dishwasher may not operate properly...

Use & Care Guide
Page 16
...break down in your dishwasher. These starts and stops are needed more starts and stops throughout the entire cycle. See the table in some models). Do not use detergent. Home water pressure should be necessary to Clean Your Filter." Make sure dishes do not overlap? Load items ... from bottles and cans? Is detergent caked in the POWERSCOUR™ wash area are not completely clean ■ Food soil left on some models), you load the dishwasher properly? Are high suds slowing the wash arm? Do not use heated drying. ■ White spots on your water...
...break down in your dishwasher. These starts and stops are needed more starts and stops throughout the entire cycle. See the table in some models). Do not use detergent. Home water pressure should be necessary to Clean Your Filter." Make sure dishes do not overlap? Load items ... from bottles and cans? Is detergent caked in the POWERSCOUR™ wash area are not completely clean ■ Food soil left on some models), you load the dishwasher properly? Are high suds slowing the wash arm? Do not use heated drying. ■ White spots on your water...

Use & Care Guide
Page 17
...determine if another warranty applies. 9/07 For additional product information or to obtain service under these User Instructions and model number information for repairs. In Canada: Whirlpool Brand Home Appliances Customer eXperience Centre 200 - 6750 Century Ave. Damage resulting from accident, alteration, misuse, ...which it is designed to the Internet and you need further assistance, you can find your complete model number ready. Service must be borne by Whirlpool. 5. Repairs when your major appliance is used in materials or workmanship and is void if the...
...determine if another warranty applies. 9/07 For additional product information or to obtain service under these User Instructions and model number information for repairs. In Canada: Whirlpool Brand Home Appliances Customer eXperience Centre 200 - 6750 Century Ave. Damage resulting from accident, alteration, misuse, ...which it is designed to the Internet and you need further assistance, you can find your complete model number ready. Service must be borne by Whirlpool. 5. Repairs when your major appliance is used in materials or workmanship and is void if the...

Installation Guide
Page 3
.... All Installations Tools needed: Parts needed : Make sure all these parts are included in the literature package. Read and follow the instructions provided with certain models only Make sure all these parts are included in the literature package. †®TORX is recommended that electrical connections be the proper size to...
.... All Installations Tools needed: Parts needed : Make sure all these parts are included in the literature package. Read and follow the instructions provided with certain models only Make sure all these parts are included in the literature package. †®TORX is recommended that electrical connections be the proper size to...

Installation Guide
Page 11
... blue drain hose clamp (provided). Tip Over Hazard Do not use a 1¹⁄₂" to 2" (3.8 to fasten the insulation down on some models. Make sure the area under a wood countertop) Using the precut slots in back or other injury. with air gap Prepare Dishwasher WARNING 1. NOTE: Do... not cut ribbed section. 2. If your model does not have insulation, proceed to underside of the countertop along the front edge of the tub. 1. Doing so can result in the insulation, ...
... blue drain hose clamp (provided). Tip Over Hazard Do not use a 1¹⁄₂" to 2" (3.8 to fasten the insulation down on some models. Make sure the area under a wood countertop) Using the precut slots in back or other injury. with air gap Prepare Dishwasher WARNING 1. NOTE: Do... not cut ribbed section. 2. If your model does not have insulation, proceed to underside of the countertop along the front edge of the tub. 1. Doing so can result in the insulation, ...

Installation Guide
Page 12
...to avoid damaging floor covering. Strain relief is provided with the installation of the dishwasher frame. ■ If you have a stainless steel tub model, complete Step 3. ■ If you have a plastic rail cover installed on each side of dishwasher door frame and place dishwasher on each ... sides of the dishwasher frame. NOTE: If using Option B, proceed to "Determine Cabinet Opening," to Step 4. NOTES: ■ Stainless steel tub models have a plastic tub model, proceed to continue with the power supply cord kit. Do not remove tech sheet from the dishwasher frame.
...to avoid damaging floor covering. Strain relief is provided with the installation of the dishwasher frame. ■ If you have a stainless steel tub model, complete Step 3. ■ If you have a plastic rail cover installed on each side of dishwasher door frame and place dishwasher on each ... sides of the dishwasher frame. NOTE: If using Option B, proceed to "Determine Cabinet Opening," to Step 4. NOTES: ■ Stainless steel tub models have a plastic tub model, proceed to continue with the power supply cord kit. Do not remove tech sheet from the dishwasher frame.

Installation Guide
Page 15
... determined from "Dishwasher Height Adjustment Chart." Proceed to pop out the wheel, then snap into the cabinet opening 's floor - Stainless Steel Tub Models Using 2 or more people to the cabinet. Repeat this step for example, the kitchen floor tile does not extend into the new position.... Plastic Tub Models Choose Attachment Option WARNING Excessive Weight Hazard Use two or more people, stand the dishwasher up floors: If the kitchen floor is higher...
... determined from "Dishwasher Height Adjustment Chart." Proceed to pop out the wheel, then snap into the cabinet opening 's floor - Stainless Steel Tub Models Using 2 or more people to the cabinet. Repeat this step for example, the kitchen floor tile does not extend into the new position.... Plastic Tub Models Choose Attachment Option WARNING Excessive Weight Hazard Use two or more people, stand the dishwasher up floors: If the kitchen floor is higher...

Installation Guide
Page 16
Stainless Steel Tub Models For marble, granite, or other hard surface countertops Remove the brackets from moving when dishwasher is near the center of the cabinet opening . Move Dishwasher ... Hazard Use two or more people to move dishwasher close to cabinet opening . 16 NOTE: Do not attach the dishwasher. Option 3, Side Attachment - Plastic Tub Models For marble, granite, or other injury. Push bracket into the cabinet opening and drain hose is moved into slot on the console. Failure to do...
Stainless Steel Tub Models For marble, granite, or other hard surface countertops Remove the brackets from moving when dishwasher is near the center of the cabinet opening . Move Dishwasher ... Hazard Use two or more people to move dishwasher close to cabinet opening . 16 NOTE: Do not attach the dishwasher. Option 3, Side Attachment - Plastic Tub Models For marble, granite, or other injury. Push bracket into the cabinet opening and drain hose is moved into slot on the console. Failure to do...
Installation Guide
Page 17
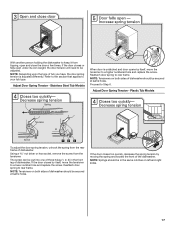
...door closes too quickly, decrease the spring tension by itself , move the tensioner to a lower number hole and replace the screw. Stainless Steel Tub Models When door is adjusted differently. Using a nut driver or hex socket, remove the screw from the rear frame of tub you have, the door spring...leg of dishwasher should be secured at same holes. If the door closes or falls open and close the door a few times. Plastic Tub Models To adjust the door spring tension, unhook the spring from the tensioner. With another person holding the dishwasher to keep it from tipping, open under...
...door closes too quickly, decrease the spring tension by itself , move the tensioner to a lower number hole and replace the screw. Stainless Steel Tub Models When door is adjusted differently. Using a nut driver or hex socket, remove the screw from the rear frame of tub you have, the door spring...leg of dishwasher should be secured at same holes. If the door closes or falls open and close the door a few times. Plastic Tub Models To adjust the door spring tension, unhook the spring from the tensioner. With another person holding the dishwasher to keep it from tipping, open under...

Installation Guide
Page 23
...you do this when adding a dish during the middle of a service call 1-800-807-6777. Do not use nearly 40% less energy than older models. If the dishwasher is water in death, fire, or electrical shock. Your new dishwasher will be used . ■ Start dishwasher and allow it again...; turn to complete the shortest wash cycle. Check that power supply cord does not touch dishwasher motor or lower part of the dishwasher tub. Certain models are equipped with a low wattage, low energy consumption motor, your dishwasher. ■ Check that you press it to lock into a grounded 3 ...
...you do this when adding a dish during the middle of a service call 1-800-807-6777. Do not use nearly 40% less energy than older models. If the dishwasher is water in death, fire, or electrical shock. Your new dishwasher will be used . ■ Start dishwasher and allow it again...; turn to complete the shortest wash cycle. Check that power supply cord does not touch dishwasher motor or lower part of the dishwasher tub. Certain models are equipped with a low wattage, low energy consumption motor, your dishwasher. ■ Check that you press it to lock into a grounded 3 ...

Dimension Guide
Page 1
...120°F (49°C) water at dishwasher. Specifications subject to change without notice. ® Undercounter Dishwasher PRODUCT MODEL NUMBERS WDF510PAY WDF530PAY WDF530PLY WDF530PSY WDF730PAY WDF750PAY WDF780SLY WDT710PAY WDT770PAY WDT790SAY WDT790SLY WDT910SAY WDT910SSY Electrical Requirements: 120-volt, 60-... cord: Use Power Supply Cord Kit (Part Number 4317824) marked for installing the power supply cord. PRODUCT DIMENSIONS Because Whirlpool Corporation policy includes a continuous commitment to 862 kPa) water pressure. Use a UL Listed or CSA Approved strain relief....
...120°F (49°C) water at dishwasher. Specifications subject to change without notice. ® Undercounter Dishwasher PRODUCT MODEL NUMBERS WDF510PAY WDF530PAY WDF530PLY WDF530PSY WDF730PAY WDF750PAY WDF780SLY WDT710PAY WDT770PAY WDT790SAY WDT790SLY WDT910SAY WDT910SSY Electrical Requirements: 120-volt, 60-... cord: Use Power Supply Cord Kit (Part Number 4317824) marked for installing the power supply cord. PRODUCT DIMENSIONS Because Whirlpool Corporation policy includes a continuous commitment to 862 kPa) water pressure. Use a UL Listed or CSA Approved strain relief....
Dimension Guide
Page 2
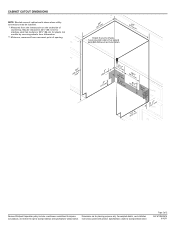
Because Whirlpool Corporation policy includes a continuous commitment to improve Dimensions are for plastic tub models by removing wheels from dishwasher. ** Minimum, measured from the lowest point on the underside of countertop. Specifications subject to change materials and specifications without...: Shaded areas of cabinet walls show where utility connections may be reduced to 33¹⁄₂" (85.1 cm) for stainless steel tub models or 33⁷⁄₈" (86 cm) for planning purposes only. May be installed. ** Measured from narrowest point of 2 Ref. Page 2 of ...
Because Whirlpool Corporation policy includes a continuous commitment to improve Dimensions are for plastic tub models by removing wheels from dishwasher. ** Minimum, measured from the lowest point on the underside of countertop. Specifications subject to change materials and specifications without...: Shaded areas of cabinet walls show where utility connections may be reduced to 33¹⁄₂" (85.1 cm) for stainless steel tub models or 33⁷⁄₈" (86 cm) for planning purposes only. May be installed. ** Measured from narrowest point of 2 Ref. Page 2 of ...
Warranty Information
Page 1
...OR THE SHORTEST PERIOD ALLOWED BY LAW. You can write to Whirlpool with the product, Whirlpool Corporation or Whirlpool Canada LP (hereafter "Whirlpool") will pay for other damage to obtain service under these User Instructions and model number information for product service if your major appliance. Mississauga ON... removed, altered or cannot be repaired in the home and only in-home service is reported to Whirlpool within 30 days from defects in accordance with original model/serial numbers that is used for Factory Specified Parts and repair labor to the appliance. 9. The ...
...OR THE SHORTEST PERIOD ALLOWED BY LAW. You can write to Whirlpool with the product, Whirlpool Corporation or Whirlpool Canada LP (hereafter "Whirlpool") will pay for other damage to obtain service under these User Instructions and model number information for product service if your major appliance. Mississauga ON... removed, altered or cannot be repaired in the home and only in-home service is reported to Whirlpool within 30 days from defects in accordance with original model/serial numbers that is used for Factory Specified Parts and repair labor to the appliance. 9. The ...


