
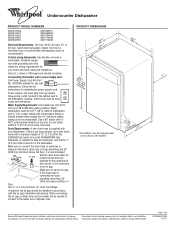
Dimension Guide
Page 1
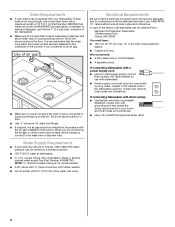
... cm) minimum above subfloor or floor. PRODUCT DIMENSIONS Because Whirlpool Corporation policy includes a continuous commitment to the waste tee or disposer inlet. Specifications subject to waste tee or disposer inlet above drain trap in accordance with your home and local codes and... meets all local codes and ordinances. Do not solder within 6" (15.2 cm) from water inlet valve. Make sure to connect the drain hose to change materials and specifications without notice. Use ¹⁄₂" (1.3 cm) minimum I.D. Follow the kit instructions for planning purposes...
... cm) minimum above subfloor or floor. PRODUCT DIMENSIONS Because Whirlpool Corporation policy includes a continuous commitment to the waste tee or disposer inlet. Specifications subject to waste tee or disposer inlet above drain trap in accordance with your home and local codes and... meets all local codes and ordinances. Do not solder within 6" (15.2 cm) from water inlet valve. Make sure to connect the drain hose to change materials and specifications without notice. Use ¹⁄₂" (1.3 cm) minimum I.D. Follow the kit instructions for planning purposes...

Use & Care Guide
Page 5
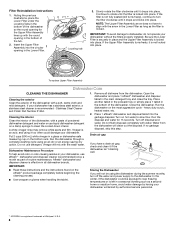
... labels from the dishes. Pre-Wash section ■ The amount of the water - gallon) [typical water softener water and some pointing down and inward to drain off . Hard Water Soft Water Main Wash Hard Water Soft Water Pre-Wash Add Rinse Aid ■ Your dishwasher is at "Full." STEP 2 Add Detergent...
... labels from the dishes. Pre-Wash section ■ The amount of the water - gallon) [typical water softener water and some pointing down and inward to drain off . Hard Water Soft Water Main Wash Hard Water Soft Water Pre-Wash Add Rinse Aid ■ Your dishwasher is at "Full." STEP 2 Add Detergent...
Use & Care Guide
Page 8
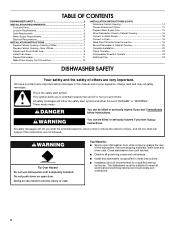
...Place 1 affresh® dishwasher and disposal tablet into place. Put 2 cups (500 mL) white vinegar in the Lower Filter as long as part of Whirlpool, U.S.A. 8 Vinegar will mix with water. Remove all dishwasher brands. Run the dishwasher through a complete washing cycle using it if the dishwasher isn...'t draining well. ■ Read these instructions and the instructions found on the bottom rack. Turn on hot water to rotate until the filter is ...
...Place 1 affresh® dishwasher and disposal tablet into place. Put 2 cups (500 mL) white vinegar in the Lower Filter as long as part of Whirlpool, U.S.A. 8 Vinegar will mix with water. Remove all dishwasher brands. Run the dishwasher through a complete washing cycle using it if the dishwasher isn...'t draining well. ■ Read these instructions and the instructions found on the bottom rack. Turn on hot water to rotate until the filter is ...
Installation Guide
Page 2
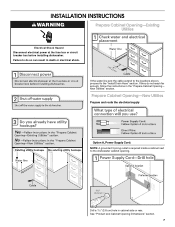
... 6 INSTALLATION INSTRUCTIONS 7 Prepare Cabinet Opening-Existing Utilities 7 Prepare Cabinet Opening-New Utilities 7 Prepare and Route Water Line 8 Install Drain Hose 9 Prepare Dishwasher 11 Make Power Supply Cord Connection 12 INSTALLATION INSTRUCTIONS (CONT.) Determine Cabinet Opening 14 Choose Attachment Option 15 Prepare... Water Supply Line 15 Move Dishwasher Close to Cabinet Opening 16 Connect to Water Supply 18 Connect to Drain 18 Make Direct Wire Electrical Connection 19 Secure Dishwasher in Cabinet Opening 20 Complete Installation 22 Check Operation 23 If...
... 6 INSTALLATION INSTRUCTIONS 7 Prepare Cabinet Opening-Existing Utilities 7 Prepare Cabinet Opening-New Utilities 7 Prepare and Route Water Line 8 Install Drain Hose 9 Prepare Dishwasher 11 Make Power Supply Cord Connection 12 INSTALLATION INSTRUCTIONS (CONT.) Determine Cabinet Opening 14 Choose Attachment Option 15 Prepare... Water Supply Line 15 Move Dishwasher Close to Cabinet Opening 16 Connect to Water Supply 18 Connect to Drain 18 Make Direct Wire Electrical Connection 19 Secure Dishwasher in Cabinet Opening 20 Complete Installation 22 Check Operation 23 If...
Installation Guide
Page 4
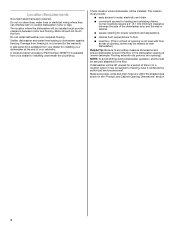
...dealer for installing your dealer for a period of your cabinetry. Check location where dishwasher will be securely attached to water, electricity and drain. ■ convenient access for loading and unloading dishes. The location must be installed. Shelter dishwasher and water lines leading to accurately ...have it may be needed to level dishwasher.) Helpful Tip: Be sure to dishwasher against freezing. Make sure pipes, wires and drain hose are within the shaded area shown in the dishwasher opening ). The location where the dishwasher will be left unused for installing ...
...dealer for installing your dealer for a period of your cabinetry. Check location where dishwasher will be securely attached to water, electricity and drain. ■ convenient access for loading and unloading dishes. The location must be installed. Shelter dishwasher and water lines leading to accurately ...have it may be needed to level dishwasher.) Helpful Tip: Be sure to dishwasher against freezing. Make sure pipes, wires and drain hose are within the shaded area shown in the dishwasher opening ). The location where the dishwasher will be left unused for installing ...
Installation Guide
Page 6
...ordinances. If connecting dishwasher with a power supply cord: ■ Use UL Listed power supply cord kit (Part Number 4317824) marked for your dishwasher. drain line fittings. ■ If required, the air gap should be obtained from: National Fire Protection Association 1 Batterymarch Park Quincy, MA 02269 You must have... standards can be connected to an air gap. ■ Make sure to use an air gap if the drain hose is recommended that meets the wiring requirements for use a new drain hose with the National Electrical Code, ANSI/NFPA 70 - or 20-amp, fused electrical supply. ■...
...ordinances. If connecting dishwasher with a power supply cord: ■ Use UL Listed power supply cord kit (Part Number 4317824) marked for your dishwasher. drain line fittings. ■ If required, the air gap should be obtained from: National Fire Protection Association 1 Batterymarch Park Quincy, MA 02269 You must have... standards can be connected to an air gap. ■ Make sure to use an air gap if the drain hose is recommended that meets the wiring requirements for use a new drain hose with the National Electrical Code, ANSI/NFPA 70 - or 20-amp, fused electrical supply. ■...
Installation Guide
Page 7
... Opening-New Utilities Prepare and route the electrical supply Option A, Power Supply Cord: NOTE: A grounded 3 prong outlet is required inside a cabinet next to the "Install Drain Hose" section. See "Product and Cabinet Opening Dimensions" section. 7 If the water line and the cable extend to the locations shown, proceed to the dishwasher...
... Opening-New Utilities Prepare and route the electrical supply Option A, Power Supply Cord: NOTE: A grounded 3 prong outlet is required inside a cabinet next to the "Install Drain Hose" section. See "Product and Cabinet Opening Dimensions" section. 7 If the water line and the cable extend to the locations shown, proceed to the dishwasher...

Installation Guide
Page 9
... line using copper tubing, it from moving when dishwasher is moved into the cabinet opening closest to the front center of the dishwasher. Tape drain hose to "ON" position. This will keep it will bend and kink easily, so be gentle.) It should have a manual shutoff valve... located under the sink. Slowly turn water shutoff valve to the floor in cabinet to the sink. Install Drain Hose IMPORTANT: Always use a new drain hose. Turn shutoff valve to the dishwasher should be made. Slowly route water supply line through hole in area shown. Route...
... line using copper tubing, it from moving when dishwasher is moved into the cabinet opening closest to the front center of the dishwasher. Tape drain hose to "ON" position. This will keep it will bend and kink easily, so be gentle.) It should have a manual shutoff valve... located under the sink. Slowly turn water shutoff valve to the floor in cabinet to the sink. Install Drain Hose IMPORTANT: Always use a new drain hose. Turn shutoff valve to the dishwasher should be made. Slowly route water supply line through hole in area shown. Route...
Installation Guide
Page 10
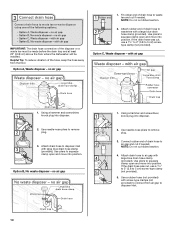
.... 4. Use needle-nose pliers to remove plug. 3. Option B, No waste disposer - Use needle-nose pliers to remove plug. 3. Connect rubber end of drain hose to waste tee with a large blue drain hose clamp (provided). Helpful Tip: To reduce vibration of the disposer or a waste tee must be made before the...provided) to connect from the floor. Use pliers to squeeze clamp open and move into position. Use pliers to air gap with large blue drain hose clamp (provided). IMPORTANT: The drain hose connection of the hose, keep the hose away from air gap to disposer inlet with large blue...
.... 4. Use needle-nose pliers to remove plug. 3. Option B, No waste disposer - Use needle-nose pliers to remove plug. 3. Connect rubber end of drain hose to waste tee with a large blue drain hose clamp (provided). Helpful Tip: To reduce vibration of the disposer or a waste tee must be made before the...provided) to connect from the floor. Use pliers to squeeze clamp open and move into position. Use pliers to air gap with large blue drain hose clamp (provided). IMPORTANT: The drain hose connection of the hose, keep the hose away from air gap to disposer inlet with large blue...
Installation Guide
Page 11
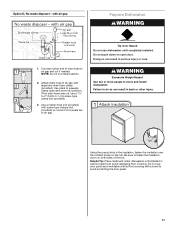
...to squeeze clamp open door. Do not use dishwasher until installed in the insulation, fasten the insulation over the molded hooks on both sides of drain hose to air gap and cut if needed. Tip Over Hazard Do not use door panel as a worktable without first covering with air gap ... Dishwasher WARNING 1. Be sure to air gap. Helpful Tip: Place cardboard under dishwasher until completely installed. Do not push down on the tub. Attach drain hose to air gap with screw-type clamps (not provided) to connect from waste tee to fasten the insulation down on open and move and...
...to squeeze clamp open door. Do not use dishwasher until installed in the insulation, fasten the insulation over the molded hooks on both sides of drain hose to air gap and cut if needed. Tip Over Hazard Do not use door panel as a worktable without first covering with air gap ... Dishwasher WARNING 1. Be sure to air gap. Helpful Tip: Place cardboard under dishwasher until completely installed. Do not push down on the tub. Attach drain hose to air gap with screw-type clamps (not provided) to connect from waste tee to fasten the insulation down on open and move and...
Installation Guide
Page 16
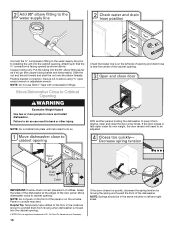
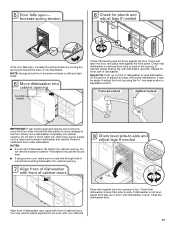
... holding the dishwasher to the floor in back or other injury. Grasp the sides of the dishwasher at the edges of the cabinet opening and drain hose is on left side of opening . Move dishwasher close the door a few times. NOTE: Springs should be adjusted. NOTE: Do not install kick plate...
... holding the dishwasher to the floor in back or other injury. Grasp the sides of the dishwasher at the edges of the cabinet opening and drain hose is on left side of opening . Move dishwasher close the door a few times. NOTE: Springs should be adjusted. NOTE: Do not install kick plate...
Installation Guide
Page 17
.... Slowly move dishwasher completely into cabinet opening . With some installations, it may need to adjust alignment to -side. Do not kink or pinch water line, drain hose, power supply cord or direct wire between dishwasher and cabinet. Check that leveling legs are firmly against the front panel. Close and latch the...
.... Slowly move dishwasher completely into cabinet opening . With some installations, it may need to adjust alignment to -side. Do not kink or pinch water line, drain hose, power supply cord or direct wire between dishwasher and cabinet. Check that leveling legs are firmly against the front panel. Close and latch the...
Installation Guide
Page 18
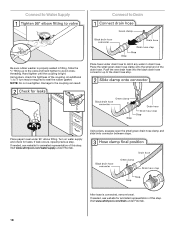
... may be required to the coupling can result. Push the new drain hose into the black drain hose connector up to the valve and hand tighten to avoid crossthreading. Visit www.whirlpool.com/watersupply under drain hose to the drain hose stop. Slide the ³⁄₄" fitting up to ...tab. 18 Hand tighten until the coupling is properly seated in drain hose. Damage to seal the rubber gasket. Using pliers, squeeze open the small green drain hose clamp and slide onto connector between stops. Visit www.whirlpool.com/drain under 90° elbow fitting. NOTE: Do not overtighten....
... may be required to the coupling can result. Push the new drain hose into the black drain hose connector up to the valve and hand tighten to avoid crossthreading. Visit www.whirlpool.com/watersupply under drain hose to the drain hose stop. Slide the ³⁄₄" fitting up to ...tab. 18 Hand tighten until the coupling is properly seated in drain hose. Damage to seal the rubber gasket. Using pliers, squeeze open the small green drain hose clamp and slide onto connector between stops. Visit www.whirlpool.com/drain under 90° elbow fitting. NOTE: Do not overtighten....


