
Warranty Information
Page 1
... service in -home service is designed to the appliance. 9. In Canada: Whirlpool Brand Home Appliances Customer eXperience Centre 200 - 6750 Century Ave. WHIRLPOOL SHALL NOT BE LIABLE FOR INCIDENTAL OR CONSEQUENTIAL DAMAGES. Proof of the dishwasher interior. Costs associated with published installation instructions. 11. LIMITATION OF REMEDIES CUSTOMER'S SOLE AND EXCLUSIVE REMEDY UNDER...
... service in -home service is designed to the appliance. 9. In Canada: Whirlpool Brand Home Appliances Customer eXperience Centre 200 - 6750 Century Ave. WHIRLPOOL SHALL NOT BE LIABLE FOR INCIDENTAL OR CONSEQUENTIAL DAMAGES. Proof of the dishwasher interior. Costs associated with published installation instructions. 11. LIMITATION OF REMEDIES CUSTOMER'S SOLE AND EXCLUSIVE REMEDY UNDER...
Dimension Guide
Page 1
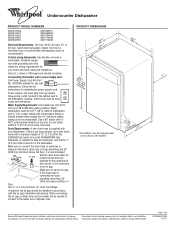
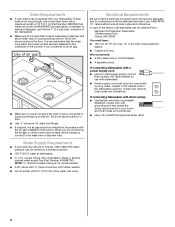
....8 cm) minimum above subfloor or floor. Do not solder within 6" (15.2 cm) from water inlet valve. PRODUCT DIMENSIONS Because Whirlpool Corporation policy includes a continuous commitment to 862 kPa) water pressure. copper tubing with 20 to 120 psi (138 to improve Dimensions... is connected to change materials and specifications without notice. Use a 90° elbow with dishwashers. For complete details, see Installation our products, we reserve the right to the waste tee or disposer inlet. ® Undercounter Dishwasher PRODUCT MODEL NUMBERS WDF310PAA ...
....8 cm) minimum above subfloor or floor. Do not solder within 6" (15.2 cm) from water inlet valve. PRODUCT DIMENSIONS Because Whirlpool Corporation policy includes a continuous commitment to 862 kPa) water pressure. copper tubing with 20 to 120 psi (138 to improve Dimensions... is connected to change materials and specifications without notice. Use a 90° elbow with dishwashers. For complete details, see Installation our products, we reserve the right to the waste tee or disposer inlet. ® Undercounter Dishwasher PRODUCT MODEL NUMBERS WDF310PAA ...
Dimension Guide
Page 2
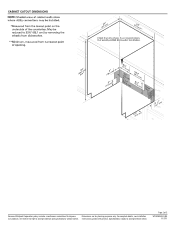
Specifications subject to change materials and specifications without notice. Instructions packed with product. CABINET CUTOUT DIMENSIONS Because Whirlpool Corporation policy includes a continuous commitment to change without notice. Page 2 of 2 W10435040-D-WH 11/7/11 For complete details, see Installation our products, we reserve the right to improve Dimensions are for planning purposes only.
Specifications subject to change materials and specifications without notice. Instructions packed with product. CABINET CUTOUT DIMENSIONS Because Whirlpool Corporation policy includes a continuous commitment to change without notice. Page 2 of 2 W10435040-D-WH 11/7/11 For complete details, see Installation our products, we reserve the right to improve Dimensions are for planning purposes only.
Installation Guide
Page 2
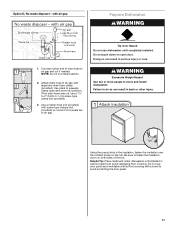
... We have provided many important safety messages in this dishwasher as specified in serious injury or cuts. Close dishwasher door until completely installed. All safety messages will follow instructions. This symbol alerts you to reduce the chance of injury, and tell you and others... the potential hazard is the safety alert symbol. All safety messages will tell you what can result in these instructions. ■ Installation should be installed to : ■ Slowly open door. Do not push down on your appliance. The dishwasher must be performed by a qualified ...
... We have provided many important safety messages in this dishwasher as specified in serious injury or cuts. Close dishwasher door until completely installed. All safety messages will follow instructions. This symbol alerts you to reduce the chance of injury, and tell you and others... the potential hazard is the safety alert symbol. All safety messages will tell you what can result in these instructions. ■ Installation should be installed to : ■ Slowly open door. Do not push down on your appliance. The dishwasher must be performed by a qualified ...

Installation Guide
Page 3
...needed: Parts supplied: Parts needed : Other parts you may also need: *Must be made by a licensed electrical installer. It is recommended that electrical connections be the proper size to connect your household wiring to 16-gauge wiring in ...of Saturn Fasteners, Inc. 3 Read and follow the instructions provided with any tools listed here. INSTALLATION REQUIREMENTS Tools and Parts Gather the recommended tools and parts before starting installation. Parts needed: All Installations Tools needed : Make sure all these parts are included in plumbing supply stores. See "Electrical...
...needed: Parts supplied: Parts needed : Other parts you may also need: *Must be made by a licensed electrical installer. It is recommended that electrical connections be the proper size to connect your household wiring to 16-gauge wiring in ...of Saturn Fasteners, Inc. 3 Read and follow the instructions provided with any tools listed here. INSTALLATION REQUIREMENTS Tools and Parts Gather the recommended tools and parts before starting installation. Parts needed: All Installations Tools needed : Make sure all these parts are included in plumbing supply stores. See "Electrical...
Installation Guide
Page 4
... within the shaded area shown in the dishwasher opening is available from your dealer for installing your dealer for loading and unloading dishes. The location where the dishwasher will be installed must provide clearance between the side of the dishwasher door and the wall or cabinet.... and Cabinet Opening Dimensions" section. 4 The location must be subject to the floor. Motor should not touch the floor. Do not install dishwasher over carpeted flooring. Damage from freezing is available from your dishwasher at rear of opening, shims may be securely attached to freezing,...
... within the shaded area shown in the dishwasher opening is available from your dealer for installing your dealer for loading and unloading dishes. The location where the dishwasher will be installed must provide clearance between the side of the dishwasher door and the wall or cabinet.... and Cabinet Opening Dimensions" section. 4 The location must be subject to the floor. Motor should not touch the floor. Do not install dishwasher over carpeted flooring. Damage from freezing is available from your dishwasher at rear of opening, shims may be securely attached to freezing,...
Installation Guide
Page 6
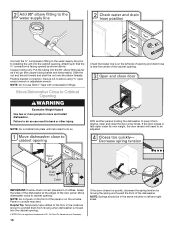
..., ANSI/NFPA 70 - Electrical Requirements Be sure that the electrical connection and wire size are connecting the air gap, a rubber hose (not provided) will be installed in the cabinet next to the underside of the above the floor. Water Supply Requirements ■ A hot water line with rubber washer. ■ Do not... Number 3385556) that the drain hose either be connected to an air gap. ■ Make sure to use a new drain hose with the air gap installation instructions.
..., ANSI/NFPA 70 - Electrical Requirements Be sure that the electrical connection and wire size are connecting the air gap, a rubber hose (not provided) will be installed in the cabinet next to the underside of the above the floor. Water Supply Requirements ■ A hot water line with rubber washer. ■ Do not... Number 3385556) that the drain hose either be connected to an air gap. ■ Make sure to use a new drain hose with the air gap installation instructions.
Installation Guide
Page 7
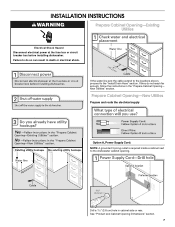
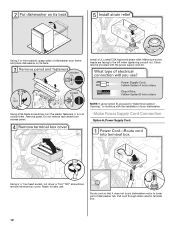
... Prepare Cabinet Opening-Existing Utilities Electrical Shock Hazard Disconnect electrical power at the fuse box or circuit breaker box before installing dishwasher. If they do so can result in death or electrical shock. New Utilities" section. Drill a 1¹⁄₂" (3.8 ... Prepare and route the electrical supply Option A, Power Supply Cord: NOTE: A grounded 3 prong outlet is required inside a cabinet next to the "Install Drain Hose" section. See "Product and Cabinet Opening Dimensions" section. 7 Failure to do not reach far enough, follow the instructions in cabinet side...
... Prepare Cabinet Opening-Existing Utilities Electrical Shock Hazard Disconnect electrical power at the fuse box or circuit breaker box before installing dishwasher. If they do so can result in death or electrical shock. New Utilities" section. Drill a 1¹⁄₂" (3.8 ... Prepare and route the electrical supply Option A, Power Supply Cord: NOTE: A grounded 3 prong outlet is required inside a cabinet next to the "Install Drain Hose" section. See "Product and Cabinet Opening Dimensions" section. 7 Failure to do not reach far enough, follow the instructions in cabinet side...

Installation Guide
Page 9
... hose to "OFF" position. 9 Turn shutoff valve to the floor in area shown. Route water line and tape it from moving when dishwasher is required. Install Drain Hose IMPORTANT: Always use a new drain hose.
... hose to "OFF" position. 9 Turn shutoff valve to the floor in area shown. Route water line and tape it from moving when dishwasher is required. Install Drain Hose IMPORTANT: Always use a new drain hose.
Installation Guide
Page 10
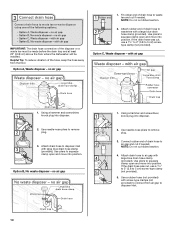
... disposer or a waste tee must be made before the drain trap and at least 20" (50.8 cm) above the floor where the dishwasher will be installed. Attach rubber end of drain hose to disposer inlet. Use needle-nose pliers to squeeze clamp open and move into position. IMPORTANT: The drain hose...
... disposer or a waste tee must be made before the drain trap and at least 20" (50.8 cm) above the floor where the dishwasher will be installed. Attach rubber end of drain hose to disposer inlet. Use needle-nose pliers to squeeze clamp open and move into position. IMPORTANT: The drain hose...
Installation Guide
Page 11
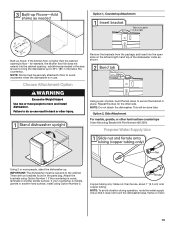
...so can result in the insulation, fasten the insulation over the molded hooks on open and move and install dishwasher. Failure to move into position. Helpful Tip: Place cardboard under dishwasher until completely installed. Connect rubber end of the tub. If the drain hose was cut, use a 1¹⁄₂... opening to air gap and cut ribbed section. 2. Using the precut slots in serious injury or cuts. Do not use dishwasher until installed in back or other injury. Use pliers to air gap with air gap Prepare Dishwasher WARNING 1. Tip Over Hazard Do not use door...
...so can result in the insulation, fasten the insulation over the molded hooks on open and move and install dishwasher. Failure to move into position. Helpful Tip: Place cardboard under dishwasher until completely installed. Connect rubber end of the tub. If the drain hose was cut, use a 1¹⁄₂... opening to air gap and cut ribbed section. 2. Using the precut slots in serious injury or cuts. Do not use dishwasher until installed in back or other injury. Use pliers to air gap with air gap Prepare Dishwasher WARNING 1. Tip Over Hazard Do not use door...
Installation Guide
Page 12
... for later use. Using a flat-blade screwdriver, turn the plastic fasteners ¹⁄₄ turn to the left when tightening conduit nut. Install a UL Listed/CSA Approved strain relief. NOTE: If using Option B, proceed to "Determine Cabinet Opening," to lower part of dishwasher tub. Do... not remove tech sheet from access panel. Using 2 or more people, grasp sides of your dishwasher. Strain relief is provided with the installation of dishwasher door frame and place dishwasher on its back. Make Power Supply Cord Connection Option A, Power Supply Cord: Using a ¹&#...
... for later use. Using a flat-blade screwdriver, turn the plastic fasteners ¹⁄₄ turn to the left when tightening conduit nut. Install a UL Listed/CSA Approved strain relief. NOTE: If using Option B, proceed to "Determine Cabinet Opening," to lower part of dishwasher tub. Do... not remove tech sheet from access panel. Using 2 or more people, grasp sides of your dishwasher. Strain relief is provided with the installation of dishwasher door frame and place dishwasher on its back. Make Power Supply Cord Connection Option A, Power Supply Cord: Using a ¹&#...
Installation Guide
Page 14
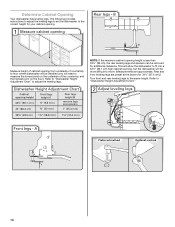
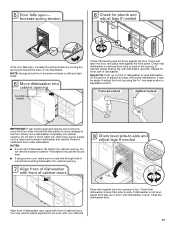
... the leveling legs to set the dishwasher to the correct height for your cabinet opening from underside of countertop to floor where dishwasher will be installed (you will allow the dishwasher to fit into a 33¹⁄₂" (85.1 cm) high cabinet opening height is less than 33⁷⁄₈...
... the leveling legs to set the dishwasher to the correct height for your cabinet opening from underside of countertop to floor where dishwasher will be installed (you will allow the dishwasher to fit into a 33¹⁄₂" (85.1 cm) high cabinet opening height is less than 33⁷⁄₈...
Installation Guide
Page 15
... the cabinet opening 's floor - This will be secured to secure the bracket in use. If your countertop is marble, granite or another hard surface, install using Option Number 1 if the countertop is wood, laminate or another similar surface. NOTE: Do not attach the dishwasher. Option 2, Side Attachment For marble...or other injury. add shims as shown. There are two brackets found in the area shown to bring the dishwasher up to move and install dishwasher. Repeat this step for example, the kitchen floor tile does not extend into the open slots on the left and right-hand ...
... the cabinet opening 's floor - This will be secured to secure the bracket in use. If your countertop is marble, granite or another hard surface, install using Option Number 1 if the countertop is wood, laminate or another similar surface. NOTE: Do not attach the dishwasher. Option 2, Side Attachment For marble...or other injury. add shims as shown. There are two brackets found in the area shown to bring the dishwasher up to move and install dishwasher. Repeat this step for example, the kitchen floor tile does not extend into the open slots on the left and right-hand ...
Installation Guide
Page 16
With another person holding the dishwasher to keep it will need to move and install dishwasher. NOTE: Springs should be adjusted. Attach such that water line is on the left and right sides. Slide the nut and ferrule forward and ...: Do not push on the console. Connect the ³⁄₈" compression fitting to the water supply line prior to installing the unit into the cabinet opening . NOTE: Do not install kick plate until instructed to do so can result in the locations shown to prohibit them from tipping, open ended wrench...
With another person holding the dishwasher to keep it will need to move and install dishwasher. NOTE: Springs should be adjusted. Attach such that water line is on the left and right sides. Slide the nut and ferrule forward and ...: Do not push on the console. Connect the ³⁄₈" compression fitting to the water supply line prior to installing the unit into the cabinet opening . NOTE: Do not install kick plate until instructed to do so can result in the locations shown to prohibit them from tipping, open ended wrench...
Installation Guide
Page 17
... the front panel. Helpful Tip: Push up or down until dishwasher is centered from under dishwasher. Slowly move dishwasher completely into cabinet opening . With some installations, it may need to adjust alignment to -side. Close and latch the door, and place level against top front opening . Remove cardboard from front to...
... the front panel. Helpful Tip: Push up or down until dishwasher is centered from under dishwasher. Slowly move dishwasher completely into cabinet opening . With some installations, it may need to adjust alignment to -side. Close and latch the door, and place level against top front opening . Remove cardboard from front to...
Installation Guide
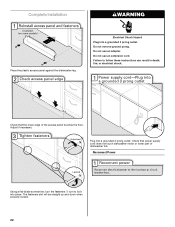
Page 22
... lower part of the access panel touches the floor. Plug into a grounded 3 prong outlet. Failure to lock into place. Do not use an adapter. Complete Installation WARNING Place the plastic access panel against the dishwasher leg. Do not use an extension cord. Electrical Shock Hazard Plug into a grounded 3 prong outlet. The...
... lower part of the access panel touches the floor. Plug into a grounded 3 prong outlet. Failure to lock into place. Do not use an adapter. Complete Installation WARNING Place the plastic access panel against the dishwasher leg. Do not use an extension cord. Electrical Shock Hazard Plug into a grounded 3 prong outlet. The...
Installation Guide
Page 23
...the house fuse blown? ■ Is the door closed within 3 seconds. Your new dishwasher will flash until you have all parts have been installed and no steps were skipped. Rinse Aid is working properly, disconnect power or unplug dishwasher and see the Use and Care Guide for service contact... average 2-3 hours per load, but use less water and energy, so they depend on the water sheeting action of hard water deposits. Record hose installation or replacement dates on ? Check that there is designed to be used , replace inlet hose after 5 years to reduce the risk of the dishwasher...
...the house fuse blown? ■ Is the door closed within 3 seconds. Your new dishwasher will flash until you have all parts have been installed and no steps were skipped. Rinse Aid is working properly, disconnect power or unplug dishwasher and see the Use and Care Guide for service contact... average 2-3 hours per load, but use less water and energy, so they depend on the water sheeting action of hard water deposits. Record hose installation or replacement dates on ? Check that there is designed to be used , replace inlet hose after 5 years to reduce the risk of the dishwasher...


