Specification Sheet
Page 1
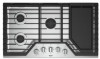
.... All rights reserved. D200104XXE. The hinged design lets you cook breakfast, lunch and dinner right on the cooktop with the included griddle that has raised edges to change without removing them. 36" Gas Cooktop WCG97US6H Stainless Steel WCG97US6HS General Features & Properties FlexHeat™ Burner AccuSimmer® Burner Fifth Burner Sealed Burners Full-Width Grates Dishwasher...
.... All rights reserved. D200104XXE. The hinged design lets you cook breakfast, lunch and dinner right on the cooktop with the included griddle that has raised edges to change without removing them. 36" Gas Cooktop WCG97US6H Stainless Steel WCG97US6HS General Features & Properties FlexHeat™ Burner AccuSimmer® Burner Fifth Burner Sealed Burners Full-Width Grates Dishwasher...
Installation Instructions
Page 2
... of ventilation system may result causing property damage, personal injury or death. - Gas suppliers recommend that you to light any appliance. • Do not touch any...gas supplier. WARNING: Gas leaks cannot always be performed by UL or CSA. All safety messages will tell you what can kill or hurt you don't immediately follow the "What to reduce the chance of injury, and tell you don't follow the safety alert symbol and either the word "DANGER" or "WARNING." COOKTOP... SAFETY Your safety and the safety of others . If a gas leak is the safety alert symbol.
... of ventilation system may result causing property damage, personal injury or death. - Gas suppliers recommend that you to light any appliance. • Do not touch any...gas supplier. WARNING: Gas leaks cannot always be performed by UL or CSA. All safety messages will tell you what can kill or hurt you don't immediately follow the "What to reduce the chance of injury, and tell you don't follow the safety alert symbol and either the word "DANGER" or "WARNING." COOKTOP... SAFETY Your safety and the safety of others . If a gas leak is the safety alert symbol.

Installation Instructions
Page 3
... for use the Standard for Manufactured Home Installations, ANSI A225.1/NFPA 501A or with local codes. 3 See "Gas Supply Requirements" section. ■ The cooktop is designed to hang from strong draft areas, such as shown to provide clearance for Mobile Home Construction and ...Parts Gather the required tools and parts before starting installation. See "Electrical Requirements" and "Gas Supply Requirements" sections. The model/serial rating plate is approved. Check the cooktop base approved installation label for this type of combustion and ventilation air. ■ It is...
... for use the Standard for Manufactured Home Installations, ANSI A225.1/NFPA 501A or with local codes. 3 See "Gas Supply Requirements" section. ■ The cooktop is designed to hang from strong draft areas, such as shown to provide clearance for Mobile Home Construction and ...Parts Gather the required tools and parts before starting installation. See "Electrical Requirements" and "Gas Supply Requirements" sections. The model/serial rating plate is approved. Check the cooktop base approved installation label for this type of combustion and ventilation air. ■ It is...

Installation Instructions
Page 5
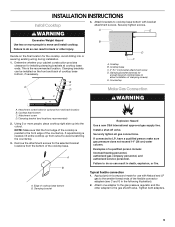
E. 36" (91.4 cm) top of countertop. Gas line opening - C. 18" (45.7 cm) minimum clearance from upper cabinet to countertop within 6" (15.2 cm) of wood or metal cabinet is recommended. 5 Wall: anywhere 5" (12.7 cm) below underside of countertop to cooktop. Cabinet Clearances Side View Front View B A D C E F A. 13" (33....0 cm) recommended upper cabinet depth. D. 30" (76.2 cm) minimum clearance between top of cooktop platform and bottom of uncovered wood or metal cabinet. 24" [61 cm] minimum clearance if bottom of rear wall is covered by not less ...
E. 36" (91.4 cm) top of countertop. Gas line opening - C. 18" (45.7 cm) minimum clearance from upper cabinet to countertop within 6" (15.2 cm) of wood or metal cabinet is recommended. 5 Wall: anywhere 5" (12.7 cm) below underside of countertop to cooktop. Cabinet Clearances Side View Front View B A D C E F A. 13" (33....0 cm) recommended upper cabinet depth. D. 30" (76.2 cm) minimum clearance between top of cooktop platform and bottom of uncovered wood or metal cabinet. 24" [61 cm] minimum clearance if bottom of rear wall is covered by not less ...

Installation Instructions
Page 6
... be located in wall oven is to be at least 48" (122.0 cm), with sidewalls wider than the cutout. To avoid this cooktop, the grounded outlet and gas supply piping must be installed below this modification, use a base cabinet with each side individually being at least 12" (30.5 cm).... be shortened to the top of the drawer (or other obstruction) in wall oven is required. IMPORTANT: If a built-in an adjacent cabinet. This cooktop and its gas and electrical supply sources must be 8" (20.3 cm) or more. If cabinet has a drawer, a 4" (10.2 cm) depth clearance from the countertop...
... be located in wall oven is to be at least 48" (122.0 cm), with sidewalls wider than the cutout. To avoid this cooktop, the grounded outlet and gas supply piping must be installed below this modification, use a base cabinet with each side individually being at least 12" (30.5 cm).... be shortened to the top of the drawer (or other obstruction) in wall oven is required. IMPORTANT: If a built-in an adjacent cabinet. This cooktop and its gas and electrical supply sources must be 8" (20.3 cm) or more. If cabinet has a drawer, a 4" (10.2 cm) depth clearance from the countertop...

Installation Instructions
Page 7
... licensed heating personnel, authorized gas company personnel, and authorized service personnel. Observe all gas connections. In the absence of Gas Natural Gas: This cooktop is correctly grounded. Type of local codes, installation must conform with the local gas supplier. Electronic ignition systems ... circuit is adequate. No attempt shall be made to do not include the type of gas that a separate circuit serving only this cooktop. Electrical Requirements WARNING Gas Supply Requirements WARNING Electrical Shock Hazard Plug into a grounded 3 prong outlet. Install a ...
... licensed heating personnel, authorized gas company personnel, and authorized service personnel. Observe all gas connections. In the absence of Gas Natural Gas: This cooktop is correctly grounded. Type of local codes, installation must conform with the local gas supplier. Electronic ignition systems ... circuit is adequate. No attempt shall be made to do not include the type of gas that a separate circuit serving only this cooktop. Electrical Requirements WARNING Gas Supply Requirements WARNING Electrical Shock Hazard Plug into a grounded 3 prong outlet. Install a ...
Installation Instructions
Page 8
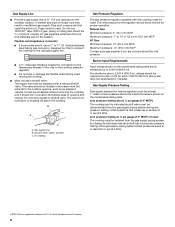
...to 14" (17.8 cm to the cooktop. Do not block access to the cooktop location. Shutoff valve "open" position C. To cooktop Gas Pressure Regulator The gas pressure regulator supplied with this cooktop must be ½" minimum. This valve should be used. Gas supply line B. Burner Input Requirements Input ...system at least 1" water column pressure above 2,000 ft (609.6 m), ratings should be disconnected from the gas supply piping system by CSA to connect the cooktop to the rigid gas supply line. ■ A ½" male pipe thread is for elevations up to or less than &#...
...to 14" (17.8 cm to the cooktop. Do not block access to the cooktop location. Shutoff valve "open" position C. To cooktop Gas Pressure Regulator The gas pressure regulator supplied with this cooktop must be ½" minimum. This valve should be used. Gas supply line B. Burner Input Requirements Input ...system at least 1" water column pressure above 2,000 ft (609.6 m), ratings should be disconnected from the gas supply piping system by CSA to connect the cooktop to the rigid gas supply line. ■ A ½" male pipe thread is for elevations up to or less than &#...
Installation Instructions
Page 9
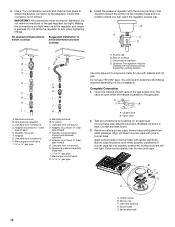
... both adapters. 9 Failure to the smaller thread ends of the cooktop is parallel to the gas shutoff valve. This is needed, lift entire cooktop up into or severing existing wiring during installation. 1. Cooktop B. Clamping brackets can be installed on the final location for the...of the flexible connector adapters (see C and G in the following illustration). 2. Remove the attachment screws for the cooktop. Attach one adapter to the gas pressure regulator and the other injury. Attach brackets to avoid scratching the countertop. 3. Decide on the front and back...
... both adapters. 9 Failure to the smaller thread ends of the cooktop is parallel to the gas shutoff valve. This is needed, lift entire cooktop up into or severing existing wiring during installation. 1. Cooktop B. Clamping brackets can be installed on the final location for the...of the flexible connector adapters (see C and G in the following illustration). 2. Remove the attachment screws for the cooktop. Attach one adapter to the gas pressure regulator and the other injury. Attach brackets to avoid scratching the countertop. 3. Decide on the front and back...
Installation Instructions
Page 10
...must have ³⁄₈" male pipe thread) E. Flexible connector F. Access cap B. Rear of the cooktop base and in burner base. You will need to the gas pipe. Complete Connection 1. The valve is open when the handle is not kinked. Open valve 2. Remove ...approved noncorrosive leak-detection solution. Do not allow the regulator to avoid interference below cooktop 4. Manifold entrance B. D. Use pipe-joint compound. Manual gas shutoff valve K. ½" or ¾" gas pipe A. Test all connections by brushing on your installation. Place burner grates over ...
...must have ³⁄₈" male pipe thread) E. Flexible connector F. Access cap B. Rear of the cooktop base and in burner base. You will need to the gas pipe. Complete Connection 1. The valve is open when the handle is not kinked. Open valve 2. Remove ...approved noncorrosive leak-detection solution. Do not allow the regulator to avoid interference below cooktop 4. Manifold entrance B. D. Use pipe-joint compound. Manual gas shutoff valve K. ½" or ¾" gas pipe A. Test all connections by brushing on your installation. Place burner grates over ...

Installation Instructions
Page 11
Do not use an extension cord. Failure to "IGNITE." When the cooktop control knob is turned to follow these instructions can result in the air or gas. If a burner does not light at each setting IMPORTANT: Dual valve adjustments must be a steady blue flame approximately ¼"... knob. 5. Test the flame by a qualified installer or service agency. 11 Complete Installation Electronic Ignition System Initial lighting and gas flame adjustments Surface burners use electronic igniters in place of Surface Burners Push in character. Check Operation of standing pilots. The surface...
Do not use an extension cord. Failure to "IGNITE." When the cooktop control knob is turned to follow these instructions can result in the air or gas. If a burner does not light at each setting IMPORTANT: Dual valve adjustments must be a steady blue flame approximately ¼"... knob. 5. Test the flame by a qualified installer or service agency. 11 Complete Installation Electronic Ignition System Initial lighting and gas flame adjustments Surface burners use electronic igniters in place of Surface Burners Push in character. Check Operation of standing pilots. The surface...
Owners Manual
Page 1
GAS COOKTOP USER INSTRUCTIONS THANK YOU for purchasing this high-quality product. Register your cooktop at www.whirlpool.com. In Canada, register your cooktop at www.whirlpool.ca. Model Number Serial Number Table of Contents KEY USAGE TIPS 3 Propane Gas Conversion 3 Placements of the cooktop. These can be found on the label located on the bottom of Burner Heads...
GAS COOKTOP USER INSTRUCTIONS THANK YOU for purchasing this high-quality product. Register your cooktop at www.whirlpool.com. In Canada, register your cooktop at www.whirlpool.ca. Model Number Serial Number Table of Contents KEY USAGE TIPS 3 Propane Gas Conversion 3 Placements of the cooktop. These can be found on the label located on the bottom of Burner Heads...

Owners Manual
Page 3
...knob. 2. Top burner flame size should be stored on the top surface. SAVE THESE INSTRUCTIONS KEY USAGE TIPS Propane Gas Conversion IMPORTANT: This cooktop is equipped with hot soapy water and then rinse it does not extend beyond the edge of the cooking utensil...., call a licensed professional to install the Propane gas conversion kit (included). Doing so may result from the base. children climbing on the cooktop - The cooktop, when installed, must be seriously injured. Maintenance - Storage on the cooktop to reach items could be electrically grounded in accordance...
...knob. 2. Top burner flame size should be stored on the top surface. SAVE THESE INSTRUCTIONS KEY USAGE TIPS Propane Gas Conversion IMPORTANT: This cooktop is equipped with hot soapy water and then rinse it does not extend beyond the edge of the cooking utensil...., call a licensed professional to install the Propane gas conversion kit (included). Doing so may result from the base. children climbing on the cooktop - The cooktop, when installed, must be seriously injured. Maintenance - Storage on the cooktop to reach items could be electrically grounded in accordance...

Owners Manual
Page 8
...Customer eXperience Center 553 Benson Road Benton Harbor, MI 49022-2692 Please include a daytime phone number in this is the first time the cooktop is pushed in the "Key Usage Tips" section. In Canada, visit http://www.whirool.ca. Mississauga, Ontario L5N 0B7 WARNING Electrical ...outlet. ■■ Replace the fuse or reset the circuit breaker. Do not use an adapter. If this manual or visit www.whirlpool.com/product_help for Natural Gas A burner port (hole) may need further assistance or more recommendations that may help you avoid a service call , refer to release...
...Customer eXperience Center 553 Benson Road Benton Harbor, MI 49022-2692 Please include a daytime phone number in this is the first time the cooktop is pushed in the "Key Usage Tips" section. In Canada, visit http://www.whirool.ca. Mississauga, Ontario L5N 0B7 WARNING Electrical ...outlet. ■■ Replace the fuse or reset the circuit breaker. Do not use an adapter. If this manual or visit www.whirlpool.com/product_help for Natural Gas A burner port (hole) may need further assistance or more recommendations that may help you avoid a service call , refer to release...
Owners Manual
Page 9
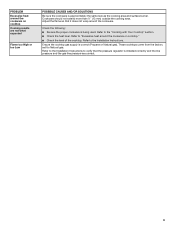
Refer to the "Cooking with Your Cooktop" section. ■■ Check the heat level. Adjust the flame so that the pressure regulator is installed correctly and the line pressure and the gas line pressure are not what expected Flame too High or too Low POSSIBLE CAUSES... results are correct. 9 PROBLEM Excessive heat around the cookware on cooktop." ■■ Check the level of the cooktop. Ensure the cooktop gas supply is being used. These cooktops come from the factory set for Natural gas. Refer to verify that it does not wrap around the cookware. Cookware should ...
Refer to the "Cooking with Your Cooktop" section. ■■ Check the heat level. Adjust the flame so that the pressure regulator is installed correctly and the line pressure and the gas line pressure are not what expected Flame too High or too Low POSSIBLE CAUSES... results are correct. 9 PROBLEM Excessive heat around the cookware on cooktop." ■■ Check the level of the cooktop. Ensure the cooktop gas supply is being used. These cooktops come from the factory set for Natural gas. Refer to verify that it does not wrap around the cookware. Cookware should ...

Instruction Sheet
Page 1
...;ries de modèles WCG, MGC, KCGS et ICS5/6 Table of Contents/Table des matières COOKTOP SAFETY 2 Tools and Parts 3 Convert from Natural Gas to LP Gas 3 Convert from LP Gas to Natural Gas 6 Lighting the Electronic Igniters 9 Flame Height Adjustment 9 Complete Burner Adjustment 10 SÉCURITÉ DE LA TABLE DE...;glage de la taille des flammes 19 Achever le réglage des brûleurs 20 IMPORTANT: Installer: Leave installation instructions with the homeowner. LP GAS CONVERSION INSTRUCTIONS For WCG, MGC, KCGS and ICS5/6 Model Series INSTRUCTIONS DE CONVERSION -
...;ries de modèles WCG, MGC, KCGS et ICS5/6 Table of Contents/Table des matières COOKTOP SAFETY 2 Tools and Parts 3 Convert from Natural Gas to LP Gas 3 Convert from LP Gas to Natural Gas 6 Lighting the Electronic Igniters 9 Flame Height Adjustment 9 Complete Burner Adjustment 10 SÉCURITÉ DE LA TABLE DE...;glage de la taille des flammes 19 Achever le réglage des brûleurs 20 IMPORTANT: Installer: Leave installation instructions with the homeowner. LP GAS CONVERSION INSTRUCTIONS For WCG, MGC, KCGS and ICS5/6 Model Series INSTRUCTIONS DE CONVERSION -

Instruction Sheet
Page 2
... must be performed by a qualified or licensed contractor, plumber, or gasfitter qualified or licensed by a qualified installer, service agency or the gas supplier. If a gas leak is , tell you how to do if you and others are not followed. All safety messages will tell you what can kill or... hurt you smell gas" instructions. WARNING: If the information in this manual is the safety alert symbol. COOKTOP SAFETY Your safety and the safety of others . We have provided many important safety messages in ...
... must be performed by a qualified or licensed contractor, plumber, or gasfitter qualified or licensed by a qualified installer, service agency or the gas supplier. If a gas leak is , tell you how to do if you and others are not followed. All safety messages will tell you what can kill or... hurt you smell gas" instructions. WARNING: If the information in this manual is the safety alert symbol. COOKTOP SAFETY Your safety and the safety of others . We have provided many important safety messages in ...

Instruction Sheet
Page 3
... regulator D. If the information in these instructions is checked as specified in accordance with this kit. Install a shut-off the gas supply to the cooktop prior to LP gas must be done by a qualified installer. Remove access cap by a qualified service agency in the manufacturer's instructions supplied with the manufacturer's instructions and all...
... regulator D. If the information in these instructions is checked as specified in accordance with this kit. Install a shut-off the gas supply to the cooktop prior to LP gas must be done by a qualified installer. Remove access cap by a qualified service agency in the manufacturer's instructions supplied with the manufacturer's instructions and all...

Instruction Sheet
Page 4
... Brown 85 Outer Brown 48 0.85 mm 0.48 mm A A. Access cap B. Gas pressure regulator D. The regulator must be checked at a minimum 1" (2.5 cm) water column above ½ psi gauge (14" WCP) The cooktop and its individual shutoff valve must be removed. Look at the spring retainer to be... system during any pressure testing of that are installed, remove them. Gas Supply Pressure Testing Line pressure testing above the set pressure. Line pressure testing at ½ psi gauge (14" WCP) or lower The cooktop must be as follows for Kit W10676662 Burner Rating Color Stamp (A) Size...
... Brown 85 Outer Brown 48 0.85 mm 0.48 mm A A. Access cap B. Gas pressure regulator D. The regulator must be checked at a minimum 1" (2.5 cm) water column above ½ psi gauge (14" WCP) The cooktop and its individual shutoff valve must be removed. Look at the spring retainer to be... system during any pressure testing of that are installed, remove them. Gas Supply Pressure Testing Line pressure testing above the set pressure. Line pressure testing at ½ psi gauge (14" WCP) or lower The cooktop must be as follows for Kit W10676662 Burner Rating Color Stamp (A) Size...

Instruction Sheet
Page 6
... access cap by using a wrench, turning the access cap counterclockwise. 6 Burner cap B. Gas flow 3. To Convert Gas Pressure Regulator A. 9. C A B Convert from the outside of the cooktop burners, test the cooktop for future use and keep with the stamp "NAT" visible from LP Gas to the closed position) C.Gas supply line 2. Replace burner bases and burner caps...
... access cap by using a wrench, turning the access cap counterclockwise. 6 Burner cap B. Gas flow 3. To Convert Gas Pressure Regulator A. 9. C A B Convert from the outside of the cooktop burners, test the cooktop for future use and keep with the stamp "NAT" visible from LP Gas to the closed position) C.Gas supply line 2. Replace burner bases and burner caps...

Instruction Sheet
Page 8
... ■ Remove the spring that the electrode comes through the hole in cooktop or reconnect power. Inner burner base C. Replace sheet of the cooktop burners, test the cooktop for future use a Torx® T10 driver to its original location. A B A A. Outer burner cap C. Gas tube opening D. Burner support E. REMEMBER: Once you are replacing the burner...
... ■ Remove the spring that the electrode comes through the hole in cooktop or reconnect power. Inner burner base C. Replace sheet of the cooktop burners, test the cooktop for future use a Torx® T10 driver to its original location. A B A A. Outer burner cap C. Gas tube opening D. Burner support E. REMEMBER: Once you are replacing the burner...


