Specification Sheet
Page 1
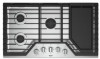
... (1) 5000 BTU FlexHeat, Sealed Burner, SpeedHeat™, Simmer 4-1/8" x 36" x 21" 35-1/4" x 20" NOTE: Dimensions are also dishwasher-safe. WCG97US6HSpecSheetV01. All rights reserved. 36" Gas Cooktop WCG97US6H Stainless Steel WCG97US6HS General Features & Properties FlexHeat™ Burner AccuSimmer® Burner Fifth Burner Sealed Burners Full-Width Grates Dishwasher-Safe Knobs Wall Oven Compatible Electrical Details...
... (1) 5000 BTU FlexHeat, Sealed Burner, SpeedHeat™, Simmer 4-1/8" x 36" x 21" 35-1/4" x 20" NOTE: Dimensions are also dishwasher-safe. WCG97US6HSpecSheetV01. All rights reserved. 36" Gas Cooktop WCG97US6H Stainless Steel WCG97US6HS General Features & Properties FlexHeat™ Burner AccuSimmer® Burner Fifth Burner Sealed Burners Full-Width Grates Dishwasher-Safe Knobs Wall Oven Compatible Electrical Details...
Installation Instructions
Page 2
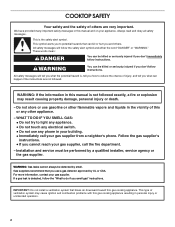
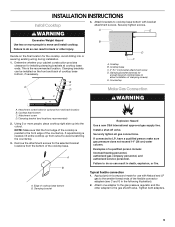
... supplier, call your appliance. This symbol alerts you to reduce the chance of injury, and tell you what the potential hazard is detected, follow instructions. COOKTOP SAFETY Your safety and the safety of others . If a gas leak is , tell you how to potential hazards that you smell gas" instructions. This is...
... supplier, call your appliance. This symbol alerts you to reduce the chance of injury, and tell you what the potential hazard is detected, follow instructions. COOKTOP SAFETY Your safety and the safety of others . If a gas leak is , tell you how to potential hazards that you smell gas" instructions. This is...

Installation Instructions
Page 3
...installing a range hood that projects horizontally a minimum of 5" (12.7 cm) beyond the bottom of the cabinets. ■ The cooktop must be a specified cooktop that is located on the underside of combustion and ventilation air. ■ It is the installer's responsibility to comply with local codes...Installations and repairs must be performed by a qualified or licensed contractor, plumber, or gasfitter qualified or licensed by the State of this cooktop must conform to the Manufactured Home Construction and Safety Standard, Title 24 CFR, Part 3280 (formerly the Federal Standard for use and...
...installing a range hood that projects horizontally a minimum of 5" (12.7 cm) beyond the bottom of the cabinets. ■ The cooktop must be a specified cooktop that is located on the underside of combustion and ventilation air. ■ It is the installer's responsibility to comply with local codes...Installations and repairs must be performed by a qualified or licensed contractor, plumber, or gasfitter qualified or licensed by the State of this cooktop must conform to the Manufactured Home Construction and Safety Standard, Title 24 CFR, Part 3280 (formerly the Federal Standard for use and...

Installation Instructions
Page 5
... (15.2 cm) of wood or metal cabinet is recommended. 5 Gas line opening - D. 30" (76.2 cm) minimum clearance between top of cooktop platform and bottom of uncovered wood or metal cabinet. 24" [61 cm] minimum clearance if bottom of rear wall is covered by not less than..., 0.015" [0.04 cm] stainless steel, or 0.024" [0.06 cm] aluminum or 0.020" [0.05 cm] copper. Wall: anywhere 5" (12.7 cm) below underside of countertop to cooktop. E. 36" (91.4 cm) top of countertop. F. Cabinet Clearances Side View Front View B A D C E F A. 13" (33.0 cm) recommended upper cabinet depth. Cabinet ...
... (15.2 cm) of wood or metal cabinet is recommended. 5 Gas line opening - D. 30" (76.2 cm) minimum clearance between top of cooktop platform and bottom of uncovered wood or metal cabinet. 24" [61 cm] minimum clearance if bottom of rear wall is covered by not less than..., 0.015" [0.04 cm] stainless steel, or 0.024" [0.06 cm] aluminum or 0.020" [0.05 cm] copper. Wall: anywhere 5" (12.7 cm) below underside of countertop to cooktop. E. 36" (91.4 cm) top of countertop. F. Cabinet Clearances Side View Front View B A D C E F A. 13" (33.0 cm) recommended upper cabinet depth. Cabinet ...

Installation Instructions
Page 6
...IMPORTANT: If a built-in an adjacent cabinet. Both have to be shortened to clear the cooktop base. Cutout Dimensions - H and I added together must be located in wall oven is installed. 6 To avoid this cooktop, the grounded outlet and gas supply piping must be at least 48" (122.0 cm), ...with the regulator. This cooktop and its gas and electrical supply sources must be at least 48" (122.0 cm), with...
...IMPORTANT: If a built-in an adjacent cabinet. Both have to be shortened to clear the cooktop base. Cutout Dimensions - H and I added together must be located in wall oven is installed. 6 To avoid this cooktop, the grounded outlet and gas supply piping must be at least 48" (122.0 cm), ...with the regulator. This cooktop and its gas and electrical supply sources must be at least 48" (122.0 cm), with...

Installation Instructions
Page 7
... Hazard Use a new CSA International approved gas supply line. Securely tighten all local codes and ordinances. If connected to convert the cooktop from : National Fire Protection Association One Batterymarch Park Quincy, MA 02269 CSA International 8501 East Pleasant Valley Road Cleveland, Ohio 44131-5575... latest edition or CAN/CGA B149 - LP Gas Conversion: Conversion must conform with all gas connections. If the types of the cooktop must conform with American National Standard, National Fuel Gas Code ANSI Z223.1 - If codes permit and a separate ground wire is ...
... Hazard Use a new CSA International approved gas supply line. Securely tighten all local codes and ordinances. If connected to convert the cooktop from : National Fire Protection Association One Batterymarch Park Quincy, MA 02269 CSA International 8501 East Pleasant Valley Road Cleveland, Ohio 44131-5575... latest edition or CAN/CGA B149 - LP Gas Conversion: Conversion must conform with all gas connections. If the types of the cooktop must conform with American National Standard, National Fuel Gas Code ANSI Z223.1 - If codes permit and a separate ground wire is ...
Installation Instructions
Page 8
...pipe thread is for testing regulator must be ½" minimum. This valve should be located in the same room but external to the cooktop opening and closing its individual shutoff valve must be used in insufficient gas supply. The inlet pressure to the regulator should be as an ...closing . The valve is needed for Canada). Shutoff valve "open" position C. Line pressure testing above ½ psi gauge (14" WCP) The cooktop and its individual manual shutoff valve during any pressure testing of the gas supply piping system at a rate of 4% for elevations up to 2,000 ...
...pipe thread is for testing regulator must be ½" minimum. This valve should be located in the same room but external to the cooktop opening and closing its individual shutoff valve must be used in insufficient gas supply. The inlet pressure to the regulator should be as an ...closing . The valve is needed for Canada). Shutoff valve "open" position C. Line pressure testing above ½ psi gauge (14" WCP) The cooktop and its individual manual shutoff valve during any pressure testing of the gas supply piping system at a rate of 4% for elevations up to 2,000 ...
Installation Instructions
Page 9
...with Natural and LP gas to do so can result in the following illustration). 2. Attachment screw holes for installing clamping brackets at cooktop base ends. Using 2 or more people to do so can be installed on the final location for use with bracket attachment ...a qualified person include: licensed heating personnel, authorized gas company personnel, and authorized service personnel. Securely tighten screws. Failure to move and install cooktop. Decide on the front and back of clamping screws) E. This is parallel to LP, have a qualified person make sure gas pressure does ...
...with Natural and LP gas to do so can result in the following illustration). 2. Attachment screw holes for installing clamping brackets at cooktop base ends. Using 2 or more people to do so can be installed on the final location for use with bracket attachment ...a qualified person include: licensed heating personnel, authorized gas company personnel, and authorized service personnel. Securely tighten screws. Failure to move and install cooktop. Decide on the front and back of clamping screws) E. This is parallel to LP, have a qualified person make sure gas pressure does ...
Installation Instructions
Page 10
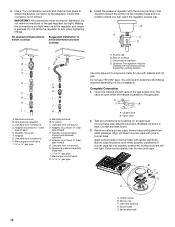
Do not make connections to avoid interference below cooktop 4. No appliance/obstructions below cooktop Suggested installation to the gas regulator too tight. Gas pressure regulator C. Manifold entrance B. ³⁄₈" elbow C. Manual gas ...must be installed with the arrow pointing toward the bottom of cooktop C. Use pipe-joint compound. H. Appliance pressure regulator (supplied) I. ½" or ¾" gas pipe J. Rear of the cooktop base and in the direction toward the cooktop bottom. Gas pressure regulator D. Use only pipe-joint compound made...
Do not make connections to avoid interference below cooktop 4. No appliance/obstructions below cooktop Suggested installation to the gas regulator too tight. Gas pressure regulator C. Manifold entrance B. ³⁄₈" elbow C. Manual gas ...must be installed with the arrow pointing toward the bottom of cooktop C. Use pipe-joint compound. H. Appliance pressure regulator (supplied) I. ½" or ¾" gas pipe J. Rear of the cooktop base and in the direction toward the cooktop bottom. Gas pressure regulator D. Use only pipe-joint compound made...

Installation Instructions
Page 11
... soft in and turn the screw located within 4 seconds. Control knob stem opening C. Test the flame by a qualified installer or service agency. 11 When the cooktop control knob is lit, it may take longer that burner caps are normal and reflect different elements in place of standing pilots. Check the flame...
... soft in and turn the screw located within 4 seconds. Control knob stem opening C. Test the flame by a qualified installer or service agency. 11 When the cooktop control knob is lit, it may take longer that burner caps are normal and reflect different elements in place of standing pilots. Check the flame...
Owners Manual
Page 1
... can be found on the label located on the bottom of your cooktop at www.whirlpool.ca. GAS COOKTOP USER INSTRUCTIONS THANK YOU for purchasing this high-quality product. Register your product model and serial numbers. Model Number Serial Number Table of Contents KEY ...
... can be found on the label located on the bottom of your cooktop at www.whirlpool.ca. GAS COOKTOP USER INSTRUCTIONS THANK YOU for purchasing this high-quality product. Register your product model and serial numbers. Model Number Serial Number Table of Contents KEY ...

Owners Manual
Page 3
...three-prong grounding plug for use a wooden toothpick or clean in . For more information, see a flame. 3. children climbing on the cooktop - This cooktop is pushed in the knob. 2. Refer to IGNITE. Turn the knob anywhere between Hi and Lo to the desired setting. A burner will... The burners should be kept clean. Power failure: In case of a power failure, burners can clog the openings in cabinets above the cooktop - Clean the burner cap with a damp cloth. 3 Proper Installation - Push in then turned counterclockwise to IGNITE. WARNING: This product ...
...three-prong grounding plug for use a wooden toothpick or clean in . For more information, see a flame. 3. children climbing on the cooktop - This cooktop is pushed in the knob. 2. Refer to IGNITE. Turn the knob anywhere between Hi and Lo to the desired setting. A burner will... The burners should be kept clean. Power failure: In case of a power failure, burners can clog the openings in cabinets above the cooktop - Clean the burner cap with a damp cloth. 3 Proper Installation - Push in then turned counterclockwise to IGNITE. WARNING: This product ...
Owners Manual
Page 4
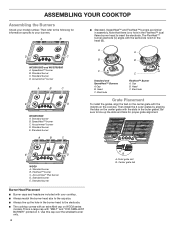
...Always line up the slots and tabs for proper grate alignment. Standard burner C. SpeedHeat™ burner C. Electrode FlexHeat™ Burner A. ASSEMBLING YOUR COOKTOP Assembling the Burners Check your burners. Note that there is a large cap with the slots in the head (B). Accusimmer® burner A B... burner only. 4 A B A.Outer grate slot B. The FlexHeat™ burner electrode (C) aligns with an extra Melt cap on the cooktop. SpeedHeat™ burner B. Accusimmer® burner D. Standard burner E. Head C. Head C. Electrode Grate Placement To install the grates, align...
...Always line up the slots and tabs for proper grate alignment. Standard burner C. SpeedHeat™ burner C. Electrode FlexHeat™ Burner A. ASSEMBLING YOUR COOKTOP Assembling the Burners Check your burners. Note that there is a large cap with the slots in the head (B). Accusimmer® burner A B... burner only. 4 A B A.Outer grate slot B. The FlexHeat™ burner electrode (C) aligns with an extra Melt cap on the cooktop. SpeedHeat™ burner B. Accusimmer® burner D. Standard burner E. Head C. Head C. Electrode Grate Placement To install the grates, align...

Owners Manual
Page 5
...rapid boiling, searing and frying. Simmer range B. Position the knob closer to boil liquids quickly. A B A. Set the knob to avoid scratching the cooktop until the grate is needed to hold a simmer. SpeedHeat™ Burner Use the SpeedHeat™ burner for a more delicate simmer, the melt cap can...for delicate simmering. Be sure to return the grates to precise simmering. ■■ Power: Select Hi for preparing large quantities of the cooktop for easy access under the grates. Grate slot B. Melt: For melting chocolate or butter or an even more delicate simmer level. Only ...
...rapid boiling, searing and frying. Simmer range B. Position the knob closer to boil liquids quickly. A B A. Set the knob to avoid scratching the cooktop until the grate is needed to hold a simmer. SpeedHeat™ Burner Use the SpeedHeat™ burner for a more delicate simmer, the melt cap can...for delicate simmering. Be sure to return the grates to precise simmering. ■■ Power: Select Hi for preparing large quantities of the cooktop for easy access under the grates. Grate slot B. Melt: For melting chocolate or butter or an even more delicate simmer level. Only ...

Owners Manual
Page 6
...W10355010. Do not place caps in the dishwasher or reassemble caps on options and ordering, call 1-800-807-6777 or visit www.whirlpool.ca. Gourmet Griddle (optional accessory) A griddle accessory is designed to avoid damaging the surface. Surface Type Control Knobs (Plastic) ...cleaned with the following genuine Whirlpool accessories. These spills may be kept clean for model number WCG51US6DW. 6 Dishwasher: The grates may affect the finish. Use a nonabrasive scrubbing pad and glass cleanser or a mild liquid cleaner, such as soon the cooktop is cool. Order Part ...
...W10355010. Do not place caps in the dishwasher or reassemble caps on options and ordering, call 1-800-807-6777 or visit www.whirlpool.ca. Gourmet Griddle (optional accessory) A griddle accessory is designed to avoid damaging the surface. Surface Type Control Knobs (Plastic) ...cleaned with the following genuine Whirlpool accessories. These spills may be kept clean for model number WCG51US6DW. 6 Dishwasher: The grates may affect the finish. Use a nonabrasive scrubbing pad and glass cleanser or a mild liquid cleaner, such as soon the cooktop is cool. Order Part ...
Owners Manual
Page 7
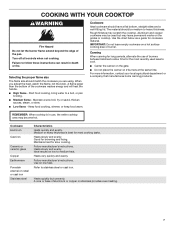
...Cast iron Ceramic or ceramic glass Copper Earthenware Porcelain enamel-on a hot surface cooking area or burner. Heats quickly but may scratch the cooktop. IMPORTANT: Do not leave empty cookware on -steel or cast iron Stainless steel Characteristics Heats quickly and evenly. Canning When canning for ...steam, or stew. ■■ Low flame - Use the chart below as a guide for the most cooking tasks. COOKING WITH YOUR COOKTOP WARNING Fire Hazard Do not let the burner flame extend beyond the edge of the cookware wastes energy and will heat the handle. ■■...
...Cast iron Ceramic or ceramic glass Copper Earthenware Porcelain enamel-on a hot surface cooking area or burner. Heats quickly but may scratch the cooktop. IMPORTANT: Do not leave empty cookware on -steel or cast iron Stainless steel Characteristics Heats quickly and evenly. Canning When canning for ...steam, or stew. ■■ Low flame - Use the chart below as a guide for the most cooking tasks. COOKING WITH YOUR COOKTOP WARNING Fire Hazard Do not let the burner flame extend beyond the edge of the cookware wastes energy and will heat the handle. ■■...

Owners Manual
Page 8
...Tips" section. If the flames look like A, call or service. Check that the burner base and caps are positioned correctly. In Canada: Whirlpool Brand Home Appliances Customer eXperience Centre 200 - 6750 Century Ave. Do not remove ground prong. Refer to a setting. Refer to "Placement of...not use an adapter. Contact a service technician or refer to the "Assistance or Service" section in this is the first time the cooktop is plugged into a grounded 3 prong outlet. Yellow Flames Call for recommendations that may have been converted improperly. Refer to the warranty ...
...Tips" section. If the flames look like A, call or service. Check that the burner base and caps are positioned correctly. In Canada: Whirlpool Brand Home Appliances Customer eXperience Centre 200 - 6750 Century Ave. Do not remove ground prong. Refer to a setting. Refer to "Placement of...not use an adapter. Contact a service technician or refer to the "Assistance or Service" section in this is the first time the cooktop is plugged into a grounded 3 prong outlet. Yellow Flames Call for recommendations that may have been converted improperly. Refer to the warranty ...
Owners Manual
Page 9
... should not extend more than ½" (13 mm) outside the cooking area. Refer to the "Cooking with Your Cooktop" section. ■■ Check the heat level. These cooktops come from the factory set for Natural gas. Check the following: ■■ Be sure the proper cookware is... correct (Propane or Natural gas). Ensure the cooktop gas supply is being used. Refer to the Installation Instructions to "Excessive heat around the cookware on cooktop Cooking results are correct. 9 Adjust the flame so that the pressure regulator is installed...
... should not extend more than ½" (13 mm) outside the cooking area. Refer to the "Cooking with Your Cooktop" section. ■■ Check the heat level. These cooktops come from the factory set for Natural gas. Check the following: ■■ Be sure the proper cookware is... correct (Propane or Natural gas). Ensure the cooktop gas supply is being used. Refer to the Installation Instructions to "Excessive heat around the cookware on cooktop Cooking results are correct. 9 Adjust the flame so that the pressure regulator is installed...

Instruction Sheet
Page 1
... propriétaire. GAZ PROPANE Pour séries de modèles WCG, MGC, KCGS et ICS5/6 Table of Contents/Table des matières COOKTOP SAFETY 2 Tools and Parts 3 Convert from Natural Gas to LP Gas 3 Convert from LP Gas to Natural Gas 6 Lighting the Electronic Igniters 9 Flame Height Adjustment...
... propriétaire. GAZ PROPANE Pour séries de modèles WCG, MGC, KCGS et ICS5/6 Table of Contents/Table des matières COOKTOP SAFETY 2 Tools and Parts 3 Convert from Natural Gas to LP Gas 3 Convert from LP Gas to Natural Gas 6 Lighting the Electronic Igniters 9 Flame Height Adjustment...

Instruction Sheet
Page 2
... a ball valve, it shall be performed by a qualified installer, service agency or the gas supplier. For more information, contact your gas supplier from a neighbor's phone. COOKTOP SAFETY Your safety and the safety of injury, and tell you what can be killed or seriously injured if you use a gas detector approved by...
... a ball valve, it shall be performed by a qualified installer, service agency or the gas supplier. For more information, contact your gas supplier from a neighbor's phone. COOKTOP SAFETY Your safety and the safety of injury, and tell you what can be killed or seriously injured if you use a gas detector approved by...


