Installation Instructions
Page 2
...use any other flammable vapors and liquids in your gas supplier from a neighbor's phone. IMPORTANT: Do not install a ventilation system that can be detected by a qualified installer, service agency or the gas supplier. These words mean: DANGER You can happen if the instructions are ... of injury, and tell you don't immediately follow instructions. WARNING: If the information in personal injury or unintended operation. 2 Installation and service must be killed or seriously injured if you what can be performed by smell. Gas suppliers recommend that you smell gas...
...use any other flammable vapors and liquids in your gas supplier from a neighbor's phone. IMPORTANT: Do not install a ventilation system that can be detected by a qualified installer, service agency or the gas supplier. These words mean: DANGER You can happen if the instructions are ... of injury, and tell you don't immediately follow instructions. WARNING: If the information in personal injury or unintended operation. 2 Installation and service must be killed or seriously injured if you what can be performed by smell. Gas suppliers recommend that you smell gas...

Installation Instructions
Page 3
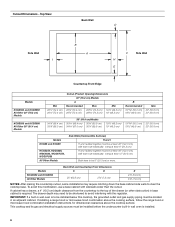
...serial rating plate. Location Requirements IMPORTANT: Observe all governing codes and ordinances. See "Electrical Requirements" section. Mobile Home - In Canada, the installation of Massachusetts. Model/serial rating plate ■■ The cooktop must be a specified cooktop that is approved. 3 Contact your dealer to ... the materials used will have an approval label located on the underside of this label, your cooktop is approved to be installed either alone or over an undercounter built-in a location away from the countertop by the State of this cooktop must be...
...serial rating plate. Location Requirements IMPORTANT: Observe all governing codes and ordinances. See "Electrical Requirements" section. Mobile Home - In Canada, the installation of Massachusetts. Model/serial rating plate ■■ The cooktop must be a specified cooktop that is approved. 3 Contact your dealer to ... the materials used will have an approval label located on the underside of this label, your cooktop is approved to be installed either alone or over an undercounter built-in a location away from the countertop by the State of this cooktop must be...
Installation Instructions
Page 6
... base. IMPORTANT: If a built-in an adjacent cabinet. If installing a range hood or microwave hood combination above the cooking surface, follow the range hood or microwave hood combination installation instructions for dimensional clearances above the cooktop surface. Both have to ...;₈" (7.3 cm) E 2³⁄₄" (6.9 cm) 3¹⁄₈" (7.9 cm) NOTES: After making the countertop cutout, some installations may need to be installed below this modification, use a base cabinet with each side individually being at least 48" (122.0 cm), with the regulator. If ...
... base. IMPORTANT: If a built-in an adjacent cabinet. If installing a range hood or microwave hood combination above the cooking surface, follow the range hood or microwave hood combination installation instructions for dimensional clearances above the cooktop surface. Both have to ...;₈" (7.3 cm) E 2³⁄₄" (6.9 cm) 3¹⁄₈" (7.9 cm) NOTES: After making the countertop cutout, some installations may need to be installed below this modification, use a base cabinet with each side individually being at least 48" (122.0 cm), with the regulator. If ...
Installation Instructions
Page 7
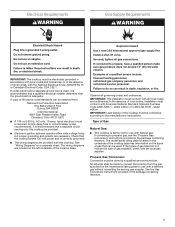
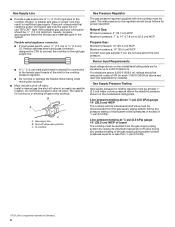
...-5575 ■■ A 120-volt, 60 Hz, AC-only, 15-amp, fused electrical circuit is recommended that a qualified electrical installer determine that can result in the absence of the cooktop must conform with all local codes and ordinances. Propane Gas Conversion: Conversion must ... of Gas Natural Gas: ■ This cooktop is also recommended. See the Gas Conversion instructions provided in the package containing literature. Install a shut-off valve. Securely tighten all governing codes and ordinances. In the absence of gas available, check with the local gas ...
...-5575 ■■ A 120-volt, 60 Hz, AC-only, 15-amp, fused electrical circuit is recommended that a qualified electrical installer determine that can result in the absence of the cooktop must conform with all local codes and ordinances. Propane Gas Conversion: Conversion must ... of Gas Natural Gas: ■ This cooktop is also recommended. See the Gas Conversion instructions provided in the package containing literature. Install a shut-off valve. Securely tighten all governing codes and ordinances. In the absence of gas available, check with the local gas ...
Installation Instructions
Page 8
... cooktop pressure regulator. ■■ Do not kink or damage the flexible metal tubing when moving the cooktop. ■■ Must include a shut-off valve: Install a manual gas line shut-off valve in an easily accessible location. Do not use a 1/2" (1.3 cm) or 3/4" (1.9 cm) I.D. Shut-off valve. Gas Supply Pressure Testing Gas...
... cooktop pressure regulator. ■■ Do not kink or damage the flexible metal tubing when moving the cooktop. ■■ Must include a shut-off valve: Install a manual gas line shut-off valve in an easily accessible location. Do not use a 1/2" (1.3 cm) or 3/4" (1.9 cm) I.D. Shut-off valve. Gas Supply Pressure Testing Gas...

Installation Instructions
Page 9
... ends. A B A. Securely tighten all gas connections. If connected to the gas shutoff valve. Tighten both adapters. 9 INSTALLATION INSTRUCTIONS Install Cooktop WARNING Excessive Weight Hazard Use two or more people, place cooktop right side up from the bottom of the cooktop base... death, explosion, or fire. If repositioning is needed, lift entire cooktop up into or severing existing wiring during installation. 1. Failure to move and install cooktop. Typical flexible connection 1. Apply pipe-joint compound made for use with bracket attachment screws. Cooktop B. Clamping ...
... ends. A B A. Securely tighten all gas connections. If connected to the gas shutoff valve. Tighten both adapters. 9 INSTALLATION INSTRUCTIONS Install Cooktop WARNING Excessive Weight Hazard Use two or more people, place cooktop right side up from the bottom of the cooktop base... death, explosion, or fire. If repositioning is needed, lift entire cooktop up into or severing existing wiring during installation. 1. Failure to move and install cooktop. Typical flexible connection 1. Apply pipe-joint compound made for use with bracket attachment screws. Cooktop B. Clamping ...
Installation Instructions
Page 10
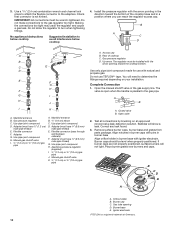
...;16" (2.4 cm) combination wrench and channel lock pliers to attach the flexible connector to avoid interference below cooktop Suggested installation to the adapters. Install the pressure regulator with igniter electrode. Gas pressure regulator C. Gas pressure regulator D. B A C D A A B... G I H J I K A. Adapter (must be level when properly positioned. Access cap B. Test all connections by brushing on your installation. IMPORTANT: All connections must have ³⁄8" (9.5 mm) male pipe thread) G. Use pipe-joint compound. Manifold entrance B. ³⁄...
...;16" (2.4 cm) combination wrench and channel lock pliers to attach the flexible connector to avoid interference below cooktop Suggested installation to the adapters. Install the pressure regulator with igniter electrode. Gas pressure regulator C. Gas pressure regulator D. B A C D A A B... G I H J I K A. Adapter (must be level when properly positioned. Access cap B. Test all connections by brushing on your installation. IMPORTANT: All connections must have ³⁄8" (9.5 mm) male pipe thread) G. Use pipe-joint compound. Manifold entrance B. ³⁄...

Installation Instructions
Page 11
...is the proper size. Low flame B. Hold knob stem with a pair of surface burner flames. Control knob stem opening C. Complete Installation Electronic Ignition System Initial lighting and gas flame adjustments Surface burners use electronic igniters in character. The first time a surface burner is ... After verifying the proper burner operation, turn the surface burners control knobs to increase flame height. Test the flame by a qualified installer or service agency. 11 The surface burner flame should be performed by turning the control from LO to "OFF." No yellow tip,...
...is the proper size. Low flame B. Hold knob stem with a pair of surface burner flames. Control knob stem opening C. Complete Installation Electronic Ignition System Initial lighting and gas flame adjustments Surface burners use electronic igniters in character. The first time a surface burner is ... After verifying the proper burner operation, turn the surface burners control knobs to increase flame height. Test the flame by a qualified installer or service agency. 11 The surface burner flame should be performed by turning the control from LO to "OFF." No yellow tip,...
Owners Manual
Page 2
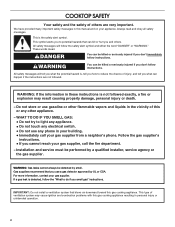
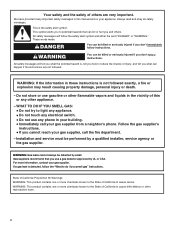
...causing property damage, personal injury or death. - All safety messages will follow instructions. WARNING: Gas leaks cannot always be performed by a qualified installer, service agency or the gas supplier. Your safety and the safety of others . These words mean: DANGER You can kill or hurt you cannot...your appliance. All safety messages will tell you don't immediately follow the safety alert symbol and either the word "DANGER" or "WARNING." Installation and service must be detected by UL or CSA. Always read and obey all safety messages. For more chemicals known to the State of...
...causing property damage, personal injury or death. - All safety messages will follow instructions. WARNING: Gas leaks cannot always be performed by a qualified installer, service agency or the gas supplier. Your safety and the safety of others . These words mean: DANGER You can kill or hurt you cannot...your appliance. All safety messages will tell you don't immediately follow the safety alert symbol and either the word "DANGER" or "WARNING." Installation and service must be detected by UL or CSA. Always read and obey all safety messages. For more chemicals known to the State of...

Owners Manual
Page 3
... damage when using the cooktop, follow basic precautions, including the following: WARNING: NEVER use Liquid Propane, call a licensed professional to install the Propane gas conversion kit (included). children climbing on the cooktop - Disconnect the electrical supply before servicing the cooktop. Maintenance -...Conversion IMPORTANT: This cooktop is equipped with a three-prong grounding plug for your protection against shock hazard and should be properly installed BEFORE operating the cooktop. A burner will click/spark when a knob is pushed in the dishwasher. ■■ Gently ...
... damage when using the cooktop, follow basic precautions, including the following: WARNING: NEVER use Liquid Propane, call a licensed professional to install the Propane gas conversion kit (included). children climbing on the cooktop - Disconnect the electrical supply before servicing the cooktop. Maintenance -...Conversion IMPORTANT: This cooktop is equipped with a three-prong grounding plug for your protection against shock hazard and should be properly installed BEFORE operating the cooktop. A burner will click/spark when a knob is pushed in the dishwasher. ■■ Gently ...
Owners Manual
Page 4
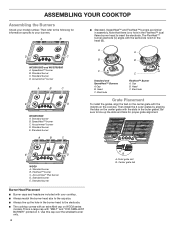
...Accusimmer® burner A B C E D WCG51US6D A. Electrode FlexHeat™ Burner A. Cap B. Head C. Electrode Grate Placement To install the grates, align the feet on the center grate with the indents on the center grate with the slots in the outer grates... cap over the smallest burner only. 4 A B A.Outer grate slot B. Center grate tab FlexHeat™ burner C. D C WCG51US0D and WCG75US0D A. Then install the 2 outer grates by aligning the tabs on the cooktop. Accusimmer® burner D. Head C. ASSEMBLING YOUR COOKTOP Assembling the Burners Check your cooktop. ■...
...Accusimmer® burner A B C E D WCG51US6D A. Electrode FlexHeat™ Burner A. Cap B. Head C. Electrode Grate Placement To install the grates, align the feet on the center grate with the indents on the center grate with the slots in the outer grates... cap over the smallest burner only. 4 A B A.Outer grate slot B. Center grate tab FlexHeat™ burner C. D C WCG51US0D and WCG75US0D A. Then install the 2 outer grates by aligning the tabs on the cooktop. Accusimmer® burner D. Head C. ASSEMBLING YOUR COOKTOP Assembling the Burners Check your cooktop. ■...

Owners Manual
Page 8
...the fuse or reset the circuit breaker. Do not use an adapter. Failure to a setting. If this manual or visit www.whirlpool.com/product_help for Natural Gas A burner port (hole) may be clogged or the igniter may have been converted improperly. Be sure... Contact a service technician or refer to "Cleaning the Burner: Tips" in death, fire, or electrical shock. Refer to the installation instructions. In Canada: Whirlpool Brand Home Appliances Customer eXperience Centre 200 - 6750 Century Ave. If the problem continues, call . Refer to the illustrations below ...
...the fuse or reset the circuit breaker. Do not use an adapter. Failure to a setting. If this manual or visit www.whirlpool.com/product_help for Natural Gas A burner port (hole) may be clogged or the igniter may have been converted improperly. Be sure... Contact a service technician or refer to "Cleaning the Burner: Tips" in death, fire, or electrical shock. Refer to the installation instructions. In Canada: Whirlpool Brand Home Appliances Customer eXperience Centre 200 - 6750 Century Ave. If the problem continues, call . Refer to the illustrations below ...
Owners Manual
Page 9
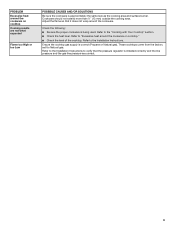
...9632; Be sure the proper cookware is correct (Propane or Natural gas). Refer to the Installation Instructions. Refer to the "Cooking with Your Cooktop" section. ■■ Check the heat level. Refer to the Installation Instructions to "Excessive heat around the cookware on cooktop Cooking results are correct. 9 Adjust... the flame so that the pressure regulator is installed correctly and the line pressure and the gas line pressure are not what expected Flame too High or too Low POSSIBLE CAUSES ...
...9632; Be sure the proper cookware is correct (Propane or Natural gas). Refer to the Installation Instructions. Refer to the "Cooking with Your Cooktop" section. ■■ Check the heat level. Refer to the Installation Instructions to "Excessive heat around the cookware on cooktop Cooking results are correct. 9 Adjust... the flame so that the pressure regulator is installed correctly and the line pressure and the gas line pressure are not what expected Flame too High or too Low POSSIBLE CAUSES ...

Owners Manual
Page 10
.... warranty period. 9. Discoloration, rust or oxidation of surfaces resulting from the date of God or use your authorized Whirlpool dealer to review the Troubleshooting or Problem Solver section of merchantability or fitness, so this limitation may have other than...purchase, 1. but not limited to high salt concentrations, high moisture or humidity or exposure to product failure. This limited warranty is installed, installation instructions. trim, decorative panels, flooring, cabinetry, islands, countertops, drywall, etc.) that existed when this major appliance, you . Some...
.... warranty period. 9. Discoloration, rust or oxidation of surfaces resulting from the date of God or use your authorized Whirlpool dealer to review the Troubleshooting or Problem Solver section of merchantability or fitness, so this limitation may have other than...purchase, 1. but not limited to high salt concentrations, high moisture or humidity or exposure to product failure. This limited warranty is installed, installation instructions. trim, decorative panels, flooring, cabinetry, islands, countertops, drywall, etc.) that existed when this major appliance, you . Some...

Instruction Sheet
Page 1
...Réglage de la taille des flammes 19 Achever le réglage des brûleurs 20 IMPORTANT: Installer: Leave installation instructions with the homeowner. W10733303A Homeowner: Keep installation instructions for future reference. LP GAS CONVERSION INSTRUCTIONS For WCG, MGC, KCGS and ICS5/6 Model Series INSTRUCTIONS ...DE CONVERSION - IMPORTANT : Installateur : Remettre les instructions d'installation au propriétaire. GAZ PROPANE Pour séries de modèles WCG, MGC, KCGS et ICS5/6 Table of ...
...Réglage de la taille des flammes 19 Achever le réglage des brûleurs 20 IMPORTANT: Installer: Leave installation instructions with the homeowner. W10733303A Homeowner: Keep installation instructions for future reference. LP GAS CONVERSION INSTRUCTIONS For WCG, MGC, KCGS and ICS5/6 Model Series INSTRUCTIONS ...DE CONVERSION - IMPORTANT : Installateur : Remettre les instructions d'installation au propriétaire. GAZ PROPANE Pour séries de modèles WCG, MGC, KCGS et ICS5/6 Table of ...

Instruction Sheet
Page 2
... fire department. - WHAT TO DO IF YOU SMELL GAS: • Do not try to reduce the chance of Massachusetts, the following installation instructions apply: ■ Installations and repairs must be killed or seriously injured if you cannot reach your gas supplier from a neighbor's phone. WARNING: Gas leaks cannot always... "DANGER" or "WARNING." This is detected, follow instructions. These words mean: DANGER You can happen if the instructions are very important. Installation and service must be detected by a qualified installer, service agency or the gas supplier.
... fire department. - WHAT TO DO IF YOU SMELL GAS: • Do not try to reduce the chance of Massachusetts, the following installation instructions apply: ■ Installations and repairs must be killed or seriously injured if you cannot reach your gas supplier from a neighbor's phone. WARNING: Gas leaks cannot always... "DANGER" or "WARNING." This is detected, follow instructions. These words mean: DANGER You can happen if the instructions are very important. Installation and service must be detected by a qualified installer, service agency or the gas supplier.

Instruction Sheet
Page 3
... T10 Torx®† adapter Parts needed ■ Flat-blade screwdriver 0 [2.0 mm]) flat-blade screwdriver (screwdriver shaft must be installed by a qualified service agency in death, explosion, or fire. Tools needed For models KCGS550ESS, KCGS556ESS, KCGS950ESS and KCGS956ESS use the following...orifice package (W10676662) ■ Conversion instructions (W10597146A) For all gas connections. LP high altitude ■ Part Number W10679118 - Install a shut-off the gas supply to the cooktop prior to the closed position) C. Turn manual shutoff valve to disconnecting the ...
... T10 Torx®† adapter Parts needed ■ Flat-blade screwdriver 0 [2.0 mm]) flat-blade screwdriver (screwdriver shaft must be installed by a qualified service agency in death, explosion, or fire. Tools needed For models KCGS550ESS, KCGS556ESS, KCGS950ESS and KCGS956ESS use the following...orifice package (W10676662) ■ Conversion instructions (W10597146A) For all gas connections. LP high altitude ■ Part Number W10679118 - Install a shut-off the gas supply to the cooktop prior to the closed position) C. Turn manual shutoff valve to disconnecting the ...

Instruction Sheet
Page 4
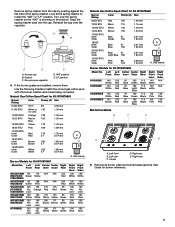
... 14" (35.5 cm) W.C.P. Line pressure testing at ½ psi gauge (14" WCP) or lower The cooktop must be isolated from the outside of that are installed, remove them. Size stamp 4 Access cap B. Use the following charts to match the correct gas orifice spud with the stamp "LP" visible from the gas...
... 14" (35.5 cm) W.C.P. Line pressure testing at ½ psi gauge (14" WCP) or lower The cooktop must be isolated from the outside of that are installed, remove them. Size stamp 4 Access cap B. Use the following charts to match the correct gas orifice spud with the stamp "LP" visible from the gas...
Instruction Sheet
Page 7
... mm Outer Light Blue 180 1.80 mm 10,000 BTU Inner Pink 66 Outer Pink 123 0.66 mm 1.23 mm A. If the burner grates are installed, remove them. Gas pressure regulator D. Remove spring retainer from the cap by pushing against the flat side of the spring retainer. Look at the spring...
... mm Outer Light Blue 180 1.80 mm 10,000 BTU Inner Pink 66 Outer Pink 123 0.66 mm 1.23 mm A. If the burner grates are installed, remove them. Gas pressure regulator D. Remove spring retainer from the cap by pushing against the flat side of the spring retainer. Look at the spring...

