Installation Instructions
Page 2
... very important. Location Requirements IMPORTANT: Observe all safety messages. Check the cooktop base for 1/2" (1.3 cm) diameter conduit ■■ UL listed wire connectors Check local codes. "W12345678" becomes "400012345678") All safety messages will be installed in this type of installation will follow instructions. Read and follow instructions. If you and others are not followed. See the "Electrical Requirements" section. The cooktop should be installed either the...
... very important. Location Requirements IMPORTANT: Observe all safety messages. Check the cooktop base for 1/2" (1.3 cm) diameter conduit ■■ UL listed wire connectors Check local codes. "W12345678" becomes "400012345678") All safety messages will be installed in this type of installation will follow instructions. Read and follow instructions. If you and others are not followed. See the "Electrical Requirements" section. The cooktop should be installed either the...

Installation Instructions
Page 3
... and white models - 213/4" (55.2 cm) Glass depth - KitchenAid 36" stainless steel (91.4 cm) models 357/8" (91.0 cm) C. Cooktop height with these Installation Instructions. Will fit in base cabinet is required. 05-Sep-2019 13:08:04 EDT | RELEASED In some installations may require notching down the base cabinet side walls to make sure that are minimum clearances and provide 0" (0 cm) clearance. ■■ Grounded electrical supply is required. Whirlpool and Maytag stainless steel models 227...
... and white models - 213/4" (55.2 cm) Glass depth - KitchenAid 36" stainless steel (91.4 cm) models 357/8" (91.0 cm) C. Cooktop height with these Installation Instructions. Will fit in base cabinet is required. 05-Sep-2019 13:08:04 EDT | RELEASED In some installations may require notching down the base cabinet side walls to make sure that are minimum clearances and provide 0" (0 cm) clearance. ■■ Grounded electrical supply is required. Whirlpool and Maytag stainless steel models 227...

Installation Instructions
Page 4
... follow the procedure below: Connect the aluminum wiring using special connectors and/or tools designed and UL listed for it is recommended that a qualified electrical installer determine that the electrical connection and wire size are adequate and in death, fire, or electrical shock. Check with local codes. Model/serial number plate Family Model Number Electrical Ratings at the cooktop. ■■ If the house has aluminum wiring follow the instructions provided for joining copper...
... follow the procedure below: Connect the aluminum wiring using special connectors and/or tools designed and UL listed for it is recommended that a qualified electrical installer determine that the electrical connection and wire size are adequate and in death, fire, or electrical shock. Check with local codes. Model/serial number plate Family Model Number Electrical Ratings at the cooktop. ■■ If the house has aluminum wiring follow the instructions provided for joining copper...

Installation Instructions
Page 5
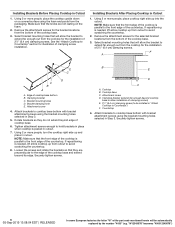
... brackets can result in oven IMPORTANT: Clamping brackets should not be autom5atically replaced by the number "4000" (e.g. Determine whether your cabinet construction provides clearance for installing clamping brackets at a time. Clamping bracket A 2. Remove foam strip roll from the package containing literature. Cooktop base B. 1/4" (6.4 mm) Foam strip C. INSTALLATION INSTRUCTIONS Prepare Cooktop for Installation WARNING Excessive Weight Hazard Use two or more people, place cooktop right side up from cutout to avoid scratching the countertop...
... brackets can result in oven IMPORTANT: Clamping brackets should not be autom5atically replaced by the number "4000" (e.g. Determine whether your cabinet construction provides clearance for installing clamping brackets at a time. Clamping bracket A 2. Remove foam strip roll from the package containing literature. Cooktop base B. 1/4" (6.4 mm) Foam strip C. INSTALLATION INSTRUCTIONS Prepare Cooktop for Installation WARNING Excessive Weight Hazard Use two or more people, place cooktop right side up from cutout to avoid scratching the countertop...
Installation Instructions
Page 6
... edge of the cooktop base. 3. Using 2 or more people, turn the cooktop right side up into the cutout. F A E C D C B A A. Tighten attachment screws enough to hold brackets in Step 3. B E D C A. Edge of clamping screws) E. 2¹⁄2" (6.4 cm) clamping screw (to be automatically replaced by the number "4000" (e.g. Bracket mounting holes D. Attachment screw 4. Countertop 4. "W12345678" becomes "400012345678") Rotate brackets so they are not resting on a covered surface using the bracket mounting holes selected in...
... edge of the cooktop base. 3. Using 2 or more people, turn the cooktop right side up into the cutout. F A E C D C B A A. Tighten attachment screws enough to hold brackets in Step 3. B E D C A. Edge of clamping screws) E. 2¹⁄2" (6.4 cm) clamping screw (to be automatically replaced by the number "4000" (e.g. Bracket mounting holes D. Attachment screw 4. Countertop 4. "W12345678" becomes "400012345678") Rotate brackets so they are not resting on a covered surface using the bracket mounting holes selected in...

Installation Instructions
Page 7
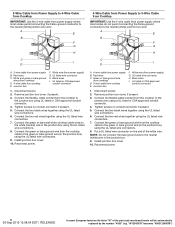
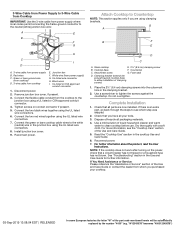
... part code mentioned herein will be connecting to: 4-wire direct A fused disconnect or circuit breaker box 5" (12,7 cm) Go to Section: 4-Wire Cable from Power Supply to 4-Wire Cable from Cooktop 3-wire direct 3¹⁄₂" (8.9 cm) A fused disconnect or circuit breaker box 3-Wire Cable from Power Supply to the neutral (white) junction box wire. A B E F G H C I . Electrical Connection Options For cooktops with a 4-wire cable If your home has: And you will be autom7atically replaced by the number "4000" (e.g. Bare or green wires D. 4-wire...
... part code mentioned herein will be connecting to: 4-wire direct A fused disconnect or circuit breaker box 5" (12,7 cm) Go to Section: 4-Wire Cable from Power Supply to 4-Wire Cable from Cooktop 3-wire direct 3¹⁄₂" (8.9 cm) A fused disconnect or circuit breaker box 3-Wire Cable from Power Supply to the neutral (white) junction box wire. A B E F G H C I . Electrical Connection Options For cooktops with a 4-wire cable If your home has: And you will be autom7atically replaced by the number "4000" (e.g. Bare or green wires D. 4-wire...
Installation Instructions
Page 8
... B. Install junction box cover. 10. Remove junction box cover, if present. 3. Reconnect power. Red wires C. White wire (from cooktop E. Tighten screws on conduit connector if present. 5. Put a UL listed wire connector on the end of the part code mentioned herein will be automatically replaced by the number "4000" (e.g. UL listed wire connector H. Connect the green or bare and white cooktop cable wires to the neutral (white) wire in the junction box. 9. Green or bare ground wire (from cooktop) D. 3-wire...
... B. Install junction box cover. 10. Remove junction box cover, if present. 3. Reconnect power. Red wires C. White wire (from cooktop E. Tighten screws on conduit connector if present. 5. Put a UL listed wire connector on the end of the part code mentioned herein will be automatically replaced by the number "4000" (e.g. UL listed wire connector H. Connect the green or bare and white cooktop cable wires to the neutral (white) wire in the junction box. 9. Green or bare ground wire (from cooktop) D. 3-wire...
Installation Instructions
Page 9
...") Remove junction box cover, if present. 3. Tighten screws on the power, check that all parts are using clamping brackets. D C A. Countertop C. Use a screwdriver to allow installation of the part code mentioned herein will be autom9atically replaced by the number "4000" (e.g. Check that you have all packaging materials. 4. Use a mild solution of the Use and Care Guide or contact the dealer from power supply) G. Reconnect power. 7. Red wires C. UL listed wire connector H. Connect the two red wires...
...") Remove junction box cover, if present. 3. Tighten screws on the power, check that all parts are using clamping brackets. D C A. Countertop C. Use a screwdriver to allow installation of the part code mentioned herein will be autom9atically replaced by the number "4000" (e.g. Check that you have all packaging materials. 4. Use a mild solution of the Use and Care Guide or contact the dealer from power supply) G. Reconnect power. 7. Red wires C. UL listed wire connector H. Connect the two red wires...

Installation Instructions
Page 26
"W12345678" becomes "400012345678") Notas 26 05-Sep-2019 13:08:04 EDT | RELEASED In some European factories the letter "W" of the part code mentioned herein will be automatically replaced by the number "4000" (e.g.
"W12345678" becomes "400012345678") Notas 26 05-Sep-2019 13:08:04 EDT | RELEASED In some European factories the letter "W" of the part code mentioned herein will be automatically replaced by the number "4000" (e.g.

Installation Instructions
Page 28
Used under license in Canada. Utilisé sous licence au Canada. "W12345678" becomes "400012345678") Todos los derechos reservados. Usado en Canadá bajo licencia. 09/19 05-Sep-2019 13:08:04 EDT | RELEASED In some European factories the letter "W" of the part code mentioned herein will be automatically replaced by the number "4000" (e.g. W11206696D ©2019 All rights reserved. Tous droits réservés.
Used under license in Canada. Utilisé sous licence au Canada. "W12345678" becomes "400012345678") Todos los derechos reservados. Usado en Canadá bajo licencia. 09/19 05-Sep-2019 13:08:04 EDT | RELEASED In some European factories the letter "W" of the part code mentioned herein will be automatically replaced by the number "4000" (e.g. W11206696D ©2019 All rights reserved. Tous droits réservés.
WCE55US6HB Manual de Uso y Cuidado.pdf
Page 1
... 7 COOKTOP CARE 7 General Cleaning 7 TROUBLESHOOTING 9 ASSISTANCE OR SERVICE 10 In the U.S.A 10 Accessories 10 In Canada 10 W11255744A In Mexico, register your product model and serial numbers. Model Number Serial Number Para una versión de estas instrucciones en español, visite www.whirlpool.com. Table of your range at www.whirlpool.com. Register your range at www.whirlpool.ca. ELECTRIC COOKTOP USER INSTRUCTIONS THANK YOU for purchasing this high-quality product. KNOB CONTROLS 5 Dual...
... 7 COOKTOP CARE 7 General Cleaning 7 TROUBLESHOOTING 9 ASSISTANCE OR SERVICE 10 In the U.S.A 10 Accessories 10 In Canada 10 W11255744A In Mexico, register your product model and serial numbers. Model Number Serial Number Para una versión de estas instrucciones en español, visite www.whirlpool.com. Table of your range at www.whirlpool.com. Register your range at www.whirlpool.ca. ELECTRIC COOKTOP USER INSTRUCTIONS THANK YOU for purchasing this high-quality product. KNOB CONTROLS 5 Dual...
WCE55US6HB Manual de Uso y Cuidado.pdf
Page 2
...you what the potential hazard is the safety alert symbol. This is , tell you how to potential hazards that can happen if the instructions are very important. State of California Proposition 65 Warnings: WARNING: This product contains one or more chemicals known to the State of ...harm. 2 WARNING: This product contains one or more chemicals known to the State of California to cause cancer. COOKTOP SAFETY Your safety and the safety of others . We have provided many important safety messages in this manual and on your appliance. Always read and obey all safety messages.
...you what the potential hazard is the safety alert symbol. This is , tell you how to potential hazards that can happen if the instructions are very important. State of California Proposition 65 Warnings: WARNING: This product contains one or more chemicals known to the State of ...harm. 2 WARNING: This product contains one or more chemicals known to the State of California to cause cancer. COOKTOP SAFETY Your safety and the safety of others . We have provided many important safety messages in this manual and on your appliance. Always read and obey all safety messages.
WCE55US6HB Manual de Uso y Cuidado.pdf
Page 3
... avoid the possibility of different size. Use Proper Pan Size - This cooktop is used to cause burns. The use aluminum foil to line surface unit drip bowls, except as knives, forks, spoons and lids should not be referred to supervise an electric grill when cooking on Grease Fires - Never Leave Surface Units Unattended at High Heat Settings - CAUTION: The cooking process should be careful to unintentional contact with one...
... avoid the possibility of different size. Use Proper Pan Size - This cooktop is used to cause burns. The use aluminum foil to line surface unit drip bowls, except as knives, forks, spoons and lids should not be referred to supervise an electric grill when cooking on Grease Fires - Never Leave Surface Units Unattended at High Heat Settings - CAUTION: The cooking process should be careful to unintentional contact with one...
WCE55US6HB Manual de Uso y Cuidado.pdf
Page 4
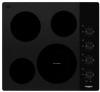
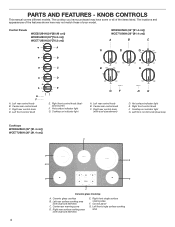
... cooking area (with dual size element) C. PARTS AND FEATURES - KNOB CONTROLS This manual covers different models. The cooktop you have purchased may not match those of the items listed. Right front control knob F. Right front single surface cooking area F. Left rear control knob B. Cooktop on indicator light G. Right rear control knob D. Center rear warming zone D. Left front single surface cooking area 4 Center rear control knob C. Control panel G. Right front control knob (dualzone burner) F. Hot surface indicator light G. Ceramic glass cooktop B. Hot surface indicator...
... cooking area (with dual size element) C. PARTS AND FEATURES - KNOB CONTROLS This manual covers different models. The cooktop you have purchased may not match those of the items listed. Right front control knob F. Right front single surface cooking area F. Left rear control knob B. Cooktop on indicator light G. Right rear control knob D. Center rear warming zone D. Left front single surface cooking area 4 Center rear control knob C. Control panel G. Right front control knob (dualzone burner) F. Hot surface indicator light G. Ceramic glass cooktop B. Hot surface indicator...
WCE55US6HB Manual de Uso y Cuidado.pdf
Page 5
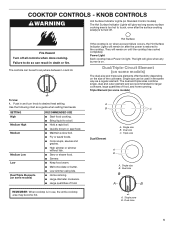
... as any burner is in the same way as a guide when setting heat levels. Push in death or fire. Single size B. Single zone B. Dual/Triple-Circuit Element (on some models) To Use: 1. COOKTOP CONTROLS - The controls can result in and turn knob to the cooktop. KNOB CONTROLS WARNING Hot Surface Indicator Lights (on Standard Control models) The Hot Surface Indicator Lights will glow when any surface cooking area is too hot to touch, even after the power is restored to desired heat setting.
... as any burner is in the same way as a guide when setting heat levels. Push in death or fire. Single size B. Single zone B. Dual/Triple-Circuit Element (on some models) To Use: 1. COOKTOP CONTROLS - The controls can result in and turn knob to the cooktop. KNOB CONTROLS WARNING Hot Surface Indicator Lights (on Standard Control models) The Hot Surface Indicator Lights will glow when any surface cooking area is too hot to touch, even after the power is restored to desired heat setting.

WCE55US6HB Manual de Uso y Cuidado.pdf
Page 6
... for oven and cooktop use the cooktop as a cutting board. ■■ Use cookware about the same size as plastic or aluminum foil, to the cooktop and can be more visible, and may not glow red when an element is normal for more information, see "General Cleaning" section. ■■ Do not cook popcorn in and turn knob from stains and provide the most even heating...
... for oven and cooktop use the cooktop as a cutting board. ■■ Use cookware about the same size as plastic or aluminum foil, to the cooktop and can be more visible, and may not glow red when an element is normal for more information, see "General Cleaning" section. ■■ Do not cook popcorn in and turn knob from stains and provide the most even heating...
WCE55US6HB Manual de Uso y Cuidado.pdf
Page 7
...; Stainless Steel Cleaner and Polish (Part Number W10355016B) (not included): See "Assistance or Service" section to medium heat settings. ■■ Stew or steam food. ■■ Simmer. ■■ Heats very quickly and evenly. ■■ See stainless steel or cast iron. ■■ Heats quickly, but unevenly. ■■ Ideal results on some models) COOKTOP CONTROLS To avoid damage to the cooktop, do not use a steam cleaner. COOKTOP CARE General Cleaning...
...; Stainless Steel Cleaner and Polish (Part Number W10355016B) (not included): See "Assistance or Service" section to medium heat settings. ■■ Stew or steam food. ■■ Simmer. ■■ Heats very quickly and evenly. ■■ See stainless steel or cast iron. ■■ Heats quickly, but unevenly. ■■ Ideal results on some models) COOKTOP CONTROLS To avoid damage to the cooktop, do not use a steam cleaner. COOKTOP CARE General Cleaning...
WCE55US6HB Manual de Uso y Cuidado.pdf
Page 8
...® Cooktop Cleaner and clean damp paper towel: Clean as soon as cooktop has cooled down . You may occur. 8 Scratches and abrasions do not use steel wool, abrasive powder cleansers, chlorine bleach, rust remover or ammonia because damage may want to wear oven mitts while doing so. Rub creme into surface with creme and paper towel. Do not use steel wool...
...® Cooktop Cleaner and clean damp paper towel: Clean as soon as cooktop has cooled down . You may occur. 8 Scratches and abrasions do not use steel wool, abrasive powder cleansers, chlorine bleach, rust remover or ammonia because damage may want to wear oven mitts while doing so. Rub creme into surface with creme and paper towel. Do not use steel wool...
WCE55US6HB Manual de Uso y Cuidado.pdf
Page 9
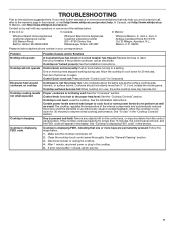
... well as the surface cooking area, element, or surface burner. See the "General Cleaning" section. 3. After 1 minute, reconnect power or plug in your correspondence. TROUBLESHOOTING First try the solutions suggested here. El Milagro, Apodaca, N.L., Mexico, C.P. 66634 Please include a daytime phone number in the cooktop. 5. Control knob set : Press and hold "Control Lock" for 30 minutes, then turn the burner on again. Control knob is not level: Level the cooktop. See "To Use" in this...
... well as the surface cooking area, element, or surface burner. See the "General Cleaning" section. 3. After 1 minute, reconnect power or plug in your correspondence. TROUBLESHOOTING First try the solutions suggested here. El Milagro, Apodaca, N.L., Mexico, C.P. 66634 Please include a daytime phone number in the cooktop. 5. Control knob set : Press and hold "Control Lock" for 30 minutes, then turn the burner on again. Control knob is not level: Level the cooktop. See "To Use" in this...
WCE55US6HB Manual de Uso y Cuidado.pdf
Page 10
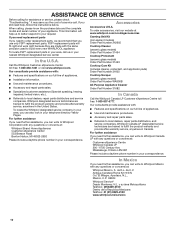
...; replacement parts. Accessories Accessories U.S.A. Whirlpool Canada LP designated service technicians are trained to fulfill the product warranty and provide after-warranty service, anywhere in your correspondence. For further assistance If you need further assistance, you can write to Whirlpool Canada LP with any questions or concerns at www.whirlpool.com/cookingaccessories Canning Unit Kit (coil element models) Order Part Number 242905 Cooktop Cleaner (ceramic glass models) Order Part Number 31464 Cooktop Protectant (ceramic glass models) Order Part Number 31463 Cooktop Care Kit...
...; replacement parts. Accessories Accessories U.S.A. Whirlpool Canada LP designated service technicians are trained to fulfill the product warranty and provide after-warranty service, anywhere in your correspondence. For further assistance If you need further assistance, you can write to Whirlpool Canada LP with any questions or concerns at www.whirlpool.com/cookingaccessories Canning Unit Kit (coil element models) Order Part Number 242905 Cooktop Cleaner (ceramic glass models) Order Part Number 31464 Cooktop Protectant (ceramic glass models) Order Part Number 31463 Cooktop Care Kit...

