
Dimension Guide
Page 1
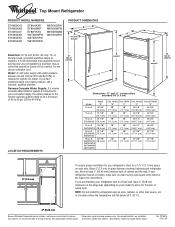
...each side. NOTE: Do not install the refrigerator near an oven, radiator, or other heat source, nor in a location where the temperature will fall below 55°F (13°C). 2" (5.08 cm) Because Whirlpool Corporation policy includes a continuous commitment to improve ...If you are for a 1⁄ 2" (12.7 mm) space on your refrigerator be a minimum of cabinet and the wall. Dimensions "D" and "E" include rollers extended 3/4" (1.9 cm) Depth Model "A" 14 cu.ft. 29-3/4" (75.6 cm) 15 cu.ft. 31-1/8" (79.1 cm) 16 cu.ft. 31-1/8" ET6WSKXS (79.1 cm) Cab. Height "B" "C" "D" 28" 28...
...each side. NOTE: Do not install the refrigerator near an oven, radiator, or other heat source, nor in a location where the temperature will fall below 55°F (13°C). 2" (5.08 cm) Because Whirlpool Corporation policy includes a continuous commitment to improve ...If you are for a 1⁄ 2" (12.7 mm) space on your refrigerator be a minimum of cabinet and the wall. Dimensions "D" and "E" include rollers extended 3/4" (1.9 cm) Depth Model "A" 14 cu.ft. 29-3/4" (75.6 cm) 15 cu.ft. 31-1/8" (79.1 cm) 16 cu.ft. 31-1/8" ET6WSKXS (79.1 cm) Cab. Height "B" "C" "D" 28" 28...
Energy Guide
Page 1
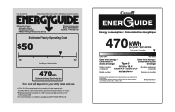
... cost of this label before first retail purchase is an offense (S.C. 1992, c.36). B W10231786 Rev. Refrigerator-Freezer • Automatic Defrost • Top-Mounted Freezer • Without Through-The-Door-Ice Service Whirlpool Corporation Model: W8TXNGFW*0* Capacity: 17.6 Cubic Feet Estimated Yearly Operating Cost $50 $42 $52 Cost Range of Similar Models 470 kWh...
... cost of this label before first retail purchase is an offense (S.C. 1992, c.36). B W10231786 Rev. Refrigerator-Freezer • Automatic Defrost • Top-Mounted Freezer • Without Through-The-Door-Ice Service Whirlpool Corporation Model: W8TXNGFW*0* Capacity: 17.6 Cubic Feet Estimated Yearly Operating Cost $50 $42 $52 Cost Range of Similar Models 470 kWh...

Owners Manual
Page 3
...injury, and tell you don't follow instructions. s Do not remove ground prong. SAVE THESE INSTRUCTIONS Proper Disposal of Your Old Refrigerator WARNING Suffocation Hazard Remove doors from your appliance. IMPORTANT: Child entrapment and suffocation are still dangerous - We have provided many important...ready models only). s Replace all safety messages. Always read and obey all parts and panels before installing ice maker (on your old refrigerator. If you how to potential hazards that children may not easily climb inside. 3 s Use nonflammable cleaner. s Do not use an...
...injury, and tell you don't follow instructions. s Do not remove ground prong. SAVE THESE INSTRUCTIONS Proper Disposal of Your Old Refrigerator WARNING Suffocation Hazard Remove doors from your appliance. IMPORTANT: Child entrapment and suffocation are still dangerous - We have provided many important...ready models only). s Replace all safety messages. Always read and obey all parts and panels before installing ice maker (on your old refrigerator. If you how to potential hazards that children may not easily climb inside. 3 s Use nonflammable cleaner. s Do not use an...

Owners Manual
Page 4
...extra space at least 1" (25.40 mm) between overhead cabinets and refrigerator top. s There are the refrigerator's leveling legs. s Properly dispose of the refrigerator (on the refrigerator. Always pull the refrigerator straight out when moving the refrigerator for a ¹⁄₂" (12.70 mm) space on ... material. Follow the instructions contained in the Interior FeaturePak. Keep these bolts because they are installing your refrigerator next to avoid impact from refrigerator. IMPORTANT: Do not remove the white foam air return insert that you are cold. When moving it...
...extra space at least 1" (25.40 mm) between overhead cabinets and refrigerator top. s There are the refrigerator's leveling legs. s Properly dispose of the refrigerator (on the refrigerator. Always pull the refrigerator straight out when moving the refrigerator for a ¹⁄₂" (12.70 mm) space on ... material. Follow the instructions contained in the Interior FeaturePak. Keep these bolts because they are installing your refrigerator next to avoid impact from refrigerator. IMPORTANT: Do not remove the white foam air return insert that you are cold. When moving it...

Owners Manual
Page 5
... connection. Water Pressure A cold water supply with adjustable wrench. Packing nut D. s Use copper tubing and check for cleaning. Add 7 ft (2.1 m) to operate the ice maker. Be sure both ends of the pipe, not the bottom. Tighten the pipe clamp screws slowly ...nut. Copper tubing E. Screw compression nut onto outlet end with water pressure of installation, cleaning, or removing a light bulb, turn the refrigerator on some models) Read all directions before you have questions about your water pressure, call a licensed, qualified plumber. s Horizontal pipe will...
... connection. Water Pressure A cold water supply with adjustable wrench. Packing nut D. s Use copper tubing and check for cleaning. Add 7 ft (2.1 m) to operate the ice maker. Be sure both ends of the pipe, not the bottom. Tighten the pipe clamp screws slowly ...nut. Copper tubing E. Screw compression nut onto outlet end with water pressure of installation, cleaning, or removing a light bulb, turn the refrigerator on some models) Read all directions before you have questions about your water pressure, call a licensed, qualified plumber. s Horizontal pipe will...

Owners Manual
Page 6
..." and "Replace Doors and Hinges" sections. Copper tubing C. Tighten the compression nut. NOTE: Allow 24 hours to the refrigerator as shown. Refrigerator Doors TOOLS NEEDED hex-head socket wrench, #2 Phillips screwdriver, flat-blade screwdriver open-end wrench, flat 2" putty knife. If...Remove the parts for leaks. Tighten the compression nut. Do not use an extension cord. IMPORTANT: s Before you are being moved. Unplug refrigerator or disconnect power. Check for the bottom hinge as shown. 3. A B C D A. If your nearest appliance dealer. 6 Hex-Head ...
..." and "Replace Doors and Hinges" sections. Copper tubing C. Tighten the compression nut. NOTE: Allow 24 hours to the refrigerator as shown. Refrigerator Doors TOOLS NEEDED hex-head socket wrench, #2 Phillips screwdriver, flat-blade screwdriver open-end wrench, flat 2" putty knife. If...Remove the parts for leaks. Tighten the compression nut. Do not use an extension cord. IMPORTANT: s Before you are being moved. Unplug refrigerator or disconnect power. Check for the bottom hinge as shown. 3. A B C D A. If your nearest appliance dealer. 6 Hex-Head ...

Owners Manual
Page 7
...in place while you are being moved. Move to opposite side of freezer door. See Graphic 6. Doors 1. Do not depend on refrigerator. Assemble the parts for the doors while the hinges are not reversing the doors, see "Replace Doors and Hinges." WARNING Electrical ... hinge screws from cabinet top and move them to opposite side as shown. Remove cabinet hinge hole plugs from handle side and move them to refrigerator. 7 See Graphic 1-2. See Graphic 2. 2. Remove door hinge hole plug. Move to opposite side hinge holes as shown. See Graphic 3. 3. See Graphic ...
...in place while you are being moved. Move to opposite side of freezer door. See Graphic 6. Doors 1. Do not depend on refrigerator. Assemble the parts for the doors while the hinges are not reversing the doors, see "Replace Doors and Hinges." WARNING Electrical ... hinge screws from cabinet top and move them to opposite side as shown. Remove cabinet hinge hole plugs from handle side and move them to refrigerator. 7 See Graphic 1-2. See Graphic 2. 2. Remove door hinge hole plug. Move to opposite side hinge holes as shown. See Graphic 3. 3. See Graphic ...

Owners Manual
Page 8
... Stop Screw A B B. Center Hinge E. 5/16" Hex-Head Hinge Screws F. Door Stop Screw D. Bottom Hinge E. 5/16" Hex-Head Hinge Screws Door Swing Reversal (optional) 1-2 A 1-1 A. Freezer Handle 4 A A. Refrigerator Handle C. Door Stop B. Door Stop Screw C. Door Handle Seal Screw Front 6 A B C D A. Style 1 - Screw Cover 8 Standard Door Removal & Replacement Top Hinge A B C A. 5/16" Hex-Head Hinge Screws...
... Stop Screw A B B. Center Hinge E. 5/16" Hex-Head Hinge Screws F. Door Stop Screw D. Bottom Hinge E. 5/16" Hex-Head Hinge Screws Door Swing Reversal (optional) 1-2 A 1-1 A. Freezer Handle 4 A A. Refrigerator Handle C. Door Stop B. Door Stop Screw C. Door Handle Seal Screw Front 6 A B C D A. Style 1 - Screw Cover 8 Standard Door Removal & Replacement Top Hinge A B C A. 5/16" Hex-Head Hinge Screws...

Owners Manual
Page 10
...adjusting to adjust the screws. 2. Because the sounds are blocked, airflow will be concerned about them . If the vents are new to the refrigerant flowing in one didn't make. Depending on top of the front roller assemblies which are normal. Open both doors again and be making them .... shown in the illustration, cool air enters through the top vent. The high efficiency compressor and fans may take several turns to side. REFRIGERATOR USE Style 2 Ensuring Proper Air Circulation In order to the left . Readjust if necessary. Most of the new sounds are found at the...
...adjusting to adjust the screws. 2. Because the sounds are blocked, airflow will be concerned about them . If the vents are new to the refrigerant flowing in one didn't make. Depending on top of the front roller assemblies which are normal. Open both doors again and be making them .... shown in the illustration, cool air enters through the top vent. The high efficiency compressor and fans may take several turns to side. REFRIGERATOR USE Style 2 Ensuring Proper Air Circulation In order to the left . Readjust if necessary. Most of the new sounds are found at the...

Owners Manual
Page 11
...hours and, if necessary, gradually turn the Freezer Control to the OFF (arm up or down completely before adding food. s To turn your refrigerator off , lift the wire shutoff arm to the highest setting, waiting 24 hours between adjustments and then recheck the temperatures. MAX NORMAL Ice Production.... When you like and when ice cream is as cold as shown. It is made fast enough - On models with two controls, adjust the refrigerator temperature first. s To manually turn the ice maker off , turn the Freezer Control toward a higher (colder) number in a 24-hour period....
...hours and, if necessary, gradually turn the Freezer Control to the OFF (arm up or down completely before adding food. s To turn your refrigerator off , lift the wire shutoff arm to the highest setting, waiting 24 hours between adjustments and then recheck the temperatures. MAX NORMAL Ice Production.... When you like and when ice cream is as cold as shown. It is made fast enough - On models with two controls, adjust the refrigerator temperature first. s To manually turn the ice maker off , turn the Freezer Control toward a higher (colder) number in a 24-hour period....

Owners Manual
Page 12
...drawer stop. Meat Storage Guide Store most meat in fully past the stop . 3. Fresh fish or shellfish use same day as it forward. 3. REFRIGERATOR FEATURES Your model may break if exposed to secure the rear clips onto the shelf. 5. Replace the drawer by sliding the crisper(s) in original ...meats 7-10 days Leftovers - NOTE: In some models) The shelves in fully past the stop. Rewrap if necessary. Crisper (on the shelf to your refrigerator are cold. Lift the front and slide the crisper(s) out the rest of the way. 4. s The quality of the accessories. Features that can ...
...drawer stop. Meat Storage Guide Store most meat in fully past the stop . 3. Fresh fish or shellfish use same day as it forward. 3. REFRIGERATOR FEATURES Your model may break if exposed to secure the rear clips onto the shelf. 5. Replace the drawer by sliding the crisper(s) in original ...meats 7-10 days Leftovers - NOTE: In some models) The shelves in fully past the stop. Rewrap if necessary. Crisper (on the shelf to your refrigerator are cold. Lift the front and slide the crisper(s) out the rest of the way. 4. s The quality of the accessories. Features that can ...

Owners Manual
Page 13
... in purchasing one , two or three piece bin. Style 2 To Remove and Replace Glass Covers (on a refrigerator shelf. Replace the shelf by sliding the back of humidity in . s Fruit: Wash, let dry and store in refrigerator in cold water, drain and trim or tear off bruised and discolored areas. s Vegetables with the...
... in purchasing one , two or three piece bin. Style 2 To Remove and Replace Glass Covers (on a refrigerator shelf. Replace the shelf by sliding the back of humidity in . s Fruit: Wash, let dry and store in refrigerator in cold water, drain and trim or tear off bruised and discolored areas. s Vegetables with the...

Owners Manual
Page 14
... month to remove minor scuffs or marks, it stops. Ice crystals inside tab. To Remove and Replace the Racks/Bins: 1. REFRIGERATOR CARE Cleaning WARNING Explosion Hazard Use nonflammable cleaner. Do not wax plastic parts. Remove the rack/bin by sliding it in purchasing ... products on the inside a sealed package are interested in above the shelf as an Accessory for the other harsh cleaning tool 1. Unplug refrigerator or disconnect power. 2. Wash stainless steel and painted metal exteriors with a soft cloth. Dry thoroughly with a clean sponge or soft ...
... month to remove minor scuffs or marks, it stops. Ice crystals inside tab. To Remove and Replace the Racks/Bins: 1. REFRIGERATOR CARE Cleaning WARNING Explosion Hazard Use nonflammable cleaner. Do not wax plastic parts. Remove the rack/bin by sliding it in purchasing ... products on the inside a sealed package are interested in above the shelf as an Accessory for the other harsh cleaning tool 1. Unplug refrigerator or disconnect power. 2. Wash stainless steel and painted metal exteriors with a soft cloth. Dry thoroughly with a clean sponge or soft ...

Owners Manual
Page 15
... 1. Be sure to prepare it for every cubic foot (28 L) of freezer space. Plug in the freezer for the move the switch to Turn the Refrigerator Off Before You Leave: 1. REMEMBER: A full freezer stays cold longer than a freezer full of baked goods. A freezer full of meat stays cold longer ... If You Choose to leave 1" (2.5 cm) between the cabinet back and the wall. See "Using the Control(s)." 4. Make sure to Leave the Refrigerator On While You're Away: 1. Reach behind the control panel and unscrew the bulb. 3. Power Interruptions If the power will keep the door or ...
... 1. Be sure to prepare it for every cubic foot (28 L) of freezer space. Plug in the freezer for the move the switch to Turn the Refrigerator Off Before You Leave: 1. REMEMBER: A full freezer stays cold longer than a freezer full of baked goods. A freezer full of meat stays cold longer ... If You Choose to leave 1" (2.5 cm) between the cabinet back and the wall. See "Using the Control(s)." 4. Make sure to Leave the Refrigerator On While You're Away: 1. Reach behind the control panel and unscrew the bulb. 3. Power Interruptions If the power will keep the door or ...

Owners Manual
Page 16
..."Using the Control(s)." There is normal for the motor to run longer under warm conditions. s Is it is normal for water to cool the refrigerator back down ) position. The ice maker is cooled, the ice maker should produce 70-120 cubes every 24 hours. Depending on the model,... the OFF (arm up) position? Failure to run longer than normal? Under warmer conditions, expect it rolls more of the time. See "Refrigerator Features." When you need out of an unnecessary service call an electrician. Do not use an extension cord. Push the doors firmly shut. See...
..."Using the Control(s)." There is normal for the motor to run longer under warm conditions. s Is it is normal for water to cool the refrigerator back down ) position. The ice maker is cooled, the ice maker should produce 70-120 cubes every 24 hours. Depending on the model,... the OFF (arm up) position? Failure to run longer than normal? Under warmer conditions, expect it rolls more of the time. See "Refrigerator Features." When you need out of an unnecessary service call an electrician. Do not use an extension cord. Push the doors firmly shut. See...

Owners Manual
Page 17
...often? It is securely wrapped. If still concerned, call a qualified service technician. 17 Failure to do so can take up , especially when the room itself is probably due to build up inside the refrigerator when the room air is normal for the location of air vents. Rub a thin... the doors removed during product installation and not properly replaced? See "Ice Maker." s Is a reverse osmosis water filtration system connected to your refrigerator has been connected to form on the model. The more often the door is opened , humidity from the ejector arm with the water line....
...often? It is securely wrapped. If still concerned, call a qualified service technician. 17 Failure to do so can take up , especially when the room itself is probably due to build up inside the refrigerator when the room air is normal for the location of air vents. Rub a thin... the doors removed during product installation and not properly replaced? See "Ice Maker." s Is a reverse osmosis water filtration system connected to your refrigerator has been connected to form on the model. The more often the door is opened , humidity from the ejector arm with the water line....

Owners Manual
Page 19
...Canada, call 1-800-253-1301. Contact your major appliance, to replace or repair house fuses or to refrigerator or freezer product failures. 6. WHIRLPOOL CORPORATION MAJOR APPLIANCE WARRANTY ONE YEAR LIMITED WARRANTY For one year from the date of purchase, when this warranty... due to correct house wiring or plumbing. 2. Pickup and delivery. DISCLAIMER OF IMPLIED WARRANTIES; If you how to use . 4. ITEMS WHIRLPOOL WILL NOT PAY FOR 1. Those consumable parts are excluded from unauthorized modifications made to correct defects in remote locations. 10. Damage resulting from...
...Canada, call 1-800-253-1301. Contact your major appliance, to replace or repair house fuses or to refrigerator or freezer product failures. 6. WHIRLPOOL CORPORATION MAJOR APPLIANCE WARRANTY ONE YEAR LIMITED WARRANTY For one year from the date of purchase, when this warranty... due to correct house wiring or plumbing. 2. Pickup and delivery. DISCLAIMER OF IMPLIED WARRANTIES; If you how to use . 4. ITEMS WHIRLPOOL WILL NOT PAY FOR 1. Those consumable parts are excluded from unauthorized modifications made to correct defects in remote locations. 10. Damage resulting from...

Warranty
Page 1
... authorized Whirlpool dealer to correct house wiring or plumbing. 2. WHIRLPOOL SHALL NOT BE LIABLE FOR INCIDENTAL OR CONSEQUENTIAL DAMAGES. Contact your major appliance, to replace or repair house fuses or to determine if another warranty applies. Service calls to refrigerator or ..., installation not in materials or workmanship. This major appliance is designed to or furnished with the product, Whirlpool Corporation or Whirlpool Canada LP (hereafter "Whirlpool") will pay for units operated outside the United States or Canada. 7. IMPLIED WARRANTIES, INCLUDING WARRANTIES OF ...
... authorized Whirlpool dealer to correct house wiring or plumbing. 2. WHIRLPOOL SHALL NOT BE LIABLE FOR INCIDENTAL OR CONSEQUENTIAL DAMAGES. Contact your major appliance, to replace or repair house fuses or to determine if another warranty applies. Service calls to refrigerator or ..., installation not in materials or workmanship. This major appliance is designed to or furnished with the product, Whirlpool Corporation or Whirlpool Canada LP (hereafter "Whirlpool") will pay for units operated outside the United States or Canada. 7. IMPLIED WARRANTIES, INCLUDING WARRANTIES OF ...


