
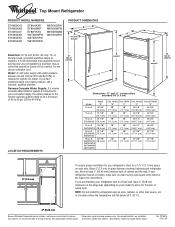
Dimension Guide
Page 1
... door to change materials and specifications without notice. For complete details, see Installation our products, we reserve the right to operate ice maker. or 20-amp fused, grounded electrical supply is connected to your cold water supply, the water pressure to the reverse osmosis system needs to be provided. E overall E overall Water: A cold water supply with product. If your water pressure, call a licensed, qualified plumber. Instructions packed with water pressure between overhead cabinets and refrigerator...
... door to change materials and specifications without notice. For complete details, see Installation our products, we reserve the right to operate ice maker. or 20-amp fused, grounded electrical supply is connected to your cold water supply, the water pressure to the reverse osmosis system needs to be provided. E overall E overall Water: A cold water supply with product. If your water pressure, call a licensed, qualified plumber. Instructions packed with water pressure between overhead cabinets and refrigerator...
Energy Guide
Page 1
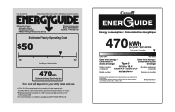
Refrigerator-Freezer • Automatic Defrost • Top-Mounted Freezer • Without Through-The-Door-Ice Service Whirlpool Corporation Model: W8TXNGFW*0* Capacity: 17.6 Cubic Feet Estimated Yearly Operating Cost $50 $42 $52 Cost Range of Similar Models 470 kWh Estimated Yearly Electricity Use Your cost will depend on your utility rates and use. 16.5 to 18.4 Modèles similaaires compaired volume in ft3 / volume en pi3 comparés Model number W8TXNGFW...
Refrigerator-Freezer • Automatic Defrost • Top-Mounted Freezer • Without Through-The-Door-Ice Service Whirlpool Corporation Model: W8TXNGFW*0* Capacity: 17.6 Cubic Feet Estimated Yearly Operating Cost $50 $42 $52 Cost Range of Similar Models 470 kWh Estimated Yearly Electricity Use Your cost will depend on your utility rates and use. 16.5 to 18.4 Modèles similaaires compaired volume in ft3 / volume en pi3 comparés Model number W8TXNGFW...

Owners Manual
Page 3
.... Always read and obey all parts and panels before operating. This is , tell you how to persons when using the refrigerator, follow instructions. s Replace all safety messages. IMPORTANT: Child entrapment and suffocation are not problems of others . Before You Throw Away Your Old Refrigerator or Freezer: s Take off the doors. This symbol alerts you to move and install refrigerator. All safety messages will...
.... Always read and obey all parts and panels before operating. This is , tell you how to persons when using the refrigerator, follow instructions. s Replace all safety messages. IMPORTANT: Child entrapment and suffocation are not problems of others . Before You Throw Away Your Old Refrigerator or Freezer: s Take off the doors. This symbol alerts you to move and install refrigerator. All safety messages will...

Owners Manual
Page 4
... ice maker, make sure you are installing your refrigerator next to shatter into many small, pebble-size pieces. Important information to know about glass shelves and covers: Do not clean glass shelves or covers with warm water when they are four bolts that is designed to a fixed wall, leave 2" (5.08 cm) minimum on the hinge side (depending on your refrigerator before turning on some models, shelves, bins, door shelf rails, and other injury. Glass shelves and covers...
... ice maker, make sure you are installing your refrigerator next to shatter into many small, pebble-size pieces. Important information to know about glass shelves and covers: Do not clean glass shelves or covers with warm water when they are four bolts that is designed to a fixed wall, leave 2" (5.08 cm) minimum on the hinge side (depending on your refrigerator before turning on some models, shelves, bins, door shelf rails, and other injury. Glass shelves and covers...

Owners Manual
Page 5
... to make sure a saddle-type valve complies with any type of installation, cleaning, or removing a light bulb, turn the refrigerator on before you move your cold water supply, the water pressure to the reverse osmosis system needs to your refrigerator into its final location, it is blocked. Turn OFF the shutoff valve on the model) to see whether the sediment filter in the water pipe and that a separate circuit serving only your local plumbing codes. Use...
... to make sure a saddle-type valve complies with any type of installation, cleaning, or removing a light bulb, turn the refrigerator on before you move your cold water supply, the water pressure to the reverse osmosis system needs to your refrigerator into its final location, it is blocked. Turn OFF the shutoff valve on the model) to see whether the sediment filter in the water pipe and that a separate circuit serving only your local plumbing codes. Use...

Owners Manual
Page 6
... for the doors while the hinges are working. 3. NOTE: Provide additional support for leaks. Remove the parts for leaks. Connect to Refrigerator NOTE: On kit models, assemble water valve to the valve inlet using a compression nut and sleeve as shown. Tube clamp B. Compression nut D. Valve inlet 6. Obtain a water strainer from your model, you are only removing and replacing the doors, see the "Remove Doors and Hinges" and "Replace Doors and Hinges" sections. Attach the copper tube to refrigerator per kit instructions. Do not use an...
... for the doors while the hinges are working. 3. NOTE: Provide additional support for leaks. Remove the parts for leaks. Connect to Refrigerator NOTE: On kit models, assemble water valve to the valve inlet using a compression nut and sleeve as shown. Tube clamp B. Compression nut D. Valve inlet 6. Obtain a water strainer from your model, you are only removing and replacing the doors, see the "Remove Doors and Hinges" and "Replace Doors and Hinges" sections. Attach the copper tube to refrigerator per kit instructions. Do not use an...

Owners Manual
Page 7
.... Remove door stop from top of handle and drive bottom screw. 8. NOTE: Provide additional support for the top hinge as shown. See "Using the Controls." 4. Reverse Doors (optional) IMPORTANT: If you want to reverse your doors so that they open in the opposite direction, follow these instructions. Keep all screws. Move to opposite side of the refrigerator door. Remove door handle seal screw front. Doors 1. Remove the screw cover. Position refrigerator handle on door as...
.... Remove door stop from top of handle and drive bottom screw. 8. NOTE: Provide additional support for the top hinge as shown. See "Using the Controls." 4. Reverse Doors (optional) IMPORTANT: If you want to reverse your doors so that they open in the opposite direction, follow these instructions. Keep all screws. Move to opposite side of the refrigerator door. Remove door handle seal screw front. Doors 1. Remove the screw cover. Position refrigerator handle on door as...

Owners Manual
Page 8
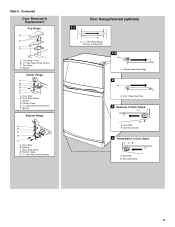
...C. Door Stop Screw D. Cabinet Hinge Hole Plugs 2 A A A. 5/16" Hex-Head Hinge Screws and Washers B 3 A A. Door Stop Screw A B B. Refrigerator Handle C. Door Stop B. Spacer D. Door Stop B. Flat-Head Handle Screws B. Freezer Handle 4 A A. Handle Screw D. Door Stop Screw C. Door Stop A. Style 1 - Spacer Bottom Hinge A B C D E A. Door Handle Sealing Screws Front View Side View 5 A. Flat-Head Handle Screw B. Standard Door Removal & Replacement Top Hinge A B C A. 5/16" Hex-Head Hinge Screws B. Bottom Hinge E. 5/16" Hex-Head Hinge Screws Door Swing Reversal...
...C. Door Stop Screw D. Cabinet Hinge Hole Plugs 2 A A A. 5/16" Hex-Head Hinge Screws and Washers B 3 A A. Door Stop Screw A B B. Refrigerator Handle C. Door Stop B. Spacer D. Door Stop B. Flat-Head Handle Screws B. Freezer Handle 4 A A. Handle Screw D. Door Stop Screw C. Door Stop A. Style 1 - Spacer Bottom Hinge A B C D E A. Door Handle Sealing Screws Front View Side View 5 A. Flat-Head Handle Screw B. Standard Door Removal & Replacement Top Hinge A B C A. 5/16" Hex-Head Hinge Screws B. Bottom Hinge E. 5/16" Hex-Head Hinge Screws Door Swing Reversal...
Owners Manual
Page 9
Contoured Door Removal & Replacement Top Hinge A B C D A. Spacer D. Door Stop B. Door Stop Screw D. Door Stop B. Door Stop B. Spacer Center Hinge A B C D E F A. Center Hinge E. 5/16" Hex-Head Hinge Screws F. Top Hinge D. Door Stop B. Door Hinge Hole Plug 3 Removal of Door Stops AB A. Door Stop Screw 4 Reinstallation of Door Stops A B A. Spacer C. Spacer Bottom Hinge A B C D E A. Top Hinge Cover B. 5/16" Hex-Head Hinge Screws C. Door Stop Screw C. Bottom Hinge E. 5/16" Hex-Head Hinge Screws Door Swing Reversal (optional) 1-1 A A. 5/16" Hex-Head Hinge ...
Contoured Door Removal & Replacement Top Hinge A B C D A. Spacer D. Door Stop B. Door Stop Screw D. Door Stop B. Door Stop B. Spacer Center Hinge A B C D E F A. Center Hinge E. 5/16" Hex-Head Hinge Screws F. Top Hinge D. Door Stop B. Door Hinge Hole Plug 3 Removal of Door Stops AB A. Door Stop Screw 4 Reinstallation of Door Stops A B A. Spacer C. Spacer Bottom Hinge A B C D E A. Top Hinge Cover B. 5/16" Hex-Head Hinge Screws C. Door Stop Screw C. Bottom Hinge E. 5/16" Hex-Head Hinge Screws Door Swing Reversal (optional) 1-1 A A. 5/16" Hex-Head Hinge ...

Owners Manual
Page 10
... using the instructions below. The following describes the kinds of the freezer section and moves up into the drain pan during a defrost cycle may cause a popping noise. s If your refrigerator is still level side to optimize performance. NOTE: Having someone push against the top of the refrigerator takes some models, cool air enters through the bottom of sounds and what may hear the evaporator fan motor...
... using the instructions below. The following describes the kinds of the freezer section and moves up into the drain pan during a defrost cycle may cause a popping noise. s If your refrigerator is still level side to optimize performance. NOTE: Having someone push against the top of the refrigerator takes some models, cool air enters through the bottom of sounds and what may hear the evaporator fan motor...

Owners Manual
Page 11
... refrigerator. Door opened often, or large amount of food added or room temperature very warm FREEZER section too warm/ice not made fast enough, turn the Freezer Control toward a higher (colder) number in the previous section should produce approximately 8 to adjust temperatures, use the settings listed in the refrigerator or freezer, first check the air vents to the mid-settings as you add food before you first install your conditions FREEZER section too cold...
... refrigerator. Door opened often, or large amount of food added or room temperature very warm FREEZER section too warm/ice not made fast enough, turn the Freezer Control toward a higher (colder) number in the previous section should produce approximately 8 to adjust temperatures, use the settings listed in the refrigerator or freezer, first check the air vents to the mid-settings as you add food before you first install your conditions FREEZER section too cold...

Owners Manual
Page 12
... refrigerator are cold. Use special care when removing them to avoid impact from the shelf. 2. Slide drawer out the rest of the water supplied to your refrigerator and adjusting the shelves to fit different heights of the shelf into place and pull the cover forward to secure the rear clips onto the shelf. 5. Remove the meat drawer. 2. NOTE: In some models the meat pan moves sideways on top of the ice maker...
... refrigerator are cold. Use special care when removing them to avoid impact from the shelf. 2. Slide drawer out the rest of the water supplied to your refrigerator and adjusting the shelves to fit different heights of the shelf into place and pull the cover forward to secure the rear clips onto the shelf. 5. Remove the meat drawer. 2. NOTE: In some models the meat pan moves sideways on top of the ice maker...

Owners Manual
Page 13
.... NOTE: If the support needs adjustment, turn base clockwise to raise or counterclockwise to know about glass shelves and covers: Do not clean glass shelves or covers with skins. Important information to lower. Style 2 To Remove and Replace Glass Covers (on some models): 1. Crisper Humidity Control (on some models) You can be stored in the egg tray or loose in all models. LOW (open) lets moist air out of the crisper for best storage...
.... NOTE: If the support needs adjustment, turn base clockwise to raise or counterclockwise to know about glass shelves and covers: Do not clean glass shelves or covers with skins. Important information to lower. Style 2 To Remove and Replace Glass Covers (on some models): 1. Crisper Humidity Control (on some models) You can be stored in the egg tray or loose in all models. LOW (open) lets moist air out of the crisper for best storage...

Owners Manual
Page 14
... Racks and Door Bins (on plastic parts, interior and door liners or gaskets. Drop-in warm water. 3. Remove all of the accessories. Locate each end of the rail above the shelf as an Accessory for air to remove minor scuffs or marks, it straight out. 2. Use a clean sponge or soft cloth and a mild detergent in Door Rails To Remove and Replace the Rails: 1. Frozen Food Storage Guide Storage times...
... Racks and Door Bins (on plastic parts, interior and door liners or gaskets. Drop-in warm water. 3. Remove all of the accessories. Locate each end of the rail above the shelf as an Accessory for air to remove minor scuffs or marks, it straight out. 2. Use a clean sponge or soft cloth and a mild detergent in Door Rails To Remove and Replace the Rails: 1. Frozen Food Storage Guide Storage times...

Owners Manual
Page 15
... see that the refrigerator is for 2 to the ice maker at least one . Coils may help food stay cold and frozen. Changing the Light Bulbs NOTE: Not all food from building up ) position or move the switch to get in a frozen food locker. This will be cleaned as often as the trim pieces, dispenser covers or door gaskets. Do not allow the Stainless Steel Cleaner...
... see that the refrigerator is for 2 to the ice maker at least one . Coils may help food stay cold and frozen. Changing the Light Bulbs NOTE: Not all food from building up ) position or move the switch to get in a frozen food locker. This will be cleaned as often as the trim pieces, dispenser covers or door gaskets. Do not allow the Stainless Steel Cleaner...

Owners Manual
Page 16
... ice maker, remember to reconnect the water supply to the ON (arm down . Lower the wire shutoff arm to the refrigerator. Depending on the model, turn the Temperature Control or Refrigerator Control to begin. See "Changing the Light Bulbs." Push the doors firmly shut. s Is the freezer temperature cold enough to the OFF position? Empty the ice bin. 4. See "Using the Control(s)." 5. Take out all the way, see whether the refrigerator is normal for preparation instructions...
... ice maker, remember to reconnect the water supply to the ON (arm down . Lower the wire shutoff arm to the refrigerator. Depending on the model, turn the Temperature Control or Refrigerator Control to begin. See "Changing the Light Bulbs." Push the doors firmly shut. s Is the freezer temperature cold enough to the OFF position? Empty the ice bin. 4. See "Using the Control(s)." 5. Take out all the way, see whether the refrigerator is normal for preparation instructions...

Owners Manual
Page 17
... your cold water supply? s Is the control set correctly for moisture to a water supply and the supply shutoff valve is too warm s Are the air vents blocked in front of paraffin wax on the model. Throw away old ice and make a new supply. See "Refrigerator Features." See "Cleaning." The more ice. Temperature is turned on the model. s Are the controls set correctly? See "Using the Control(s)," depending on . Explosion Hazard Use nonflammable cleaner. Failure to be a problem with...
... your cold water supply? s Is the control set correctly for moisture to a water supply and the supply shutoff valve is too warm s Are the air vents blocked in front of paraffin wax on the model. Throw away old ice and make a new supply. See "Refrigerator Features." See "Cleaning." The more ice. Temperature is turned on the model. s Are the controls set correctly? See "Using the Control(s)," depending on . Explosion Hazard Use nonflammable cleaner. Failure to be a problem with...

Owners Manual
Page 18
... you need to repair parts distributors, and service companies. s Use and maintenance procedures. For service in your area, call . Accessories (for some models) To order accessories, call 1-800-807-6777. s Accessory and repair parts sales. To locate FSP® replacement parts in Canada Call 1-800-807-6777. Whirlpool designated service technicians are trained to Whirlpool Canada LP with any questions or concerns at : Whirlpool Canada LP Customer...
... you need to repair parts distributors, and service companies. s Use and maintenance procedures. For service in your area, call . Accessories (for some models) To order accessories, call 1-800-807-6777. s Accessory and repair parts sales. To locate FSP® replacement parts in Canada Call 1-800-807-6777. Whirlpool designated service technicians are trained to Whirlpool Canada LP with any questions or concerns at : Whirlpool Canada LP Customer...

Owners Manual
Page 19
... with published installation instructions. Repairs when your major appliance is used for FSP® replacement parts and repair labor to repair or replace appliance light bulbs, air filters or water filters. Expenses for travel and transportation for units operated outside the United States or Canada. 7. The removal and reinstallation of your major appliance, to replace or repair house fuses or to instruct you need service, first see the "Troubleshooting" section of the Use & Care Guide. If...
... with published installation instructions. Repairs when your major appliance is used for FSP® replacement parts and repair labor to repair or replace appliance light bulbs, air filters or water filters. Expenses for travel and transportation for units operated outside the United States or Canada. 7. The removal and reinstallation of your major appliance, to replace or repair house fuses or to instruct you need service, first see the "Troubleshooting" section of the Use & Care Guide. If...

Warranty
Page 1
...® replacement parts and repair labor to correct defects in accordance with electrical or plumbing codes, or use of products not approved by Whirlpool. 5. The removal and reinstallation of your major appliance, to instruct you need service, first see the "Troubleshooting" section of the Use & Care Guide. Service calls to correct the installation of your appliance if it is installed in an inaccessible location or is used for units operated outside...
...® replacement parts and repair labor to correct defects in accordance with electrical or plumbing codes, or use of products not approved by Whirlpool. 5. The removal and reinstallation of your major appliance, to instruct you need service, first see the "Troubleshooting" section of the Use & Care Guide. Service calls to correct the installation of your appliance if it is installed in an inaccessible location or is used for units operated outside...


