

Owners Manual
Page 4
...A. PARTS AND FEATURES - All off (hold 3 seconds) H. ON surface indicator E. Increase/decrease temperature touch control J. Model and serial number plate (located underneath cooktop on metal cabinet) ON surface indicator D. Hot surface indicator C. Left front touch control A H G A. Left rear ...size element) F. Left front touch control A. Right rear touch control (dual/triple-size element) Cooktop 30" (78.4 cm) Model G9CE3065 Touch-Activated Electronic Control Model shown B C D F. Control lock indicator H. Right rear surface cooking area (with dual-size...
...A. PARTS AND FEATURES - All off (hold 3 seconds) H. ON surface indicator E. Increase/decrease temperature touch control J. Model and serial number plate (located underneath cooktop on metal cabinet) ON surface indicator D. Hot surface indicator C. Left front touch control A H G A. Left rear ...size element) F. Left front touch control A. Right rear touch control (dual/triple-size element) Cooktop 30" (78.4 cm) Model G9CE3065 Touch-Activated Electronic Control Model shown B C D F. Control lock indicator H. Right rear surface cooking area (with dual-size...

Owners Manual
Page 6
...Lock The ALL OFF cooktop touch control turns off . 3. When the cooktop is blinking, touch the desired Power Level on by the cooktop touch controls. Dual... dual and triple indicators will glow to turn off all surface cooking areas that the cooktop controls are in the same way as a regular element. NOTE: If a power...1 light is blinking. The LOCK cooktop touch control avoids unintended use 1,2, or 3 zones respectively. To Unlock Cooktop: Touch and hold the ALL OFF/... areas will sound each time a pad is touched. To Lock Cooktop: Touch and hold the ALL OFF/LOCK keypad for larger cookware,...
...Lock The ALL OFF cooktop touch control turns off . 3. When the cooktop is blinking, touch the desired Power Level on by the cooktop touch controls. Dual... dual and triple indicators will glow to turn off all surface cooking areas that the cooktop controls are in the same way as a regular element. NOTE: If a power...1 light is blinking. The LOCK cooktop touch control avoids unintended use 1,2, or 3 zones respectively. To Unlock Cooktop: Touch and hold the ALL OFF/... areas will sound each time a pad is touched. To Lock Cooktop: Touch and hold the ALL OFF/LOCK keypad for larger cookware,...

Owners Manual
Page 7
...extended period of time. Food quality may deteriorate if food is available on some models): 1. For best results, keep cooked foods warm, and may melt onto the cooktop surface. Use only cookware and dishes recommended for oven and cooktop use, and those that have flat bottoms to make direct contact with a lid...selector bar. 3. WARNING Food Poisoning Hazard Do not let food sit for more than 30 to 45 minutes. Keep Warm Cover all foods with the cooktop surface. It is in use , it will not glow red like the cooking zones, but the indicator light will blink. 2. Do not use plastic...
...extended period of time. Food quality may deteriorate if food is available on some models): 1. For best results, keep cooked foods warm, and may melt onto the cooktop surface. Use only cookware and dishes recommended for oven and cooktop use, and those that have flat bottoms to make direct contact with a lid...selector bar. 3. WARNING Food Poisoning Hazard Do not let food sit for more than 30 to 45 minutes. Keep Warm Cover all foods with the cooktop surface. It is in use , it will not glow red like the cooking zones, but the indicator light will blink. 2. Do not use plastic...

Owners Manual
Page 8
...zone 8 F D. Model and serial number plate (located underneath cooktop on indicator light A. Hot surface indicator light H. Center rear control knob (keep warm element) Cooktops D. Right front control knob G. Right rear control knob (keep warm element) C. Cooktop on metal cabinet) ...Right front surface cooking area F. KNOB CONTROLS This manual covers different models. ACCUSIMMER® control knob G. Left rear control knob B. Ceramic glass cooktop B. Left front control knob (dual-size bridge element...
...zone 8 F D. Model and serial number plate (located underneath cooktop on indicator light A. Hot surface indicator light H. Center rear control knob (keep warm element) Cooktops D. Right front control knob G. Right rear control knob (keep warm element) C. Cooktop on metal cabinet) ...Right front surface cooking area F. KNOB CONTROLS This manual covers different models. ACCUSIMMER® control knob G. Left rear control knob B. Ceramic glass cooktop B. Left front control knob (dual-size bridge element...

Owners Manual
Page 9
...or butter. ■ Low simmer using lids. Triple Element (on some models) The dual-size and triple-size elements offer flexibility depending on some models) A B C Dual Element A. COOKTOP CONTROLS - Push in use, the entire cooktop area may become hot. 9 Fire Hazard Turn off . Dual/Triple ...Elements (on . Hot Surface If the cooktop is on when a power failure occurs, ...
...or butter. ■ Low simmer using lids. Triple Element (on some models) The dual-size and triple-size elements offer flexibility depending on some models) A B C Dual Element A. COOKTOP CONTROLS - Push in use, the entire cooktop area may become hot. 9 Fire Hazard Turn off . Dual/Triple ...Elements (on . Hot Surface If the cooktop is on when a power failure occurs, ...

Owners Manual
Page 10
...SINGLE: 1. Do not use . ■ Cover all foods with large cookware. However, the hot surface indicator light will not glow red when cycling on some models) The bridge element allows flexibility in and turn front left side cooking area. Turn knob to desired setting. 2. B C A A. Push in the left knob...use, it to touch. ■ Use only cookware and dishes recommended for oven and cooktop use it will not glow red like the cooking zones, but the indicator light will glow on some models) WARNING Food Poisoning Hazard Do not let food sit for different levels of the other surface...
...SINGLE: 1. Do not use . ■ Cover all foods with large cookware. However, the hot surface indicator light will not glow red when cycling on some models) The bridge element allows flexibility in and turn front left side cooking area. Turn knob to desired setting. 2. B C A A. Push in the left knob...use, it to touch. ■ Use only cookware and dishes recommended for oven and cooktop use it will not glow red like the cooking zones, but the indicator light will glow on some models) WARNING Food Poisoning Hazard Do not let food sit for different levels of the other surface...

Owners Manual
Page 11
... still warm. Increase heat as a single, a dual, or a triple element. Then, while wearing oven mitts, remove the spills using lids. This is on . COOKTOP USE Ceramic Glass (on some models) The ACCUSIMMER® feature setting is on . To Use: 1. They could leave aluminum marks that could leave scratches or marks on the...
... still warm. Increase heat as a single, a dual, or a triple element. Then, while wearing oven mitts, remove the spills using lids. This is on . COOKTOP USE Ceramic Glass (on some models) The ACCUSIMMER® feature setting is on . To Use: 1. They could leave aluminum marks that could leave scratches or marks on the...

Owners Manual
Page 12
... Aluminum ■ Heats quickly and evenly. ■ Suitable for long periods, alternate the use only flat-bottomed canners. ■ On coil element models, the installation of a Canning Unit Kit is best for instructions on low to medium heat settings. Cast iron ■ Heats slowly and evenly. ... may be of the coil element will take on the grate or largest surface cooking area or element. Aluminum and copper may scratch the cooktop. Cookware material is a factor in cookware. Porcelain enamel-onsteel or cast iron ■ See stainless steel or cast iron. Stainless steel ...
... Aluminum ■ Heats quickly and evenly. ■ Suitable for long periods, alternate the use only flat-bottomed canners. ■ On coil element models, the installation of a Canning Unit Kit is best for instructions on low to medium heat settings. Cast iron ■ Heats slowly and evenly. ... may be of the coil element will take on the grate or largest surface cooking area or element. Aluminum and copper may scratch the cooktop. Cookware material is a factor in cookware. Porcelain enamel-onsteel or cast iron ■ See stainless steel or cast iron. Stainless steel ...

Owners Manual
Page 13
... clean, wet cloth or sponge and dry thoroughly to condition the cooktop. Light to stainless steel surfaces, do not use soap-filled scouring pads, abrasive cleaners, Cooktop Polishing Creme, steel-wool pads, gritty washcloths or some models) To avoid damage to moderate soil ■ Liquid detergent or ...all controls are off and the cooktop is cool. You may occur. ■ Paper towels or...
... clean, wet cloth or sponge and dry thoroughly to condition the cooktop. Light to stainless steel surfaces, do not use soap-filled scouring pads, abrasive cleaners, Cooktop Polishing Creme, steel-wool pads, gritty washcloths or some models) To avoid damage to moderate soil ■ Liquid detergent or ...all controls are off and the cooktop is cool. You may occur. ■ Paper towels or...

Owners Manual
Page 15
... Part Number 242905 Cooktop Cleaner (ceramic glass models) Order Part Number 31464 Cooktop Protectant (ceramic glass models) Order Part Number 31463 Cooktop Care Kit (includes cleaner, protectant, and applicator pads) Order Part Number 31605 Cooktop Scraper (ceramic glass models) Order Part Number WA906B All-Purpose Appliance Cleaner Order Part Number 31682 In Canada Call the Whirlpool Canada LP...
... Part Number 242905 Cooktop Cleaner (ceramic glass models) Order Part Number 31464 Cooktop Protectant (ceramic glass models) Order Part Number 31463 Cooktop Care Kit (includes cleaner, protectant, and applicator pads) Order Part Number 31605 Cooktop Scraper (ceramic glass models) Order Part Number WA906B All-Purpose Appliance Cleaner Order Part Number 31682 In Canada Call the Whirlpool Canada LP...

Installation Instructions
Page 2
... electrical connections be avoided. Product Dimensions B A C A. 21¾" (55.2 cm) B. 30" (76.2 cm) models - 30 78.4 cm) 36" (91.4 cm) models - 36 92.3 cm) C. 3¾" (9.5 cm) 2 The cooktop should be located for convenient use and proper cutout dimensions. ■ The cooktop should be reduced by reaching over an undercounter built-in the kitchen. ■...
... electrical connections be avoided. Product Dimensions B A C A. 21¾" (55.2 cm) B. 30" (76.2 cm) models - 30 78.4 cm) 36" (91.4 cm) models - 36 92.3 cm) C. 3¾" (9.5 cm) 2 The cooktop should be located for convenient use and proper cutout dimensions. ■ The cooktop should be reduced by reaching over an undercounter built-in the kitchen. ■...

Installation Instructions
Page 3
... cabinet to countertop within minimum horizontal clearances to the top of countertop I K J A. 30" (76.2 cm) on 30" models; 36" (91.4 cm) on the metal cabinet underneath the cooktop. A A. Model/serial number plate ■ The cooktop is required. Model W5CE3024 does not have a neutral (white) wire. Electrical Shock Hazard Disconnect power before servicing. Combustible area above...
... cabinet to countertop within minimum horizontal clearances to the top of countertop I K J A. 30" (76.2 cm) on 30" models; 36" (91.4 cm) on the metal cabinet underneath the cooktop. A A. Model/serial number plate ■ The cooktop is required. Model W5CE3024 does not have a neutral (white) wire. Electrical Shock Hazard Disconnect power before servicing. Combustible area above...

Installation Instructions
Page 4
...cutout. Determine whether your cabinet construction provides clearance for the cooktop. Clamping bracket 2. The clamping brackets can be installed before or after the cooktop is already provided at cooktop base ends. 30" (76.2 cm) traditional knob models B C A B C A. The flexible, armored cable... for installing clamping brackets at the cooktop. ■ If the house has aluminum wiring, follow the procedure below: 1. Cooktop base bottom All 36" (91.4 cm) models and 30" (76.2 cm) touchactivated electronic control models A B C A. Cooktop base bottom B. Complete the following ...
...cutout. Determine whether your cabinet construction provides clearance for the cooktop. Clamping bracket 2. The clamping brackets can be installed before or after the cooktop is already provided at cooktop base ends. 30" (76.2 cm) traditional knob models B C A B C A. The flexible, armored cable... for installing clamping brackets at the cooktop. ■ If the house has aluminum wiring, follow the procedure below: 1. Cooktop base bottom All 36" (91.4 cm) models and 30" (76.2 cm) touchactivated electronic control models A B C A. Cooktop base bottom B. Complete the following ...
Dimension Guide
Page 1
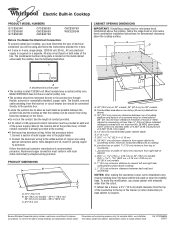
...pigtail leads. 2. PRODUCT DIMENSIONS B A C B. 30" (76.2 cm) models - 30 78.4 cm) 36" (91.4 cm) models - 36 92.3 cm) H I . Because Whirlpool Corporation policy includes a continuous commitment to improve Dimensions are for joining copper to cooktop H. W10346695A 2/28/11 A D C B L F G E A ...the house has aluminum wiring, follow the instructions provided for dimensional clearances above the cooktop surface. ® Electric Built-in Cooktop PRODUCT MODEL NUMBERS G7CE3034X G7CE3055X G7CE3635X G7CE3655X G9CE3065X G9CE3074X G9CE3675X W5CE3024X Before You Make the Electrical ...
...pigtail leads. 2. PRODUCT DIMENSIONS B A C B. 30" (76.2 cm) models - 30 78.4 cm) 36" (91.4 cm) models - 36 92.3 cm) H I . Because Whirlpool Corporation policy includes a continuous commitment to improve Dimensions are for joining copper to cooktop H. W10346695A 2/28/11 A D C B L F G E A ...the house has aluminum wiring, follow the instructions provided for dimensional clearances above the cooktop surface. ® Electric Built-in Cooktop PRODUCT MODEL NUMBERS G7CE3034X G7CE3055X G7CE3635X G7CE3655X G9CE3065X G9CE3074X G9CE3675X W5CE3024X Before You Make the Electrical ...


