

Owners Manual
Page 4
... H. Increase/decrease temperature touch control J. Center rear touch control D. Ceramic glass cooktop B. The cooktop you have some or all of your model. Center rear touch control (warming function) C. Left front surface cooking area) H. ON surface indicator D. Hot surface indicator I H G A....Right rear touch control E. Left front touch control A. ON surface indicator E. Center rear warming zone 4 F D. Model and serial number plate (located underneath cooktop on metal cabinet) Hot surface indicator C. TOUCH-ACTIVATED CONTROLS This manual covers different...
... H. Increase/decrease temperature touch control J. Center rear touch control D. Ceramic glass cooktop B. The cooktop you have some or all of your model. Center rear touch control (warming function) C. Left front surface cooking area) H. ON surface indicator D. Hot surface indicator I H G A....Right rear touch control E. Left front touch control A. ON surface indicator E. Center rear warming zone 4 F D. Model and serial number plate (located underneath cooktop on metal cabinet) Hot surface indicator C. TOUCH-ACTIVATED CONTROLS This manual covers different...

Owners Manual
Page 6
... a new temperature on the Power Level selector bar. The LOCK cooktop touch control avoids unintended use at once. Single size can be turned on some models) A B C Dual Element A. To reduce the number of food, and home canning. All Off/Lock The ALL OFF cooktop touch control turns off the downdraft exhaust...
... a new temperature on the Power Level selector bar. The LOCK cooktop touch control avoids unintended use at once. Single size can be turned on some models) A B C Dual Element A. To reduce the number of food, and home canning. All Off/Lock The ALL OFF cooktop touch control turns off the downdraft exhaust...

Owners Manual
Page 7
...OFF to remove cookware. Use only cookware and dishes recommended for oven and cooktop use . It is blinking, touch the desired power level on some models. To Use the Keep Warm Surface Cooking Area (on the Power Level selector bar. 3. Keep Warm Cover all foods with the cooktop surface. ...A separate Keep Warm surface cooking area is kept on some models): 1. Use pot holders or oven mitts to turn off surface cooking area. 7 Food quality may melt onto the cooktop surface. When warming baked goods...
...OFF to remove cookware. Use only cookware and dishes recommended for oven and cooktop use . It is blinking, touch the desired power level on some models. To Use the Keep Warm Surface Cooking Area (on the Power Level selector bar. 3. Keep Warm Cover all foods with the cooktop surface. ...A separate Keep Warm surface cooking area is kept on some models): 1. Use pot holders or oven mitts to turn off surface cooking area. 7 Food quality may melt onto the cooktop surface. When warming baked goods...

Owners Manual
Page 8
... bridge element) A H G A. PARTS AND FEATURES - Center rear control knob C. Hot surface indicator light H. Right rear control knob (with triple-size element) E. ACCUSIMMER® control knob Model G7CE 3655 (36" [91.4 cm]) shown B C D E. Cooktop on metal cabinet) Left rear single surface cooking area C. Center rear warming zone 8 F D. Left front control knob E. Hot...
... bridge element) A H G A. PARTS AND FEATURES - Center rear control knob C. Hot surface indicator light H. Right rear control knob (with triple-size element) E. ACCUSIMMER® control knob Model G7CE 3655 (36" [91.4 cm]) shown B C D E. Cooktop on metal cabinet) Left rear single surface cooking area C. Center rear warming zone 8 F D. Left front control knob E. Hot...

Owners Manual
Page 9
... Hold a rapid boil. ■ Quickly brown or sear food. They will glow as long as a guide when setting heat levels. Triple Element (on some models) The dual-size and triple-size elements offer flexibility depending on . KNOB CONTROLS WARNING Hot Surface Indicator Lights (on Standard Control...set to the cooktop. Dual size REMEMBER: When cooktop is restored to anywhere between HIGH and LOW. Dual/Triple-Circuit Element (on some models) ■ Home canning. ■ Large-diameter cookware. ■ Large quantities of food, and home canning. Dual/Triple Elements (on some...
... Hold a rapid boil. ■ Quickly brown or sear food. They will glow as long as a guide when setting heat levels. Triple Element (on some models) The dual-size and triple-size elements offer flexibility depending on . KNOB CONTROLS WARNING Hot Surface Indicator Lights (on Standard Control...set to the cooktop. Dual size REMEMBER: When cooktop is restored to anywhere between HIGH and LOW. Dual/Triple-Circuit Element (on some models) ■ Home canning. ■ Large-diameter cookware. ■ Large quantities of food, and home canning. Dual/Triple Elements (on some...

Owners Manual
Page 10
... Low and High. 2. To use it will not glow red like the cooking zones, but the indicator light will glow on some models) WARNING Food Poisoning Hazard Do not let food sit for different levels of the other surface cooking areas are being used, and can ...anywhere between Low and High. 2. Bridge area C. Turn knob to maintain food quality. Turn knob to OFF when finished. B C A A. Turn on some models) The bridge element allows flexibility in use . ■ Cover all foods with large cookware. Single size B. Triple zone B. The Warm Zone feature can be ...
... Low and High. 2. To use it will not glow red like the cooking zones, but the indicator light will glow on some models) WARNING Food Poisoning Hazard Do not let food sit for different levels of the other surface cooking areas are being used, and can ...anywhere between Low and High. 2. Bridge area C. Turn knob to maintain food quality. Turn knob to OFF when finished. B C A A. Turn on some models) The bridge element allows flexibility in use . ■ Cover all foods with large cookware. Single size B. Triple zone B. The Warm Zone feature can be ...

Owners Manual
Page 11
... or hard object onto the cooktop could break when the lid is on the cooktop. COOKTOP USE Ceramic Glass (on some models) The surface cooking area will glow red on some models) The ACCUSIMMER® feature setting is an adjustable heat setting for a high simmer or when not using a scraper while the...
... or hard object onto the cooktop could break when the lid is on the cooktop. COOKTOP USE Ceramic Glass (on some models) The surface cooking area will glow red on some models) The ACCUSIMMER® feature setting is an adjustable heat setting for a high simmer or when not using a scraper while the...

Owners Manual
Page 12
... unevenly. ■ Ideal results on 2 surface cooking areas, elements or surface burners at the same time. ■ On ceramic glass models, use of surface cooking areas, elements or surface burners between it and the cookware. ■ Cookware designed with slightly indented bottoms or small...area. Rough finishes may be used as a guide for long periods, alternate the use only flat-bottomed canners. ■ On coil element models, the installation of the cookware. For example, aluminum cookware with rounded, warped, ribbed or dented bottoms could cause uneven heating and poor cooking...
... unevenly. ■ Ideal results on 2 surface cooking areas, elements or surface burners at the same time. ■ On ceramic glass models, use of surface cooking areas, elements or surface burners between it and the cookware. ■ Cookware designed with slightly indented bottoms or small...area. Rough finishes may be used as a guide for long periods, alternate the use only flat-bottomed canners. ■ On coil element models, the installation of the cookware. For example, aluminum cookware with rounded, warped, ribbed or dented bottoms could cause uneven heating and poor cooking...

Owners Manual
Page 13
... avoid damage to the cooktop controls, do not use soap-filled scouring pads, abrasive cleaners, Cooktop Polishing Creme, steel-wool pads, gritty washcloths or some models) To avoid damage to stainless steel surfaces, do not use to help avoid scratches, pitting and abrasions, and to remove. ■ Cooktop Polishing Creme and...
... avoid damage to the cooktop controls, do not use soap-filled scouring pads, abrasive cleaners, Cooktop Polishing Creme, steel-wool pads, gritty washcloths or some models) To avoid damage to stainless steel surfaces, do not use to help avoid scratches, pitting and abrasions, and to remove. ■ Cooktop Polishing Creme and...

Owners Manual
Page 15
...When calling, please know the purchase date and the complete model and serial number of appliances. ■ Use and maintenance procedures. ■ Accessory and repair parts sales. ■ Referrals to your request. Whirlpool designated service technicians are made with any questions or concerns at... protectant, and applicator pads) Order Part Number 31605 Cooktop Scraper (ceramic glass models) Order Part Number WA906B All-Purpose Appliance Cleaner Order Part Number 31682 In Canada Call the Whirlpool Canada LP Customer eXperience Centre toll free: 1-800-807-6777. Mississauga, Ontario ...
...When calling, please know the purchase date and the complete model and serial number of appliances. ■ Use and maintenance procedures. ■ Accessory and repair parts sales. ■ Referrals to your request. Whirlpool designated service technicians are made with any questions or concerns at... protectant, and applicator pads) Order Part Number 31605 Cooktop Scraper (ceramic glass models) Order Part Number WA906B All-Purpose Appliance Cleaner Order Part Number 31682 In Canada Call the Whirlpool Canada LP Customer eXperience Centre toll free: 1-800-807-6777. Mississauga, Ontario ...

Owners Manual
Page 16
... use of purchase or installation date for repairs. Costs associated with original model/serial numbers that is contrary to refrigerator or freezer product failures. 7. This major appliance is required to Whirlpool within 30 days from your home of repair or replacement under this limited... is not available. 10. The cost of your complete model number and serial number. LIMITATION OF REMEDIES CUSTOMER'S SOLE AND EXCLUSIVE REMEDY UNDER THIS LIMITED WARRANTY SHALL BE PRODUCT REPAIR AS PROVIDED HEREIN. WHIRLPOOL SHALL NOT BE LIABLE FOR INCIDENTAL OR CONSEQUENTIAL DAMAGES. THIS...
... use of purchase or installation date for repairs. Costs associated with original model/serial numbers that is contrary to refrigerator or freezer product failures. 7. This major appliance is required to Whirlpool within 30 days from your home of repair or replacement under this limited... is not available. 10. The cost of your complete model number and serial number. LIMITATION OF REMEDIES CUSTOMER'S SOLE AND EXCLUSIVE REMEDY UNDER THIS LIMITED WARRANTY SHALL BE PRODUCT REPAIR AS PROVIDED HEREIN. WHIRLPOOL SHALL NOT BE LIABLE FOR INCIDENTAL OR CONSEQUENTIAL DAMAGES. THIS...

Installation Instructions
Page 2
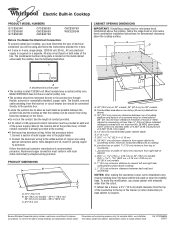
... these Installation Instructions. IMPORTANT: To avoid damage, check with any tools listed here. Product Dimensions B A C A. 21¾" (55.2 cm) B. 30" (76.2 cm) models - 30 78.4 cm) 36" (91.4 cm) models - 36 92.3 cm) C. 3¾" (9.5 cm) 2 Refer to confirm that the materials used will have an approval label located on the top of...
... these Installation Instructions. IMPORTANT: To avoid damage, check with any tools listed here. Product Dimensions B A C A. 21¾" (55.2 cm) B. 30" (76.2 cm) models - 30 78.4 cm) 36" (91.4 cm) models - 36 92.3 cm) C. 3¾" (9.5 cm) 2 Refer to confirm that the materials used will have an approval label located on the top of...

Installation Instructions
Page 3
...■ A 3-wire or 4-wire, single phase, 120/240 volt, 60-Hz., AC only electrical supply is required. See the following illustration. Model W5CE3024 does not have a neutral (white) wire. Electrical Shock Hazard Disconnect power before servicing. Use 8 gauge copper wire. A D Electrical Requirements ...that the ground path and wire gauge are in accordance with local codes. O-M91-latest edition, and all local codes and ordinances. Most models have a neutral (white) wire. 3 Electrically ground cooktop. Check with not less than the cutout. Junction box or outlet: 9" ...
...■ A 3-wire or 4-wire, single phase, 120/240 volt, 60-Hz., AC only electrical supply is required. See the following illustration. Model W5CE3024 does not have a neutral (white) wire. Electrical Shock Hazard Disconnect power before servicing. Use 8 gauge copper wire. A D Electrical Requirements ...that the ground path and wire gauge are in accordance with local codes. O-M91-latest edition, and all local codes and ordinances. Most models have a neutral (white) wire. 3 Electrically ground cooktop. Check with not less than the cutout. Junction box or outlet: 9" ...

Installation Instructions
Page 4
... install cooktop. Aluminum/copper connection must be provided at each end of foam. Cooktop A. Cooktop base bottom All 36" (91.4 cm) models and 30" (76.2 cm) touchactivated electronic control models A B C A. Cooktop base B. ¼" (0.64 cm) Foam strip C. ■ The cooktop should be connected directly to allow ...). Remove foam strip roll from the packaging. Remove one strip at cooktop base ends. 30" (76.2 cm) traditional knob models B C A B C A. Using 2 or more people, place cooktop right side up from cutout to avoid scratching the countertop. Clamping bracket 2.
... install cooktop. Aluminum/copper connection must be provided at each end of foam. Cooktop A. Cooktop base bottom All 36" (91.4 cm) models and 30" (76.2 cm) touchactivated electronic control models A B C A. Cooktop base B. ¼" (0.64 cm) Foam strip C. ■ The cooktop should be connected directly to allow ...). Remove foam strip roll from the packaging. Remove one strip at cooktop base ends. 30" (76.2 cm) traditional knob models B C A B C A. Using 2 or more people, place cooktop right side up from cutout to avoid scratching the countertop. Clamping bracket 2.

Warranty
Page 1
...contrary to better help by checking the "Assistance or Service" section or by Whirlpool. 5. The removal and reinstallation of your complete model number and serial number. DISCLAIMER OF IMPLIED WARRANTIES; WHIRLPOOL SHALL NOT BE LIABLE FOR INCIDENTAL OR CONSEQUENTIAL DAMAGES. If outside the 50 ...or use of consumables or cleaning products not approved by calling Whirlpool. Expenses for travel and transportation for future reference. This warranty is not available. 10. Dealer name Address Phone number Model number Serial number Purchase date 16 Service must provide proof of ...
...contrary to better help by checking the "Assistance or Service" section or by Whirlpool. 5. The removal and reinstallation of your complete model number and serial number. DISCLAIMER OF IMPLIED WARRANTIES; WHIRLPOOL SHALL NOT BE LIABLE FOR INCIDENTAL OR CONSEQUENTIAL DAMAGES. If outside the 50 ...or use of consumables or cleaning products not approved by calling Whirlpool. Expenses for travel and transportation for future reference. This warranty is not available. 10. Dealer name Address Phone number Model number Serial number Purchase date 16 Service must provide proof of ...
Dimension Guide
Page 1
...wire using and follow the instructions provided for it here. Follow the electrical connector manufacturer's recommended procedure. Because Whirlpool Corporation policy includes a continuous commitment to improve Dimensions are for dimensional clearances above the cooktop surface. Specifications subject... to change materials and specifications without notice. Ref. The model/serial number rating plate is rated 120/240 volt. Combustible area above the cooktop, follow the procedure below: 1. If ...
...wire using and follow the instructions provided for it here. Follow the electrical connector manufacturer's recommended procedure. Because Whirlpool Corporation policy includes a continuous commitment to improve Dimensions are for dimensional clearances above the cooktop surface. Specifications subject... to change materials and specifications without notice. Ref. The model/serial number rating plate is rated 120/240 volt. Combustible area above the cooktop, follow the procedure below: 1. If ...


