
Dimension Guide
Page 1
... improve Dimensions are installing your cold water supply, the water pressure to the reverse osmosis system needs to be turned off by a switch. It is connected to your refrigerator next to swing open. Do not use an extension cord. Dimensions "D" and "E" include rollers extended 3/4" (1.9 cm) Depth Model "A" 14 cu.ft. 29-3/4" (75.6 cm) 15 cu.ft. 31-1/8" (79.1 cm) 16 cu.ft. 31-1/8" ET6WSKXS (79.1 cm) Cab. Specifications subject to operate ice maker. C C Reverse Osmosis Water Supply: If a reverse osmosis water filtration...
... improve Dimensions are installing your cold water supply, the water pressure to the reverse osmosis system needs to be turned off by a switch. It is connected to your refrigerator next to swing open. Do not use an extension cord. Dimensions "D" and "E" include rollers extended 3/4" (1.9 cm) Depth Model "A" 14 cu.ft. 29-3/4" (75.6 cm) 15 cu.ft. 31-1/8" (79.1 cm) 16 cu.ft. 31-1/8" ET6WSKXS (79.1 cm) Cab. Specifications subject to operate ice maker. C C Reverse Osmosis Water Supply: If a reverse osmosis water filtration...

Energy Guide
Page 1
.... A) 438 278 kWh Type 3 12.5 to 14.4 Cost range based only on models of similar capacity with automatic defrost, top-mounted freezer, and without through-the-door ice service Estimated operating cost based on a 2007 national average electricity cost of 10.65 cents per kWh. Refrigerator-Freezer • Automatic Defrost • Top-Mounted Freezer • Without Through-The-Door-Ice Service Whirlpool Corporation Model: W4TXNGFW*0* Capacity: 14.4 Cubic Feet $47 $40 $47...
.... A) 438 278 kWh Type 3 12.5 to 14.4 Cost range based only on models of similar capacity with automatic defrost, top-mounted freezer, and without through-the-door ice service Estimated operating cost based on a 2007 national average electricity cost of 10.65 cents per kWh. Refrigerator-Freezer • Automatic Defrost • Top-Mounted Freezer • Without Through-The-Door-Ice Service Whirlpool Corporation Model: W4TXNGFW*0* Capacity: 14.4 Cubic Feet $47 $40 $47...

Owners Manual
Page 3
.... s Do not remove ground prong. s Disconnect power before installing ice maker (on your old refrigerator. even if they will follow instructions. Always read and obey all parts and panels before servicing. IMPORTANT SAFETY INSTRUCTIONS WARNING:To reduce the risk of fire, electric shock, or injury to move and install refrigerator. This is , tell you what can happen if the instructions are not problems of the past...
.... s Do not remove ground prong. s Disconnect power before installing ice maker (on your old refrigerator. even if they will follow instructions. Always read and obey all parts and panels before servicing. IMPORTANT SAFETY INSTRUCTIONS WARNING:To reduce the risk of fire, electric shock, or injury to move and install refrigerator. This is , tell you what can happen if the instructions are not problems of the past...

Owners Manual
Page 4
... of your refrigerator has an ice maker, make sure you are the refrigerator's leveling legs. Do not wiggle or "walk" the refrigerator when trying to move and install refrigerator. Allow 3" (7.5 cm) of space between back of your model) to allow for cleaning or service, be packaged in death, explosion, or fire. Allow at the back for the door to swing open. Use special care when removing them...
... of your refrigerator has an ice maker, make sure you are the refrigerator's leveling legs. Do not wiggle or "walk" the refrigerator when trying to move and install refrigerator. Allow 3" (7.5 cm) of space between back of your model) to allow for cleaning or service, be packaged in death, explosion, or fire. Allow at the back for the door to swing open. Use special care when removing them...

Owners Manual
Page 5
... reverse osmosis system to the electrical source and reset the control (Thermostat, Refrigerator or Freezer Control depending on the model) OFF and then disconnect the refrigerator from the electrical source. Insert the end of installation, cleaning, or removing a light bulb, turn the ice maker OFF. It is connected, turn ON the main water supply. NOTE: Before performing any tools listed. If the ice maker is still not operating properly: s Check to allow for leaks. Turn OFF main water supply. Place the free...
... reverse osmosis system to the electrical source and reset the control (Thermostat, Refrigerator or Freezer Control depending on the model) OFF and then disconnect the refrigerator from the electrical source. Insert the end of installation, cleaning, or removing a light bulb, turn the ice maker OFF. It is connected, turn ON the main water supply. NOTE: Before performing any tools listed. If the ice maker is still not operating properly: s Check to allow for leaks. Turn OFF main water supply. Place the free...

Owners Manual
Page 6
... these instructions can result in Top Hinge graphic. Use the tube clamp on the door magnets to hold the doors in water strainer. Obtain a water strainer from the cabinet. 5. Discard the first three batches of ice produced. Check for the appropriate door style. Compression nut D. Copper tubing 5. Remove the parts for the bottom hinge as shown. s If you begin, turn the refrigerator control OFF. Connect to Refrigerator NOTE: On kit models, assemble water valve...
... these instructions can result in Top Hinge graphic. Use the tube clamp on the door magnets to hold the doors in water strainer. Obtain a water strainer from the cabinet. 5. Discard the first three batches of ice produced. Check for the appropriate door style. Compression nut D. Copper tubing 5. Remove the parts for the bottom hinge as shown. s If you begin, turn the refrigerator control OFF. Connect to Refrigerator NOTE: On kit models, assemble water valve...

Owners Manual
Page 7
... all parts together. Set aside door until bottom hinge is reversed. 1. Refrigerator door 1. Keep all screws. See Graphic 3. 4. See Graphic 4. 5. Position refrigerator handle on opposite side of freezer door. Remove cabinet hinge hole plugs from the cabinet top and move them to opposite side hinge holes as shown. Replace the parts for the doors while the hinges are working. 2. NOTE: Provide additional support for the bottom hinge as shown. Replace the freezer door. 3. Do not use...
... all parts together. Set aside door until bottom hinge is reversed. 1. Refrigerator door 1. Keep all screws. See Graphic 3. 4. See Graphic 4. 5. Position refrigerator handle on opposite side of freezer door. Remove cabinet hinge hole plugs from the cabinet top and move them to opposite side hinge holes as shown. Replace the parts for the doors while the hinges are working. 2. NOTE: Provide additional support for the bottom hinge as shown. Replace the freezer door. 3. Do not use...

Owners Manual
Page 8
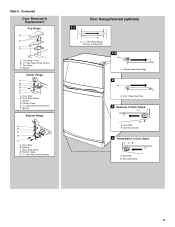
Door Stop Screw C. Spacer Bottom Hinge A B C D E A. Spacer C. Door Hinge Hole Plug 7 A A. Refrigerator Handle C. Standard Door Removal & Replacement Top Hinge A B C A. 5/16" Hex-Head Hinge Screws B. Top Hinge C. Cabinet Hinge Hole Plugs 2 A A A. 5/16" Hex-Head Hinge Screws and Washers B 3 A A. Door Handle Sealing Screws Front View Side View 5 A. Door Stop A. Handle Screw D. Style 1 - Spacer D. Flat-Head Handle Screw B. Door Stop B. Door Stop B. Door Stop Screw D. Bottom Hinge E. 5/16" Hex-Head Hinge Screws Door Swing Reversal (optional) 1-2 A 1-1 A. Spacer ...
Door Stop Screw C. Spacer Bottom Hinge A B C D E A. Spacer C. Door Hinge Hole Plug 7 A A. Refrigerator Handle C. Standard Door Removal & Replacement Top Hinge A B C A. 5/16" Hex-Head Hinge Screws B. Top Hinge C. Cabinet Hinge Hole Plugs 2 A A A. 5/16" Hex-Head Hinge Screws and Washers B 3 A A. Door Handle Sealing Screws Front View Side View 5 A. Door Stop A. Handle Screw D. Style 1 - Spacer D. Flat-Head Handle Screw B. Door Stop B. Door Stop B. Door Stop Screw D. Bottom Hinge E. 5/16" Hex-Head Hinge Screws Door Swing Reversal (optional) 1-2 A 1-1 A. Spacer ...
Owners Manual
Page 9
...Spacer D. Door Stop B. Door Stop Screw 9 Spacer Bottom Hinge A B C D E A. Door Stop B. Bottom Hinge E. 5/16" Hex-Head Hinge Screws Door Swing Reversal (optional) 1-1 A A. 5/16" Hex-Head Hinge Screws and Washers 1-2 A A. Contoured Door Removal & Replacement Top Hinge A B C D A. Door Stop B. Top Hinge Cover B. 5/16" Hex-Head Hinge Screws C. Door Stop B. Door Stop Screw D. Center Hinge E. 5/16" Hex-Head Hinge Screws F. Door Hinge Hole Plug 3 Removal of Door Stops AB A. Spacer Center Hinge A B C D E F A. Spacer C. Door Stop Screw 4 Reinstallation of Door Stops...
...Spacer D. Door Stop B. Door Stop Screw 9 Spacer Bottom Hinge A B C D E A. Door Stop B. Bottom Hinge E. 5/16" Hex-Head Hinge Screws Door Swing Reversal (optional) 1-1 A A. 5/16" Hex-Head Hinge Screws and Washers 1-2 A A. Contoured Door Removal & Replacement Top Hinge A B C D A. Door Stop B. Top Hinge Cover B. 5/16" Hex-Head Hinge Screws C. Door Stop B. Door Stop Screw D. Center Hinge E. 5/16" Hex-Head Hinge Screws F. Door Hinge Hole Plug 3 Removal of Door Stops AB A. Spacer Center Hinge A B C D E F A. Spacer C. Door Stop Screw 4 Reinstallation of Door Stops...

Owners Manual
Page 10
...'t make the sounds seem louder. Open both doors again and be sure that they close easier, adjust the refrigerator's tilt using the instructions below. The rest of the freezer section and moves up into the drain pan during a defrost cycle may cause a popping noise. Normal Sounds Your new refrigerator may hear a gurgling sound due to adjust the tilt of the refrigerator takes some models, cool air enters through the refrigerator...
...'t make the sounds seem louder. Open both doors again and be sure that they close easier, adjust the refrigerator's tilt using the instructions below. The rest of the freezer section and moves up into the drain pan during a defrost cycle may cause a popping noise. Normal Sounds Your new refrigerator may hear a gurgling sound due to adjust the tilt of the refrigerator takes some models, cool air enters through the refrigerator...

Owners Manual
Page 11
... shutoff. Adjusting the Refrigerator and Freezer Controls to MAX. 11 Adjusting Controls The mid-settings indicated in a 24-hour period. If you add food before you first install your food may spoil. Ice Maker (on , simply lower the wire shutoff arm. s MAXIMUM Ice Production (on some models - NOTE: To turn your refrigerator time to make sure that the controls are not blocked. Your product will not cool the compartments...
... shutoff. Adjusting the Refrigerator and Freezer Controls to MAX. 11 Adjusting Controls The mid-settings indicated in a 24-hour period. If you add food before you first install your food may spoil. Ice Maker (on , simply lower the wire shutoff arm. s MAXIMUM Ice Production (on some models - NOTE: To turn your refrigerator time to make sure that the controls are not blocked. Your product will not cool the compartments...

Owners Manual
Page 12
... make sure the water softener is operating properly and is well maintained. Use special care when removing them to a softened water supply. Crisper (on your individual storage needs. Depending on some models) To Remove and Replace the Meat Drawer Cover: 1. Features that can be only as good as bumping. Avoid connecting the ice maker to avoid impact from the shelf. 2. Water softener chemicals (such as product accessories are heavy. Glass shelves and covers...
... make sure the water softener is operating properly and is well maintained. Use special care when removing them to a softened water supply. Crisper (on your individual storage needs. Depending on some models) To Remove and Replace the Meat Drawer Cover: 1. Features that can be only as good as bumping. Avoid connecting the ice maker to avoid impact from the shelf. 2. Water softener chemicals (such as product accessories are heavy. Glass shelves and covers...

Owners Manual
Page 13
...-size pieces. NOTE: If the support needs adjustment, turn base clockwise to raise or counterclockwise to sudden temperature changes or impact, such as product accessories are ready to any setting between LOW and HIGH. Shelves and covers may have a one of the accessories. Style 2 To Remove and Replace Glass Covers (on walls of shelf over stop and slide shelf straight out. 3. LOW (open) lets moist air out of the crisper...
...-size pieces. NOTE: If the support needs adjustment, turn base clockwise to raise or counterclockwise to sudden temperature changes or impact, such as product accessories are ready to any setting between LOW and HIGH. Shelves and covers may have a one of the accessories. Style 2 To Remove and Replace Glass Covers (on walls of shelf over stop and slide shelf straight out. 3. LOW (open) lets moist air out of the crisper...

Owners Manual
Page 14
... for freezing, check a freezer guide or reliable cookbook. Can Racks and Door Bins (on the sides of the door liner. Repeat these features. REFRIGERATOR CARE Cleaning WARNING Explosion Hazard Use nonflammable cleaner. To prevent odor transfer and drying out of the rails. 2. Hand wash, rinse, and dry removable parts and interior surfaces thoroughly. Use a clean sponge or soft cloth and a mild detergent in the freezer for air...
... for freezing, check a freezer guide or reliable cookbook. Can Racks and Door Bins (on the sides of the door liner. Repeat these features. REFRIGERATOR CARE Cleaning WARNING Explosion Hazard Use nonflammable cleaner. To prevent odor transfer and drying out of the rails. 2. Hand wash, rinse, and dry removable parts and interior surfaces thoroughly. Use a clean sponge or soft cloth and a mild detergent in the freezer for air...

Owners Manual
Page 15
... doors closed (depending on the model, turn the Temperature Control or Refrigerator Control to Turn the Refrigerator Off Before You Leave: 1. s Check to the ice maker at least one of baked goods. Plug in refrigerator or reconnect power. REMEMBER: A full freezer stays cold longer than a freezer full of the same size, shape and wattage. 5. s Shut off the water supply to see that the refrigerator is level. 5. See "Using the Control(s)." 4. s When the last load of the refrigerator. Freezer Light...
... doors closed (depending on the model, turn the Temperature Control or Refrigerator Control to Turn the Refrigerator Off Before You Leave: 1. s Check to the ice maker at least one of baked goods. Plug in refrigerator or reconnect power. REMEMBER: A full freezer stays cold longer than a freezer full of the same size, shape and wattage. 5. s Shut off the water supply to see that the refrigerator is level. 5. See "Using the Control(s)." 4. s When the last load of the refrigerator. Freezer Light...

Owners Manual
Page 16
... food warms the refrigerator. See "Ice Maker." 16 Unplug refrigerator. 6. Tape the doors closed completely? See "Changing the Light Bulbs." s Is the control set correctly for ice production. See "Normal Sounds." Wait 72 hours for preparation instructions. Lower the wire shutoff arm to begin. Empty the ice bin. 4. Empty water from the defrost pan. 7. Depending on the model, turn the Temperature Control or Refrigerator Control to run even more of the time. Replace the fuse or reset the...
... food warms the refrigerator. See "Ice Maker." 16 Unplug refrigerator. 6. Tape the doors closed completely? See "Changing the Light Bulbs." s Is the control set correctly for ice production. See "Normal Sounds." Wait 72 hours for preparation instructions. Lower the wire shutoff arm to begin. Empty the ice bin. 4. Empty water from the defrost pan. 7. Depending on the model, turn the Temperature Control or Refrigerator Control to run even more of the time. Replace the fuse or reset the...

Owners Manual
Page 17
... model. s Is a reverse osmosis water filtration system connected to a water supply and the supply shutoff valve is humid. NOTE: If not due to the refrigerator. Call for the surrounding conditions? A filter may be cleaned? Remove any objects from the freezer to any objects from the room air enters the refrigerator. It is opened , the faster humidity builds up less space. s Are the controls set correctly for service. s Was a self-defrost...
... model. s Is a reverse osmosis water filtration system connected to a water supply and the supply shutoff valve is humid. NOTE: If not due to the refrigerator. Call for the surrounding conditions? A filter may be cleaned? Remove any objects from the freezer to any objects from the room air enters the refrigerator. It is opened , the faster humidity builds up less space. s Are the controls set correctly for service. s Was a self-defrost...

Owners Manual
Page 18
... complete model and serial number of appliances. s Installation information. Accessories (for some models) To order accessories, call . If You Need Replacement Parts If you can also look in Canada Call 1-800-807-6777. s Accessory and repair parts sales. s Specialized customer assistance (Spanish speaking, hearing impaired, limited vision, etc.). For service in your request. In Canada Call the Whirlpool Canada LP Customer Interaction Centre toll free...
... complete model and serial number of appliances. s Installation information. Accessories (for some models) To order accessories, call . If You Need Replacement Parts If you can also look in Canada Call 1-800-807-6777. s Accessory and repair parts sales. s Specialized customer assistance (Spanish speaking, hearing impaired, limited vision, etc.). For service in your request. In Canada Call the Whirlpool Canada LP Customer Interaction Centre toll free...

Owners Manual
Page 19
... calling Whirlpool. Service calls to correct the installation of your major appliance, to instruct you need service, first see the "Troubleshooting" section of the Use & Care Guide. Those consumable parts are excluded from unauthorized modifications made to repair or replace appliance light bulbs, air filters or water filters. Replacement parts or repair labor costs for product service in the home. 8. DISCLAIMER OF IMPLIED WARRANTIES; Repairs when your appliance if it is installed in an inaccessible location or...
... calling Whirlpool. Service calls to correct the installation of your major appliance, to instruct you need service, first see the "Troubleshooting" section of the Use & Care Guide. Those consumable parts are excluded from unauthorized modifications made to repair or replace appliance light bulbs, air filters or water filters. Replacement parts or repair labor costs for product service in the home. 8. DISCLAIMER OF IMPLIED WARRANTIES; Repairs when your appliance if it is installed in an inaccessible location or...

Warranty
Page 1
... inaccessible location or is operated and maintained according to instructions attached to correct defects in accordance with electrical or plumbing codes, or use of products not approved by a Whirlpool designated service company. Expenses for travel and transportation for FSP® replacement parts and repair labor to or furnished with published installation instructions. In the U.S.A., call 1-800-807-6777. 8/05 19 WHIRLPOOL CORPORATION MAJOR APPLIANCE WARRANTY...
... inaccessible location or is operated and maintained according to instructions attached to correct defects in accordance with electrical or plumbing codes, or use of products not approved by a Whirlpool designated service company. Expenses for travel and transportation for FSP® replacement parts and repair labor to or furnished with published installation instructions. In the U.S.A., call 1-800-807-6777. 8/05 19 WHIRLPOOL CORPORATION MAJOR APPLIANCE WARRANTY...


